Opis
1. Uvod proizvoda
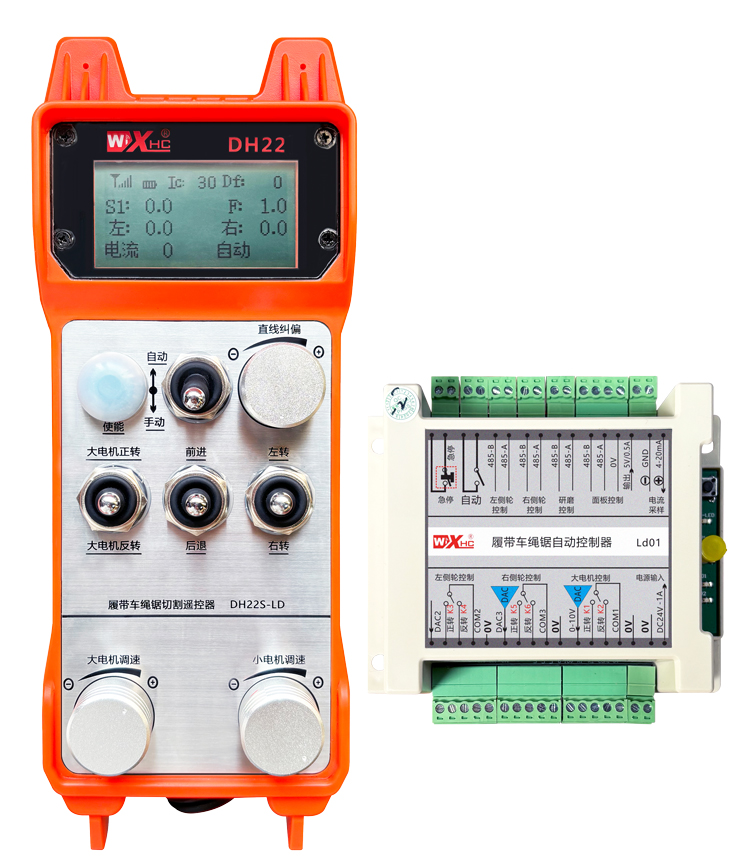
Daljinski upravljač za automatsko rezanje gusjeničarske pile za užad je pogodan za gusječnu pilu za užad
mašine za sečenje. Koristi se 485 Modbus RTU protokol za kontrolu frekvencije lijevog i desnog kolosijeka
pretvarači, kao i velika brzina pretvaranja frekvencije motora za kontrolu pokretanja i prednje strane, pozadi,
kontroleri lijevog i desnog smjera. I može očitati radnu struju velike frekvencije motora
pretvarač kroz 485 Modbus RTU protokol. Analizom i poređenjem struje
veliki motor, brzina lijevog i desnog kolosijeka može se automatski podesiti u realnom vremenu
postići funkciju automatskog rezanja.
2. Funkcionalne karakteristike proizvoda
1. Usvajanje 433MHz bežične komunikacijske tehnologije, sa bežičnom radnom udaljenosti od 100 metra.
2. Usvojite funkciju automatskog skoka frekvencije i koristite 32 setovi bežičnih daljinskih upravljača
istovremeno, bez uticaja jedno na drugo.
3. Podržava sve frekventne pretvarače sa 485 Modbus RTU protokol, i trenutno kompatibilnu frekvenciju
marke pretvarača uključuju:Shanghai Xielin, Fuji, Huichuan, Zhongchen, INVT, i . Za brendove
koji nisu kompatibilni, kontaktirajte nas za prilagođavanje.
4. Regulacija brzine podrške, početak, i trenutno čitanje velikih frekvencijskih pretvarača motora.
5. Podrška uredbe lijevog i desnog frekvencije za trenferenciju, početak, prednji, natrag, Lijeva i desna kontrola.
6. Podrška linearnoj korekciji frekvencijskih pretvarača lijevog i desnog kolosijeka kako bi mašina ostala u pokretu
prava linija.
7. Podržava funkciju automatskog rezanja pile za užad, automatski podešava brzinu lijeve i desne staze
realnom vremenu prema trenutnim informacijama velikog motora.
8. Također je kompatibilan s direktnom kontrolom IO izlaza za pokretanje i zaustavljanje motora, i analogni naponski izlaz
kontrola brzine motora.
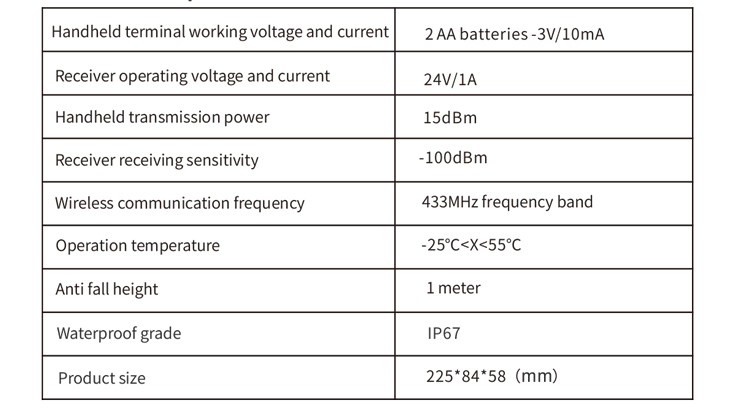
3. Specifikacije proizvoda
4. Uvod u funkciju proizvoda
Bilješke:
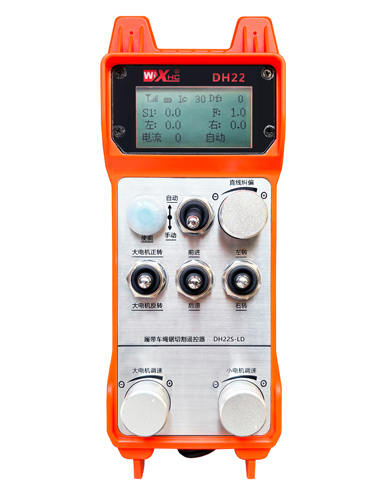
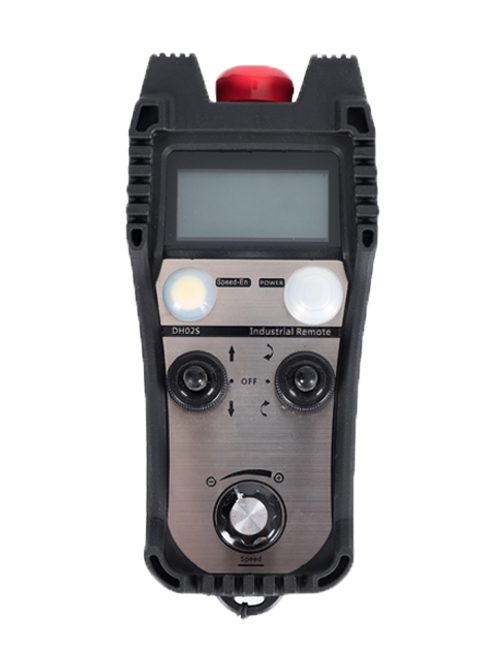
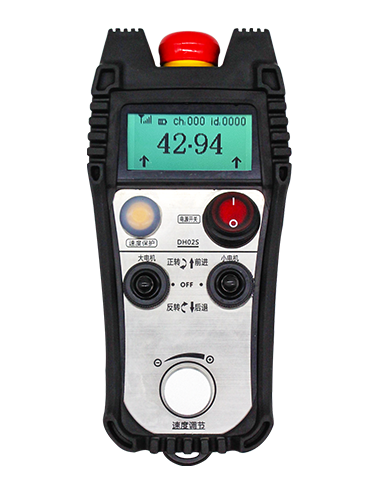
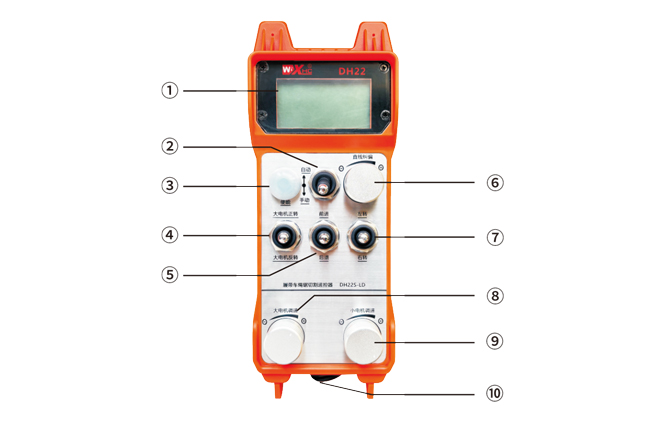
①Prikaz na ekranu:
②Prekidač načina rada:
③Omogući:
Kombinirana dugmad, neke operacije zahtijevaju držanje dugmeta za omogućavanje rada,pogledajte upute za svaki prekidač za detalje.
④Veliki prekidač motora:
Korišćenje prekidača za resetovanje sa 3 brzine, povlačenjem ovog prekidača može se kontrolirati naprijed i nazad rotacija velikog motora. Nakon puštanja, država će ostati, i na ekranu će se pojaviti odgovarajući prikazi. Strelica S1↑ označava rotaciju prema naprijed, a strelica S1 ↓ označava rotaciju u smjeru suprotnom.
⑤Mali motorni prekidač naprijed/nazad:
Mali motor je opremljen sa 3-brzinskim samoblokirajućim prekidačem ispred njega. Pritiskom na dugme za uključivanje i povlačenjem ovog prekidača možete upravljati malim motorom da se kreće naprijed i nazad, a na ekranu će se pojaviti odgovarajući prikaz. Strelica ↑↑ predstavlja naprijed, a strelica ↓↓ predstavlja unazad.
⑥ Pravolinijska korekcija:
Korištenje dugmeta enkodera s više okreta, pritisnite dugme za uključivanje, okrenite dugme udesno, i prikazati ispravku prave linije: Df: Lijevo dugme za okretanje se povećava za 1 jedinica po rotaciji, i lijevo
brzina motora se povećava za 0.1 jedinica; Okrenite lijevo dugme, pravolinijski prikaz korekcije: Df: Na desnoj strani, svaki okret dugmeta se povećava za 1 jedinica, a brzina desnog motora se povećava
by 0.1 jedinica.
⑦Mali prekidač za okretanje motora:
Korišćenje prekidača za resetovanje sa 3 brzine, kada se radi ručno, mali motor se može kontrolisati da skreće lijevo ili desno. Jednom pušten, daljinski upravljač će automatski zaustaviti ovu radnju. U naprednom stanju, kada se ovaj prekidač okrene, na ekranu će se pojaviti odgovarajući prikaz. Strelica ←↑ označava skretanje ulijevo, a ↑→ strelica označava skretanje udesno. Kada je u načinu rada unazad, okrenite ovaj prekidač i na ekranu će se pojaviti odgovarajući prikaz. Strelica ←↓ označava skretanje ulijevo, a strelica ↓→ označava skretanje udesno.
⑧ Velika regulacija brzine motora:
Korištenje dugmeta enkodera s više okreta, rotirajući 1 mrežu svaki put, vrijednost brzine velikog motora mijenja se približno 0.2 jedinice. Brza rotacija može brzo promijeniti vrijednost brzine velikog motora.
⑨ Mala regulacija brzine motora:
Korištenje dugmeta enkodera s više okreta, u ručnom načinu rada, pritisnite dugme za uključivanje i zatim rotirajte jednu po jednu mrežu,vrijednost brzine lijevog i desnog malih motora mijenja se za oko 0.1 jedinice, i brza rotacija može brzo promijeniti vrijednost brzine malog motora. U automatskom načinu rada, pritisnite dugme za uključivanje i rotirajte jednu po jednu mrežu,vrijednost ograničenja brzine F malog motora mijenja se približno 0.1 jedinice. Brza rotacija može brzo promijeniti vrijednost ograničenja brzine malog motora.
⑩ Prekidač za napajanje na daljinskom upravljaču
Ekran displeja daljinskog upravljača je uključen.
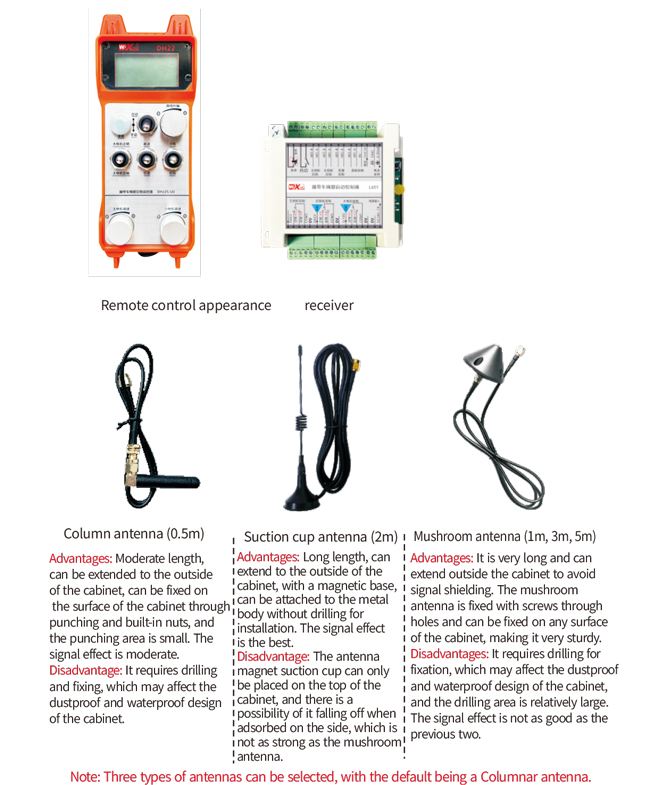
5. Dijagram dodataka proizvoda
6. Vodič za instalaciju proizvoda
6.1 Koraci instalacije proizvoda
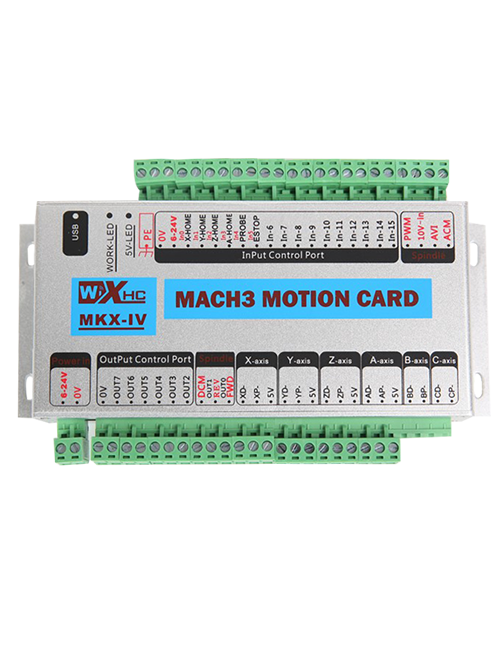
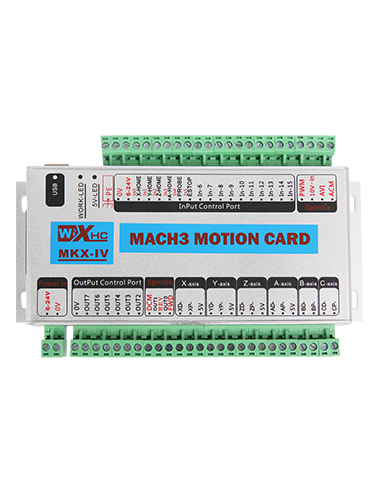
1. Ugradite prijemnik u električni ormarić kroz kopču na stražnjoj strani, ili ga ugradite u kućište kroz rupe za zavrtnje na četiri ugla prijemnika.
2. Pogledajte naš dijagram ožičenja prijemnika i uporedite ga sa vašom opremom na licu mesta. Povežite opremu sa prijemnikom putem žica.
3. Nakon popravljanja prijemnika, potrebno je spojiti antenu opremljenu prijemnikom i postaviti ili postaviti vanjski kraj antene izvan elektro ormara. Preporučuje se da ga postavite na vrh električnog ormarića za najbolji signalni efekat. Zabranjeno je ostavljati antenu nepovezanu ili je postavljati u električni ormarić, jer može uzrokovati da signal bude neupotrebljiv.
4. Konačno, postavite bateriju na daljinski upravljač, zategnite poklopac baterije, i uključite prekidač za napajanje na daljinskom upravljaču. Nakon što ekran daljinskog upravljača prikazuje normalno
radni interfejs, mogu se izvoditi operacije daljinskog upravljanja.
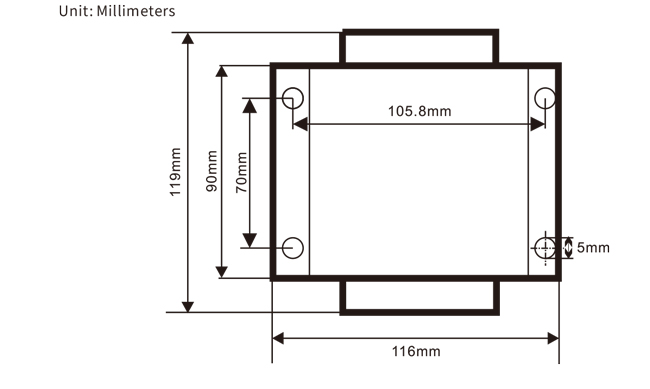
6.2 Ugradne dimenzije prijemnika
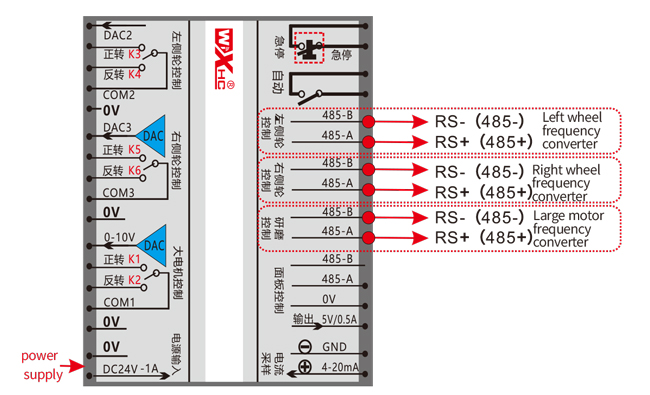
6.3 Referentni dijagram ožičenja prijemnika
7. Uputstvo za upotrebu proizvoda
7.1 Postavke parametara daljinskog upravljača
Metoda za unos pozadinskih parametara daljinskog upravljača:
Okrenite prekidač načina rada na ručni način rada, podesite brzinu malog motora na 25 na obje strane, ili 0, 10, 20, 40, 50 na sve strane, i neprekidno okrećite prekidač za naprijed velikog motora prema gore 3 puta i naniže 3 puta;
Koristite “Mala kontrola brzine motora” dugme za okretanje stranica, pritisnite dugme za uključivanje, a zatim okrenite malo dugme za kontrolu brzine motora da biste izmenili parametre. Nakon modifikacije, okrenite stranicu do kraja,izaberite “Sačuvaj” za izlaz, i pritisnite dugme za uključivanje da izađete iz menija;
Parametri su sljedeći:
Maksimalna struja: opseg povratne sprege velike struje motora, podešeni opseg 15-200A, default 100;
Parametri kontrole brzine: Automatski način rada, mali motor automatski ubrzava brže ili sporije,što je manje to brže, podesiti raspon 200-1500, default 800;
Parametar usporavanja: Postavite gornju granicu koja dozvoljava promjenu brzine motora. Kada se struja promijeni iznad ove vrijednosti, doći će do usporavanja. Što je manji, što je brže usporavanje lijevog i desnog motora, sa rasponom od 05-12 i neizvršenje od 06;
Ubrzanje a1: Što je veća brzina motora, brže se povećava, sa rasponom od 00-06 i neizvršenje od 01;
Usporavanje a2: Što je veća brzina motora, brže se smanjuje, sa rasponom od 00-06 i neizvršenje od 02;
Omogućite regulaciju brzine: Da li treba omogućiti regulaciju brzine malog motora? 00 ne omogućava, 01 omogućava, default is 01;
Pokrenite samozaključavanje: Da li veliki motor automatski održava samozaključavanje nakon otpuštanja prekidača za naprijed i nazad? 00 ne drži, 01 drži, default 01
Maksimalno hodanje: maksimalna brzina lijevog i desnog motora, domet 10-100, default 50;
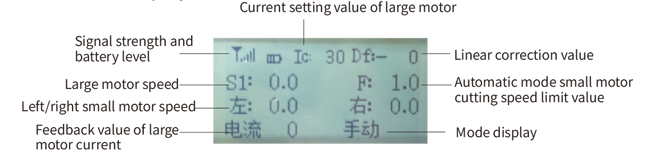
Struja rezanja: maksimalna struja rezanja, prikazano na ekranu kao IC vrijednost, domet 15-160, default 30,
odgovara IC: 30 prikazano na ekranu. Gornja granica ovog parametra je 80% maksimalne struje;
Zadano ograničenje brzine: Zadana brzina automatskog rezanja malog motora kada je uključena je unutar raspona od 0-100, sa zadatkom od 10. Na ekranu se prikazuje F1.0, i ovaj parametar je tačan samo kada je maksimalno hodanje postavljeno na 50.
Automatski način rada: Postavite na 00, automatski/ručni prekidač je prekidač za način rada. Postavite na 01, automatski/ručni prekidač je postavljen na automatski položaj, ekran prikazuje osvetljenje, i automatski izlaz terminala na prijemniku je zatvoren. Kada je postavljeno na ručno, automatski izlazni terminal je isključen;
Odstupanje ograničenja brzine: Gornja granica automatske brzine rezanja malog motora kreće se od 00 to 200, sa zadatkom od 60 i odgovarajući prikaz 6.0 na ekranu; Gornja granica prikazane vrijednosti=pomak ograničenja brzine x 0.1;
Maximum host: maksimalna brzina velikog motora, domet 10-100, default 50;
Mbus oprema (obavezno): Izbor velikog modela frekventnog pretvarača motora, domet 00-03, default 03;
00- Šangaj Xielin 01-Fuji
02-INVT 03-Inovance(Zhongchen, Robikon)
SBUS oprema (obavezno): Izbor modela pretvarača frekvencije motora, domet 00-05, default 03;
00- Šangaj Xielin 01-Fuji
02-INVT 03-Inovance(Zhongchen, Robikon)
04-Anchuanda 05-Nema
7.2 Podešavanje parametara frekventnog pretvarača
1. Izbor izvora komande: Komunikacijski komandni kanal
2. Izbor glavnog izvora frekvencije: data komunikacija
3. Brzina prijenosa: 19200
4. Format podataka: Nema verifikacije, format podataka<8-N-1>
5. Lokalna adresa: Postavite lijevi frekventni pretvarač na 1, pravi frekventni pretvarač na 2, i
veliki pretvarač frekvencije motora na 3
7.3 Upute za rad na daljinskom upravljaču
1. Uključite mašinu, Uključite daljinski upravljač, uđite u pozadinu daljinskog upravljača, postavite
pozadinske parametre daljinskog upravljanja, uglavnom podešavanje malog motora i velike frekvencije motora
modeli pretvarača: (preskočite ovaj korak ako ga je proizvođač mašine već postavio);
2. Podesite parametre frekventnog pretvarača (preskočite ovaj korak ako je proizvođač mašine
je već postavio);
3. Postavite daljinski upravljač na ručni način rada, a zatim pomoću daljinskog upravljača pomaknite mašinu
radni položaj;
4. U ručnom načinu rada, podesite struju rezanja velikog motora na IC i brzinu velikog motora
5. Prebacite se na automatski način rada i postavite F vrijednost ograničenja brzine rezanja za mali motor;
6. U automatskom režimu, okrenite prekidač velikog motora prema naprijed kako biste pokrenuli veliki motor, onda okrenite
mali motor prekidač za naprijed ili natrag, a daljinski upravljač ulazi u automatsko rezanje
mod za početak rezanja.
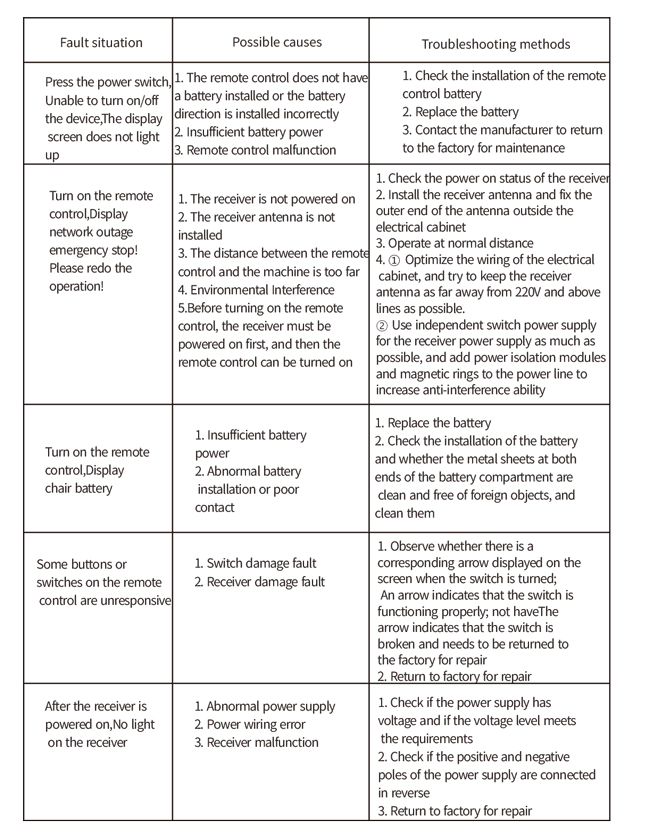
8.Rješavanje problema s proizvodom
9.Održavanje
1. Koristite ga u suhom okruženju na sobnoj temperaturi i pritisku kako biste produžili vijek trajanja.
2. Molimo izbjegavajte korištenje u nenormalnim okruženjima kao što su kiša i mjehurići vode kako biste produžili vijek trajanja.
3. Održavajte pretinac za baterije i područje metalnih gelera čistima.
4. Izbjegavajte oštećenje daljinskog upravljača zbog stiskanja i pada.
5. Ako se ne koristi dugo, izvadite bateriju i čuvajte daljinski upravljač i bateriju u čistom stanju
i sigurno mjesto.
6.Tokom skladištenja i transporta, treba obratiti pažnju na otpornost na vlagu i udarce.
10. Sigurnosne informacije
1. Prije upotrebe pažljivo pročitajte upute i zabranite rad neprofesionalcima.
2. Molimo zamijenite bateriju na vrijeme kada je baterija preniska kako biste izbjegli greške uzrokovane
nedovoljna snaga, što može dovesti do toga da daljinski upravljač ne može raditi.
3. Ako je potreban popravak, Molimo kontaktirajte proizvođača. Ako je oštećenje uzrokovano samopopravkom, proizvođač
neće dati garanciju.