Podržava 2 Prilagodljivi tasteri, Sa izlazom signala IO signala;
Podržava -2 Kontrola osovine;
Podržava 3-nivo kontrolu uvećanja;

1.Uvod proizvoda
2. Funkcionalne karakteristike proizvoda
| Operating voltage and current of wireless remote |
3V/14MA
|
| Battery specifications | 2 AA alkaline batteries, size 5 |
| Low voltage alarm range of wireless remote | < 2.3V |
| Napon napajanja prijemnika | DC5V-24V/A |
| Receiver emergency stop output load range | AC125V-1A/DC30V-2A |
| Receiver enable output load range |
AC125V-1A/DC30V-2A
|
| Receiver custom button output load range | DC24V/50mA |
| Receiver axis selection output load range | DC24V/50mA |
| Receiver magnification output load range | DC24V/50mA |
| Transmission power of handheld terminal |
15dBm
|
| Receiver receiving sensitivity | -100dBm |
| Wireless communication frequency | 433MHz frequency band |
| Wireless communication distance | Barrier free distance of 40 metra |
| Operation temperature | -25℃ < X < 55℃ |
| Anti fall height | 1 (metar) |
| Custom button quantity | 2 |


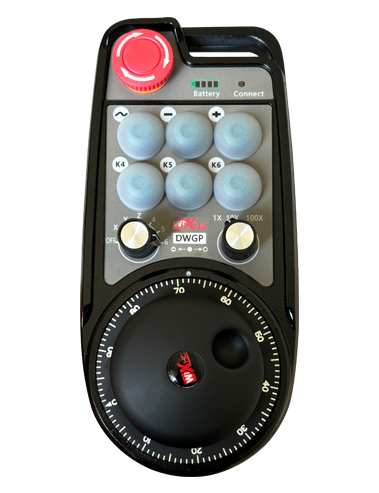
① Pulse encoder:
Pritisnite i držite dugme za uključivanje, protresti pulsni enkoder, emituju pulsni signal,and control the movement ofthe machine axis.
② Enable button:
Press either enable button on either side, and the two sets of enable IO outputs on the receiver will conduct. Release the enable button to disconnect the enable IO output; And before switching the axis selection magnification and shaking the handwheel,the enable button needs to be held down to be effective; This function can be cancelled through configuration software.
③ Indicator lights:
Left side light: power on light,the handwheel uses the axis to select OFF for power on, and this light stays on after power on;
Middle light: a signal light that lights up when operating any function ofthe handwheel, and does not light up when there is no operation;
Right side light: Alarmna lampica niskog napona, low battery level,this lightflashes or stays on, battery needs to be replaced.
④ Emergency stop button:
Pritisnite dugme za zaustavljanje u nuždi, i dva seta IO izlaza za hitno zaustavljanje na prijemniku će biti isključena, i sve funkcije ručnog kotača će biti nevažeće.
⑤ Magnification switch:
Press and hold the enable button to switch the magnification switch, which can switch the magnification controlled by the handwheel.
⑥ Axis selection switch (prekidač za napajanje):
Press and hold the enable button to switch the axis selection switch, which can switch the movement axis controlled by the handwheel. Switch this switch from OFF to any axis and turn on the handwheel power.
⑦ Custom button:
Two custom buttons, svaki odgovara IO izlaznoj tački na prijemniku.

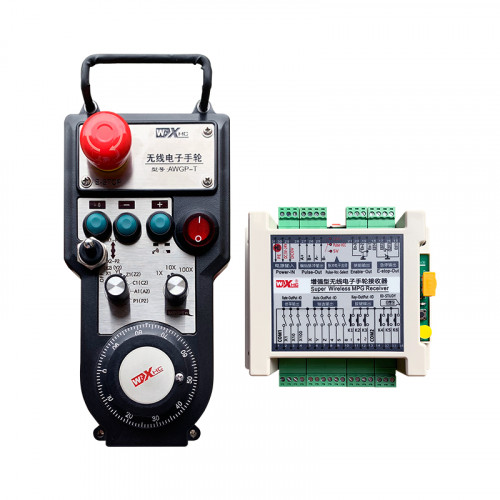
1. Ugradite prijemnik u električni ormarić kroz kopču na stražnjoj strani, ili ga ugradite u kućište kroz rupe za zavrtnje na četiri ugla prijemnika.
2. Pogledajte naš dijagram ožičenja prijemnika i uporedite ga sa vašom opremom na licu mesta. Connect the equipment to the receiver via cables.
3.After the receiver is properly fixed, antena opremljena prijemnikom mora biti povezana, and the outer end of the antenna should be installed or placed outside the electrical cabinet. Preporučuje se da ga postavite na vrh električnog ormarića za najbolji signalni efekat. It is prohibited to leave the antenna unconnected or place it inside the electrical cabinet, as this may result in the signal being unusable.
4. Konačno, turn on the power switch of the handwheel, and you can operate the machine remotely using the handwheel.
6.2 Ugradne dimenzije prijemnika

6.3 Referentni dijagram ožičenja prijemnika

7. Uputstvo za upotrebu proizvoda
1. Power on the machine and the receiver. The receiver’s working indicator light flashes. Install the battery in the wireless electronic handwheel, secure the battery cover, i
turn on the power switch of the wireless electronic handwheel. The handwheel’s battery level indicator light is on.
2. Odaberite koordinatnu osu: Pritisnite i držite dugme za uključivanje, toggle the axis selection switch, and select the axis you want to operate.
3. Odaberite uvećanje: Pritisnite i držite dugme za uključivanje, toggle the magnification switch,and select the desired magnification level.
4. Pokretna osovina: Pritisnite i držite dugme za uključivanje, odaberite prekidač za odabir osi, odaberite prekidač za uvećanje, and then rotate the pulse encoder. Rotate clockwise to move the
positive axis and counterclockwise to move the negative axis.
5. Pritisnite i držite bilo koje prilagođeno dugme, and the corresponding button IO output of the receiver will be turned on. Release the button, and the output will be turned off.
6. Pritisnite dugme za zaustavljanje u nuždi, odgovarajući IO izlaz za hitno zaustavljanje prijemnika će biti isključen, funkcija ručnog kotača će biti onemogućena,otpustite dugme za zaustavljanje u nuždi, IO izlaz za hitno zaustavljanje će biti zatvoren, i funkcija ručnog kotača će biti vraćena.
7. Ako se ručni točak ne koristi neko vrijeme, it will automatically enter sleep mode to reduce power consumption. Kada se ponovo koristi, the handwheel can be activated by pressing the enable button.
8. Ako se ručni točak ne koristi duže vrijeme, it is recommended to switch the handwheel shaft to the OFF position, isključite napajanje ručnog točka, i produžite vijek trajanja baterije.
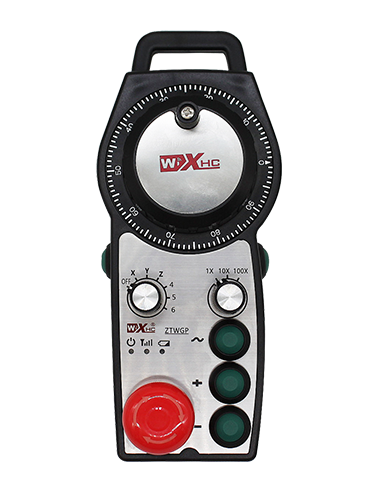
8. Opis modela proizvoda

① :ZTWGP represents the appearance style
②:Parametri impulsnog izlaza:
01: Indicates that the pulse output signal is A, B; Impulsni napon 5V; pulse quantity 100PPR.
02:Indicating thatthe pulse output signals are A and B; Pulse voltage 12V; pulse quantity 100PPR.
03:Indicating thatthe pulse output signals are A, B, A -, B -; Impulsni napon 5V; pulse quantity 100PPR.
04:Označava izlaz otvorenog kola NPN niskog nivoa, sa izlaznim impulsnim signalima A i B;The number of pulses is 100PPR.
05:Označava izlaz PNP izvora visokog nivoa, sa izlaznim impulsnim signalima A i B; The number of pulses is 100PPR.
③:Representing the number of axis selection switches, 2 predstavlja 2 sjekire.
④:Represents the type of axis selection switch signal, A predstavlja izlazni signal od tačke do tačke, a B predstavlja kodirani izlazni signal.
⑤:Represents the type of multiplication switch signal, A predstavlja izlazni signal od tačke do tačke, a B predstavlja kodirani izlazni signal.
⑥:Represents the number of custom buttons, 2 predstavlja 2 Prilagođeni gumbi.
⑦:Represents the power supply for the system handwheel, i 05 predstavlja napajanje od 5V.
⑧:L represents the left column (left knife holder), and R represents the right column (right knife holder).
9.Solution to Product Malfunctions

1. Koristite ga u suhom okruženju na sobnoj temperaturi i pritisku kako biste produžili vijek trajanja.
2. Molimo izbjegavajte korištenje u nenormalnim okruženjima kao što su kiša i mjehurići vode kako biste produžili vijek trajanja.
3. Održavajte izgled ručnog kotača čistim kako biste produžili njegov vijek trajanja.
4. Molimo izbjegavajte gnječenje, pada, bumping, itd. kako bi se spriječilo oštećenje preciznih komponenti unutar ručnog kotača ili greške u preciznosti.
5. Ako se ne koristi dugo, molimo Vas da ručni točak čuvate na čistom i bezbednom mestu. Tokom skladištenja i transporta, treba obratiti pažnju na otpornost na vlagu i udarce.
11. Sigurnosne informacije
1. Prije upotrebe pažljivo pročitajte upute i zabranite rad neprofesionalcima.
2. Please replace the battery in a timely manner when the battery level is too low to avoid errors caused by insufficient battery power and inability to operate the handwheel.
3. Ako je potreban popravak, Molimo kontaktirajte proizvođača. Ako je oštećenje uzrokovano samopopravkom, Proizvođač neće pružiti garanciju