Subtenas 2 Agordeblaj butonoj, kun ŝaltila IO-signala eligo;
Subtenas -2 Aksa kontrolo;
Subtenas 3-nivelan grandigan kontrolon;

1.Enkonduko de Produkto
2. Produktaj funkciaj trajtoj
| Operating voltage and current of wireless remote |
3V/14MA
|
| Battery specifications | 2 AA alkaline batteries, size 5 |
| Low voltage alarm range of wireless remote | < 2.3V |
| Tensio de elektroprovizo de ricevilo | DC5V-24V/A |
| Receiver emergency stop output load range | AC125V-1A/DC30V-2A |
| Receiver enable output load range |
AC125V-1A/DC30V-2A
|
| Receiver custom button output load range | DC24V/50mA |
| Receiver axis selection output load range | DC24V/50mA |
| Receiver magnification output load range | DC24V/50mA |
| Transmission power of handheld terminal |
15dBm
|
| Receiver receiving sensitivity | -100dBm |
| Wireless communication frequency | 433MHz frequency band |
| Wireless communication distance | Barrier free distance of 40 metroj |
| Operation temperature | -25℃ < X < 55℃ |
| Anti fall height | 1 (Metro) |
| Custom button quantity | 2 |


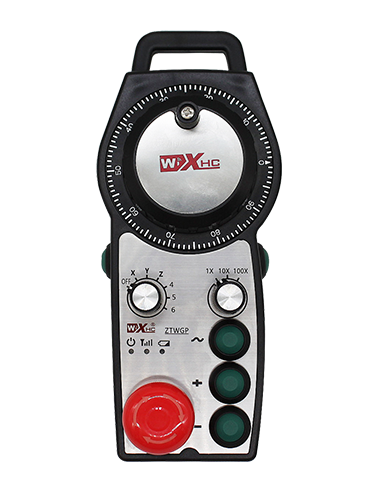
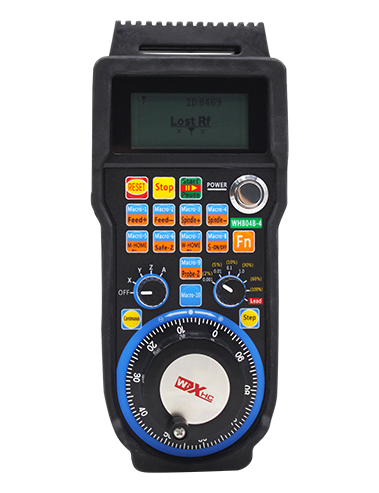
① Pulse encoder:
Premu kaj tenu la ebligan butonon, skuu la pulskodilon, elsendi pulssignalon,and control the movement ofthe machine axis.
② Enable button:
Press either enable button on either side, and the two sets of enable IO outputs on the receiver will conduct. Release the enable button to disconnect the enable IO output; And before switching the axis selection magnification and shaking the handwheel,the enable button needs to be held down to be effective; This function can be cancelled through configuration software.
③ Indicator lights:
Left side light: power on light,the handwheel uses the axis to select OFF for power on, and this light stays on after power on;
Middle light: a signal light that lights up when operating any function ofthe handwheel, and does not light up when there is no operation;
Right side light: Malalttensia alarmlumo, low battery level,this lightflashes or stays on, battery needs to be replaced.
④ Emergency stop button:
Premu la butonon de krizhalto, kaj la du aroj de krizhaltaj IO-produktaĵoj sur la ricevilo estos malkonektitaj, kaj ĉiuj funkcioj de la manrado estos malvalidaj.
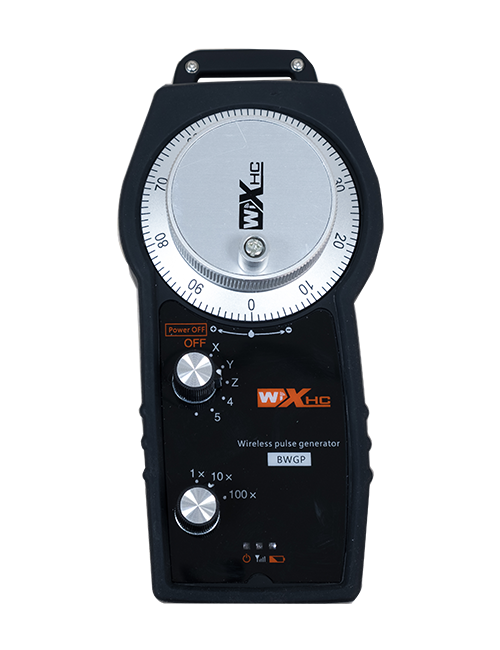
⑤ Magnification switch:
Press and hold the enable button to switch the magnification switch, which can switch the magnification controlled by the handwheel.
⑥ Axis selection switch (elektra ŝaltilo):
Press and hold the enable button to switch the axis selection switch, which can switch the movement axis controlled by the handwheel. Switch this switch from OFF to any axis and turn on the handwheel power.
⑦ Custom button:
Two custom buttons, ĉiu egalrilatante al IO-eligpunkto sur la ricevilo.

1. Instalu la ricevilon en la elektran kabineton tra la buko sur la dorso, aŭ instalu ĝin en la kabineton tra la ŝraŭbaj truoj ĉe la kvar anguloj de la ricevilo.
2. Riferu al nia ricevila drata diagramo kaj komparu ĝin kun via surloka ekipaĵo. Connect the equipment to the receiver via cables.
3.After the receiver is properly fixed, la anteno ekipita per la ricevilo devas esti konektita, and the outer end of the antenna should be installed or placed outside the electrical cabinet. Oni rekomendas meti ĝin sur la supro de la elektra kabineto por la plej bona signala efiko. It is prohibited to leave the antenna unconnected or place it inside the electrical cabinet, as this may result in the signal being unusable.
4. Fine, turn on the power switch of the handwheel, and you can operate the machine remotely using the handwheel.
6.2 Dimensioj de instalado de ricevilo

6.3 Diagramo de Referenca Elektro de Ricevilo

7. Instrukcioj pri produktaj operacioj
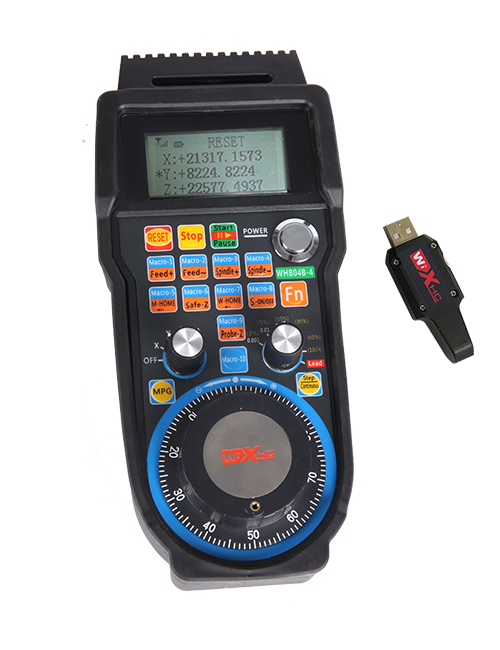
1. Power on the machine and the receiver. The receiver’s working indicator light flashes. Install the battery in the wireless electronic handwheel, secure the battery cover, Kaj
turn on the power switch of the wireless electronic handwheel. The handwheel’s battery level indicator light is on.
2. Elektu la koordinatakson: Premu kaj tenu la ebligan butonon, toggle the axis selection switch, and select the axis you want to operate.
3. Elektu pligrandigon: Premu kaj tenu la ebligan butonon, toggle the magnification switch,and select the desired magnification level.
4. Movanta akso: Premu kaj tenu la ebligan butonon, elektu la aksan elektan ŝaltilon, elektu la pligrandigan ŝaltilon, and then rotate the pulse encoder. Rotate clockwise to move the
positive axis and counterclockwise to move the negative axis.
5. Premu kaj tenu ajnan kutiman butonon, and the corresponding button IO output of the receiver will be turned on. Release the button, and the output will be turned off.
6. Premu la butonon de krizhalto, la responda krizhalto IO-eligo de la ricevilo estos malkonektita, la manrado funkcio estos malŝaltita,liberigu la butonon de krizhalto, la krizhalto IO-eligo estos fermita, kaj la manrado-funkcio estos restarigita.
7. Se la manrado ne estas operaciita dum tempodaŭro, it will automatically enter sleep mode to reduce power consumption. Kiam ĝi estas uzata denove, the handwheel can be activated by pressing the enable button.
8. Se la manrado ne estas uzata dum longa tempo, it is recommended to switch the handwheel shaft to the OFF position, malŝaltu la manradon potencon, kaj plilongigi la baterian vivon.
8. Produkta Modela Priskribo

① :ZTWGP represents the appearance style
②:Parametroj de eligo de pulso:
01: Indicates that the pulse output signal is A, B; Pulso-tensio 5V; pulse quantity 100PPR.
02:Indicating thatthe pulse output signals are A and B; Pulse voltage 12V; pulse quantity 100PPR.
03:Indicating thatthe pulse output signals are A, B, A -, B -; Pulso-tensio 5V; pulse quantity 100PPR.
04:Indikas malaltnivelan NPN-malfermcirkvitan eliron, kun pulsaj eligsignaloj de A kaj B;The number of pulses is 100PPR.
05:Indikas altnivelan PNP-fontan eligon, kun pulsaj eligsignaloj de A kaj B; The number of pulses is 100PPR.
③:Representing the number of axis selection switches, 2 reprezentas 2 aksoj.
④:Represents the type of axis selection switch signal, A reprezentas punkt-al-punktan eligsignalon, kaj B reprezentas ĉifritan eligsignalon.
⑤:Represents the type of multiplication switch signal, A reprezentas punkt-al-punktan eligsignalon, kaj B reprezentas ĉifritan eligsignalon.
⑥:Represents the number of custom buttons, 2 reprezentas 2 Propraj butonoj.
⑦:Represents the power supply for the system handwheel, Kaj 05 reprezentas 5V elektroprovizon.
⑧:L represents the left column (left knife holder), and R represents the right column (right knife holder).
9.Solution to Product Malfunctions

1. Bonvolu uzi ĝin en seka medio ĉe ĉambra temperaturo kaj premo por plilongigi ĝian funkcidaŭron.
2. Bonvolu eviti uzi en eksternormaj medioj kiel pluvo kaj akvaj vezikoj por plilongigi la funkcidaŭron.
3. Bonvolu konservi la aspekton de la manrado pura por plilongigi ĝian funkcidaŭron.
4. Bonvolu eviti premi, falante, batante, ktp. malhelpi damaĝon al la precizecaj komponantoj ene de la manrado aŭ precizecaj eraroj.
5. Se ne uzata dum longa tempo, bonvolu konservi la manradon en pura kaj sekura loko. Dum stokado kaj transportado, atento devas esti pagita al humideco kaj ŝoko-rezisto.
11. Sekurecaj Informoj
1. Bonvolu legi la instrukciojn atente antaŭ ol uzi kaj malpermesu al neprofesiuloj funkcii.
2. Please replace the battery in a timely manner when the battery level is too low to avoid errors caused by insufficient battery power and inability to operate the handwheel.
3. Se necesas riparo, Bonvolu kontakti la fabrikanton. Se la damaĝo estas kaŭzita de memriparo, La fabrikanto ne provizos garantion