1. Utilisez un câble de prise aviation à 6 conducteurs pour la connexion, avec une longueur de câble de volant de 10 mètres.
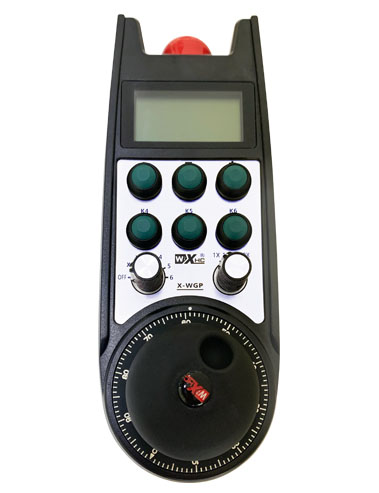
2. L'écran du volant peut afficher les coordonnées de la pièce du système, coordonnées mécaniques,vitesse d'avance, Sélection de l'axe, grossissement, et d'autres informations.
3. Bouton d'arrêt d'urgence de prise en charge, Sortie du signal de commutation IO, et l'arrêt d'urgence de l'arrêt du volant est toujours valable.
4. Prise en charge 6 boutons personnalisés, commuter les signaux IO, et peut émettre des signaux vers le système via le câblage IO ou la communication.
Manuel d'instructions du volant électronique filaire
Description
1. Introduction du produit
Le volant électronique est utilisé pour le guidage manuel, positionnement, alignement de l'outil, et d'autres opérations sur les machines-outils CNC. Ce modèle de volant électronique est un volant électronique filaire à affichage réel Siemens. Le volant est connecté à l'interface X130 du système Siemens via un câble réseau, et les coordonnées du système sont lues et affichées sur l'écran LCD du volant via la communication du protocole S7. Le volant peut également contrôler la sélection des axes du système, grossissement, boutons, et d'autres signaux via la communication.
2.Caractéristiques fonctionnelles du produit
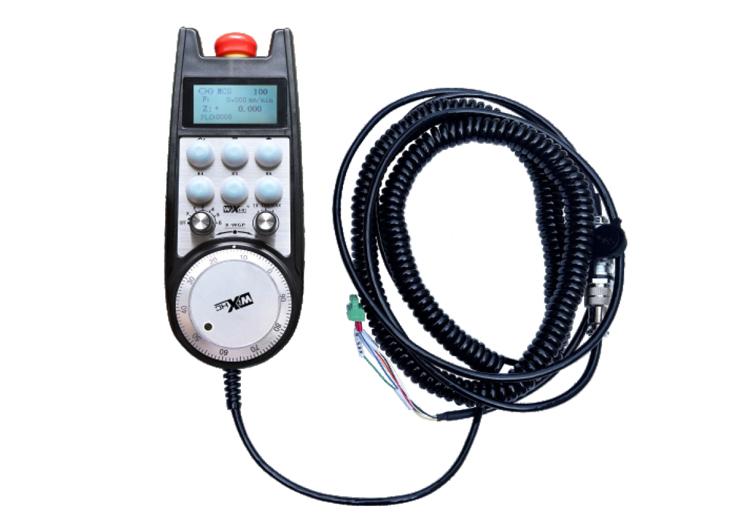
1. Utilisez un câble de prise aviation à 6 conducteurs pour la connexion, avec une longueur de câble de volant de 10 mètres.
2. L'écran du volant peut afficher les coordonnées de la pièce du système, coordonnées mécaniques,vitesse d'avance, Sélection de l'axe, grossissement, et d'autres informations.
3. Bouton d'arrêt d'urgence de prise en charge, Sortie du signal de commutation IO, et l'arrêt d'urgence de l'arrêt du volant est toujours valable.
4. Prise en charge 6 boutons personnalisés, commuter les signaux IO, et peut émettre des signaux vers le système via le câblage IO ou la communication.
5. Prise en charge 6 ou 8 contrôle des axes, avec des signaux IO de commutateur qui peuvent être émis vers le système via un câblage IO ou une communication.
6. Prise en charge 3 ou 4 niveaux de contrôle du grossissement, avec des signaux IO de commutateur qui peuvent être émis vers le système via un câblage IO ou une communication.
7. Encodeur d'impulsion de support, 100 impulsions/tour, peut émettre des signaux vers le système via un câblage d'impulsion AB.
8. Prend en charge le protocole Siemens S7 et Siemens 828D, 840DSL, ONE et autres systèmes modèles.
3. Spécifications du produit
| Tension d'alimentation de fonctionnement du volant | DC24V/1A |
| Tension d'alimentation du récepteur | DC24V/1A |
| Plage de charge de sortie IO du récepteur | DC24V |
| Longueur du câble d'extrémité du volant | 10m |
| Longueur du câble d'extrémité du récepteur | 1m |
| Longueur du câble réseau côté récepteur | 3m |
| Température de fonctionnement | -25℃<X<55℃ |
| Hauteur anti-chute | 1m |
| Quantité de boutons personnalisés | 6 |
| Dimensions du produit | 233*90.7*77.4(mm) |
4.Présentation de la fonction du produit
Note:
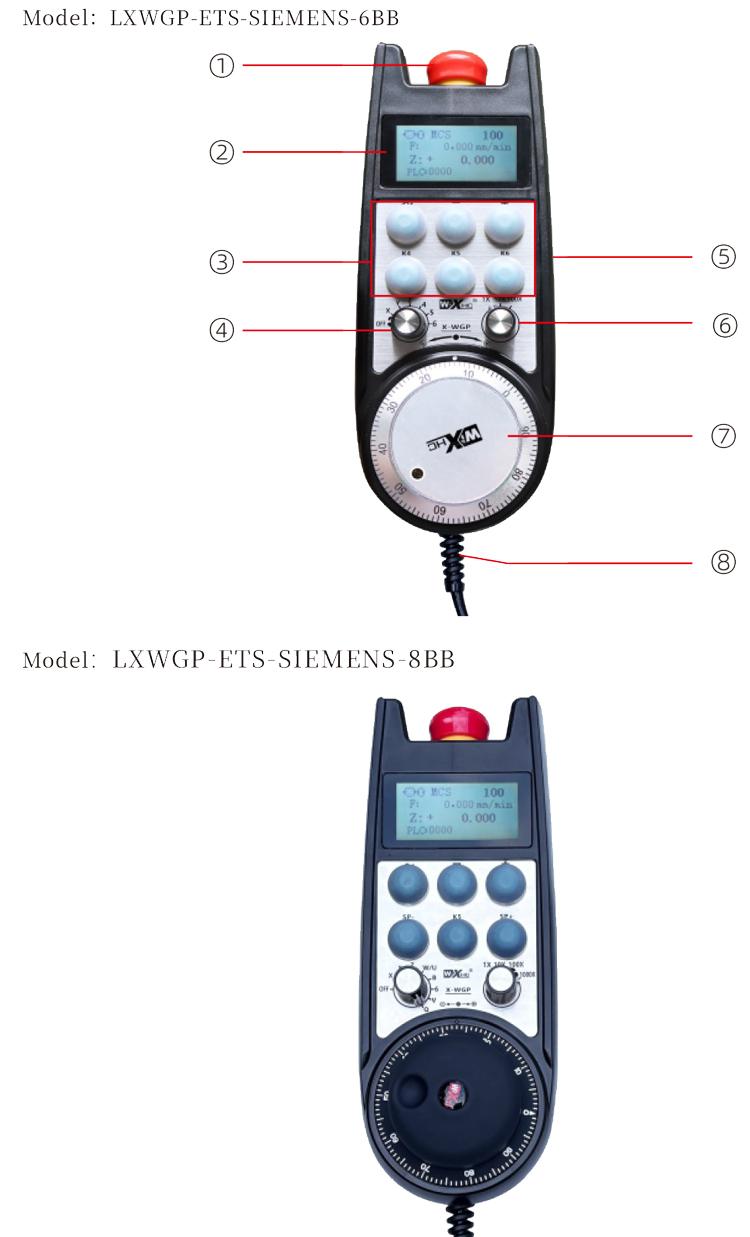
Bouton d'arrêt d'urgence:
Appuyez sur le bouton d'arrêt d'urgence, et les deux ensembles de sorties IO d'arrêt d'urgence sur le récepteur seront déconnectés, et toutes les fonctions du volant seront invalides.
Après avoir relâché l'arrêt d'urgence, la sortie IO d'arrêt d'urgence du récepteur est fermée, et toutes les fonctions du volant sont restaurées.
② Affichage de l'écran:
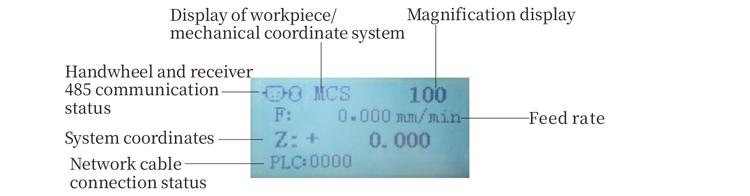
API: 0000 indique que le câble réseau n'est pas connecté, API: 1010 indique que le câble réseau est connecté avec succès au système PLC.
API: 1110 représente une écriture réussie des données du système sur le volant, API: 0001 représente une connexion réussie à l'ordinateur.
③ Bouton personnalisé:
6 boutons personnalisés, chacun correspondant à un point de sortie IO sur le récepteur, également connecté au système via la communication.
④ Commutateur de sélection d'axe:
Le commutateur de sélection d'axe peut changer l'axe de mouvement contrôlé par le volant.
⑤ Bouton Activer:
Appuyez et maintenez l'un des boutons d'activation des deux côtés pour activer l'encodeur d'impulsions en le secouant. Et les deux groupes sur le récepteur permettent à la sortie IO de conduire, relâchez le bouton d'activation pour permettre à la sortie IO de se déconnecter.
⑥ Commutateur de grossissement:Le commutateur de grossissement peut changer le grossissement
commandé par le volant.
⑦ Codeur d'impulsions:
Appuyez et maintenez le bouton d'activation, secouer l'encodeur d'impulsions, émettre un signal d'impulsion, et contrôler le mouvement de l'axe de la machine.
⑧ Câble du volant:
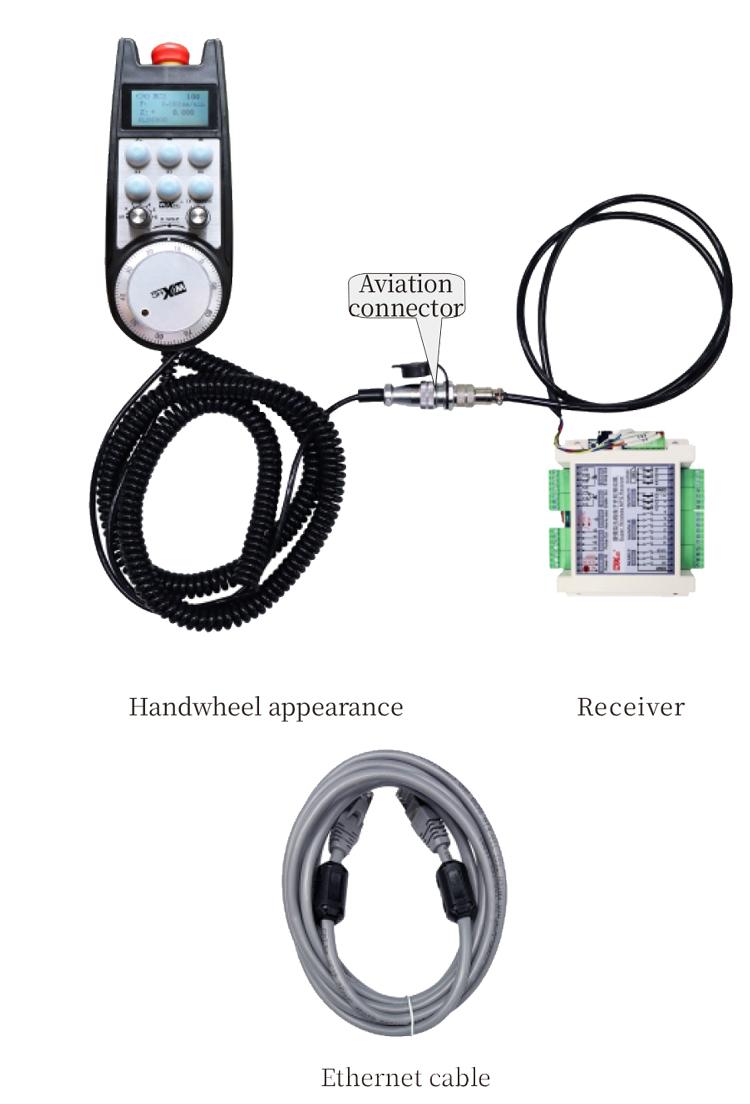
Câble reliant le volant et le récepteur, prise aéronautique, utilisé pour l'alimentation électrique et la communication du volant.
5. Schéma des accessoires du produit
6. Guide d'installation du produit
6.1 Étapes d'installation du produit
6.1 Étapes d'installation du produit
1. Installez le récepteur dans l'armoire électrique à travers les trous de vis aux quatre coins.
2. Référez-vous à notre schéma de câblage du récepteur et comparez-le avec votre équipement sur site. Connectez l'appareil au récepteur via des câbles et connectez le récepteur à l'interface X130 du système à l'aide de câbles Ethernet..
3. Après avoir réparé le récepteur, installer la base de prise aviation à la position d'ouverture du volant sur le panneau, et branchez l'autre extrémité de la base dans l'interface du volant sur le récepteur. Insérez ensuite la fiche aviation du câble du volant dans l'embase et serrez le dispositif de fixation.
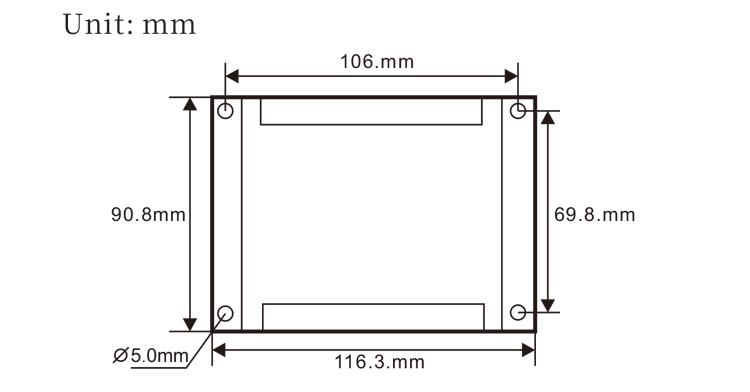
6.2 Dimensions d'installation du récepteur
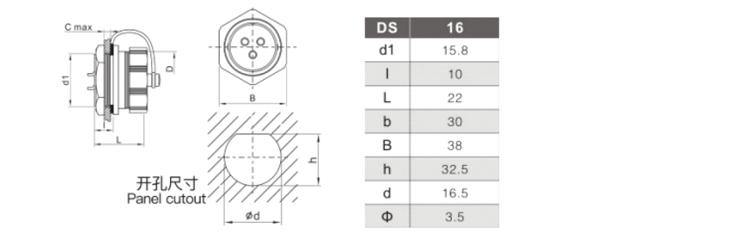
6.3 Dimensions d'installation des fiches aviation
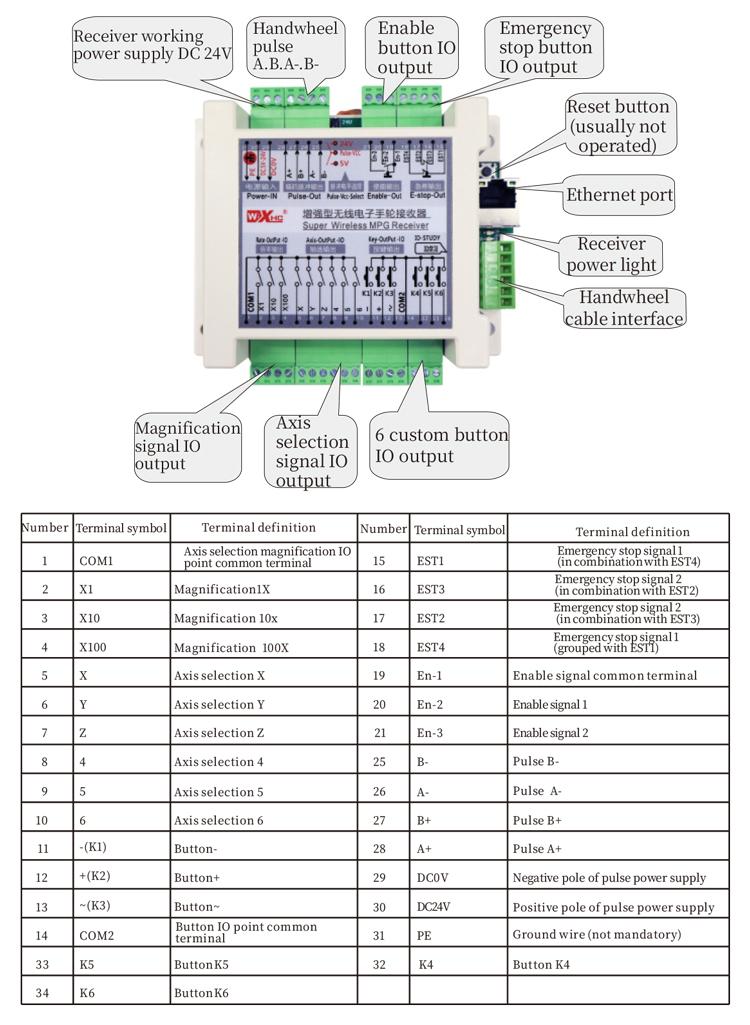
6.4 Schéma de référence de câblage du récepteur
 7.Instructions d'utilisation du produit
7.Instructions d'utilisation du produit
1. Lorsque le récepteur est allumé et que le voyant de fonctionnement du récepteur clignote, connectez le récepteur à l'ordinateur avec un câble réseau, définir l'adresse IP fixe de l'ordinateur, et utilisez le logiciel de l'outil de configuration réseau pour définir les paramètres réseau de la fonction volant. Pour des méthodes de réglage spécifiques, se référer au “Manuel d'utilisation du volant filaire LXWGP-ETS”.
2.Une fois le récepteur configuré, le système doit programmer un programme PLC. Veuillez vous référer au “LXWGP-ETS Différentes méthodes de réglage du système de commande numérique Siemens” et documents de routine du programme PLC pour plus de détails.
3.Après avoir terminé les paramètres ci-dessus, amener le récepteur à l'armoire électrique de la machine et l'installer. Retirez le câble réseau de l'ordinateur et branchez-le sur l'interface X130 du système. Connectez l'alimentation du récepteur et la ligne d'impulsion.3.
4.Après avoir terminé les paramètres ci-dessus, amener le récepteur à l'armoire électrique de la machine et l'installer. Retirez le câble réseau de l'ordinateur et branchez-le sur l'interface X du système. Connectez l'alimentation du récepteur et la ligne d'impulsion.
5. Sélectionner la sélection de l'axe: Basculez le commutateur de sélection d'axe et sélectionnez l'axe sur lequel vous souhaitez opérer.
6. Sélectionnez le grossissement: Commutez le commutateur de grossissement et sélectionnez le niveau de grossissement dont vous avez besoin.
7. Axe mobile: Appuyez et maintenez le bouton d'activation, sélectionner le commutateur de sélection d'axe, sélectionnez le commutateur de grossissement, puis faites pivoter l'encodeur d'impulsions pour faire tourner l'axe mobile positif dans le sens des aiguilles d'une montre et l'axe mobile négatif dans le sens inverse des aiguilles d'une montre..
8. Appuyez et maintenez n'importe quel bouton personnalisé pour activer la sortie IO du bouton correspondant dans le récepteur, et relâchez le bouton pour éteindre la sortie.
9. Appuyez sur le bouton d'arrêt d'urgence, la sortie IO d'arrêt d'urgence correspondante du récepteur sera déconnectée, la fonction volant sera désactivée, relâcher le bouton d'arrêt d'urgence, la sortie IO d'arrêt d'urgence sera fermée, et la fonction du volant sera restaurée.
8.Description du modèle de produit

① LXWGP représente un style d'apparence filaire, et l'interface de communication du récepteur
est une interface Ethernet.
② : Représente un système spécifique à Siemens.
③ : représente le nombre de commutateurs de sélection d'axe, représente les axes, et représente
axes.
④ : représente le type de sélection d'axe et le signal de grossissement, A représente
signal de sortie point à point, et B représente le signal de sortie codé.

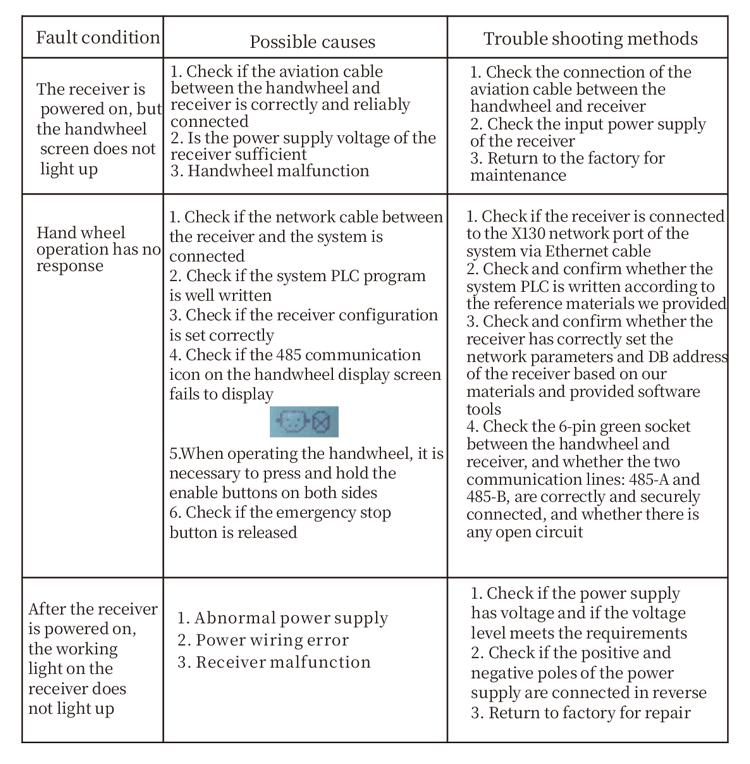
9.Dépannage du produit
10.Entretien
1. Veuillez l'utiliser dans un environnement sec à température et pression ambiantes pour prolonger sa durée de vie.
2. Veuillez éviter d'utiliser dans des environnements anormaux tels que la pluie et les bulles d'eau pour prolonger la durée de vie.
3. Veuillez garder l'apparence du volant propre pour prolonger sa durée de vie.
4. Veuillez éviter de presser, chute, heurte, etc.. pour éviter d'endommager les composants de précision à l'intérieur du volant ou des erreurs de précision.
5. Si ce n'est pas utilisé pendant longtemps, veuillez ranger le volant dans un endroit propre et sûr. Pendant le stockage et le transport, il faut prêter attention à la résistance à l'humidité et aux chocs.
11. Informations de sécurité
1. Veuillez lire attentivement les instructions avant utilisation et interdire aux non-professionnels d'utiliser.
2. Si une situation anormale se produit avec le volant, veuillez arrêter de l'utiliser immédiatement et dépanner. Avant le dépannage, il est interdit d'utiliser à nouveau le volant défectueux pour éviter les accidents de sécurité causés par des défauts inconnus du volant;
3. Si la réparation est requise, Veuillez contacter le fabricant. Si le dommage est causé par une auto-réparation, Le fabricant ne fournira pas de garantie