Նկարագրություն
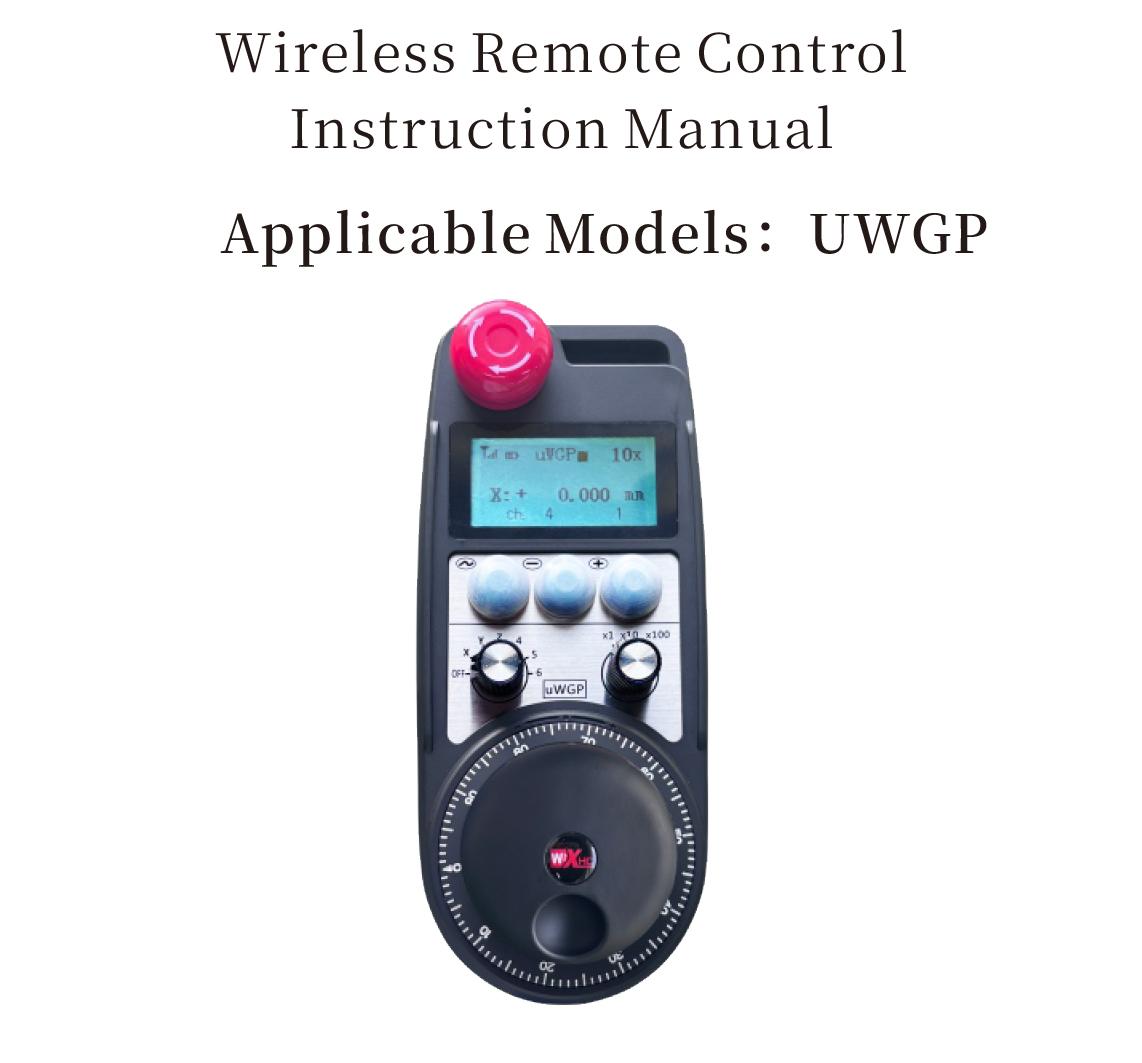
1.Ապրանքի ներածություն
Wireless Remote Control is used for manual guidance, դիրքավորում, tool setting and other operations of CNC machine tools. Այս ապրանքը ընդունում է անլար փոխանցման տեխնոլոգիա, վերացնելով ավանդական գարնանային մետաղալարերի միացումը, Մալուխների կողմից առաջացած սարքավորումների անհաջողությունների նվազեցում, վերացնելով մալուխի ձգման թերությունները, նավթի բծեր, և այլն:, and is more convenient to operate.It is widely applicable to CNC machine tools such as gantry machining centers, gantry vertical lathes, and CNC gear processing machines, and is compatible with various mainstream CNC system brands on the market, including Siemens, Mitsubishi, Ֆանուխ, Syntec and more.
2.Ապրանքի առանձնահատկությունները
1. Ընդունում է 433 ՄՀց անլար կապի տեխնոլոգիա՝ անլար գործառնական հեռավորությամբ 20 մետր.
2.Հարմարվողական հաճախականության ցատկում; 32 անլար հեռակառավարման սարքերի հավաքածուները կարող են միաժամանակ օգտագործվել առանց միջամտության.
3.Supports the emergency stop button, and the emergency stop button remains effective even after the remote control is powered off.
4.Աջակցում է 3 հարմարեցված կոճակներ՝ անջատվող IO ազդանշանի ելքով.
5.Աջակցում է 6 առանցքների հսկողությանը, մի քանազոր 7 12 առանցքների կառավարումը հարմարեցված է.
6. Աջակցում է 3 արագությամբ խոշորացման կառավարում, և 4-արագությամբ խոշորացման կառավարումը հարմարեցված է.
7.աջակցում է միացնել կոճակի գործառույթը, որը կարող է ելքային անջատիչ IO ազդանշաններ, ինչպես նաև վերահսկել առանցքի ընտրությունը, խոշորացում և կոդավորում.
8.Աջակցում է առանցքի ընտրության և խոշորացման կոդավորման տեսակի փոփոխմանը ծրագրային ապահովման միջոցով.
9. Supports pulse encoder with specification of 100 Մեկ հեղափոխության իմպուլսներ.
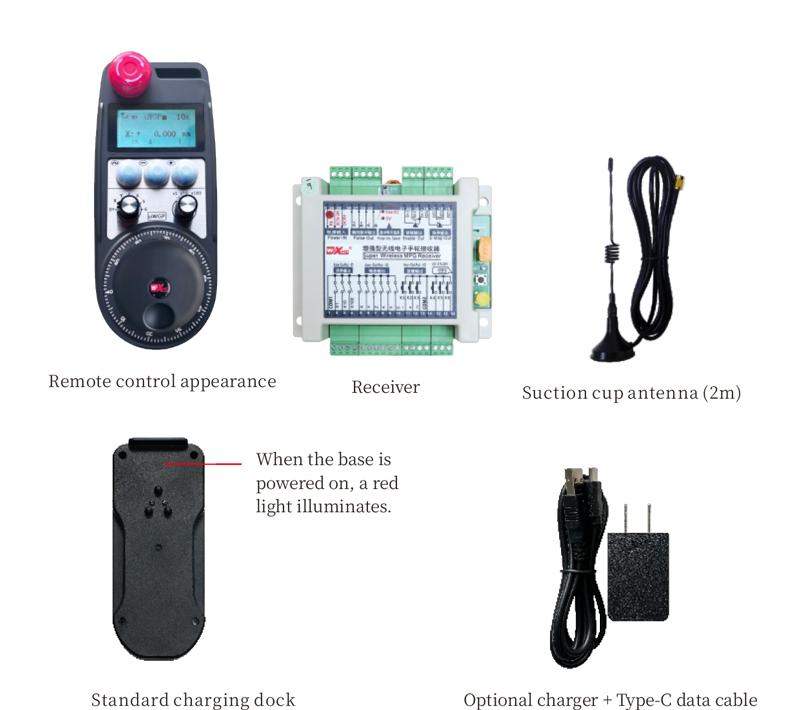
10. Supports standard Type-C charging with 5V-2A charging specification; built-in battery
specification: 14500 / 1100մԱհ.
| Working Voltage and Current of Handheld Terminal |
3.7V/20.0mA |
| Charging Battery Specification |
3.7V/14500/1100mAh
|
| Low Voltage Alarm Range of Handheld Terminal |
<3.35Վիճակ |
| Receiver Power Supply Voltage |
DC5V-24V/1A |
| Receiver Emergency Stop Output Load Range |
AC125V-1A / DC30V-2A |
| Receiver Enable Output Load Range |
AC125V-1A / DC30V-2A |
| Receiver Custom Button Output Load Range |
DC24V / 50MA
|
| Receiver Axis Selection Output Load Range |
DC24V / 50MA |
| Receiver magnification Output Load Range |
DC24V / 50MA |
| Handheld Terminal Transmit Power |
15դդմ
|
| Ստացողը զգայունություն է ստանում |
-100դդմ |
| Անլար կապի հաճախականություն |
433MHZ հաճախականության խումբ
|
| Wireless Communication Distance |
20 meters barrier-free distance
|
| Operating Temperature |
-25℃<X<55℃ |
| Safe drop height |
1 մ
|
| Number of Custom Buttons |
3
|
| Product Weight |
546.86(g) |
| Product Dimensions |
200*87*72(մմ) |
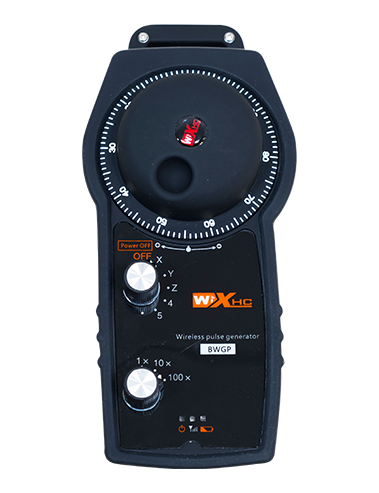
4. Ապրանքի գործառույթի ներածություն
Նշումներ:
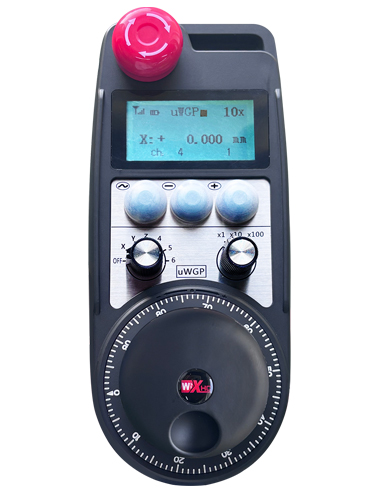
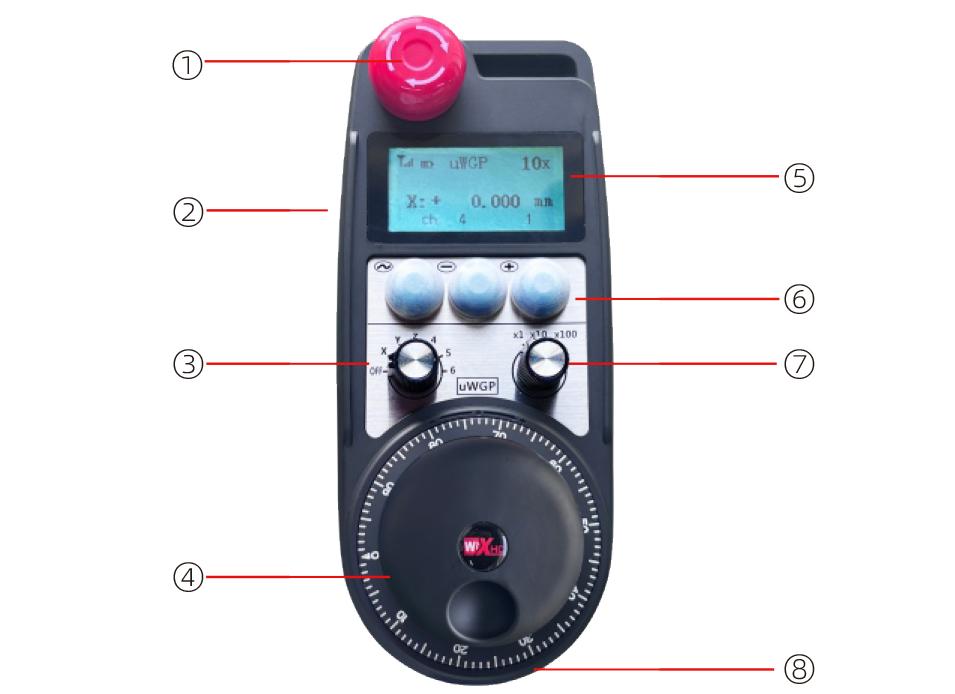
① Emergency Stop Button:
Սեղմեք շտապ օգնության կոճակը, the two groups of emergency stop IO outputs on the receiver will disconnect, and all remote control functions will be invalidated.Release the emergency stop button, the emergency stop IO outputs on the receiver will be closed, and all remote control functions will be restored. Բացի այդ, even if the remote control is powered off, pressing the emergency stop button can still activate the emergency stop IO output of the receiver.
② Enable Button:
Press either enable button on both sides, the two sets of enable IO outputs on the receiver will conduct. Release the enable button, and the enable IO outputs will disconnect. It is necessary to press and hold the enable button before toggling axis selection, magnification or rotating the remote control for the operation to take effect.This function can be canceled through the configuration software.
③ Axis Selection Switch (Power Switch):
Սեղմեք եւ պահեք միացնել կոճակը, then toggling the axis selection switch can control the movement of axis .Press and hold the enable button, then toggle the axis selection switch to switch the motion axis controlled by the remote control. Toggle the switch from the OFF position to any axis position, and the remote control will power on automatically.
④ Pulse Encoder:
Press and hold the enable button and rotate the pulse encoder, it will output pulse signals to control the movement of the machine axis.
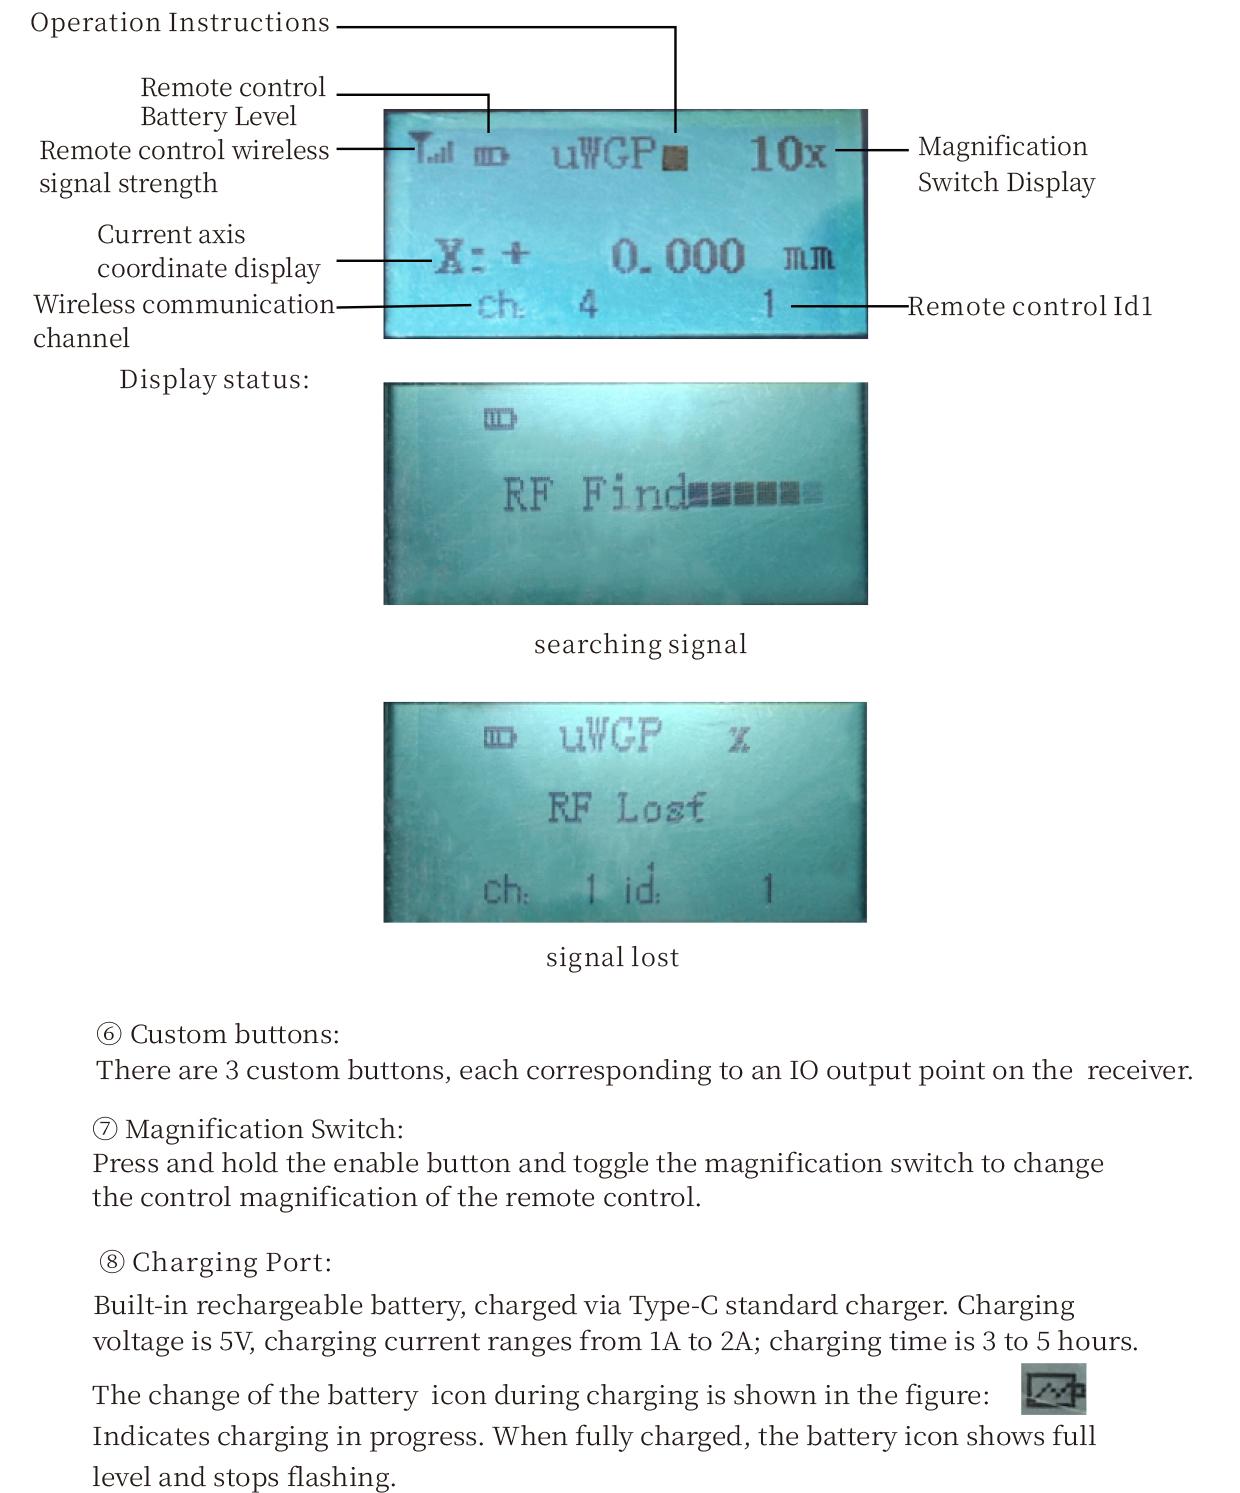
⑤ LCD Display Screen:
5. Product Accessories Diagram
6. Ապրանքի տեղադրման ուղեցույց
6.1 Ապրանքի տեղադրման քայլերը
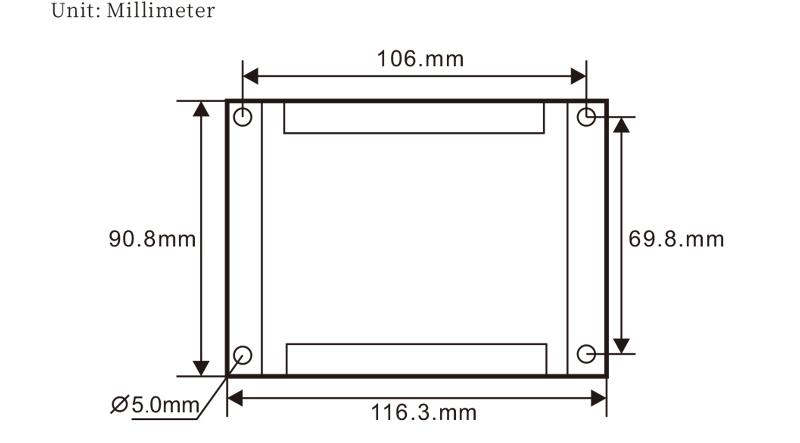
1. Install the receiver in the electrical cabinet via the buckle on its back, or mount it inside the electrical cabinet through the screw holes at the four corners of the receiver.
2. Տե՛ս մեր ընդունիչի միացման սխեման, համեմատեք այն ձեր տեղում գտնվող սարքավորումների հետ, and connect the equipment to the receiver with cables.
3. After the receiver is fixed in place, install the supporting antenna of the receiver properly. Mount or place the outer end of the antenna outside the electrical cabinet. It is recommended to place it on the top of the electrical cabinet for optimal signal performance. Do not leave the antenna uninstalled or place it inside the electrical cabinet; հակառակ դեպքում, signal failure may occur.
4. Վերջապես, turn on the remote control power switch, then you can remotely operate the machine via the remote control.
6.2 Receiver Installation Dimensions
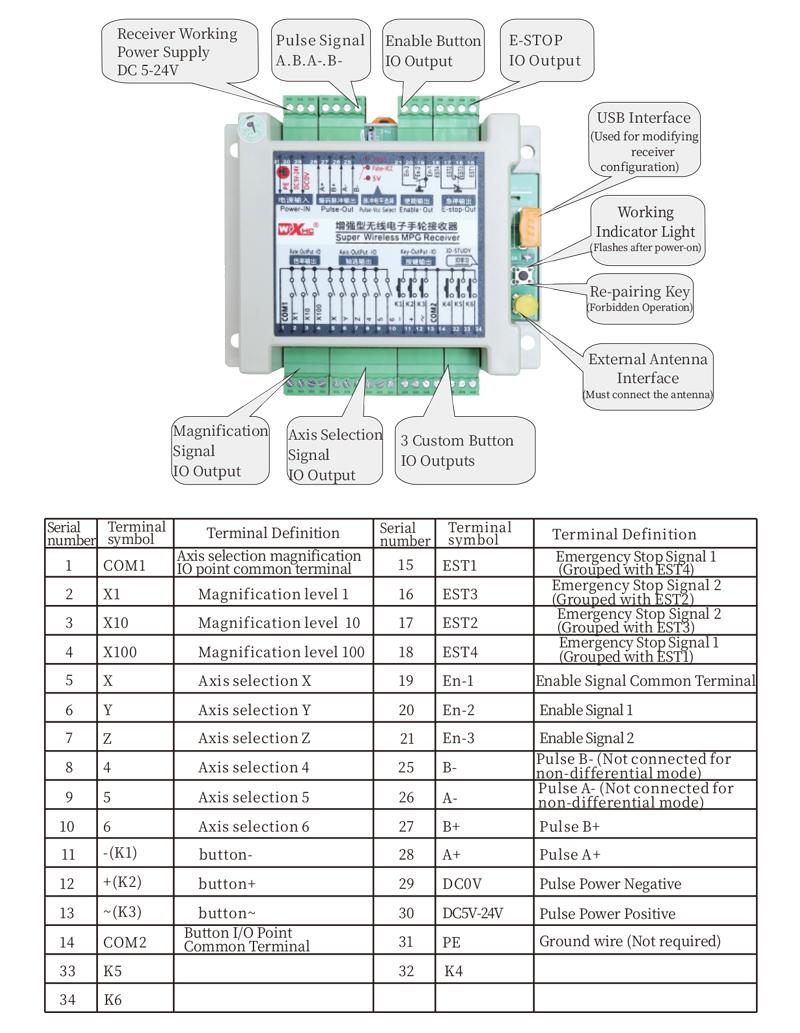
6.3 Ստացողի էլեկտրագծերի հղման դիագրամ
7. Ապրանքի շահագործման հրահանգներ
1. Իշխանություն մեքենայի եւ ստացողի վրա. The receiver operation indicator flashes. After the wireless electronic remote control is fully charged, toggle it from the OFF gear to the X-axis gear, and the remote control display lights up.
2. Select the axis : Սեղմեք եւ պահեք միացնել կոճակը, toggle the axis selection switch to select the axis to be operated.
3. Select the magnification: Սեղմեք եւ պահեք միացնել կոճակը, toggle the magnification switch to select the required magnification gear.
4. Axis movement: Սեղմեք եւ պահեք միացնել կոճակը, select the axis selection switch and the magnification switch, then rotate the pulse encoder. Rotate clockwise to move the axis in the positive direction, and rotate counterclockwise to move the axis in the negative direction.
5. Սեղմեք եւ պահեք ցանկացած սովորական կոճակ, the corresponding button IO output of the receiver will turn on; release the button, and the output will turn off.
6. Սեղմեք շտապ օգնության կոճակը, the corresponding emergency stop IO output of the receiver disconnects and the remote control function becomes invalid. Release the emergency stop button, the emergency stop IO output closes and the remote control function is restored.
7. If the wireless remote control is not operated for a period of time, Այն ինքնաբերաբար կմտնի քնի ռեժիմ, էներգիայի սպառումը նվազեցնելու համար. It can be used normally again by pressing the enable button again.
8.If the wireless remote control is not used for a long time, turn the axis switch to OFF to turn off the power and extend battery life
8. Ապրանքի մոդելի նկարագրությունը
①:UWGP stands for appearance style.
②:Pulse Output Parameters:
01: Ցույց է տալիս, որ զարկերակային արտադրանքի ազդանշանը ա, Բոց; Pulse Voltage 5V; Pulse քանակություն 100PPR.
02: Ցույց է տալիս, որ զարկերակային արտադրանքի ազդանշանը ա, Բոց; Pulse լարային 12V; pulse quantity 25PPR.
03: Ցույց է տալիս, որ զարկերակային արտադրանքի ազդանշանը ա, Բոց, Էունք -, Բոց -; Pulse Voltage 5V; Pulse քանակություն 100PPR.
04: Ույց է տալիս ցածր մակարդակի NPN բաց սխեմայի ելքը, A եւ B- ի զարկերակային ելքային ազդանշաններով; The number of pulses is 100PPR.
05: Ույց է տալիս PNP- ի բարձր մակարդակի արտադրանքի բարձր մակարդակը, A եւ B- ի զարկերակային ելքային ազդանշաններով; Իմպուլսների քանակը 100ppr է.
③:Represents the axis selection switch quantity; 6 stands for 6 առանցք, 7 stands for 7 առանցք, and so on.
④: Represents the signal type of the axis selection switch.A stands for point-to-point output signal, and B stands for encoder output signal.
⑤: Represents the signal type of the magnification switch.A stands for point-to-point output signal, and B stands for encoder output signal.
⑥: Ներկայացնում է սովորական կոճակների քանակը; 3 corresponds to 6 Պատվերով կոճակներ.
⑦: Represents the power supply for the system remote control. 05 stands for 5V power supply, մի քանազոր 24 stands for 24V power supply.
⑧: Represents the contact charging mode. It starts charging automatically when placed back on the charging base.
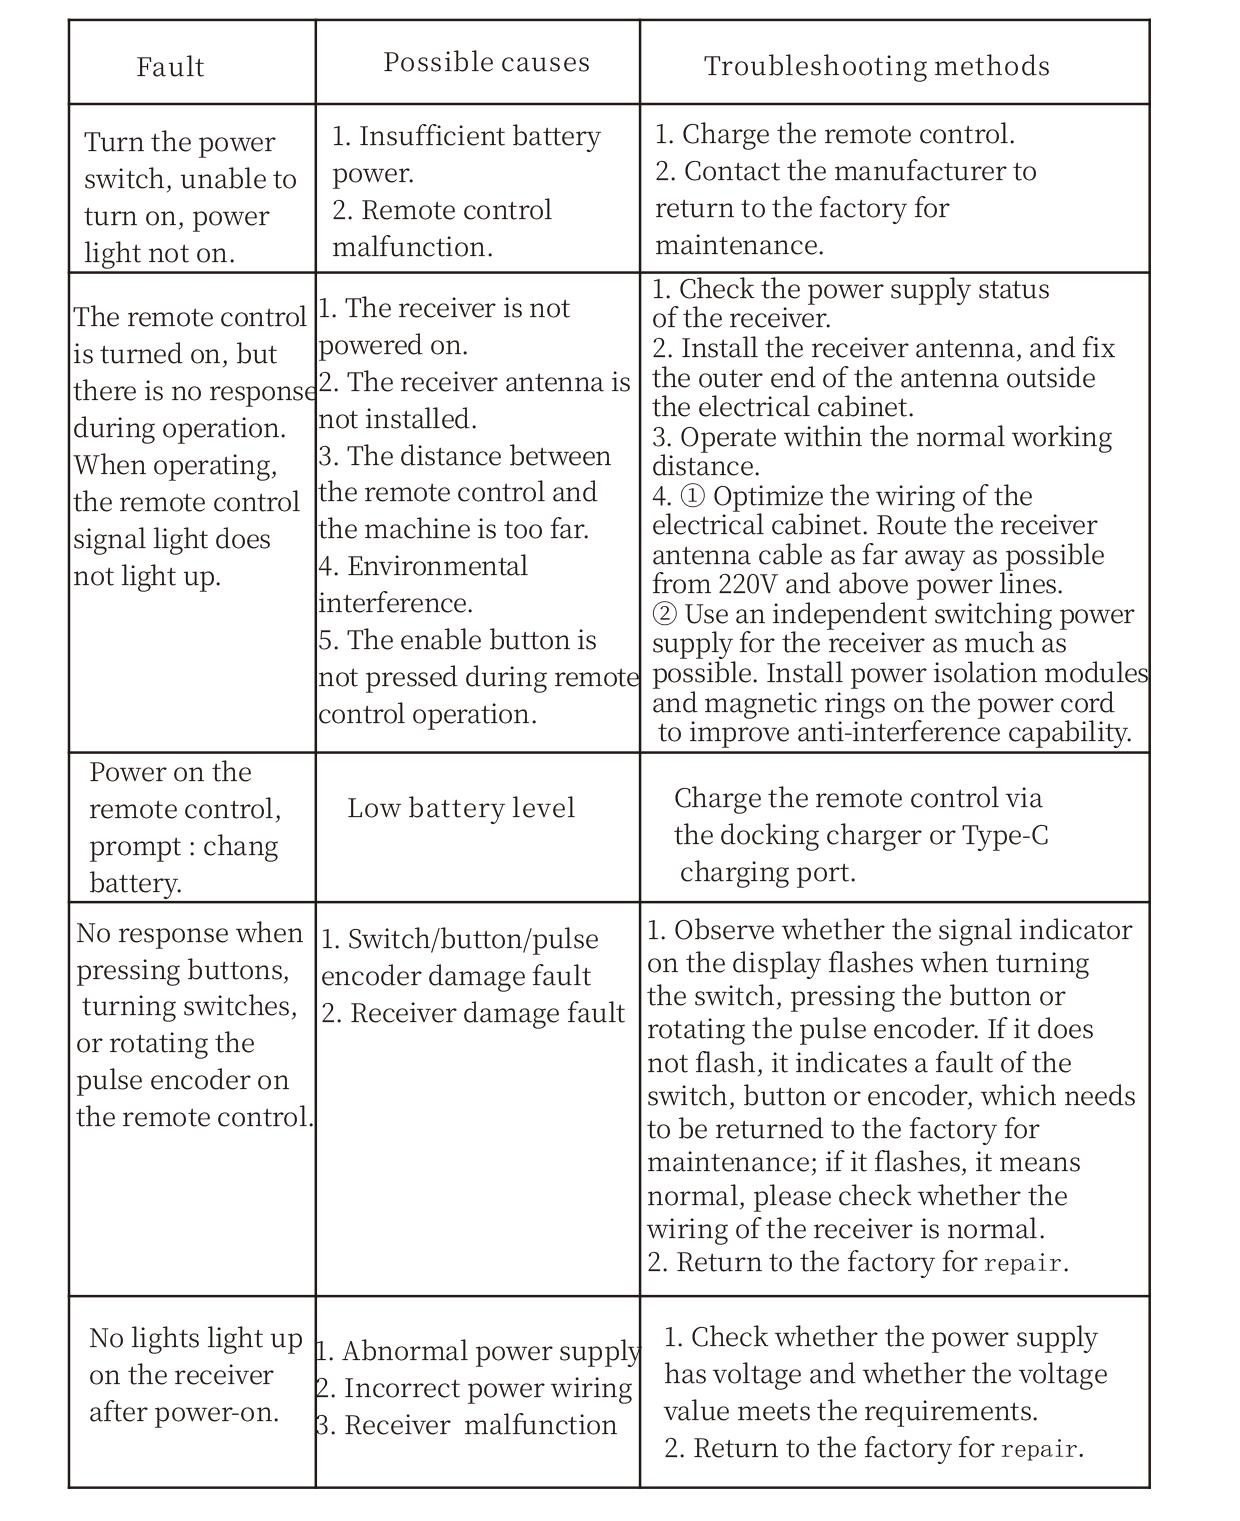
9. Ապրանքի անսարքությունների վերացում
10. Maintenance and upkeep
1. Խնդրում ենք օգտագործել այն չոր միջավայրում սենյակային ջերմաստիճանում եւ ճնշում է իր ծառայության կյանքը երկարացնելու համար.
2. Please avoid using in abnormal environments such as rain and water to extend the service life.
3. Please keep the appearance of the remote control clean to extend its service life.
4. Please avoid crushing, dropping, or bumping, եւ այլն. to prevent damage to the precision components inside the remote control or accuracy errors.
5. Եթե երկար ժամանակ չի օգտագործվում, please store the remote control in a clean and safe place.
6. Avoid moisture and shock during storage and transportation.
11. Անվտանգության տեղեկատվություն
1. Օգտագործելուց առաջ ուշադիր կարդացեք հրահանգները եւ արգելեք ոչ մասնագետներին գործարկելուց.
2. Please charge the remote control in a timely manner when the battery level is too low, to avoid malfunction and operational errors caused by insufficient power.
3. If you repair it yourself and cause damage, the warranty will be void.