Сүрөттөө
1. Продукцияны киргизүү
Автоматтык кесүү үчүн алыстан башкаруучу унаа аркан арааны трек түрүндөгү аркан араа үчүн ылайыктуу
кесүүчү машиналар. Ал колдонот 485 Сол жана оң трек жыштыгын көзөмөлдөө үчүн Modbus RTU протоколу
конвертерлер, ошондой эле чоң мотор жыштыгын өзгөртүү ылдамдыгын башкаруу баштоо жана алдыңкы, арткы,
сол жана оң багыт контроллерлору. Жана ал чоң мотор жыштыгынын жумушчу агымын окуй алат
аркылуу конвертер 485 Modbus RTU протоколу. нын агымын талдоо жана салыштыруу менен
чоң мотор, сол жана оң тректердин ылдамдыгы реалдуу убакытта автоматтык түрдө жөнгө салынышы мүмкүн
автоматтык кесүү функциясына жетишүү.
2. Продукт функционалдык өзгөчөлүктөрү
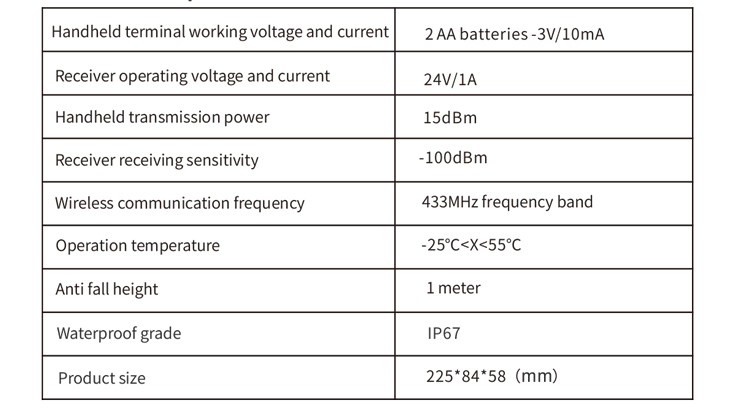
1. 433MHz зымсыз байланыш технологиясын кабыл алуу, зымсыз иштөө аралыгы менен 100 Метр.
2. Автоматтык жыштыкты кабыл алуу функциясын кабыл алуу жана пайдалануу 32 зымсыз алыстан башкаруучу комплект
бир эле убакта, бири-бирине тийбестен.
3. менен бардык жыштык өзгөрткүчтөрдү колдойт 485 Modbus RTU протоколу, жана учурда туура келген жыштык
конвертер бренддер кирет:Шанхай Хиелин, Fuji, Хуйчуань, Zhongchen, Чакыруу, жана . Бренддер үчүн
дал келбейт, ыңгайлаштыруу үчүн биз менен байланышыңыз.
4. Ылдамдыкка жөнгө салуу, баштоо, Учурдагы ири мотор жыштыгын которуу.
5. Сол жана оңго жыштыкты конверттерди тез арада жөнгө салуу, баштоо, алдыңкы, артка, сол жана оң көзөмөл.
6. Сол жактагы сызыктуу оңдоп-түзөөнү колдоо
түз сызык.
7. Аркан араанын автоматтык кесүү функциясын колдоо, сол жана оң трек ылдамдыгын автоматтык түрдө тууралоо
чоң мотор учурдагы маалымат боюнча реалдуу убакыт.
8. Ал ошондой эле кыймылдаткычты баштоо жана токтотуу үчүн түз IO чыгаруу башкаруусу менен шайкеш келет, жана аналогдук чыңалуунун чыгышы
мотор ылдамдыгын көзөмөлдөө.
3. Продукциянын өзгөчөлүктөрү
4. Продукт функциясын киргизүү
Нота:
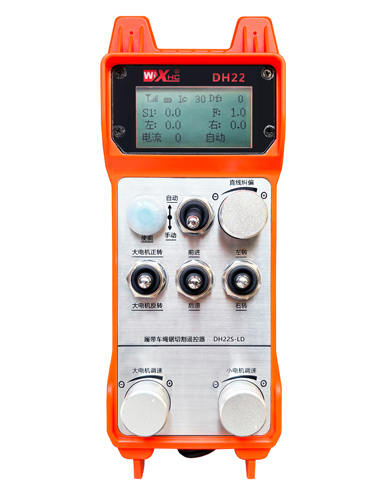
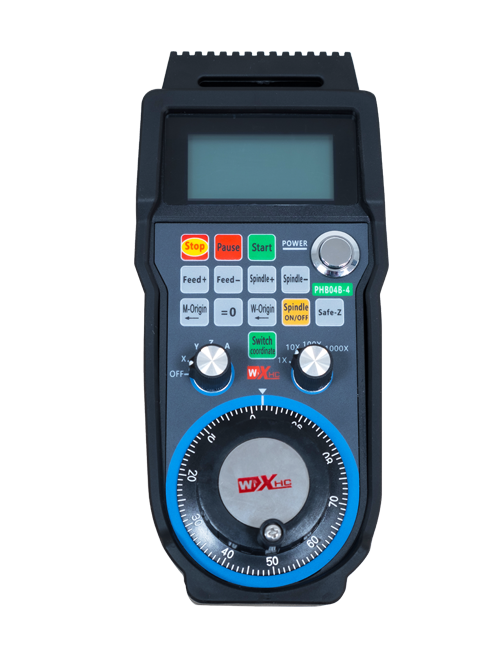
①screen дисплей:
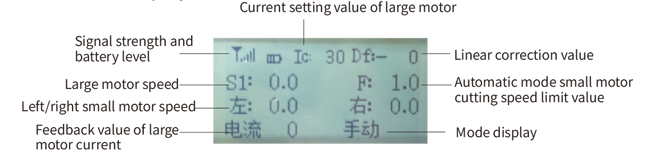
②mode Switch:
③Иштетүү:
Айкалыш баскычтар, Айрым операциялар иштөөнүн иштетүү баскычын басып, иштетүү баскычын басып турууну талап кылат,чоо-жайын билүү үчүн ар бир которуу үчүн нускамаларды караңыз.
④Чоң мотор өчүргүч:
3 ылдамдыктарын калыбына келтирүү, Бул өчүргүчтү тартуу чоң мотордун алдыга жана тескери ротацияны башкара алат. Берилгенден кийин, Мамлекет кала берет, жана экранда тийиштүү дисплейлер болот. S1↑ жебе алдыга айланууну көрсөтөт, жана S1 ↓ жебе тескери айланууну көрсөтөт.
⑤small Motor Atwervent / Reverse Switch:
Чакан мотор анын алдында 3-тездиктүү өзүн-өзү кулпулоочу өчүргүч менен жабдылган. Иштетүү баскычын басуу жана бул которгучту тартуу кичинекей моторду алдыга жана артка жылдыруу үчүн башкара алат, жана тиешелүү дисплей экранда пайда болот. ↑↑ жебе алдыга карай билдирет, жана ↓↓ жебе артты билдирет.
⑥ Түз сызыкты оңдоо:
Көп бурчтук коддукту колдонуу, иштетүү баскычын басыңыз, баскычты оңго буруңуз, жана түз сызыкты оңдоону көрсөтүү: Df: Солго буруш баскычы көбөйөт 1 айлануу бирдиги, жана сол
мотор ылдамдыгы жогорулайт 0.1 бирдиги; Сол текти буруңуз, Түз сызык оңдоп-түзөө дисплей: Df: Оң жакта, баскычтын ар бир айлануусу көбөйөт 1 бирдиги, жана туура мотордун ылдамдыгы жогорулайт
тарабынан 0.1 бирдиги.
⑦Чакан мотор бургуч:
3 ылдамдыктарын калыбына келтирүү, Кол менен иштетилгенде, Кичинекей моторду солго же оңго бурууга болот. Бир жолу бошотулган, алыстан башкаруу бул аракетти автоматтык түрдө токтотот. Алга абалында, бул которгуч бурулганда, экранда тиешелүү дисплей пайда болот. ←↑ жебе сол бурулууну көрсөтөт, жана ↑→ жебе оңго бурулушту көрсөтөт. Тескери режимде, бул которгучту бурсаңыз, экранда тиешелүү дисплей пайда болот. ←↓ жебе сол бурулууну көрсөтөт, жана ↓→ жебе оңго бурулушту көрсөтөт.
⑧ Моторду тез арада жөнгө салуу:
Көп бурчтук коддукту колдонуу, айлануу 1 Ар бир жолу тор, ири мотордун ылдамдык мааниси болжол менен 0.2 бирдиктер. Тез айлануу чоң мотордун ылдамдыгын тез өзгөртө алат.
⑨ Чакан мотор ылдамдыгын жөнгө салуу:
Көп бурчтук коддукту колдонуу, кол режиминде, иштетүү баскычын басып, анан бир убакта бир торду айлантыңыз,сол жана оң кичинекей моторлордун ылдамдыгы болжол менен өзгөрөт 0.1 бирдиктер, жана тез айлануу чакан motor.In автоматтык режимде ылдамдык маанисин тез өзгөртө алат, иштетүү баскычын басып, бир убакта бир торду айлантыңыз,кичинекей кыймылдаткычтын ылдамдыгын чектөө мааниси F болжол менен өзгөрөт 0.1 бирдиктер. Ыкчам айлануу кичинекей мотордун ылдамдыгын чектөөнү тез өзгөртө алат.
⑩ Алыстан башкаруунун кубат которгучу
Алыстан башкаруу дисплей экраны күйгүзүлдү.
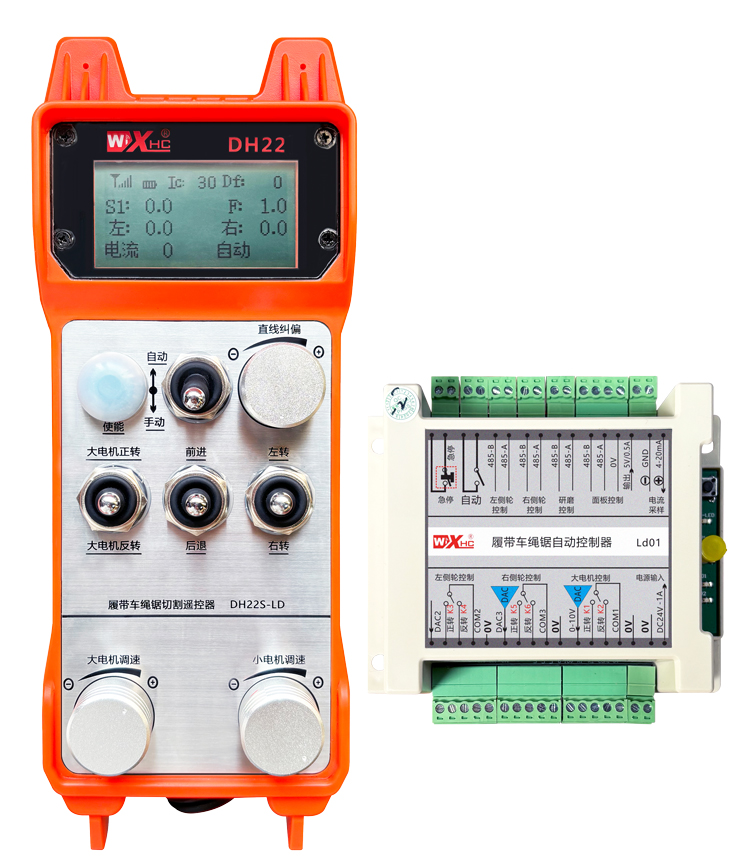
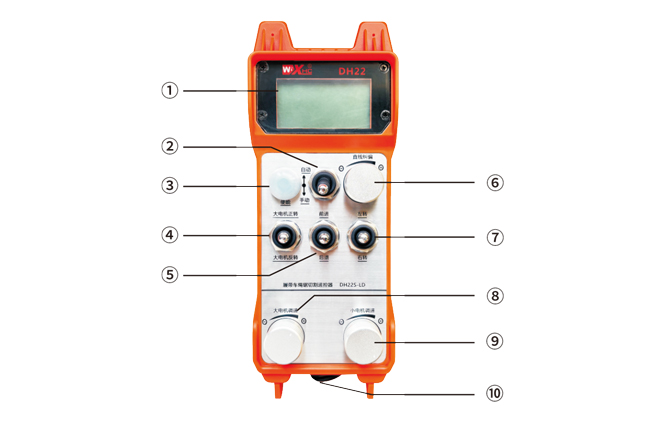
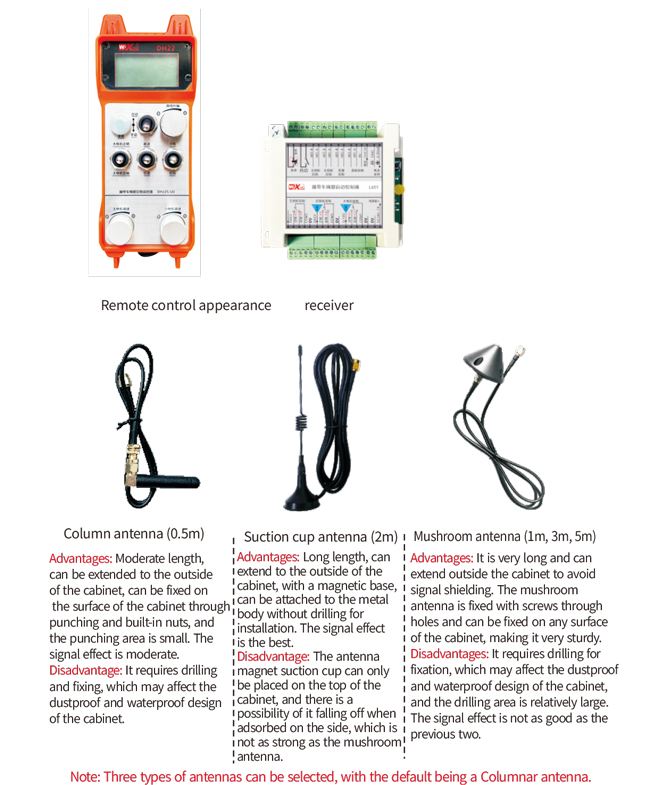
5. Продукция аксессуарлары Диаграмма
6. Продукцияны орнотуу боюнча колдонмо
6.1 Продукцияны орнотуу кадамдары
1. Алуучуга электр шкафына орнотуу арткы бетиндеги электр шкафына орнотуңуз, же ал кабыл алуучунун төрт бурчундагы бурама тешиктери аркылуу шкафка орнотуңуз.
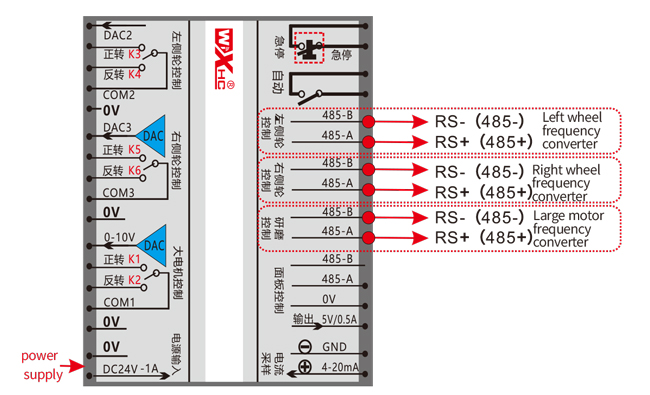
2. Биздин алуучу зымдуу диаграммага кайрылыңыз жана аны сиздин сайттын жабдууларыңыз менен салыштырыңыз. Жабдууларды ресиверге зымдар аркылуу туташтырыңыз.
3. Кабыл алуучуну бекиткенден кийин, ресивер менен жабдылган антеннаны туташтыруу жана антеннанын сырткы учун электр шкафынын сыртына орнотуу же коюу керек. Мыкты сигнал эффектинин эң мыкты натыйжасы үчүн аны электр кабинетинин үстүнө коюу сунушталат. Антеннаны туташтырбай коюуга же электрдик шкафтын ичине коюуга тыюу салынат, анткени ал сигналдын жараксыз болушуна алып келиши мүмкүн.
4. Акыры, батареяны пультка орнотуңуз, батарейканын капкагын тартыңыз, жана пульттун өчүргүчтү күйгүзүңүз. Алыстан башкаруу дисплей экраны кадимки көрсөтөт кийин
жумушчу интерфейс, алыстан башкаруу операцияларын аткарууга болот.
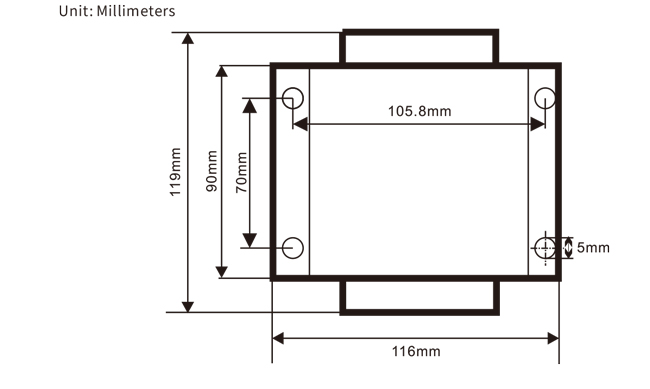
6.2 Алуучуну орнотуу өлчөмдөрү
6.3 Кабыл алуучунун зымга шилтеме диаграммасы
7. Продукт операциялык көрсөтмөлөр
7.1 Алыскы контролдук параметр жөндөөлөрү
Алыстан башкаруунун арткы параметрлерин киргизүү ыкмасы:
Режимди которгучту кол режимине буруңуз, кичинекей мотордун ылдамдыгын тууралаңыз 25 эки тараптан, же 0, 10, 20, 40, 50 бардык тараптан, жана чоң мотордун алдыга которгучун тынымсыз өйдө буруңуз 3 жолу жана төмөн 3 жолу;
Колдонуу “Чакан мотор ылдамдыгын көзөмөлдөө” барактарын которуу үчүн баскыч, иштетүү баскычын басыңыз, анан параметрлерди өзгөртүү үчүн мотор ылдамдыгын башкаруу баскычын буруңуз. өзгөртүү кийин, баракчаны аягына чейин күйгүзүңүз,тандоо “Сактоо” чыгуу, жана менюдан чыгуу үчүн иштетүү баскычын басыңыз;
Параметрлер төмөнкүдөй:
Максималдуу учурдагы: чоң мотор токунун пикир диапазону, белгиленген диапазон 15-200A, По умолчанию 100;
Ылдамдыкты башкаруу параметрлери: Автоматтык режим, кичинекей мотор автоматтык түрдө тезирээк же жайыраак ылдамдайт,кичирээк, диапазонун коюу 200-1500, По умолчанию 800;
Жайлоо параметр: Мотор ылдамдыгын өзгөртүүгө мүмкүндүк берген жогорку чекти коюңуз. Учурдагы өзгөрүүлөрдөн тышкары, жайлоо пайда болот. Кичирээк, сол жана оң кыймылдаткычтардын ылдамдыгы ылдамыраак, бир катар менен 05-12 жана демейки 06;
A1 ылдамдануусу: Мотор ылдамдыгы чоңураак, ошончолук тезирээк көбөйөт, бир катар менен 00-06 жана демейки 01;
Жайлоо A2: Мотор ылдамдыгы чоңураак, тезирээк төмөндөйт, бир катар менен 00-06 жана демейки 02;
Тез жөнгө салуу: Чакан мотордун ылдамдыгын жөнгө салууну иштетүү керекпи? 00 иштетпейт, 01 мүмкүнчүлүк берет, демейки болуп саналат 01;
Өзүн-өзү бекитүүнү баштаңыз: Алдыга жана артка которгучтар бошотулгандан кийин чоң мотор автоматтык түрдө өзүн-өзү кулпулоону сактайбы? 00 кармабайт, 01 кармайт, По умолчанию 01
Максималдуу басуу: сол жана оң кыймылдаткычтарынын максималдуу ылдамдыгы, диапазону 10-100, По умолчанию 50;
Токуу ток: максималдуу кесүү ток, экранда IC мааниси катары көрсөтүлөт, диапазону 15-160, По умолчанию 30,
IC туура келет: 30 экранда көрсөтүлөт. Бул параметрдин жогорку чеги болуп саналат 80% максималдуу токтун;
Демейки ылдамдык чеги: күйгүзүлгөн демейки чакан мотор автоматтык кесүү ылдамдыгы диапазонунда болот 0-100, демейки менен 10. Экранда F1.0 көрсөтүлөт, жана бул параметр максималдуу басуу коюлганда гана так болот 50.
Автоматтык режим: Төмөнкүгө коюу 00, автоматтык/кол которуштуруу режими болуп саналат. Төмөнкүгө коюу 01, автоматтык/кол менен которуу автоматтык абалга коюлган, дисплей экран жарык көрсөтөт, жана кабылдагычтагы автоматтык терминал чыгаруу жабык. Кол менен орнотулганда, автоматтык чыгаруу терминалы ажыратылган;
Ылдамдык чегинен четтөө: Чакан мотордун автоматтык кесүү ылдамдыгынын жогорку чеги чейин 00 чейин 200, демейки менен 60 жана тиешелүү дисплей 6.0 экранда; Дисплей маанисинин жогорку чеги = ылдамдык чегинин жылышуусу x 0.1;
Максималдуу хост: чоң мотор максималдуу ылдамдыгы, диапазону 10-100, По умолчанию 50;
Mbus жабдуулар (Милдеттүү): Чоң мотор жыштыгын өзгөрткүч моделин тандоо, диапазону 00-03, По умолчанию 03;
00- Шанхай Xielin 01-Fuji
02-INVT 03-Инновация (Чжунчэн, Робикон)
SBUS жабдыктары (Милдеттүү): Кичинекей мотор жыштыгын конвертер модел тандоо, диапазону 00-05, По умолчанию 03;
00- Шанхай Xielin 01-Fuji
02-INVT 03-Инновация (Чжунчэн, Робикон)
04-Анчуанда 05-да
7.2 Жыштыкты конверторду параметр
1. Буйрук булагын тандоо: Байланыш буйругу каналы
2. Негизги жыштыкты тандоо: Байланыш берилген
3. Берүү ылдамдыгы: 19200
4. Берилмелер форматы: Текшерүү жок, берилмелер форматы<8-N-1>
5. Жергиликтүү дарек: Сол жыштыкты конверттерди коюңуз 1, Туура жыштык конвертер 2, жана
үчүн чоң мотор жыштыгын өзгөрткүч 3
7.3 Алыстан башкаруу операциясынын көрсөтмөлөрү
1. Машинада кубат, Алыстан башкарууну күйгүзүңүз, алыстан башкаруунун арткы бөлүгүн киргизиңиз, коюу
алыстан башкаруу арткы параметрлери, негизинен чакан мотор жана чоң мотор жыштыгын орнотуу
конвертер моделдери: (Эгер машинаны өндүрүүчүсү буга чейин эле койсо, бул кадамды өткөрүп жибериңиз);
2. Жыштыкты конвертордун параметрлерин коюңуз (машина өндүрүүчүсү болсо, бул кадамды өткөрүп жибериңиз
аны мурунтан эле орноткон);
3. Алыстан башкарууну кол менен башкаруу режимине коюңуз, андан кийин машинаны жылдыруу үчүн пультту колдонуңуз
жумушчу позициясы;
4. Кол режиминде, чоң мотордун кесүү агымын IC жана чоң мотордун ылдамдыгын коюңуз
5. Автоматтык режимге которулуу жана Кичинекей мотор үчүн Cleting Speed Limit F маанисин коюңуз;
6. Автоматтык режимде, Чоң моторду алдыга жылдырыңыз, анан бур
кичинекей мотор алдыга же артка которуу, жана пульт автоматтык кесүү кирет
кесүүнү баштоо үчүн режим.
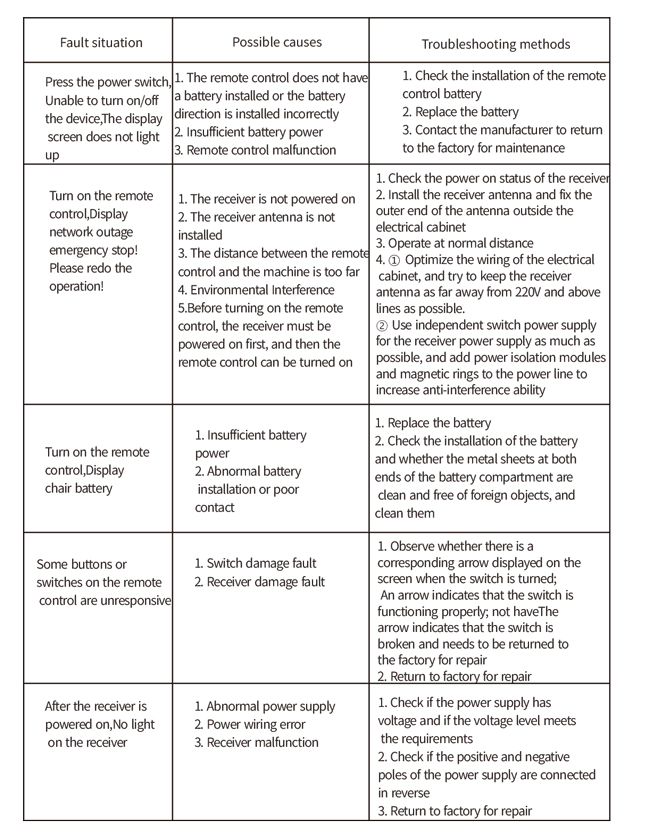
8.Продукцияны чечүү
9.Техникалык тейлөө
1. Сураныч, аны бөлмө температурасында кургак чөйрөдө колдонуп, анын тейлөө мөөнөтүн узартуу үчүн басым жасаңыз.
2. Кызматтын жашоосун узартуу үчүн жамгыр жана суу көбүкчөлөрү сыяктуу анормалдуу чөйрөлөрдө колдонуудан алыс болуңуз.
3. Батарейканын уятчасын жана металл Shrapel аймагын тазалаңыз.
4. Сураныч, кысылып калуу жана жыгылып калуу үчүн алыскы көзөмөлдөн алыс болуңуз.
5. Эгерде көптөн бери колдонулбаса, сураныч, батарейканы чыгарып, пультту жана батарейканы таза сактаңыз
жана коопсуз жер.
6.Сактоо жана транспорт учурунда, нымга жана шок каршылыгына көңүл буруу керек.
10. Коопсуздук маалыматы
1. Сураныч, колдонмону кылдаттык менен жасаардан мурун, адистин эмес эмес.
2. Каталарды болтурбоо үчүн батареяны өз убагында алмаштырыңыз
жетишсиз күч, Алыстан башкарууга алып келиши мүмкүн болгон алыстан башкарууга алып келиши мүмкүн.
3. Эгерде оңдоо талап кылынса, Өндүрүүчүгө кайрылыңыз. Эгерде зыян келтирүү менен зыян келтирсе, өндүрүүчүсү
кепилдик бербейт.