Колдойт 2 Ыңгайлаштырылган баскычтар, которгуч түрүндөгү io сигнал чыгаруу;
Колдойт -2 огу башкаруу;
3 деңгээлдеги чоңойтуу контролун колдойт;

1.Продукцияны киргизүү
2. Продукт функционалдык өзгөчөлүктөрү
| Операциялык чыңалуу жана зымсыз алыскы алыскы |
3V / 14ma
|
| Батарейка мүнөздөмөлөрү | 2 AA щелочтуу батарейкалар, өлчөмү 5 |
| Төмөн чыңалуудагы сигнализациясы зымсыз алыскы алыскы | < 2.3V |
| Алуучу электр менен жабдуу чыңалуу | Dc5v-24v / a |
| Кабыл алгыч авариялык токтотуу | AC125V-1A / DC30V-2A |
| Кабыл алуучуну иштетүү |
AC125V-1A / DC30V-2A
|
| Кабыл алуучунун ыңгайлуулугу | DC24V / 50mA |
| Алуучу огу тандоо | DC24V / 50mA |
| Кабыл алуучунун чоңойтуу | DC24V / 50mA |
| Колдук терминалдын берүү күчү |
15DBM
|
| Кабыл алуу сезимталдыгын алуу | -100DBM |
| Зымсыз байланыш жыштыгы | 433MHz Frequency Band |
| Зымсыз байланыш аралык | Барьер 40 Метр |
| Операция температурасы | -25℃ < X < 55℃ |
| Күздүн бийиктиги | 1 (метр) |
| Ыңгайлаштырылган баскычтын саны | 2 |


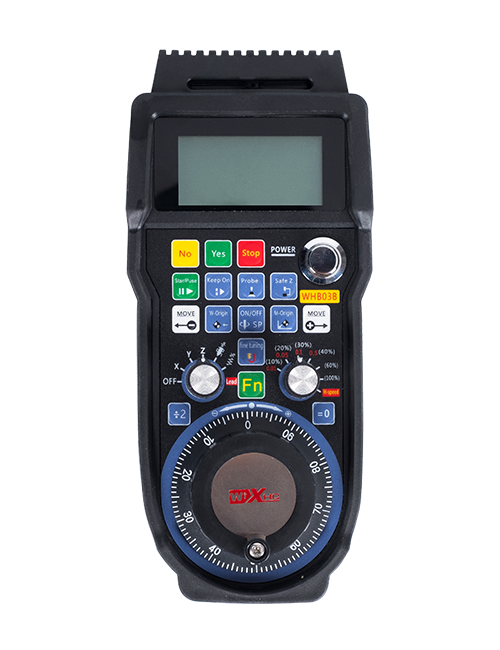
① Пульс коддоочу:
Иштоо баскычын басып, кармап туруңуз, Пульс коддосун чайкоо, импульс сигналы,машинанын огу кыймылын көзөмөлдөө.
② иштетүү баскычын иштетүү:
Эки жагындагы иштетүү баскычын басыңыз, жана эки топтому IOнин кабыл алуучуну иштетүүчүнү иштетет. Иштетүү IO output EONE чыгышын ажыратуу үчүн иштетүү баскычын басыңыз; Окуис тандоону чоңойтууга жана колду чайкап,Иштетүү баскычы натыйжалуу болуу үчүн өткөрүлүшү керек; Бул функцияны конфигурация программасы аркылуу жокко чыгарса болот.
③ Индикатор чырактары:
Сол тарабы: Жарыкта күч,Колду алсак, бюджетти өчүрүү үчүн огу колдонот, жана бул жарык бийликтен кийин калат;
Ортоңку жарык: Колдуңдуктан кандайдыр бир функцияны иштеп жатканда жаркыраган белги жарык, жана иштебей калганда, жарык бербейт;
Оң жагы жарык: Төмөн чыңалуудагы ойготкуч жарык, Батарея деңгээли төмөн,Бул жеңил жеген, Батареяны алмаштыруу керек.
④ өзгөчө кырдаалдарды токтотуу баскычы:
Тез жардам токтотуу баскычын басыңыз, жана эки өзгөчө кырдаалды токтотуучу IO кабыл алгычтагы чыгарылыштан ажыратылат, жана кол жуугучтун бардык функциялары жараксыз болот.
⑤ Чоңойтуу которгуч:
Чоңойтуу которгучту которуштуруу үчүн иштетүү баскычын басып, кармап туруңуз, көтөргүч коллегин көзөмөлгө алган чоңойтуу.
⑥ Axis тандоо (Кубат которуштуруу):
Axis Selection которгучун жандыруу үчүн иштетүү баскычын басып, кармап туруңуз, Кыймыл операторун колго түшүргөн операторго которсо болот. Бул которуштуруу каалаган огу менен өчүрүп, Handwelel кубатын күйгүзүңүз.
⑦ Ыңгайлаштырылган баскычы:
Эки бажы баскычтары, Ар бир IO output пунктуна алуучуга.

1. Алуучуга электр шкафына орнотуу арткы бетиндеги электр шкафына орнотуңуз, же ал кабыл алуучунун төрт бурчундагы бурама тешиктери аркылуу шкафка орнотуңуз.
2. Биздин алуучу зымдуу диаграммага кайрылыңыз жана аны сиздин сайттын жабдууларыңыз менен салыштырыңыз. Кабел аркылуу жабдууларды кабыл алуучка туташтырыңыз.
3.Алуучу талаптагыдан кийин оңдолгон, Алуучу менен жабдылган антенна туташууга тийиш, жана антеннанын сырткы аягы электр шкафтын атынан орнотуу керек. Мыкты сигнал эффектинин эң мыкты натыйжасы үчүн аны электр кабинетинин үстүнө коюу сунушталат. Антеннаны колонналасыз калтырууга тыюу салынат же электр шкафтын ичинде аны жайгаштырууга тыюу салынат, Бул сигналга туура келбей калышы мүмкүн.
4. Акыры, Колдун кубаттуулугун күйгүзүү, жана сиз машинаны алыстан иштетсеңиз болот.
6.2 Алуучуну орнотуу өлчөмдөрү

6.3 Кабыл алуучунун зымга шилтеме диаграммасы

7. Продукт операциялык көрсөтмөлөр
1. Машинада жана кабыл алуучунун кубаты. Кабыл алуучунун жумушчу көрсөткүчүнүн жаркыраган жарк этет. Батареяны зымсыз электрондук туткага орнотуңуз, батарейканын капкагын камсыз кылуу, жана
Зымсыз электрондук колонгончунун кубаттуулугун күйгүзүңүз. Батареянын батарейканын деңгээлиндеги индикатор жарык.
2. Координат огу тандаңыз: Иштоо баскычын басып, кармап туруңуз, огу селекциялык которуштурууну котор, жана сиз иштей турган окту тандаңыз.
3. Чоңойууну тандаңыз: Иштоо баскычын басып, кармап туруңуз, чоңойтуу которгучту котор,жана каалаган чоңойтуу деңгээлин тандаңыз.
4. Axis жылдыруу: Иштоо баскычын басып, кармап туруңуз, огу тандоо которуштурууну тандаңыз, Чоңойтуу которгучты тандаңыз, андан кийин импульстук коддорду айлантыңыз. Жылуу үчүн сааттын жебесин айлантыңыз
Терс охсаны жылдыруу үчүн позитивдүү огу жана саатка каршы.
5. Өзгөчөлөштүрүлгөн баскычты басып, кармап туруңуз, жана алгычтын IOнин жыйынтыгы күйгүзүлөт. Баскычты бошот, жана жыйынтык өчүрүлөт.
6. Тез жардам токтотуу баскычын басыңыз, Тийиштүү тез жардам токтотуу IO кабыл алгычтын жыйынтыгы ажыратылат, Колдун иштеши өчүрүлөт,Тез жардам токтотуу баскычын бошотуңуз, тез жардам токтотуу IO натыйжасы жабылат, жана Handwel Fection калыбына келтирилет.
7. Эгер кол жуугуч бир нече убакытка иштебесе, Бул электр энергиясын керектөөнү азайтуу үчүн ал автоматтык түрдө уйку режимин киргизет. Ал кайрадан колдонулганда, Жандандыруу баскычын басуу менен колду жандырса болот.
8. Эгерде кол жуугуч узак убакытка колдонулбаса, Кол жуугуч валын өчүрүүгө сунушталат, Колдуңдукту өчүрүп коюңуз, батарейканын иштөө мөөнөтүн узартуу.
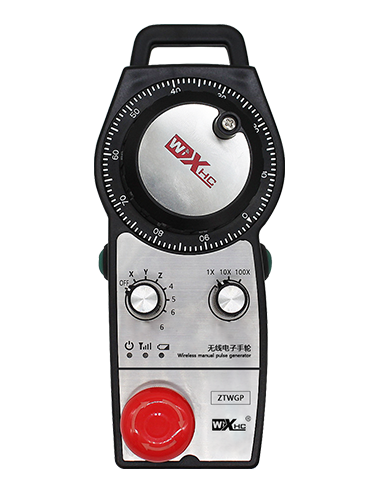
8. Продукт моделинин сүрөттөлүшү

① :Ztwgp сырткы көрүнүш стилин билдирет
②:Pulse Output параметрлери:
01: Импульстун чыгарылышынын сигнал экендигин көрсөтөт, Б; Pulse Voltage 5V; Пульс саны 100ppr.
02:Pulse чыгарылышынын сигналдарын көрсөтүү a жана b; Pulse Voltage 12V; Пульс саны 100ppr.
03:Пульстин чыгарылышынын сигналдарын көрсөтүү a, Б, A -, Б -; Pulse Voltage 5V; Пульс саны 100ppr.
04:NPN ачык ачык схеманын төмөндүгүн көрсөтөт, Пульстун чыгуучу сигналдары A жана B;Импульстун саны 100ppr.
05:Жогорку деңгээлдеги PNP булагын чыгарууну көрсөтөт, Пульстун чыгуучу сигналдары A жана B; Импульстун саны 100ppr.
③:Огу селекциялык которгучтарынын санын билдирет, 2 билдирет 2 AXES.
④:Огу тандоонун сигналынын түрүн билдирет, A Пойнт-Пойнт, жана В коддолгон чыгарылган сигналды билдирет.
⑤:Көбөйтүү сигналынын түрүн билдирет, A Пойнт-Пойнт, жана В коддолгон чыгарылган сигналды билдирет.
⑥:Бажы баскычтарынын санын билдирет, 2 билдирет 2 бажы баскычтары.
⑦:Тутумду туташтыргычка жеткирүү, жана 05 5В электр менен жабдуу.
⑧:L сол тилкеди билдирет (сол бычагы ээси), жана r оң тилкени билдирет (оң бычак кармагыч).
9.Продукцияны туура эмес чечүү

1. Сураныч, аны бөлмө температурасында кургак чөйрөдө колдонуп, анын тейлөө мөөнөтүн узартуу үчүн басым жасаңыз.
2. Кызматтын жашоосун узартуу үчүн жамгыр жана суу көбүкчөлөрү сыяктуу анормалдуу чөйрөлөрдө колдонуудан алыс болуңуз.
3. Сураныч, тейлөө мөөнөтүн узартуу үчүн, кол жуугучтун көрүнүшү.
4. Сураныч, сыгуудан алыс болуңуз, жыгылуу, бүктөө, жана башкалар. Кол жуугучтун же тактык каталарынын ичинде тактык компоненттерине зыян келтирбөө.
5. Эгерде көптөн бери колдонулбаса, Таза жана коопсуз жерде кол жуугучту сактаңыз. Сактоо жана транспорт учурунда, нымга жана шок каршылыгына көңүл буруу керек.
11. Коопсуздук маалыматы
1. Сураныч, колдонмону кылдаттык менен жасаардан мурун, адистин эмес эмес.
2. Батарейканы батарейканын деңгээли өтө төмөн, батарейканын деңгээли өтө төмөн болгондуктан, батарейканын деңгээли өтө төмөн болгондуктан, батарейканын деңгээли өтө төмөн болгондуктан, ал батарейканын деңгээли өтө эле төмөн эмес.
3. Эгерде оңдоо талап кылынса, Өндүрүүчүгө кайрылыңыз. Эгерде зыян келтирүү менен зыян келтирсе, Өндүрүүчү кепилдик бербейт