Appoġġ 4 buttuni tad-dwana, Swiċċ is-sinjal IO, Sinjal tal-ħruġ għas-sistema permezz tal-protokoll IO-Link;
Tappoġġja l-buttuna tal-moviment malajr + u buttuna -, Agħfas u żomm il-buttuna biex tissostitwixxi l-handwheel biex tmexxi l-magna;
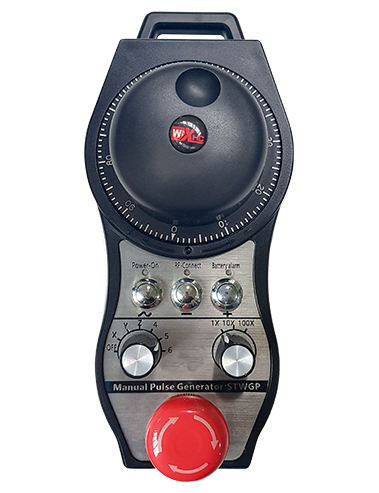
FANUC iddedikat bla fili elettronika handwheel
Deskrizzjoni

1.Introduzzjoni tal-Prodott
Handwheel elettroniku mingħajr fili jintuża għal gwida manwali, pożizzjonament, allinjament tal-għodda,u operazzjonijiet oħra fuq għodod tal-magni CNC. Dan il-prodott jadotta teknoloġija ta 'trasmissjoni mingħajr fili, telimina l-konnessjoni tradizzjonali tal-wajer tar-rebbiegħa, Tnaqqis tal-fallimenti tat-tagħmir ikkawżati minn kejbils, jeliminaw l-iżvantaġġi tat-tkaxkir tal-kejbil u t-tbajja taż-żejt, u tagħmel l-operazzjoni aktar konvenjenti. Dan il-mudell ta 'handwheel elettroniku mingħajr fili huwa handwheel iddedikat għas-sistema Fanuc. Il-koordinati tas-sistema Fanuc jintwerew f'ħin reali fuq l-iskrin tar-rota tal-idejn permezz tal-protokoll IO-LINK, u l-għażla tal-assi,ingrandiment, u s-sinjali tal-buttuni huma konnessi direttament mas-sistema permezz tal-protokoll IO-LINK, tnaqqis tal-wajers.
2. Karatteristiċi tal-prodott
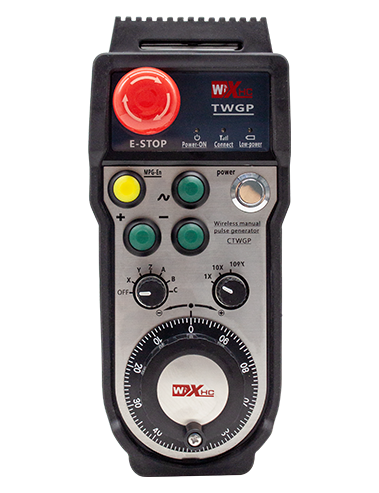
1. Adotta 433MHz Teknoloġija tal-Komunikazzjoni Wireless, Id-distanza ta 'operazzjoni bla fili hija 40 miters;
2. Tadotta funzjoni awtomatika tal-qbiż tal-frekwenza, użu 32 settijiet ta 'kontrolluri remoti mingħajr fili fl-istess ħin mingħajr ma jaffettwaw lil xulxin;
3. Tappoġġja l-buttuna ta 'waqfien ta' emerġenza, swiċċ output tas-sinjal io, konness mas-sistema permezz ta 'wajers IO;
4. Appoġġ 4 buttuni tad-dwana, Swiċċ is-sinjal IO, Sinjal tal-ħruġ għas-sistema permezz tal-protokoll IO-Link;
5. Tappoġġja l-buttuna tal-moviment malajr + u buttuna -, Agħfas u żomm il-buttuna biex tissostitwixxi l-handwheel biex tmexxi l-magna;
6. Appoġġ għall-kontroll tal-assi 6, Swiċċ is-sinjal IO, Sinjal tal-ħruġ għas-sistema permezz tal-protokoll IO-Link;
7. Appoġġ 1X,10x, 100X kontroll . Swiċċ ta 'appoġġ l0 sinjal, u joħroġ sinjali lis-sistema permezz tal-protokoll IO-LINK;
8. Appoġġ funzjoni tal-buttuna ta 'attivazzjoni, qabbad mas-sistema permezz ta 'wajers IO, u l-encoder tal-kontroll jippermettu fl-istess ħin;
9. Appoġġ encoder tal-polz, 100 impulsi/ċirku, aċċess għas-sistema MPG handwheel interface billi joħroġ sinjal ta 'kodifikazzjoni AB;
3.Speċifikazzjonijiet tal-Prodott

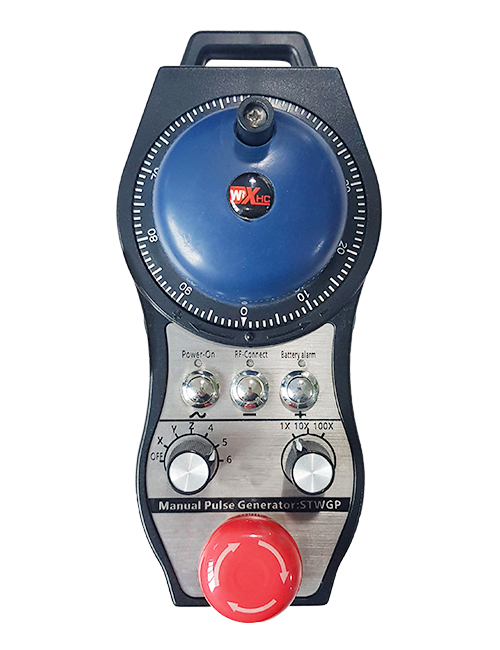
4.Karatteristiċi tal-Prodott

Noti:
① Buttuna ta 'waqfien ta' emerġenza:
Agħfas il-buttuna ta 'waqfien ta' emerġenza, iż-żewġ outputs IO ta 'waqfien ta' emerġenza fuq ir-riċevitur huma skonnettjati, u l-funzjonijiet kollha tar-rota tal-idejn huma invalidi.Wara li l-waqfien ta 'emerġenza jiġi rilaxxat, l-output IO ta 'waqfien ta' emerġenza fuq ir-riċevitur huwa magħluq u l-funzjonijiet kollha tar-rota tal-idejn huma restawrati.
②Display tal-iskrin:

③Butuni Personalizzati:
4 buttuni tad-dwana, kull buttuna tikkorrispondi għal punt ta 'output IO fuq ir-riċevitur, imqabbad mas-sistema permezz ta' IOLINK. Ġeneralment, il-buttuna ~ hija ssettjata bħala buttuna ta 'veloċità għolja.
④Swiċċ tal-għażla tal-assi:
Il-bidla tas-swiċċ tal-għażla tal-assi tista 'taqleb l-assi li jiċċaqlaq ikkontrollat mill-handwheel.
⑤ Buttuni ta 'shortcut:
Agħfas il-buttuna "+" biex tmexxi l-magna 'l quddiem, u agħfas il-buttuna short cut "-" biex tmexxi l-magna b'mod negattiv. Dan jista 'jissostitwixxi t-tidwir tar-rota tal-idejn biex iċċaqlaq il-magna.
⑥Enable buttuna:
Agħfas u żomm kwalunkwe waħda mill-buttuni ta' attivazzjoni fuq iż-żewġ naħat u ħawwad l-encoder tal-polz biex tkun effettiva. U ż-żewġ gruppi ta 'enable IO outputs fuq ir-riċevitur huma mixgħula. Itlaq il-buttuna ta 'attivazzjoni u l-output ta' IO ta 'attivazzjoni jiġi skonnettjat.
⑦Swiċċ tal-proporzjon:
Li taqleb is-swiċċ tal-ingrandiment jista 'jaqleb l-ingrandiment tal-kontroll tal-handwheel.
⑧Encoder tal-impuls:
Agħfas u żomm il-buttuna enable u ħawwad l-encoder tal-polz biex tibgħat polz
sinjal biex jikkontrolla l-moviment tal-assi tal-magna.
⑨Swiċċ tal-enerġija:
Buttuna tal-qawwa tar-rota tal-idejn.
5.Dijagramma tal-Aċċessorji tal-Prodott

6.Gwida għall-Installazzjoni tal-Prodott
6.1 Passi ta' Installazzjoni tal-Prodott
1. Installa r-riċevitur fil-kabinett elettriku permezz tat-toqob tal-kamin fl-erba 'kantunieri.
2.Irreferi għad-dijagramma tal-wajers tar-riċevitur tagħna, qabbilha mat-tagħmir tiegħek fuq il-post, u qabbad
it-tagħmir għar-riċevitur permezz ta' kejbils.
3. Wara li r-riċevitur jiġi ffissat, L-antenna mgħammra mar-riċevitur għandha tkun konnessa,
u t-tarf ta 'barra ta' l-antenna għandu jiġi installat jew imqiegħed barra l-kabinett elettriku.
Huwa rrakkomandat li tpoġġiha fuq il-parti ta 'fuq tal-kabinett elettriku għall-aħjar effett tas-sinjal. Huwa
huwa pprojbit li tħalli l-antenna mhux imqabbda jew tpoġġi l-antenna ġewwa l-kabinett elettriku,
li jista 'jikkawża li s-sinjal ma jkunx jista' jintuża.
4.Fl-aħħarnett, Ixgħel is-swiċċ tal-qawwa tal-handwheel u tista 'tħaddem il-magna minn
kontroll mill-bogħod bl-idejn.
6.2 Dimensjonijiet ta 'installazzjoni tar-riċevitur

6.3 Dijagramma ta 'referenza tal-wajers tar-riċevitur

7. Manutenzjoni u kura
1. Jekk jogħġbok użah f'ambjent niexef b'temperatura u pressjoni normali biex testendi l-
ħajja tas-servizz;
2. Jekk jogħġbok evita li tużah f'ambjenti anormali bħax-xita u l-bżieżaq tal-ilma biex testendi
il-ħajja tas-servizz;
3. Jekk jogħġbok żomm id-dehra tar-rota tal-idejn nadifa biex testendi l-ħajja tas-servizz;
4. Jekk jogħġbok evita li tagħfas, jaqa ', bumping, eċċ. biex tiġi evitata ħsara lill-partijiet ta 'preċiżjoni
ġewwa l-handwheel jew tikkawża żbalji ta 'preċiżjoni;
5. Jekk ma jintużax għal żmien twil, Jekk jogħġbok aħżen il-handwheel f'post nadif u sigur;
6. Oqgħod attent għall-umdità u x-xokk waqt il-ħażna u t-trasport.
8. Informazzjoni dwar is-Sigurtà
1. Jekk jogħġbok aqra l-istruzzjonijiet bir-reqqa qabel l-użu. Dawk li mhumiex professjonisti huma pprojbiti
joperaw.
2. Jekk jogħġbok ibdel il-batterija fil-ħin meta l-batterija tkun baxxa wisq biex tevita żbalji kkawżati minn
qawwa insuffiċjenti li tikkawża li r-rota tal-idejn ma tkunx tista' topera.
3. Jekk hija meħtieġa t-tiswija, Jekk jogħġbok ikkuntattja lill-manifattur. Jekk il-ħsara hija kkawżata minn awto-tiswija,
Il-manifattur ma jipprovdix garanzija.
-500x650.png)