Cov lus piav qhia
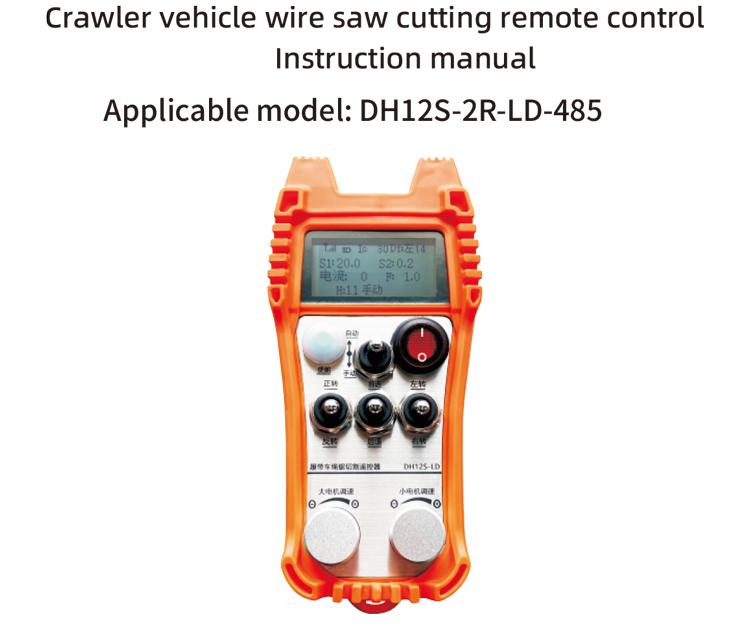
1. Khoom taw qhia
The crawler vehicle rope saw automatic cutting remote control is suitable for crawler rope saw cutting machines. It adopts 485ModbusRTU protocol to control the speed start and front and rear left and right direction control of the left and right crawler inverters, as well as the large motor frequency conversion RTU protocol to control the speed start and front and rear left and right direction control of the left and right crawler inverters, and the large motor frequency conversion over-current analysis and comparison, automatically adjust the left and right crawler speeds in real time to achieve automatic cutting function.
2. Product features
1. siv 433MHZ wireless kev sib txuas lus thev naus laus zis, Wireless kev khiav hauj lwm nrug yog 100 meters.
2. Adopt automatic frequency hopping function, use 32 sets of wireless remote controllers at the same time, without affecting each other.
3. Support all inverters with 485-Modbus RTU protocol. The inverter brands that have been adapted include:Shanghai Xielin, Fuji, Inovance, Zhongchen, INVT, Anchuanda. If the brand is not ada please contact us for customization.
4. Support large motor inverter start, speed regulation, and current reading.
5. Support left and right crawler inverter speed regulation, start, front and back left and right control.
6. Support left and right crawler inverter straight line correction to keep the machine moving in a straight line.
7. Support rope saw automatic cutting function, automatically adjust the left and right crawler speed in real time according to the large motor current information.
8. At the same time, it is compatible with direct IO output to control the start and stop of the motor, and analog voltage output to control the motor speed.
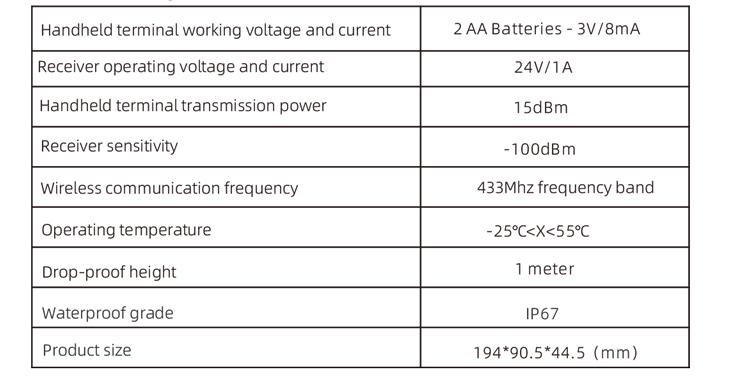
3. Cov khoom lag luam specifications
4. Khoom muaj nuj nqi taw qhia

Cov ntawv ceeb toom:
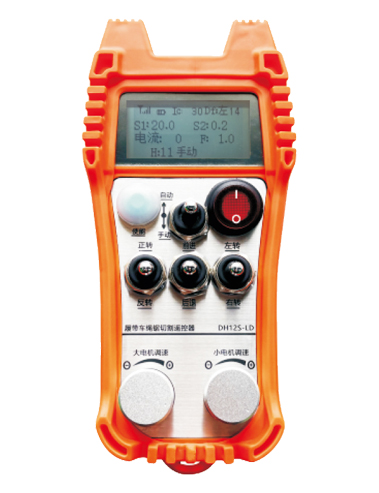
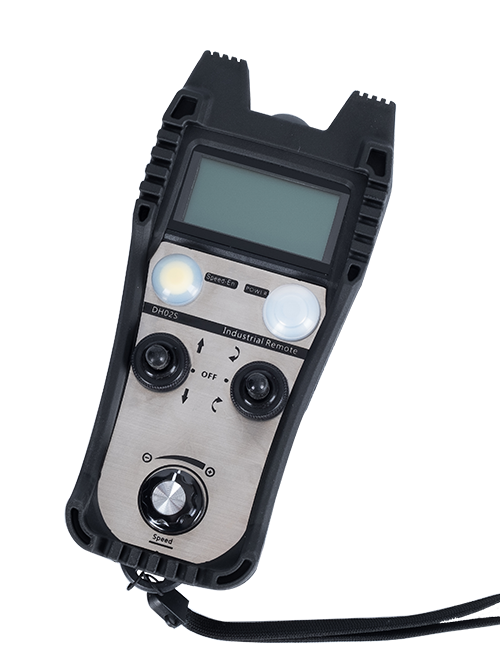
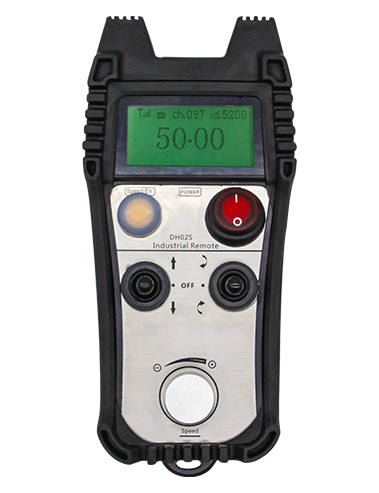
①Screen display:

②Mode switch:
Using a 2-level switch, it is possible to switch between automatic and manual modes, and the corresponding mode will be displayed on the screen for switching.
③ Enable:
Combination buttons, Qee qhov kev ua haujlwm yuav tsum tau nias thiab tuav lub pob kom ua haujlwm., Thov saib cov lus qhia rau txhua qhov kev hloov pauv kom paub meej ntxiv..
(4) Lub cev muaj zog loj hloov.:
Siv 3-ceev pib dua hloov., Rub qhov hloov no tswj kev sib hloov rau pem hauv ntej thiab rov qab ntawm lub cev muaj zog loj.. After releasing it, Lub xeev yuav raug tswj hwm., Cov cim sib xws yuav tshwm sim ntawm lub vijtsam.. Tus xub '↑' qhia txog kev tig mus rau pem hauv ntej., Tus xub '↓' qhia txog kev tig rov qab..
(5) Lub cev muaj zog me me rau pem hauv ntej / rov qab hloov.:
Siv 3-ceev nws tus kheej xauv hloov., Rub qhov hloov no tswj lub cev muaj zog me me kom txav mus rau pem hauv ntej thiab rov qab.. Cov zaub sib xws yuav tshwm rau ntawm lub vijtsam., Tus xub '↑' qhia rau pem hauv ntej, thiab tus xub '↓' qhia rov qab..
(6) Cov chaw taws teeb tswj fais fab hloov.:
Tig rau cov chaw taws teeb tswj zaub screen..
⑦ small motor turning switch:
Siv 3-ceev pib dua hloov., when manually operated, the small motor can be controlled to turn left or right. Once released, the remote control will automatically stop this action.When in the forward state, turn this switch and the corresponding display will appear on the screen.The + arrow indicates left turn, and the – arrow indicates right turn.When in reverse mode, turn this switch and the corresponding display will appear on the screen.The + arrow indicates left turn, and the – arrow indicates right turn.Press and hold the enable button, then turn this switch to perform a stationary turning function, making the turn faster.
⑧ Large motor speed regulation:
Using a multi turn encoder knob, rotate the knob to adjust the speed S1 of the large motor For every 1 grid rotation, the speed value of the large motor changes by approximately 0.2 units, and rapid rotation can quickly modify the speed value of the large motor.
9 Small motor speed regulation (linear correction):To use the multi turn encoder knob, in manual mode, for every 1 turn of the knob, the speed value of the small motor changes by approximately 0.1 units. Fast rotation can quickly modify the speed value of the small motor.
In automatic mode, press the enable button and rotate 1 grid each time. The speed limit value F of the small motor changes by approximately 0.1 units. Rapid rotation can quickly modify the speed limit value of the small motor.Press the enable button, turn the knob to the right, and the straight line correction display shows D f: left. Each rotation of the knob increases by 1 unit; Turn left knob, straight line correction display: Df: right. Each rotation of the knob increases by 1 unit, and each correction unit corresponds to a motor speed control AVI voltage of about 0.02 V.
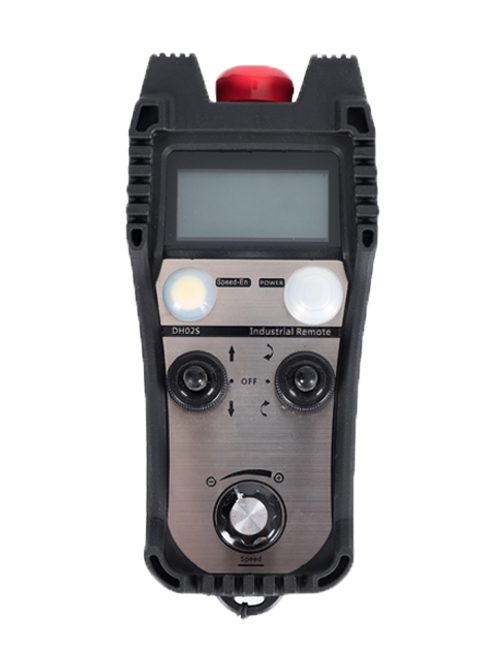
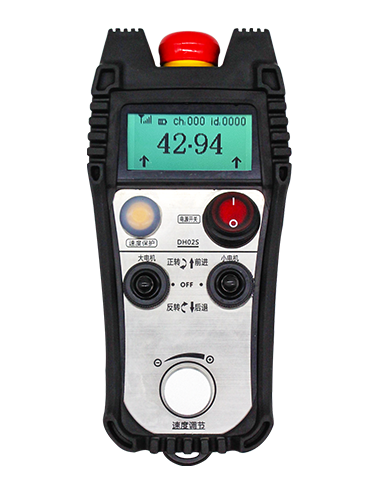
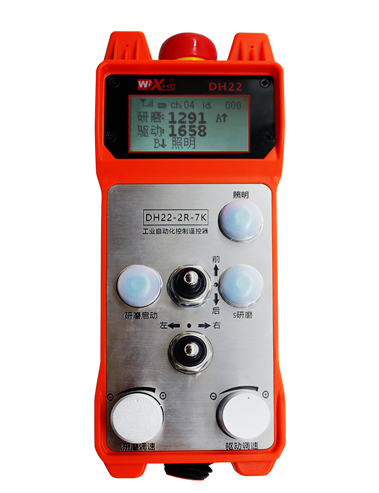
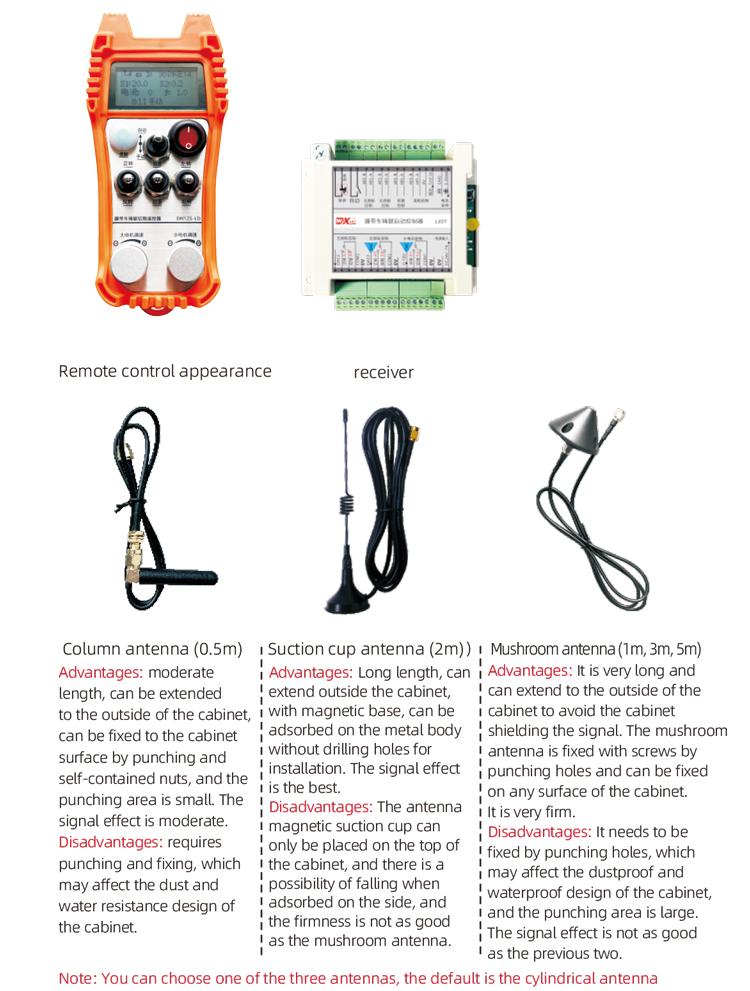
5. Product accessory diagram
6. Product Installation Guide
6.1 Cov kauj ruam ntawm cov khoom lag luam
1. Install the receiver in the electrical cabinet through the buckle on the back, or install it in the electrical cabinet through the screw holes at the four corners of the receiver.
2. Xa mus rau peb daim duab receiver xaim hluav taws xob, compare your on-site equipment, and connect the equipment to the receiver through wires.
3. Tom qab lub receiver yog ruaj ntseg, lub kav hlau txais xov uas los nrog lub receiver yuav tsum tau txuas nrog, thiab sab nraud kawg ntawm lub kav hlau txais xov yuav tsum tau ntsia los yog positioned sab nraum lub txee hluav taws xob. It is recommended to place it on the top of the electrical cabinet for the best signal effect. It is forbidden to leave the antenna unconnected or place the antenna inside the electrical cabinet, which may cause poor signal and unusable.
4. Finally, install the battery in the remote control, tighten the battery cover, and then turn on the power switch of the remote control. After the remote control display shows the normal working interface, you can perform remote control operation.
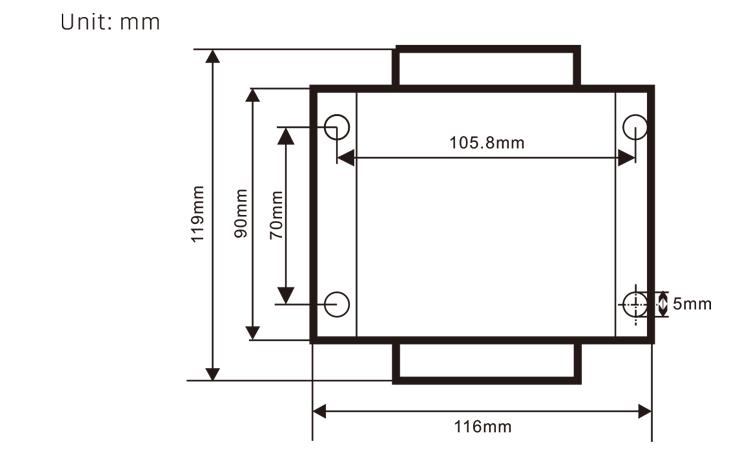
6.2 Receiver installation dimensions
6.3 Receiver Wiring Reference Diagram

7. Product operation instructions
7.1 Remote Control Parameter Settings
How to enter the background parameters of the remote controller: turn the mode switch to manual mode, adjust the speed of the small motor to 25, or 0, 10, 20, 40, 50, and turn the forward switch of the large motor upwards 3 times and downwards 3 times;
Use the “Small Motor Speed Control” knob to turn the page, press Enable and turn the small motor speed control knob to modify the parameters; after modification, turn the page to the end, select Save and Exit, and press the Enable button to exit the menu;
The parameters are as follows:Maximum current: large motor current feedback value range, setting range 15-200A, default 60;
Speed control parameters: automatic mode small motor automatic acceleration speed, the smaller the faster, setting range 200-1500, default 1000;
Deceleration parameter: Set the upper limit of the motor speed change allowed. When the current changes beyond this value, it will decelerate. The smaller it is, the faster the left and right motors will decelerate. The range is 05-12, and the default is 06;
Acceleration a1: The larger the value, the faster the motor speed increases, range 00-06,default 01; Deceleration a2: The larger the value, the faster the motor speed decreases, range 00-06, default 02;
Enable speed regulation: Whether the small motor speed regulation needs to be enabled, 00 is not enabled, 01 is enabled, default 01;
Startup self-locking: Whether the large motor will automatically keep self-locking after the forward and reverse switch is released, 00 tsis raug tswj hwm, 01 yog tswj hwm, default 01;
Siab tshaj plaws mus ncig: Siab tshaj plaws ceev ntawm sab laug thiab txoj cai lub cev muaj zog, range 10-100, default 50;
Txiav tam sim no: Qhov siab tshaj plaws txiav tam sim no, qhov screen qhia IC tus nqi, range 15-160, default 30, qhov screen qhia IC: 30. Qhov kev txwv sab sauv ntawm no parameter = qhov siab tshaj plaws tam sim no × 80%;
Lub neej ntawd ceev txwv: Lub neej ntawd tsis siv neeg txiav ceev ntawm lub cev muaj zog me me thaum pib, range 00-100, default 10, qhov screen qhia F1.0, qhov no parameter tsuas yog raug thaum qhov siab tshaj plaws mus txawv tebchaws yog teem rau 50.
Wireless channel: Lub neej ntawd yog 10. Thaum lub teeb liab tswj cov chaw taws teeb tsis ruaj khov lossis muaj teeb liab cuam tshuam ntawm qhov chaw, koj tuaj yeem hloov qhov parameter no los hloov cov channel kom tsis txhob muaj kev cuam tshuam;
Kev txwv ceev offset: Qhov kev txwv sab sauv ntawm lub cev muaj zog me me tsis siv neeg txiav ceev,range 00-200, default 60, qhov screen qhia 6.0; Zaub tus nqi sab sauv txwv = ceev txwv offset × 0.1;
Siab tshaj plaws tus tswv tsev: Siab tshaj plaws ceev ntawm lub cev muaj zog loj, range 10-100, default 50;
Mbus ntaus ntawv ( yuav tsum tau ): large motor inverter model selection, range 00-03, default 03;
00- Shanghai Xielin 01 Fuji
02- INVT 03 Inovance(Zhongchen, Robicon)
SBUS equipment (yuav tsum tau): Small motor frequency converter model selection, range 00-05, default 03;
00- Shanghai Xielin 01 Fuji
02- INVT 03 Inovance(Zhongchen, Robicon)
04-Anchuanda 05-None
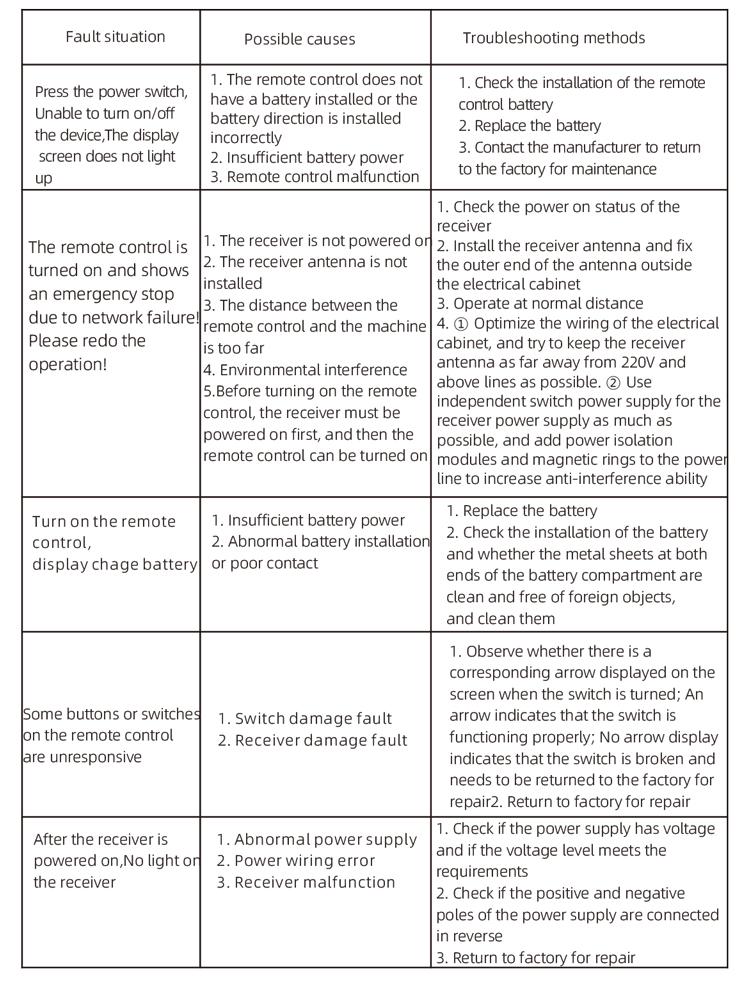
8. Product troubleshooting
7.2 Parameter setting of frequency converter
1. Command source selection: Communication command channel
2. Main frequency source selection: communication given
3. Baud rate: 19200
4. Data format: No verification, data format<8-N-1>
5. Local address: Set the left frequency converter to 1, the right frequency converter to 2, and the large motor frequency converter to 3
7.3 Remote Control Operation Instructions
1. Power on the machine, turn on the remote control, enter the remote control background, set the remote control background parameters, mainlyIt is to set the models of small and large motor frequency converters (skip this step if the machine manufacturer has already set them);
2. Set the parameters of the frequency converter (Hla cov kauj ruam no yog tias lub tshuab chaw tsim tshuaj paus twb tau teeb tsa nws);
3. Teeb tsa cov chaw taws teeb tswj mus rau phau ntawv hom, Tom qab ntawd siv cov chaw taws teeb tswj kom txav lub tshuab mus rau txoj haujlwm ua haujlwm;
4. Hauv phau ntawv hom, Teem tus nqi IC rau lub cev muaj zog loj txiav tam sim no thiab nws qhov nrawm;
5. Hloov mus rau hom tsis siv neeg thiab teeb tsa qhov kev txiav ceev ceev F tus nqi rau lub cev muaj zog me me;
6. In automatic mode, Tig lub cev muaj zog loj hloov mus rau pem hauv ntej los pib nws, Tom qab ntawd tig lub cev muaj zog me me hloov mus rau pem hauv ntej lossis rov qab. Cov chaw taws teeb tswj nkag mus rau hauv hom tsis siv neeg txiav thiab pib txiav.
9.Kev saib xyuas
1. Please use it in a dry environment at room temperature and pressure to extend its service life.
2. Please avoid using in abnormal environments such as rain and water bubbles to extend the service life.
3. Khaws lub roj teeb thiab thaj chaw hlau shrapnel kom huv.
4. Tsis txhob ua kev puas tsuaj rau cov chaw taws teeb los ntawm nyem lossis poob nws.
5. Yog tias cov chaw taws teeb tsis siv ntev, please remove the battery and store the remote control and battery in a clean and safe place.
6.During storage and transportation, attention should be paid to moisture and shock resistance.
10. Safety Information
1. Please read the instructions carefully before use and prohibit non professionals from operating.
2. Please replace the battery in a timely manner when the battery is too low to avoid errors caused by insufficient power, which may result in the remote control being unable to operate.
3. If repair is required, please contact the manufacturer. If the damage is caused by self repair, the manufacturer will not provide warranty