समर्थन 2 अनुकूल बटनहरू, स्विच-प्रकार आईओ स sign ्केत आउटपुटको साथ;
समर्थन -2 अक्ष नियन्त्रण;
--स्तर म्याट म्याटमेन्ट नियन्त्रण समर्थन गर्दछ;

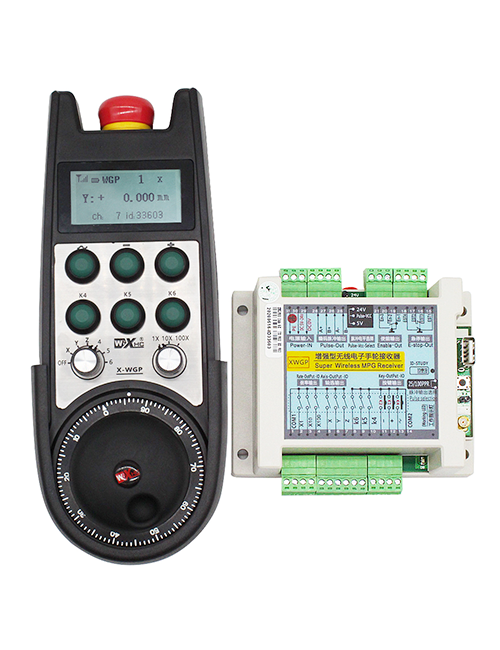
1.उत्पादन परिचय
2. उत्पाद कार्यात्मक सुविधाहरू
| अपरेटिङ भोल्टेज र ताररहित रिमोटको वर्तमान |
3V/14MA
|
| ब्याट्री विशिष्टताहरू | 2 AA क्षारीय ब्याट्रीहरू, आकार 5 |
| वायरलेस रिमोट को कम भोल्टेज अलार्म दायरा | < 2.3V |
| रिसीभर पावर सप्लाई भोल्टेज | DC5V-24V/A |
| रिसीभर आपतकालीन स्टप आउटपुट लोड दायरा | AC125V-1A/DC30V-2A |
| रिसीभरले आउटपुट लोड दायरा सक्षम पार्छ |
AC125V-1A/DC30V-2A
|
| रिसीभर अनुकूलन बटन आउटपुट लोड दायरा | DC24V/50mA |
| रिसीभर अक्ष चयन आउटपुट लोड दायरा | DC24V/50mA |
| रिसीभर म्याग्निफिकेसन आउटपुट लोड दायरा | DC24V/50mA |
| ह्यान्डहेल्ड टर्मिनलको प्रसारण शक्ति |
15dBm
|
| रिसीभर प्राप्त गर्ने संवेदनशीलता | -100dBm |
| ताररहित संचार आवृत्ति | 433मेगाहर्ट्ज फ्रिक्वेन्सी ब्यान्ड |
| ताररहित संचार दूरी | को बाधा मुक्त दूरी 40 मिटर |
| सञ्चालन तापमान | -25℃ < X < 55℃ |
| पतन विरोधी उचाइ | 1 (मीटर) |
| अनुकूलन बटन मात्रा | 2 |


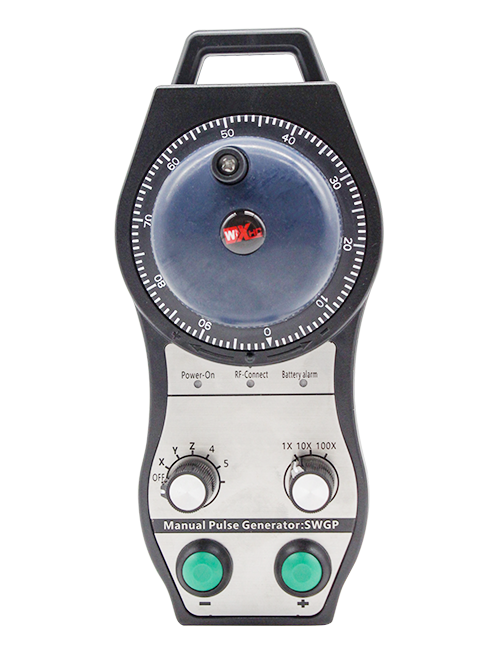
① पल्स इन्कोडर:
सक्षम बटन थिच्नुहोस् र होल्ड गर्नुहोस्, पल्स एन्कोडर हल्लाउनुहोस्, एक पल्स संकेत उत्सर्जन,र मेसिन अक्ष को आन्दोलन नियन्त्रण.
② सक्षम बटन:
दुबै छेउमा सक्षम बटन थिच्नुहोस्, र रिसीभरमा सक्षम IO आउटपुटहरूको दुई सेटहरूले सञ्चालन गर्नेछ. सक्षम IO आउटपुट विच्छेदन गर्न सक्षम बटन जारी गर्नुहोस्; र अक्ष चयन म्याग्निफिकेसन स्विच गर्नु र ह्यान्डव्हील हल्लाउनु अघि,सक्षम बटन प्रभावकारी हुन तल समात्न आवश्यक छ; यो प्रकार्य कन्फिगरेसन सफ्टवेयर मार्फत रद्द गर्न सकिन्छ.
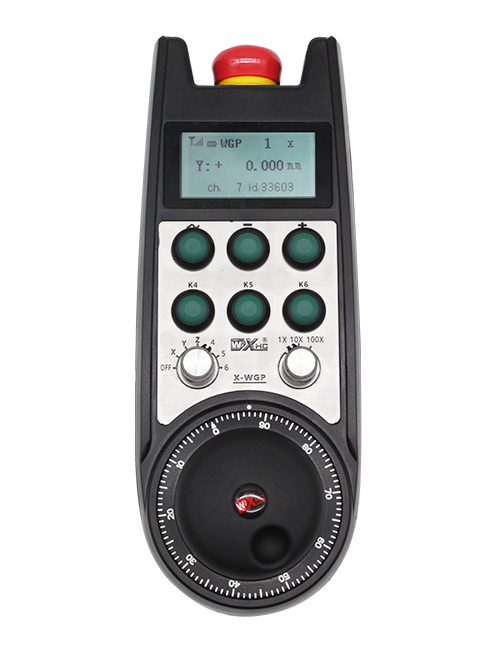
③ सूचक बत्तीहरू:
बायाँ साइड बत्ती: प्रकाशमा शक्ति,ह्यान्डव्हीलले पावर अनको लागि अफ चयन गर्न अक्ष प्रयोग गर्दछ, र यो लाइट पावर अन गरे पछि पनि रहन्छ;
मध्य प्रकाश: ह्यान्डव्हीलको कुनै पनि प्रकार्य सञ्चालन गर्दा उज्यालो हुने सिग्नल लाइट, र कुनै अपरेशन नभएको बेला उज्यालो हुँदैन;
दायाँ छेउको बत्ती: कम भोल्टेज अलार्म प्रकाश, कम ब्याट्री स्तर,यो लाइट फ्ल्यास वा रहन्छ, ब्याट्री बदल्न आवश्यक छ.
④ आपतकालीन रोक बटन:
आपतकालीन स्टप बटन थिच्नुहोस्, र रिसीभरमा आपतकालीन स्टप IO आउटपुटहरूको दुई सेटहरू विच्छेद हुनेछन्, र ह्यान्डव्हीलका सबै प्रकार्यहरू अमान्य हुनेछन्.
⑤ म्याग्निफिकेसन स्विच:
म्याग्निफिकेसन स्विच स्विच गर्न सक्षम बटन थिचिराख्नुहोस्, जसले ह्यान्डव्हीलद्वारा नियन्त्रित म्याग्निफिकेसन स्विच गर्न सक्छ.
⑥ अक्ष चयन स्विच (पावर स्विच):
अक्ष चयन स्विच स्विच गर्न सक्षम बटन थिच्नुहोस् र होल्ड गर्नुहोस्, जसले ह्यान्डव्हील द्वारा नियन्त्रित आन्दोलन अक्ष स्विच गर्न सक्छ. यो स्विचलाई अफबाट कुनै पनि अक्षमा स्विच गर्नुहोस् र ह्यान्डव्हील पावर अन गर्नुहोस्.
⑦ आफू अनुकूल बटन:
दुई अनुकूलन बटन, प्रत्येक रिसीभरमा IO आउटपुट बिन्दुसँग सम्बन्धित.

1. पछाडिको बकवास मार्फत प्राविधिक मन्त्रिपरिषद्मा प्राप्तकर्ता स्थापना गर्नुहोस्, वा यसलाई रिसीभरको चार कुनाहरूमा स्क्रू प्वालमा क्याबिनेटमा स्थापना गर्नुहोस्.
2. हाम्रो प्रापक वाइरिंग रेखाचित्र सन्दर्भ गर्नुहोस् र यसलाई तपाईंको साइट उपकरणको साथ तुलना गर्नुहोस्. केबलहरू मार्फत रिसीभरमा उपकरण जडान गर्नुहोस्.
3.रिसीभर ठीकसँग तय भएपछि, रिसिभर संग सुसज्जित एन्टेना जडान हुनुपर्छ, र एन्टेनाको बाहिरी छेउ बिजुलीको क्याबिनेट बाहिर स्थापित वा राख्नु पर्छ. यो उत्तम संकेत प्रभावको लागि इलेक्ट्रिकल क्याबिनेटको शीर्षमा यसलाई राख्न सिफारिस गरिन्छ. एन्टेनालाई जडान नगरी छोड्न वा विद्युतीय क्याबिनेट भित्र राख्न निषेध गरिएको छ, किनकि यसले संकेत प्रयोग गर्न नसक्ने हुन सक्छ.
4. अन्तमा, ह्यान्डव्हीलको पावर स्विच अन गर्नुहोस्, र तपाईं ह्यान्डव्हील प्रयोग गरेर टाढाबाट मेसिन सञ्चालन गर्न सक्नुहुन्छ.
6.2 रिसीभर स्थापना आयाम

6.3 रिसीभर वायरिंग संदर्भ रेखाचित्र

7. उत्पादन अपरेशन निर्देशनहरू
1. मेसिन र रिसीभरमा पावर. रिसीभरको काम गर्ने सूचक बत्ती चम्कन्छ. वायरलेस इलेक्ट्रोनिक ह्यान्डव्हीलमा ब्याट्री स्थापना गर्नुहोस्, ब्याट्री कभर सुरक्षित गर्नुहोस्, र
ताररहित इलेक्ट्रोनिक ह्यान्डव्हीलको पावर स्विच अन गर्नुहोस्. ह्यान्डव्हीलको ब्याट्री स्तर सूचक प्रकाश सक्रिय छ.
2. समन्वय अक्ष चयन गर्नुहोस्: सक्षम बटन थिच्नुहोस् र होल्ड गर्नुहोस्, अक्ष चयन स्विच टगल गर्नुहोस्, र तपाईले सञ्चालन गर्न चाहानु भएको अक्ष चयन गर्नुहोस्.
3. म्याग्निफिकेसन चयन गर्नुहोस्: सक्षम बटन थिच्नुहोस् र होल्ड गर्नुहोस्, म्याग्निफिकेसन स्विच टगल गर्नुहोस्,र इच्छित म्याग्निफिकेसन स्तर चयन गर्नुहोस्.
4. चलिरहेको अक्ष: सक्षम बटन थिच्नुहोस् र होल्ड गर्नुहोस्, अक्ष चयन स्विच चयन गर्नुहोस्, म्याग्निफिकेसन स्विच चयन गर्नुहोस्, र त्यसपछि पल्स एन्कोडर घुमाउनुहोस्. सार्नको लागि घडीको दिशामा घुमाउनुहोस्
सकारात्मक अक्ष र नकारात्मक अक्ष सार्न घडीको विपरीत दिशामा.
5. कुनै पनि अनुकूलन बटन थिच्नुहोस् र होल्ड गर्नुहोस्, र रिसीभरको सम्बन्धित बटन IO आउटपुट खोलिनेछ. बटन छोड्नुहोस्, र आउटपुट बन्द हुनेछ.
6. आपतकालीन स्टप बटन थिच्नुहोस्, रिसीभरको सम्बन्धित आपतकालीन स्टप IO आउटपुट विच्छेद हुनेछ, ह्यान्डव्हील प्रकार्य असक्षम हुनेछ,आपतकालीन स्टप बटन छोड्नुहोस्, आपतकालीन स्टप IO आउटपुट बन्द हुनेछ, र ह्यान्डव्हील प्रकार्य पुनर्स्थापित हुनेछ.
7. यदि ह्यान्डव्हील समयावधिको लागि सञ्चालन गरिएको छैन, यसले बिजुली खपत कम गर्न स्वचालित रूपमा निद्रा मोडमा प्रवेश गर्नेछ. जब यो फेरि प्रयोग गरिन्छ, ह्यान्डव्हील सक्षम बटन थिचेर सक्रिय गर्न सकिन्छ.
8. लामो समयसम्म ह्यान्डव्हील प्रयोग नगर्दा, ह्यान्डव्हील शाफ्टलाई अफ स्थितिमा स्विच गर्न सिफारिस गरिन्छ, ह्यान्डव्हील पावर बन्द गर्नुहोस्, र ब्याट्री जीवन विस्तार.
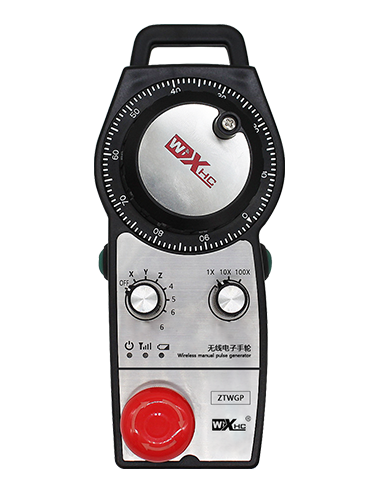
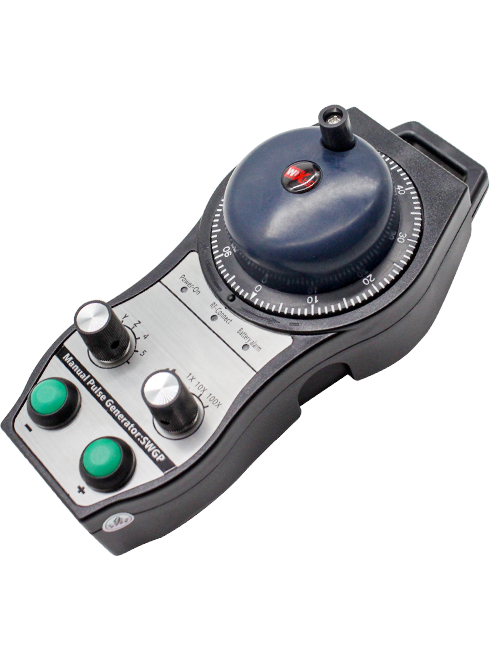
8. उत्पादन मोडेल विवरण

① :ZTWGP उपस्थिति शैली प्रतिनिधित्व गर्दछ
②:पल्स आउटपुट प्यारामिटरहरू:
01: पल्स आउटपुट संकेत A हो भनेर संकेत गर्दछ, बि; पल्स भोल्टेज 5V; पल्स मात्रा 100PPR.
02:पल्स आउटपुट संकेतहरू A र B हुन् भनेर संकेत गर्दै; पल्स भोल्टेज 12V; पल्स मात्रा 100PPR.
03:पल्स आउटपुट संकेतहरू A हो भनेर संकेत गर्दै, बि, ए -, बि -; पल्स भोल्टेज 5V; पल्स मात्रा 100PPR.
04:निम्न-स्तर NPN खुला सर्किट आउटपुट संकेत गर्दछ, A र B को पल्स आउटपुट संकेतहरूको साथ;दाल संख्या 100PPR छ.
05:उच्च-स्तर PNP स्रोत आउटपुट संकेत गर्दछ, A र B को पल्स आउटपुट संकेतहरूको साथ; दाल संख्या 100PPR छ.
③:अक्ष चयन स्विचहरूको संख्या प्रतिनिधित्व गर्दै, 2 प्रतिनिधित्व गर्दछ 2 अक्षहरू.
④:अक्ष चयन स्विच संकेत को प्रकार को प्रतिनिधित्व गर्दछ, A ले पोइन्ट-टु-पोइन्ट आउटपुट संकेत प्रतिनिधित्व गर्दछ, र B ले सङ्केतित आउटपुट संकेत प्रतिनिधित्व गर्दछ.
⑤:गुणन स्विच संकेत को प्रकार को प्रतिनिधित्व गर्दछ, A ले पोइन्ट-टु-पोइन्ट आउटपुट संकेत प्रतिनिधित्व गर्दछ, र B ले सङ्केतित आउटपुट संकेत प्रतिनिधित्व गर्दछ.
⑥:अनुकूलन बटनहरूको संख्या प्रतिनिधित्व गर्दछ, 2 प्रतिनिधित्व गर्दछ 2 कस्टम बटनहरू.
⑦:प्रणाली ह्यान्डव्हील को लागी बिजुली आपूर्ति को प्रतिनिधित्व गर्दछ, र 05 5V पावर आपूर्ति प्रतिनिधित्व गर्दछ.
⑧:L ले बायाँ स्तम्भलाई प्रतिनिधित्व गर्दछ (बायाँ चक्कु होल्डर), र R ले दायाँ स्तम्भलाई प्रतिनिधित्व गर्दछ (दायाँ चक्कु होल्डर).
9.उत्पादन खराबीहरूको समाधान

1. कोठाको तापक्रममा सुक्खा वातावरणमा यसलाई प्रयोग गर्नुहोस् र यसको सेवा जीवन विस्तार गर्न दबाब दिनुहोस्.
2. कृपया सेवा जीवन विस्तार गर्न असामान्य वातावरणमा प्रयोग नगर्नुहोस्.
3. कृपया यसको सेवा जीवन विस्तार गर्न ह्यान्डव्हीलको उपस्थिति सफा राख्नुहोस्.
4. कृपया निचोडबाट जोगिनुहोस्, झर्दै, बम्पिङ, आदि. ह्यान्डव्हील वा सटीकता त्रुटिहरू भित्र सटीक घटकहरूलाई क्षति हुनबाट रोक्न.
5. यदि लामो समयको लागि प्रयोग गरिएको छैन भने, कृपया ह्यान्डव्हीललाई सफा र सुरक्षित ठाउँमा भण्डार गर्नुहोस्. भण्डारण र यातायात को समयमा, ध्यान ओसिलो र शोर प्रतिरोधमा भुक्तान गर्नुपर्छ.
11. सुरक्षा पुग्मी
1. कृपया अपरेटिंगबाट गैर पेशेवरहरू प्रयोग गर्नु अघि ध्यानपूर्वक निर्देशनहरू पढ्नुहोस् र निषेध गर्नुहोस्.
2. अपर्याप्त ब्याट्री पावर र ह्यान्डव्हील चलाउन नसक्ने कारणले गर्दा हुने त्रुटिहरूबाट बच्नको लागि ब्याट्रीको स्तर धेरै कम हुँदा समयमै ब्याट्री बदल्नुहोस्।.
3. यदि मर्मत आवश्यक छ, कृपया निर्मातालाई सम्पर्क गर्नुहोस्. यदि क्षति स्वयं मर्मत को कारण हो, निर्माताले वारेन्टी प्रदान गर्दैन