Beskrivelse
1. Produkt introduksjon
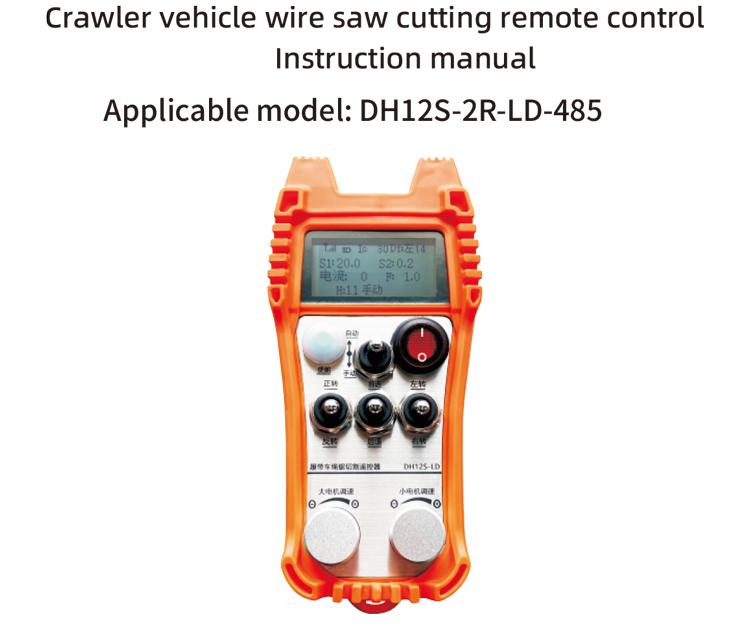
Den automatiske skjærefjernkontrollen til beltekjøretøytau er egnet for skjæremaskiner for beltebånd. Den tar i bruk 485ModbusRTU-protokollen for å kontrollere hastighetsstarten og front- og bakre venstre og høyre retningskontroll av venstre og høyre belteomformere, så vel som den store motorfrekvenskonverterings-RTU-protokollen for å kontrollere hastighetsstarten og front- og bakre venstre og høyre retningskontroll for venstre og høyre beltevekselretter, og den store motorfrekvenskonverteringsoverstrømanalysen og sammenligningen, justerer automatisk venstre og høyre beltehastighet i sanntid for å oppnå automatisk kuttefunksjon.
2. Produktfunksjoner
1. Ta i bruk 433MHZ trådløs kommunikasjonsteknologi, trådløs operasjonsavstand er 100 meter.
2. Bruk automatisk frekvenshoppingsfunksjon, bruk 32 sett med trådløse fjernkontroller samtidig, uten å påvirke hverandre.
3. Støtt alle omformere med 485-Modbus RTU-protokoll. Invertermerkene som er tilpasset inkluderer:Shanghai Xielin, Fuji, Innovasjon, Zhongchen, Invt, Anchuanda. Hvis merket ikke er ada, vennligst kontakt oss for tilpasning.
4. Støtt start av stor motoromformer, hastighetsregulering, og nåværende lesing.
5. Støtt venstre og høyre vekselretterhastighetsregulering, start, front og bak venstre og høyre kontroll.
6. Støtt rettlinjekorreksjon for venstre og høyre beltevekselretter for å holde maskinen i bevegelse i en rett linje.
7. Støtte tausag automatisk kuttefunksjon, justerer automatisk venstre og høyre beltehastighet i sanntid i henhold til informasjonen om stor motorstrøm.
8. Samtidig, den er kompatibel med direkte IO-utgang for å kontrollere start og stopp av motoren, og analog spenningsutgang for å kontrollere motorhastigheten.
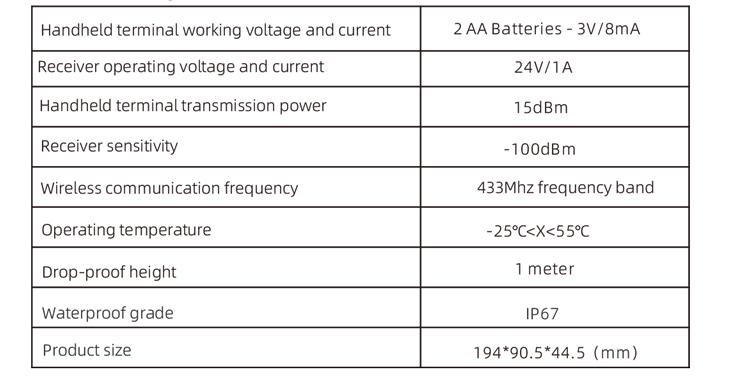
3. Produktspesifikasjoner
4. Produktfunksjon introduksjon

Merknader:
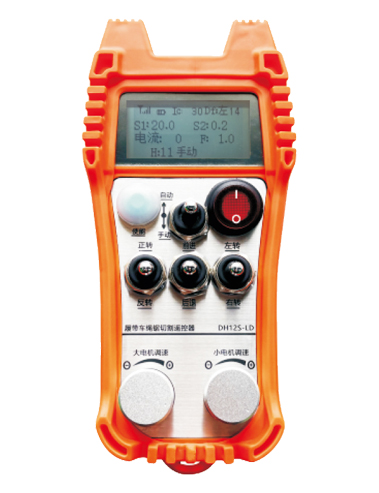
① Skjermdisplay:

②Mode -bryter:
Bruker en 2-nivås bryter, det er mulig å bytte mellom automatisk og manuell modus, og den tilsvarende modusen vil vises på skjermen for veksling.
③ Aktiver:
Kombinasjonsknapper, Noen operasjoner krever å holde nede aktiveringsknappen for drift, Vennligst se instruksjonene for hver bryter for detaljer.
④ Stor motorbryter:
Ved hjelp av en 3-trinns tilbakestillingsbryter, Å trekke denne bryteren kan kontrollere frem og bakover rotasjon av den store motoren. Etter å ha sluppet den, staten vil forbli, og det vil være tilsvarende skjermer på skjermen. t-pilen indikerer rotasjon fremover, og y-pilen indikerer omvendt rotasjon.
⑤Small Motor Forward/Reverse Switch:
Bruker en 3-trinns selvlåsende bryter, å trekke i denne bryteren kan kontrollere den lille motoren til å bevege seg fremover og bakover. Den tilsvarende skjermen vil vises på skjermen, med t-pilen som indikerer fremover og ↓-pilen som indikerer bakover.
⑥ Strømbryter for fjernkontroll:
Skjermbildet for fjernkontroll er slått på.
⑦ liten motor dreiebryter:
Ved hjelp av en 3-trinns tilbakestillingsbryter, Når manuelt opererte, Den lille motoren kan kontrolleres for å svinge til venstre eller høyre. En gang utgitt, fjernkontrollen vil automatisk stoppe denne handlingen, vri denne bryteren og det tilsvarende displayet vises på skjermen + pilen indikerer venstresving, og den – pilen indikerer høyresving.Når du er i reversmodus, vri denne bryteren og det tilsvarende displayet vises på skjermen + pilen indikerer venstresving, og den – pilen indikerer høyresving. Trykk og hold inne aktiveringsknappen, vri deretter denne bryteren for å utføre en stasjonær svingfunksjon, gjør svingen raskere.
⑧ Stor motorhastighetsregulering:
Ved hjelp av en multi turn -koderknapp, vri knappen for å justere hastigheten S1 til den store motoren For hver 1 nettrotasjon, Hastighetsverdien på den store motoren endres med omtrent 0.2 enheter, og rask rotasjon kan raskt endre hastighetsverdien til den store motoren.
9 Liten motorhastighetsregulering (lineær korreksjon):For å bruke multi-turn encoder-knotten, I manuell modus, for hver 1 vri på knappen, hastighetsverdien til den lille motoren endres med ca 0.1 enheter. Rask rotasjon kan raskt endre hastighetsverdien til den lille motoren.
I automatisk modus, trykk på aktiveringsknappen og roter 1 rutenett hver gang. Hastighetsgrenseverdien F for den lille motoren endres med ca 0.1 enheter. Rask rotasjon kan raskt endre hastighetsgrenseverdien til den lille motoren. Trykk på aktiveringsknappen, vri knappen til høyre, og rettlinjekorreksjonsskjermen viser D f: Igjen. Hver rotasjon av knotten øker med 1 enhet; Sving venstre knott, Rett linjekorreksjonsskjerm: Df: høyre. Hver rotasjon av knotten øker med 1 enhet, og hver korreksjonsenhet tilsvarer en motorhastighetskontroll AVI-spenning på ca 0.02 V.
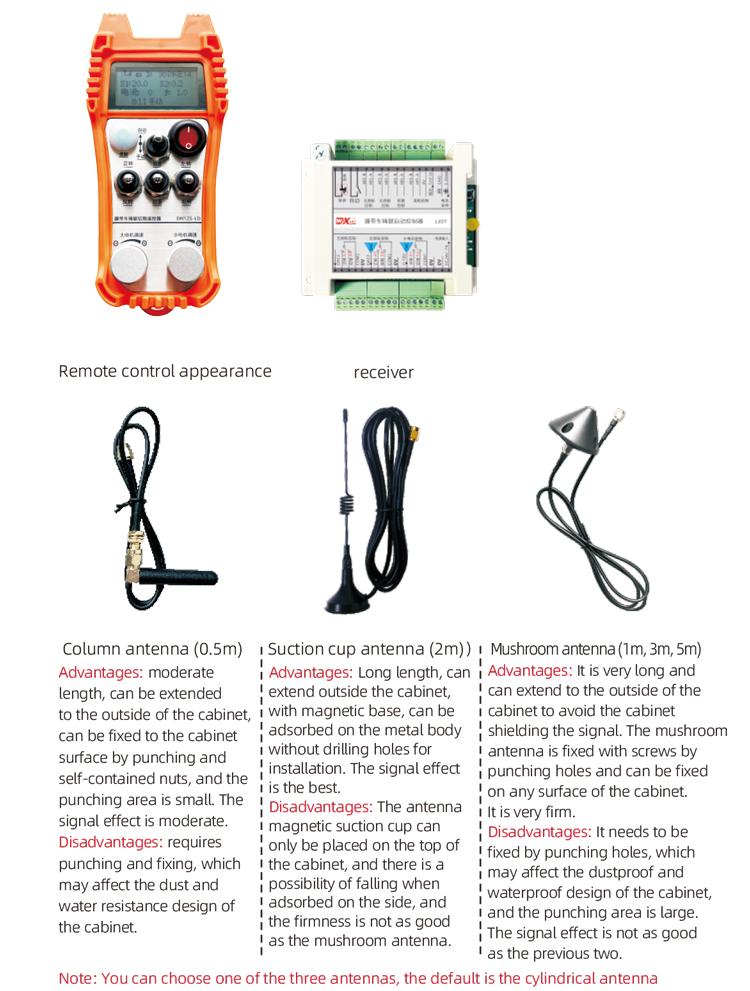
5. Produkttilbehør Diagram
6. Produktinstallasjonsveiledning
6.1 Produktinstallasjonstrinn
1. Installer mottakeren i det elektriske skapet gjennom spennen på baksiden, eller installer den i det elektriske skapet gjennom skruehullene i de fire hjørnene på mottakeren.
2. Se vårt koblingsskjema for mottakeren, sammenligne utstyret ditt på stedet, og koble utstyret til mottakeren gjennom ledninger.
3. Etter at mottakeren er fikset, antennen utstyrt med mottakeren må være tilkoblet, og den ytre enden av antennen må installeres eller plasseres utenfor det elektriske skapet. Det anbefales å plassere den på toppen av det elektriske skapet for den beste signaleffekten. Det er forbudt å la antennen være frakoblet eller plassere antennen inne i det elektriske skapet, som kan føre til dårlig signal og ubrukelig.
4. Endelig, installer batteriet i fjernkontrollen, Stram batteridekselet, og slå deretter på strømbryteren på fjernkontrollen. Etter at fjernkontrollen viser det normale arbeidsgrensesnittet, du kan utføre fjernkontrolloperasjon.
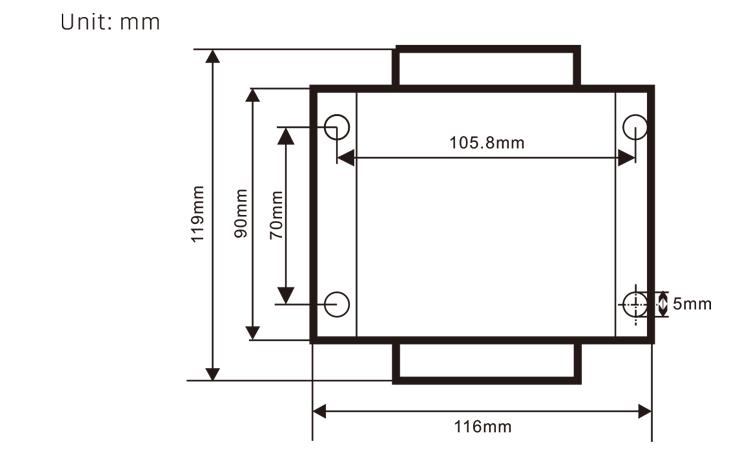
6.2 Mottakerinstallasjonsdimensjoner
6.3 Mottaker Kabling Referansediagram

7. Instruksjoner for produktdrift
7.1 Innstillinger for fjernkontrollparameter
Slik legger du inn bakgrunnsparametrene til fjernkontrollen: vri modusbryteren til manuell modus, Juster hastigheten på den lille motoren til 25, eller 0, 10, 20, 40, 50, og vri foroverbryteren på den store motoren oppover 3 ganger og nedover 3 ganger;
Bruk “Liten motorhastighetskontroll” knott for å bla, trykk på Aktiver og vri den lille motorhastighetskontrollen for å endre parameterne; etter modifikasjon, Snu siden til slutten, velg Lagre og avslutt, og trykk på Aktiver-knappen for å gå ut av menyen;
Parametrene er som følger:Maksimal strøm: stort verdiområde for tilbakekobling av motorstrøm, innstillingsområde 15-200A, misligholde 60;
Hastighetskontrollparametere: automatisk modus liten motor automatisk akselerasjonshastighet, jo mindre jo raskere, innstillingsområde 200-1500, misligholde 1000;
Retardasjonsparameter: Still inn den øvre grensen for tillatt motorhastighetsendring. Når strømmen endres utover denne verdien, det vil avta. Jo mindre den er, jo raskere vil venstre og høyre motor bremses. Rekkevidden er 05-12, og standard er 06;
Akselerasjon A1: Jo større verdi, jo raskere øker motorhastigheten, område 00-06, standard 01; Retting A2: Jo større verdi, jo raskere synker motorhastigheten, spekter 00-06, misligholde 02;
Aktiver hastighetsregulering: Om den lille motorhastighetsreguleringen må aktiveres, 00 er ikke aktivert, 01 er aktivert, misligholde 01;
Oppstart selvlåsende: Om den store motoren automatisk vil holde seg selvlåsende etter at forover- og reversbryteren er sluppet, 00 er ikke vedlikeholdt, 01 opprettholdes, misligholde 01;
Maksimal reise: Maksimal hastighet på venstre og høyre motor, spekter 10-100, misligholde 50;
Kutte strøm: Maksimal skjærestrøm, skjermen viser IC-verdi, spekter 15-160, misligholde 30, skjermen viser IC: 30. Den øvre grensen for denne parameteren = maksimal strøm x 80%;
Standard hastighetsgrense: Standard liten motors automatiske kuttehastighet ved oppstart, spekter 00-100, misligholde 10, skjermen viser F1.0, denne parameteren er bare nøyaktig når maksimal vandring er satt til 50.
Trådløs kanal: Standard er 10. Når fjernkontrollsignalet er ustabilt eller det er signalforstyrrelser på stedet, du kan endre denne parameteren for å bytte kanal for å unngå interferens;
Fartsgrense offset: Den øvre grensen for den automatiske kuttehastigheten til den lille motoren,spekter 00-200, misligholde 60, skjermen vises 6.0; Visningsverdi øvre grense = fartsgrense offset × 0.1;
Maksimal vert: Maksimal hastighet til den store motoren, spekter 10-100, misligholde 50;
Mbus-enhet ( påbudt ): stort utvalg av motoromformermodeller, spekter 00-03, misligholde 03;
00- Shanghai Xielin 01 Fuji
02- Invt 03 Inovance (Zhongchen, Robicon)
SBUS -utstyr (påbudt): Liten motorfrekvensomformer modellvalg, spekter 00-05, misligholde 03;
00- Shanghai Xielin 01 Fuji
02- Invt 03 Inovance (Zhongchen, Robicon)
04-Anchuanda 05-ingen
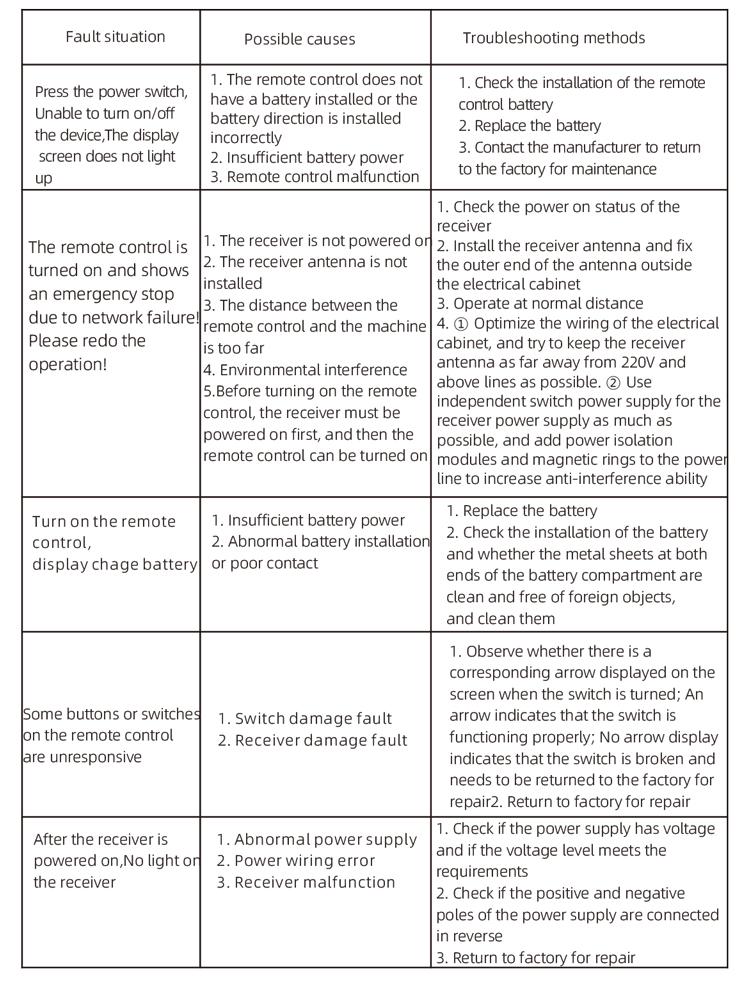
8. Feilsøking av produkt
7.2 Parameterinnstilling av frekvensomformer
1. Kommandokildevalg: Kommunikasjonskommandokanal
2. Hovedfrekvens kildevalg: kommunikasjon gitt
3. Baud rate: 19200
4. Dataformat: Ingen bekreftelse, dataformat<8-N-1>
5. Lokal adresse: Sett venstre frekvensomformer til 1, riktig frekvensomformer til 2, og den store motorens frekvensomformer til 3
7.3 Instruksjoner for fjernkontroll drift
1. Kraft på maskinen, Slå på fjernkontrollen, gå inn i fjernkontrollens bakgrunn, angi bakgrunnsparametrene for fjernkontrollen, Det er hovedsakelig å stille inn modellene til små og store motorfrekvensomformere (hopp over dette trinnet hvis maskinprodusenten allerede har satt dem);
2. Angi parametrene til frekvensomformeren (Hopp over dette trinnet hvis maskinprodusenten allerede har satt det);
3. Sett fjernkontrollen til manuell modus, og bruk deretter fjernkontrollen til å flytte maskinen til arbeidsstilling;
4. I manuell modus, still inn IC-verdien for skjærestrømmen til den store motoren og hastigheten til den store motoren;
5. Bytt til automatisk modus og sett skjærehastighetsgrensen F -verdien for den lille motoren;
6. I automatisk modus, vri den store motorbryteren fremover for å starte den store motoren, og drei deretter den lille motorbryteren til forover eller revers. Fjernkontrollen går inn i automatisk kuttemodus og begynner å kutte.
9.Vedlikehold
1. Bruk den i et tørt miljø ved romtemperatur og trykk for å forlenge levetiden.
2. Unngå å bruke i unormale miljøer som regn- og vannbobler for å forlenge levetiden.
3. Vennligst hold batterirommet og metallskrapelområdet rent.
4. Unngå å skade fjernkontrollen på grunn av å klemme og falle.
5. Hvis ikke brukt i lang tid, ta ut batteriet og oppbevar fjernkontrollen og batteriet på et rent og trygt sted.
6.Under lagring og transport, oppmerksomhet bør rettes mot fuktighet og sjokkmotstand.
10. Sikkerhetsinformasjon
1. Les instruksjonene nøye før bruk og forby ikke -fagpersoner å drifte.
2. Vennligst skift ut batteriet i tide når batteriet er for lavt for å unngå feil forårsaket av utilstrekkelig strøm, noe som kan føre til at fjernkontrollen ikke er i stand til å operere.
3. Hvis reparasjon er påkrevd, Ta kontakt med produsenten. Hvis skaden er forårsaket av selvreparasjon, produsenten vil ikke gi garanti