Beskrivelse
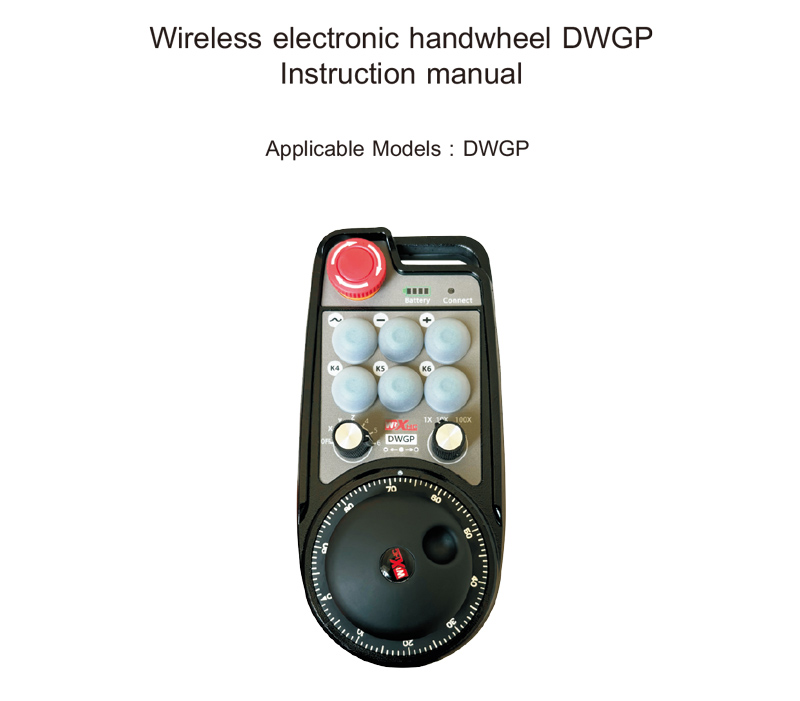
1.Produkt introduksjon
Trådløst elektronisk håndratt brukes til manuell veiledning, posisjonering, verktøyinnstilling og
andre operasjoner av CNC-maskinverktøy. Dette produktet bruker trådløs overføringsteknologi,
eliminerer den tradisjonelle fjærtrådforbindelsen, redusere utstyrsfeil forårsaket av kabler,
eliminerer ulempene med kabeldraging, oljeflekker, etc., og er mer praktisk å
operere. Det er mye brukt i CNC-maskinverktøy som portalmaskineringssentre, portal
vertikale dreiebenker, CNC-girbehandlingsmaskiner, og kan tilpasses en rekke CNC
systemer på markedet, som Siemens, Mitsubishi, Fanuc, syntec og andre CNC-systemer
merkevarer.
2.Produktfunksjoner
1. Ta i bruk 433MHZ trådløs kommunikasjonsteknologi, trådløs operasjonsavstand er 80 meter;
2. Bruk automatisk frekvenshoppingsfunksjon, bruk 32 sett med trådløse fjernkontroller på
samtidig uten å påvirke hverandre;
3. Støtte nødstoppknapp, og etter at håndhjulet er slått av, nødstoppen
knappen er fortsatt gyldig;
4. Støtte 6 Tilpassede knapper, bryter IO-signalutgang;
5. Støtte 6-akse kontroll, 7-12 aksekontroll kan tilpasses;
6. Støtter 1X,10X, 100X-kontroll og kan maksimalt tilpasses 1000X;
7. Støtter aktiveringsknappfunksjonen, utgangsbryter l0 sialer. valg av akse,maanification
og koder.;
8. Støtte aksevalg og forstørrelsesvalgkoderutgang;
9. Støtter standard Type-C-lading, 5V-2A ladespesifikasjon, innebygd batterispesifikasjon
14500/1100mAh.
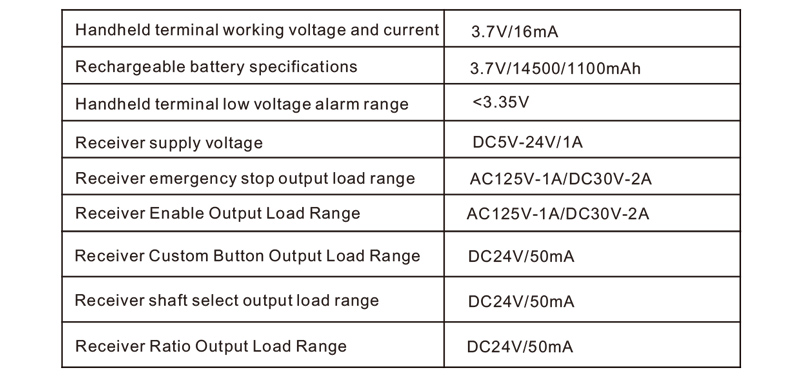
3.Produktspesifikasjoner

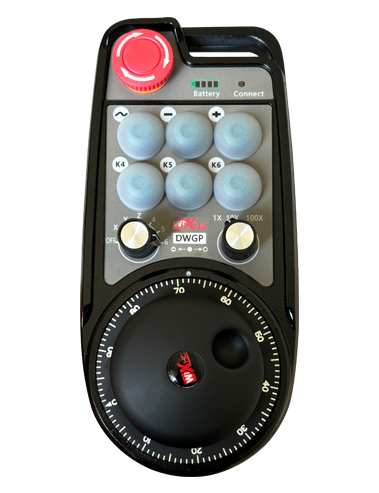
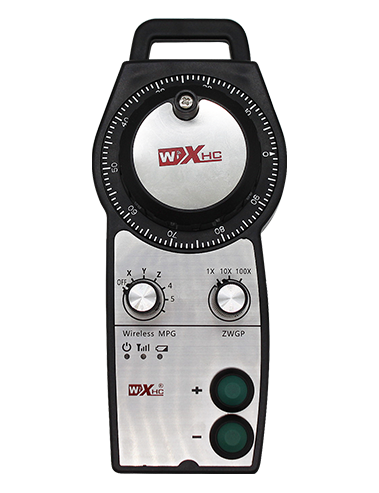
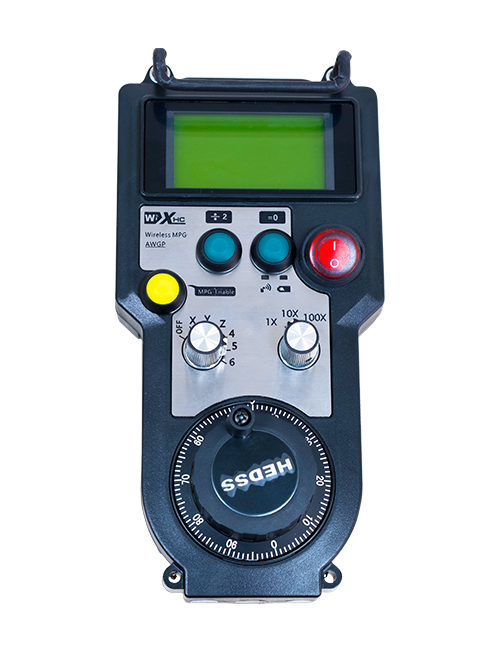
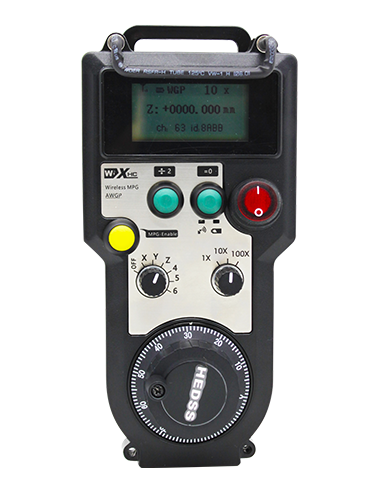
4.Produktfunksjon introduksjon
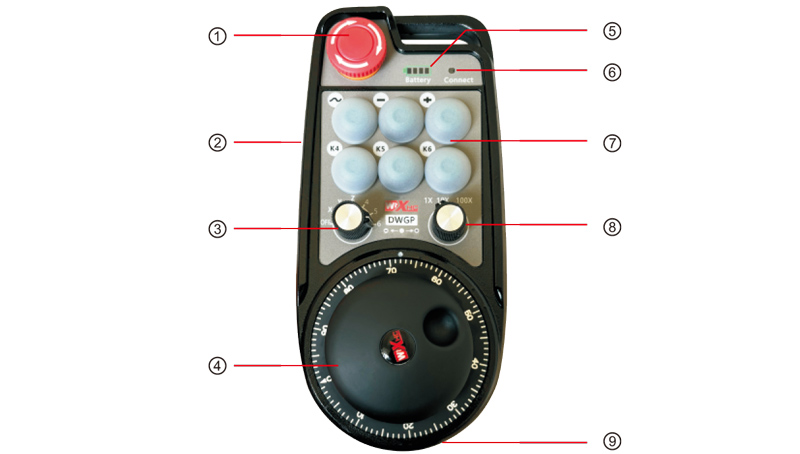
Merknader:
①Nødstoppknapp:
Når nødstoppknappen trykkes, de to nødstopp IO-utgangene på
mottakeren er frakoblet, og alle håndhjulsfunksjoner er ugyldige. Når krisen
stoppet slippes, nødstopp IO-utgangen på mottakeren er lukket, og alle håndhjul
funksjoner gjenopprettes; og etter at håndhjulet er slått av, nødstopp IO-utgangen
av mottakeren er fortsatt gyldig når nødstoppknappen trykkes inn.
②Aktiver-knapp:
Trykk på en av aktiveringsknappene på begge sider, og de to gruppene av aktivere IO
utgangene på mottakeren slås på. Slipp aktiveringsknappen og aktiverings-IO
utgangen vil bli slått av. I tillegg, du må trykke og holde inne aktiveringsknappen før
bytte aksevalgsforhold og riste håndhjulet. Denne funksjonen kan være
kansellert gjennom konfigurasjonsprogramvaren.
③Aksevalgbryter (strømbryter):
Trykk og hold aktiveringsknappen og bytt aksevalgbryteren for å bytte
bevegelig akse kontrollert av håndhjulet. Slå denne bryteren fra AV til hvilken som helst akse og
slå på håndrattet.
④Pulsgiver:
Trykk og hold aktiveringsknappen og rist pulsgiveren for å sende ut en puls
signal for å kontrollere bevegelsen til maskinaksen.
⑤Batteriindikator:
Håndhjulets kraftdisplay, alt lys betyr full kraft, all off betyr at det ikke er det
slått på eller ikke har strøm, det første rutenettet til venstre blinker, indikerer at strømmen er for lav,
vennligst lad i tide.
⑥Signallys:
Hvis signallampen lyser, det betyr at håndrattet betjenes og signalet er det
normal; hvis signallyset er av, det betyr at det ikke er noen operasjon, eller den blir operert men
det trådløse signalet er ikke tilkoblet.
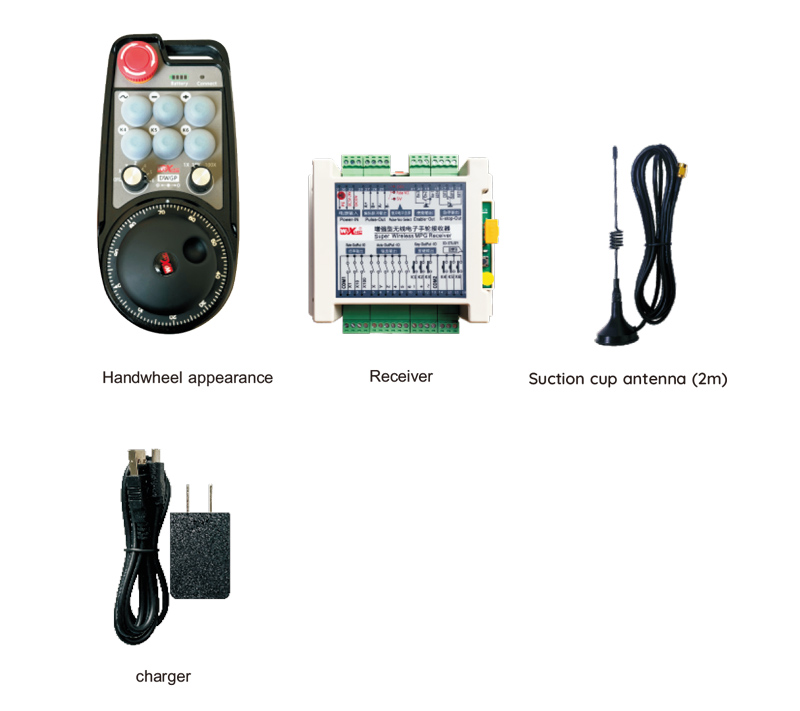
5.Produkttilbehør Diagram
6.Produktinstallasjonsveiledning
6.1 Produktinstallasjonstrinn
1. Installer mottakeren i det elektriske skapet ved hjelp av klipsene på baksiden, eller installer den i
det elektriske skapet ved hjelp av skruehullene i de fire hjørnene på mottakeren.
2.Se vårt koblingsskjema for mottakeren, sammenligne det med utstyret ditt på stedet, og koble til
utstyret til mottakeren via kabler.
3.Etter at mottakeren er fikset, antennen utstyrt med mottakeren må være tilkoblet,
og den ytre enden av antennen må installeres eller plasseres utenfor det elektriske skapet. Den
anbefales å plassere den på toppen av el-skapet for best signaleffekt. Det er det
forbudt å la antennen være koblet fra eller plassere antennen inne i det elektriske skapet,
som kan føre til at signalet blir ubrukelig.
4. Endelig, slå på håndhjulets strømbryter og du kan betjene maskinen ved å
håndratt fjernkontroll.
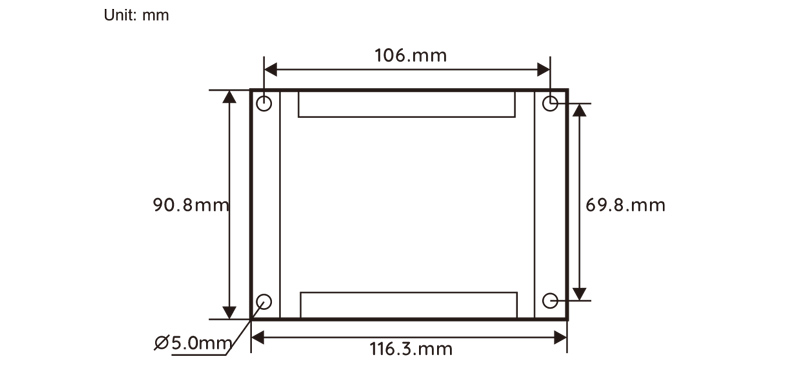
6.2 Mottakerinstallasjonsdimensjoner
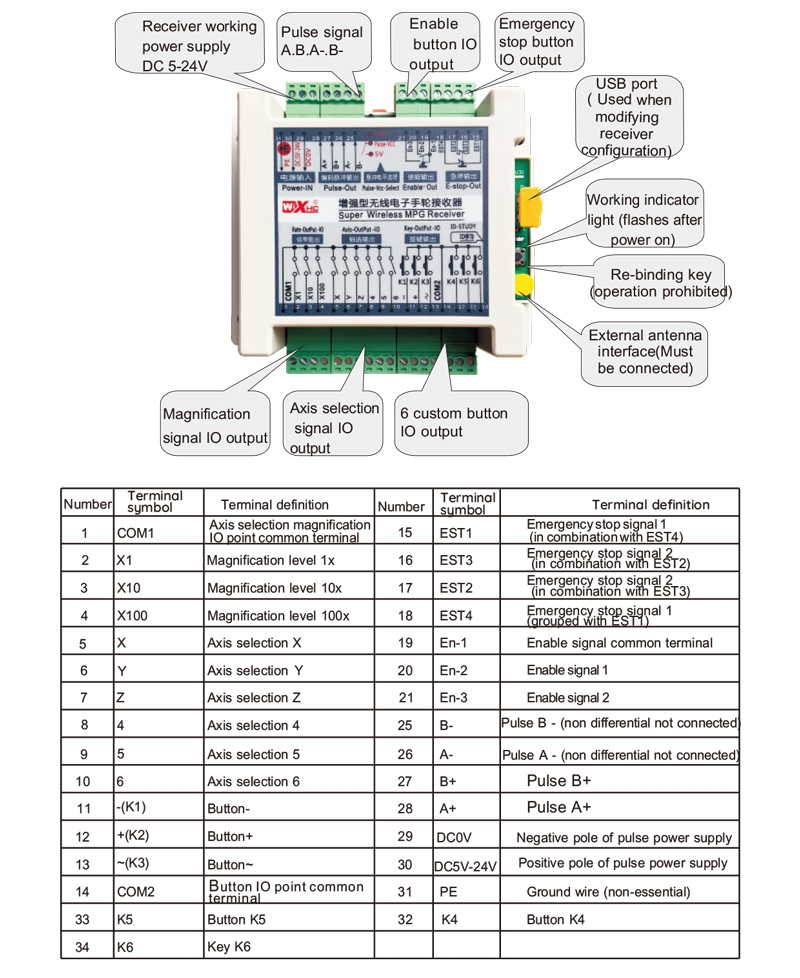
6.3 Mottaker Kabling Referansediagram
7.Produktdriftsinstruksjoner
1. Maskinen er slått på, mottakeren er slått på, mottakerens arbeidsindikator
lyset blinker, det trådløse elektroniske håndhjulet har batteriet installert, batteridekselet
er festet, den trådløse elektroniske håndhjulets strømbryter er slått på, og den
håndhjulets strømlampe lyser;
2. Velg koordinataksen: Trykk og hold inne aktiveringsknappen, bytte aksevalg
bryter, og velg aksen du vil operere på;
3. Velg forstørrelse: Trykk og hold inne aktiveringsknappen, bytt forstørrelsesbryteren,
og velg forstørrelsesnivået du trenger;
4. Bevegelig akse: Trykk og hold inne aktiveringsknappen, velg bryteren for aksevalg, velge
forstørrelsesbryteren, og roter deretter pulsgiveren for å rotere den positive bevegelige aksen
med klokken og den negative bevegelige aksen mot klokken;
5. Trykk og hold en egendefinert knapp, og den tilsvarende knappen IO-utgang på
mottakeren slås på. Slipp knappen for å slå av utgangen;
6. Trykk på nødstoppknappen, den tilsvarende nødstopp IO-utgangen til
mottakeren er frakoblet, håndrattfunksjonen er deaktivert, slipp nødstoppen
knapp, nødstopp IO-utgangen er lukket, og håndhjulsfunksjonen gjenopprettes;
7. Hvis håndhjulet ikke betjenes over en periode, den går automatisk i dvale
modus for å redusere strømforbruket. Når den brukes igjen, håndhjulet kan være
aktiveres ved å trykke på aktiveringsknappen;
8. Hvis håndhjulet ikke brukes over lengre tid,det anbefales å bytte håndhjulet
akselen til AV-posisjon, slå av håndhjulet, og forlenge batterilevetiden.
8.Produktmodellbeskrivelse

① :DWGP representerer utseendestilen
② :Pulsutgangsparametere:
01: Indikerer at pulsutgangssignalene er A og B, og pulsspenningen er 5V; Puls
mengde 100PPR;
02: Indikerer at pulsutgangssignalene er A og B, og pulsspenningen er 12V; Puls
mengde 25PPR;
03: Indikerer at pulsutgangssignalet er A B、EN-、B-; Pulsspenning 5V; Puls mengde 1
00PPR;
04: Indikerer en lav-nivå NPN åpen kretsutgang, med pulsutgangssignaler på A og B; de
antall pulser er 100PPR;05: Indikerer høynivå PNP-kildeutgang, pulsutgangssignaler
er A og B; pulsmengde er 100PPR;
③ : representerer antall aksevalgbrytere, 6 representerer 6 akser, 7 representerer 7 akser.
④ : representerer typen aksevalgbrytersignal, A representerer punkt-til-punkt utgangssignal,
B representerer kodet utgangssignal;
⑤ : representerer typen forstørrelsesbrytersignal,
A representerer punkt-til-punkt utgangssignal, B representerer kodet utgangssignal;
⑥ : representerer antall egendefinerte knapper, 6 representerer 6 Tilpassede knapper;
⑦ : representerer strømforsyningen til systemhåndhjulet, 05 representerer 5V strømforsyning,
og 24 representerer 24V strømforsyning.
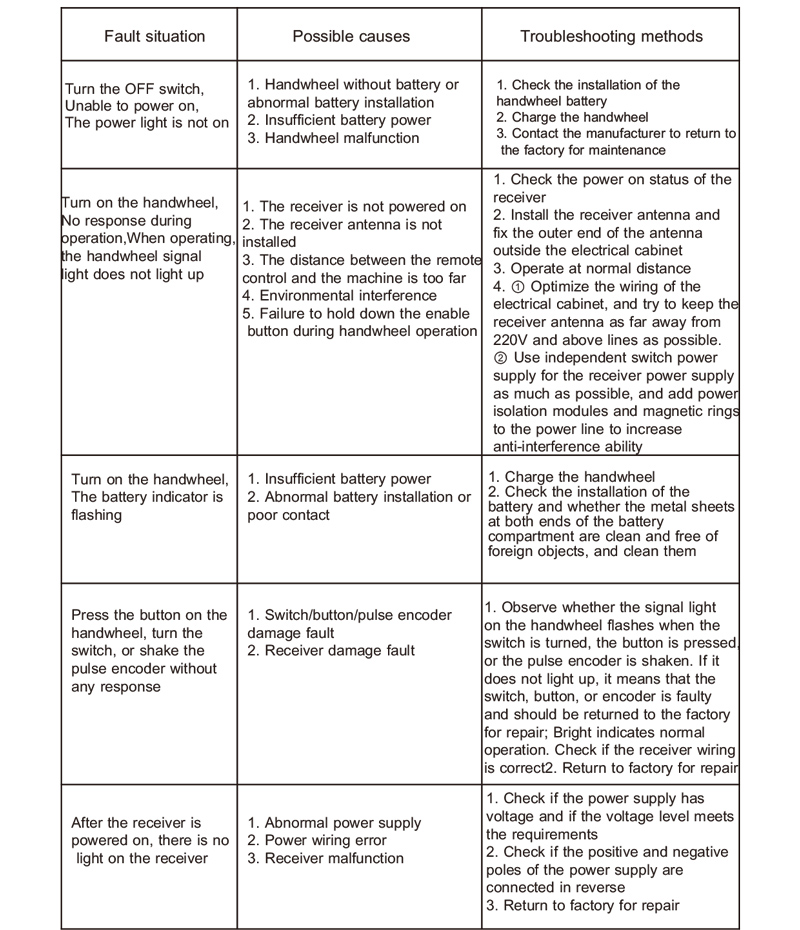
9.Feilsøking av produktet
10. Vedlikehold og stell
1. Bruk den i et tørt miljø ved romtemperatur og trykk for å forlenge levetiden;
2. Unngå å bruke i unormale miljøer som regn- og vannbobler for å forlenge levetiden;
3. Hold håndhjulets utseende rent for å forlenge levetiden;
4. Vennligst unngå å klemme, fallende, støtende, osv. for å forhindre skade på presisjonskomponentene inni
håndhjulet eller nøyaktighetsfeil;
5. Hvis ikke brukt i lang tid, oppbevar håndhjulet på et rent og trygt sted;
6.Under lagring og transport, oppmerksomhet bør rettes mot fuktighet og sjokkmotstand.
11.Sikkerhetsinformasjon
1. Les instruksjonene nøye før bruk og forby ikke -fagpersoner å drifte;
2. Når batterinivået er for lavt, vennligst lad det i tide for å unngå feil forårsaket av utilstrekkelig
batteri og manglende evne til å betjene håndhjulet;
3. Hvis reparasjon er påkrevd, Ta kontakt med produsenten. Hvis skaden er forårsaket av selvreparasjon, produsenten vil ikke gi garanti.