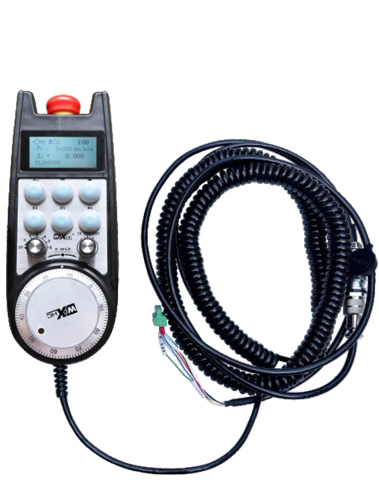
1. Uza un kabel di plug di aviashon di 6 núkleo pa konekshon ., cu un largura di kabel di man . 10 meternan.
2. E pantaya di wiel por mustra sistemanan di piesa di trabou di sistema ., koordinatanan mekániko,tasa di alimentashon, selekshon di as, engrandesimentu, i otro informashon ..
3. Sostené boton di stop di emergensia, switch di salida di señal di IO, y e parada di emergencia di shutdown di man shutdown ta valido ainda ..
4. Sostené 6 botonnan personalisá, switch señalnan di IO, e por output señalnan na e sistema pa medio di IO wiring òf komunikashon ..
Manual di Instrukshon elektróniko di man di man di kabel
Deskripshon
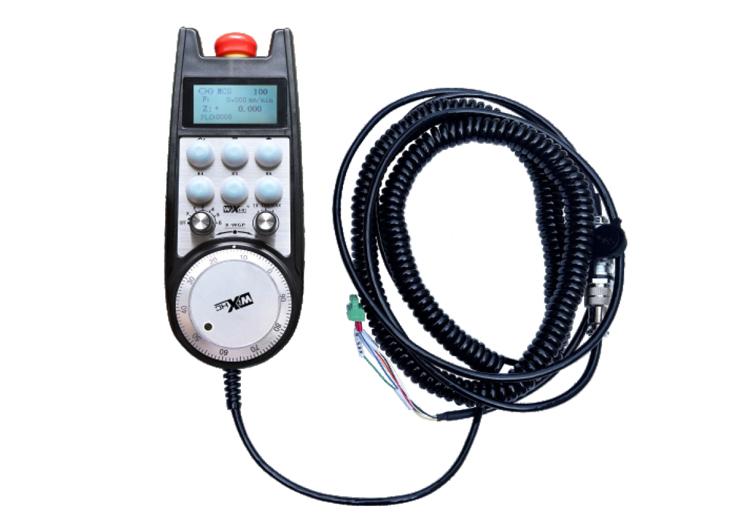
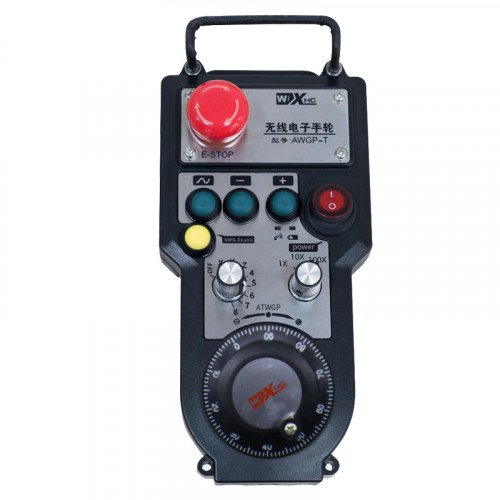
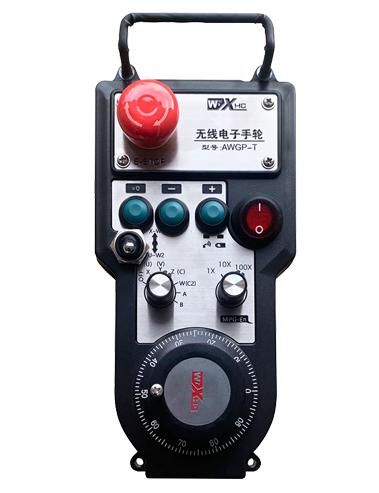
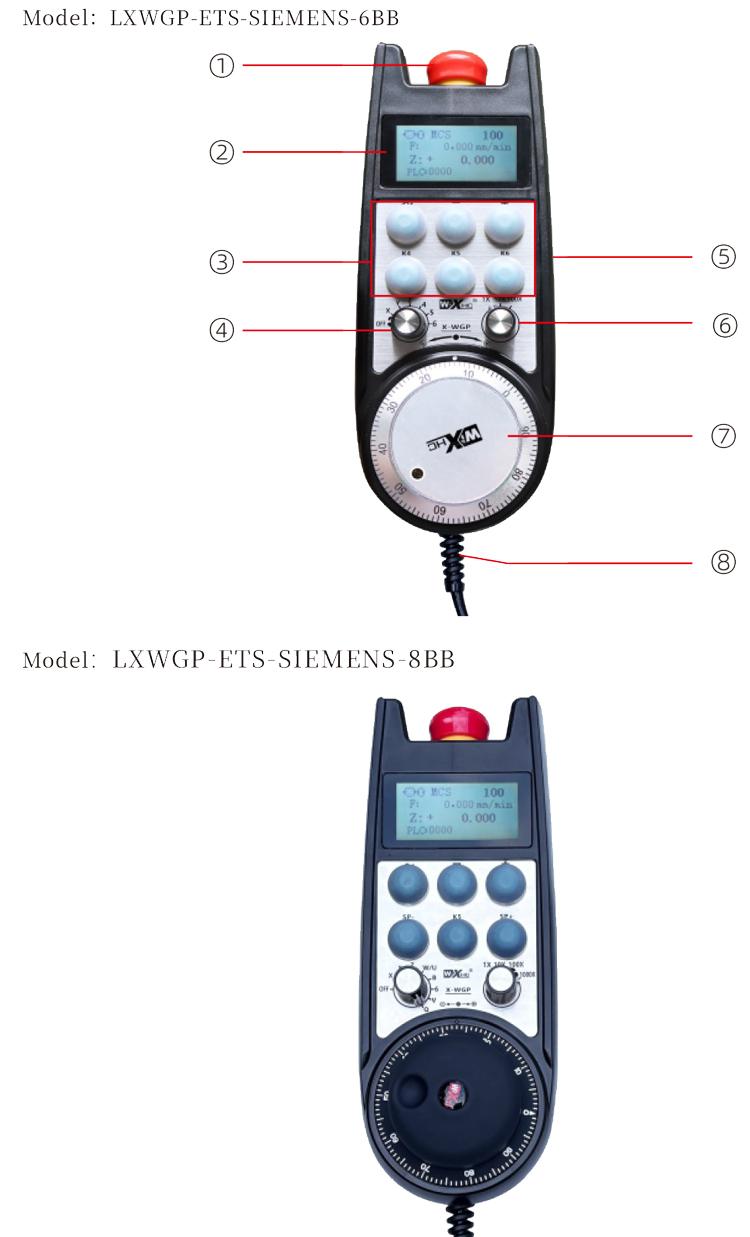
1. Introdukshon di produkto
Wiel di man elektróniko ta wòrdu usá pa guia manual ., posishonamentu, alineashon di herment, i otro operashonnan riba hermentnan di mashin di CNC .. E modelo aki di wiel di man elektróniko ta un Siemens real di display ku kabel di man. E wil di man ta konektá na e interfase X130 di e sistema di Siemens pa medio di un kabel di ret ., i e koordinadonan di sistema ta wòrdu lesá i mustra riba e pantaya LCD di e wiel di man pa medio di komunikashon di protokòl S7 .. E wil di man tambe por kontrolá selekshon di as di sistema ., engrandesimentu, botonnan, y otro señalnan pa medio di comunicacion ..
2.Produkto funshonal di karakterístika
1. Uza un kabel di plug di aviashon di 6 núkleo pa konekshon ., cu un largura di kabel di man . 10 meternan.
2. E pantaya di wiel por mustra sistemanan di piesa di trabou di sistema ., koordinatanan mekániko,tasa di alimentashon, selekshon di as, engrandesimentu, i otro informashon ..
3. Sostené boton di stop di emergensia, switch di salida di señal di IO, y e parada di emergencia di shutdown di man shutdown ta valido ainda ..
4. Sostené 6 botonnan personalisá, switch señalnan di IO, e por output señalnan na e sistema pa medio di IO wiring òf komunikashon ..
5. Sostené 6 òf 8 kontrol di as, ku señalnan di IO ..
6. Sostené 3 òf 4 nivelnan di kontrol di engrandesé, ku señalnan di IO ..
7. Sosten di pulso coder, 100 pulsonan/turn, por saka señalnan na e sistema pa medio di kabelnan di pulso di AB ..
8. Sostené e protokòl di Siemens S7 i Avisonan 828D, 840DSL, ONE y otro sistemanan modelo ..
3. Spesifikashonnan di produkto
| E voltahe di suministro di koriente di trabou di man | DC24V/1A |
| E voltahe di suministro di koriente di ontvanger | DC24V/1A |
| Reciever IO di salida di rango di . | DC24V |
| Hand wiel di largura di kabel | 10m |
| Ricibimento di largura di kabel . | 1m |
| Resember di largura di kabel di ret | 3m |
| Temperatura operativo | -25°<X<55° |
| Altura anti-fall | 1m |
| Cantidad di Boton Personalisa | 6 |
| Dimenshonnan di produkto | 233*90.7*77.4(mm; |
4.Introdukshon di funshon di produkto
Nota:
Boton di parada di emergensia:
Druk riba e boton di stop di emergencia ., e dos sètnan di emergensia stop IO salidanan riba e risibidó lo ta deskonektá ., y tur funcion di e wiel di man lo ta invalido ..
Despues di libera e parada di emergencia ., e salida di emergencia di IO riba e receptor ta cera ., y tur funcion di e wiel di man ta wordo restaura ..
Screen display:
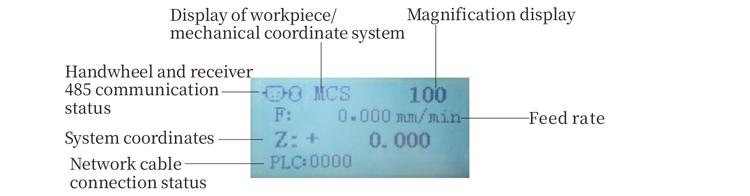
PLC: 0000 ta indiká ku e kabel di ret no ta konektá ., PLC: 1010 ta indiká ku e kabel di ret ta konektá ku éksito na e sistema di PLC ..
PLC: 1110 ta representá skirbimentu eksitoso di datonan ., PLC: 0001 ta representá konekshon eksitoso ku e kòmpiuter ..
Boton personalisá:
6 botonnan personalisá, kada un korespondiente na un punto di salida di IO riba e risibí ., tambe konektá ku e sistema pa medio di komunikashon ..
Switch di seleccion di axis:
E switch di selekshon di as por kambia e as di moveshon kontrolá pa e wil di man ..
Boton Habilitá:
Prensa i tene sea habilitá boton na tur dos banda pa aktivá e encoder di pulso dor di sakudi esaki. E dos gruponan riba e risibidó ta permití IO salida pa kondusí ., libera e boton di habilitá pa permití IO salida pa deskonektá ..
Switch di engrandesementu:E switch di engrandesementu por kambia e engrandesimentu .
kontrolá pa e wiel di man ..
pulso encoder:
Presioná i tene e boton di habilitá ., sakudí e enkoder di pulso ., emití un señal di pulso ., e ta kontrolá e moveshon di e as di mashin ..
Kabel di man di man:
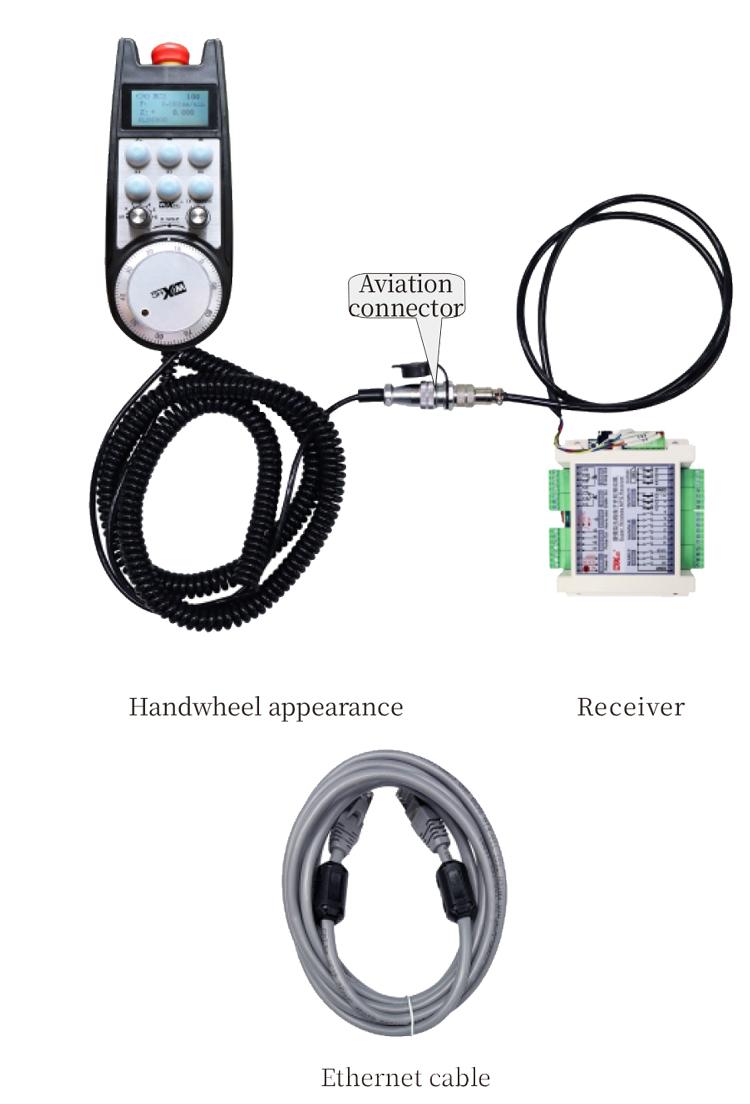
Kabel konektá e wiel di man i e risibidó ., plug, usa pa suministro di koriente di man i komunikashon.
5. Diagram di aksesorio di produkto
6. Guia di Instalashon di Produkto
6.1 Pasonan di instalashon di produkto
6.1 Pasonan di instalashon di produkto
1. Instala e recibidor den e armario di coriente door di e buraconan di schroef na e cuater skinanan ..
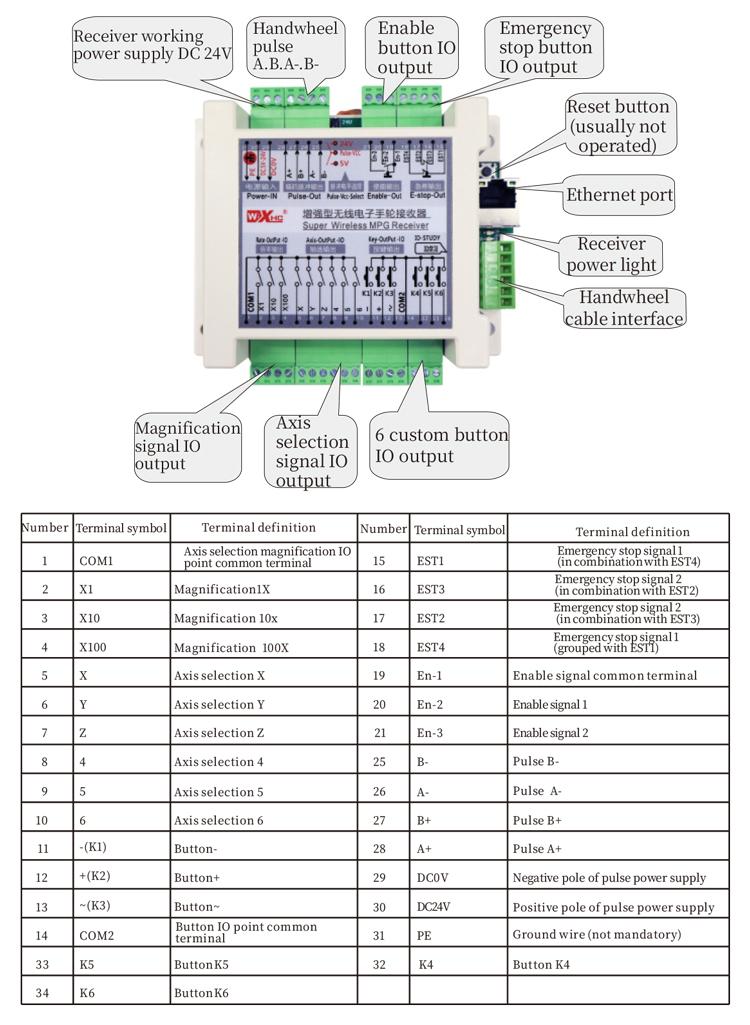
2. Referí na nos diagram di kabel di risibí i kompará esaki ku bo ekipo riba e sitio .. Konektá e aparato na e risibí pa medio di kabelnan i konektá e receptor na e interfase X130 di e sistema usando kabelnan di Ethernet ..
3. Despues di drecha e recibidor ., instala e base di plug di aviashon na e posishon di apertura di man riba e panel ., e plug e otro punta di e base den e interfaz di man di man riba e recibidor .. Despues insertá e plug di aviashon di e kabel di man di man den e base i strech e aparato di fiho ..
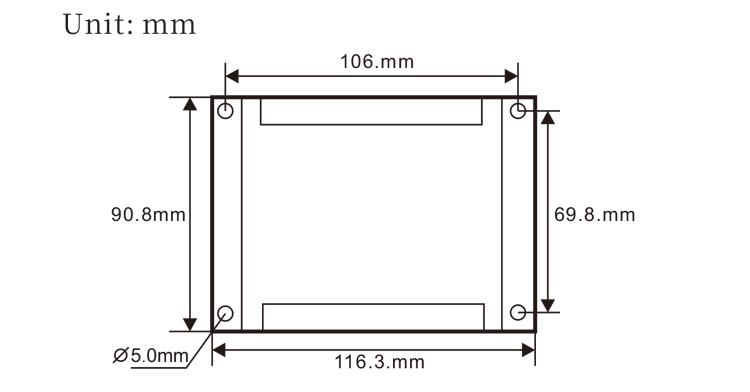
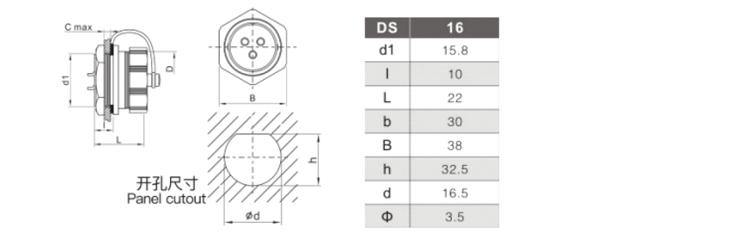
6.2 Dimenshonnan di instalashon di reseptor
6.3 Dimenshonnan di instalashon di plugnan di aviashon
6.4 Diagram di Referensia di Kable
 7.Instrukshonnan di Operashon di Produkto
7.Instrukshonnan di Operashon di Produkto
1. Ora e risibidó ta alimentá riba e lus di indicador di trabou di e recibidor ta flash ., konektá e risibí na e kòmpiuter ku un kabel di ret ., pone e IP adres fiho di e kòmpiuter ., i usa e software di herment di konfigurashon di ret pa pone e parameternan di ret di e funshon di wiel di man .. Pa métodonan di konfigurashon spesífiko, referí na e “LXWGP-ETS Manual di Usuario di man di Man”.
2.Despues cu e recibidor ta wordo lanta ., e sistema mester programa un programa di PLC .. Por fabor referí na e “LXWGP-ETS Diferente Siemens Numériko Sistema di Konfigurashon di Métodonan” i materialnan di rutina di programa di programa di PLC pa detaye ..
3.Despues di a completa e configuracionnan ariba menciona ., hiba e recibidor na e armario di coriente di mashin y instala esaki .. Saka e kabel di ret for di e kòmpiuter i plug esaki den e interfase X130 di e sistema.Konektá e suministro di koriente i liña di pulso di e risibidó.3.
4.Despues di a completa e configuracionnan ariba menciona ., hiba e recibidor na e armario di coriente di mashin y instala esaki .. Saca e kabel di red for di e computer y plug esaki den e interfaz X di e sistema .. Conecta e suministro di coriente y liña di pulso di e recibidor ..
5. Selektá selekshon di as .: Switch e switch di seleccion di as y selecta e as cu bo kier opera riba dje ..
6. Selektá engrandesementu: Switch e switch di engrandesementu i selektá e nivel di engrandesementu ku bo mester.
7. Move as: Presioná i tene e boton di habilitá ., selektá e switch di selekshon di as ., selektá e switch di engrandesementu, i despues ta draai e encoder.
8. Druk i tene kualke boton personalisá pa activa e salida di IO di e boton korespondiente den e risibidó, e libera e boton pa paga e salida ..
9. Druk riba e boton di stop di emergencia ., e korespondiente di emergensia di emergencia IO salida di e recibidor lo ta deskonektá ., e funshon di wiel di man lo wòrdu desaktivá ., libera e boton di stop di emergencia ., e salida di emergencia di IO lo ta cera ., y e funcion di wiel di man lo wordo restaura ..
8.Deskripshon di modelo di Produkto

LXWGP ta representá un estilo di aparensia ku kabel, i e interfase di komunikashon di e risibidó .
ta un interfase di Ethernet ..
6 : Representá Siemens sistema spesífiko.
6 : ta representá e kantidat di switchnan di selekshon di as ., ta representá hachanan, e ta representá
asnan.
6 : ta representá e tipo di selekshon di as i señal di engrandesé ., A ta representá
señal di salida di punto-pa-punto, e B ta representá señal di salida kodifiká ..

9.Produkto di problema pa tira
10.Mantenementu
1. Por fabor us’é den un ambiente seku na temperatura di kamber i preshon pa ekstendé su bida di servisio.
2. Por fabor evitá di usa den ambientenan abnormal manera áwaseru i bubbles di awa pa ekstendé e bida di servisio ..
3. Por fabor tene e aparensia di e man di man limpi pa ekstendé su bida di servisio.
4. Por fabor evita di squeeze ., kai, bump, etc. pa prevení daño na e komponentenan di presishon paden di e erornan di man òf eksaktitut ..
5. Si no ta usa pa hopi tempu ., por fabor warda e wiel di man na un lugá limpi i sigur.Durante almasenamentu i transporte, atenshon mester wòrdu duna na humedat i resistensia di choke ..
11. Informashon di Seguridat
1. Por fabor lesa e instrukshonnan bon promé ku usa i prohibí no profeshonalnan di operashon.
2. Si cualkier situacion abnormal sosode cu e wiel di man ., por fabor stòp di us’é mesora i solushoná problema. Promé ku hasi solushoná problema, ta prohibi pa uza e wiel di man defecto atrobe pa evita accidentenan di seguridad causa pa fayonan di man di man desconoci .;
3. Si ta rekeri reparacion ., tuma kontakto ku e fabrikante. Si e daño ta wordo causa door di reparacion propio ., e fabricante lo no duna garantia .