Opis
1.Uvod izdelka
Wireless Remote Control is used for manual guidance, pozicioniranje, tool setting and other operations of CNC machine tools. Ta izdelek uporablja tehnologijo brezžičnega prenosa, odprava tradicionalne povezave z vzmetno žico, zmanjšanje okvar opreme zaradi kablov, odpravljanje pomanjkljivosti vlečenja kabla, oljni madeži, itd., and is more convenient to operate.It is widely applicable to CNC machine tools such as gantry machining centers, gantry vertical lathes, and CNC gear processing machines, and is compatible with various mainstream CNC system brands on the market, including Siemens, Mitsubishi, FANUC, Syntec and more.
2.Funkcije izdelka
1. Sprejema brezžično komunikacijsko tehnologijo 433 MHz z razdaljo brezžičnega delovanja 20 metri.
2.Prilagodljivo frekvenčno skakanje; 32 komplete brezžičnih daljinskih upravljalnikov je mogoče uporabljati hkrati brez motenj.
3.Supports the emergency stop button, and the emergency stop button remains effective even after the remote control is powered off.
4.Podpira 3 gumbi po meri s preklopnim izhodom IO signala.
5.Podpira 6-osno krmiljenje, in 7 na 12-osno krmiljenje je prilagodljivo.
6. Podpira 3-stopenjski nadzor povečave, in 4-stopenjski nadzor povečave je prilagodljiv.
7.podpira funkcijo gumba za vklop, ki lahko oddaja preklopne IO signale, in tudi nadzor izbire osi, povečavo in kodirnik.
8.Podpira spreminjanje vrste kodiranja izbire osi in povečave prek programske opreme.
9. Supports pulse encoder with specification of 100 impulzov na obrat.
10. Supports standard Type-C charging with 5V-2A charging specification; built-in battery
specification: 14500 / 1100mAh.
| Working Voltage and Current of Handheld Terminal |
3.7V/20.0mA |
| Charging Battery Specification |
3.7V/14500/1100mAh
|
| Low Voltage Alarm Range of Handheld Terminal |
<3.35V |
| Receiver Power Supply Voltage |
DC5V-24V/1A |
| Receiver Emergency Stop Output Load Range |
AC125V-1A/DC30V-2A |
| Receiver Enable Output Load Range |
AC125V-1A/DC30V-2A |
| Receiver Custom Button Output Load Range |
DC24V/50mA
|
| Receiver Axis Selection Output Load Range |
DC24V/50mA |
| Receiver magnification Output Load Range |
DC24V/50mA |
| Handheld Terminal Transmit Power |
15dBm
|
| Sprejemna občutljivost sprejemnika |
-100dBm |
| Frekvenca brezžične komunikacije |
433MHz frekvenčni pas
|
| Wireless Communication Distance |
20 meters barrier-free distance
|
| Operating Temperature |
-25℃<X<55℃ |
| Safe drop height |
1 m
|
| Number of Custom Buttons |
3
|
| Product Weight |
546.86(g) |
| Product Dimensions |
200*87*72(mm) |
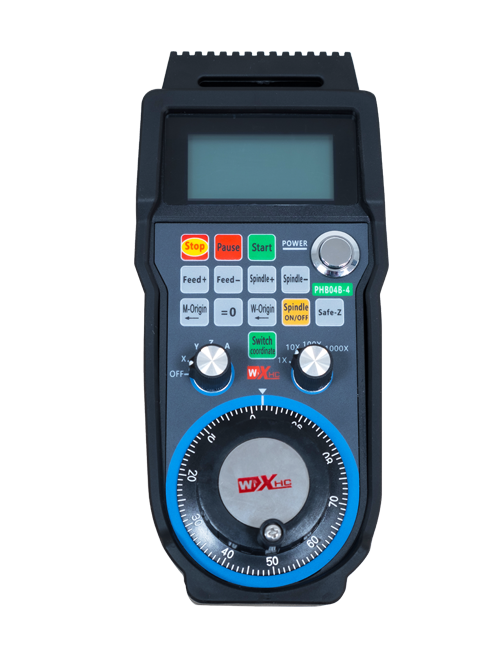
4. Uvod v funkcijo izdelka
Opombe:
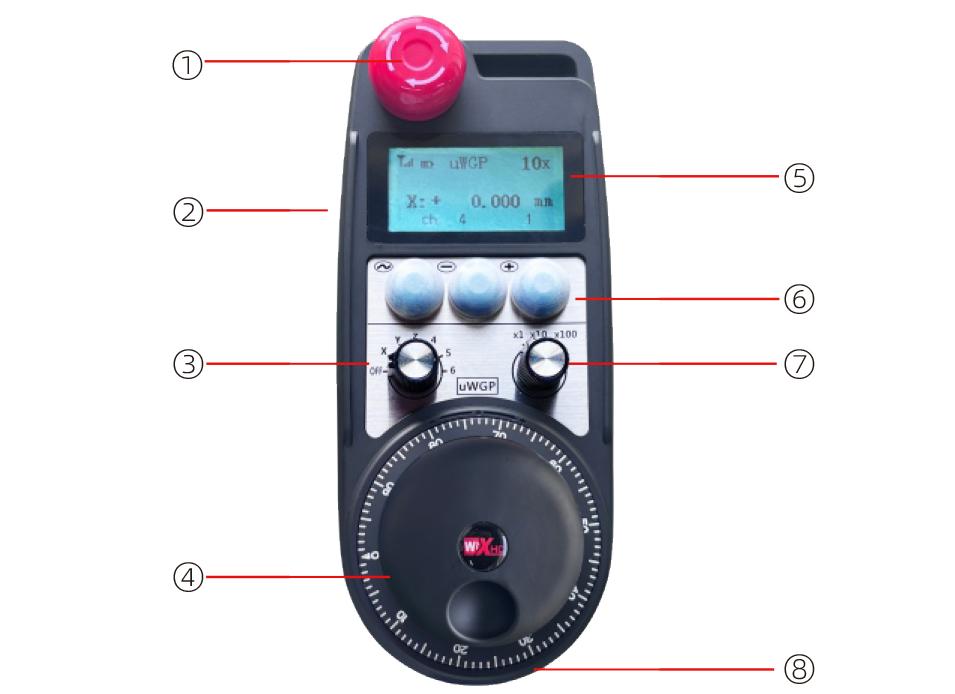
① Emergency Stop Button:
Pritisnite gumb za zaustavitev v sili, the two groups of emergency stop IO outputs on the receiver will disconnect, and all remote control functions will be invalidated.Release the emergency stop button, the emergency stop IO outputs on the receiver will be closed, and all remote control functions will be restored. Poleg tega, even if the remote control is powered off, pressing the emergency stop button can still activate the emergency stop IO output of the receiver.
② Enable Button:
Press either enable button on both sides, the two sets of enable IO outputs on the receiver will conduct. Release the enable button, and the enable IO outputs will disconnect. It is necessary to press and hold the enable button before toggling axis selection, magnification or rotating the remote control for the operation to take effect.This function can be canceled through the configuration software.
③ Axis Selection Switch (Power Switch):
Pritisnite in držite gumb za omogočanje, then toggling the axis selection switch can control the movement of axis .Press and hold the enable button, then toggle the axis selection switch to switch the motion axis controlled by the remote control. Toggle the switch from the OFF position to any axis position, and the remote control will power on automatically.
④ Pulse Encoder:
Press and hold the enable button and rotate the pulse encoder, it will output pulse signals to control the movement of the machine axis.
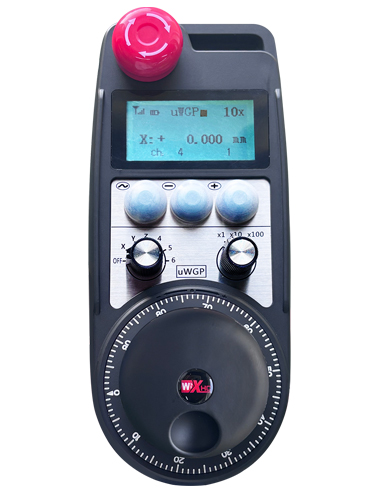
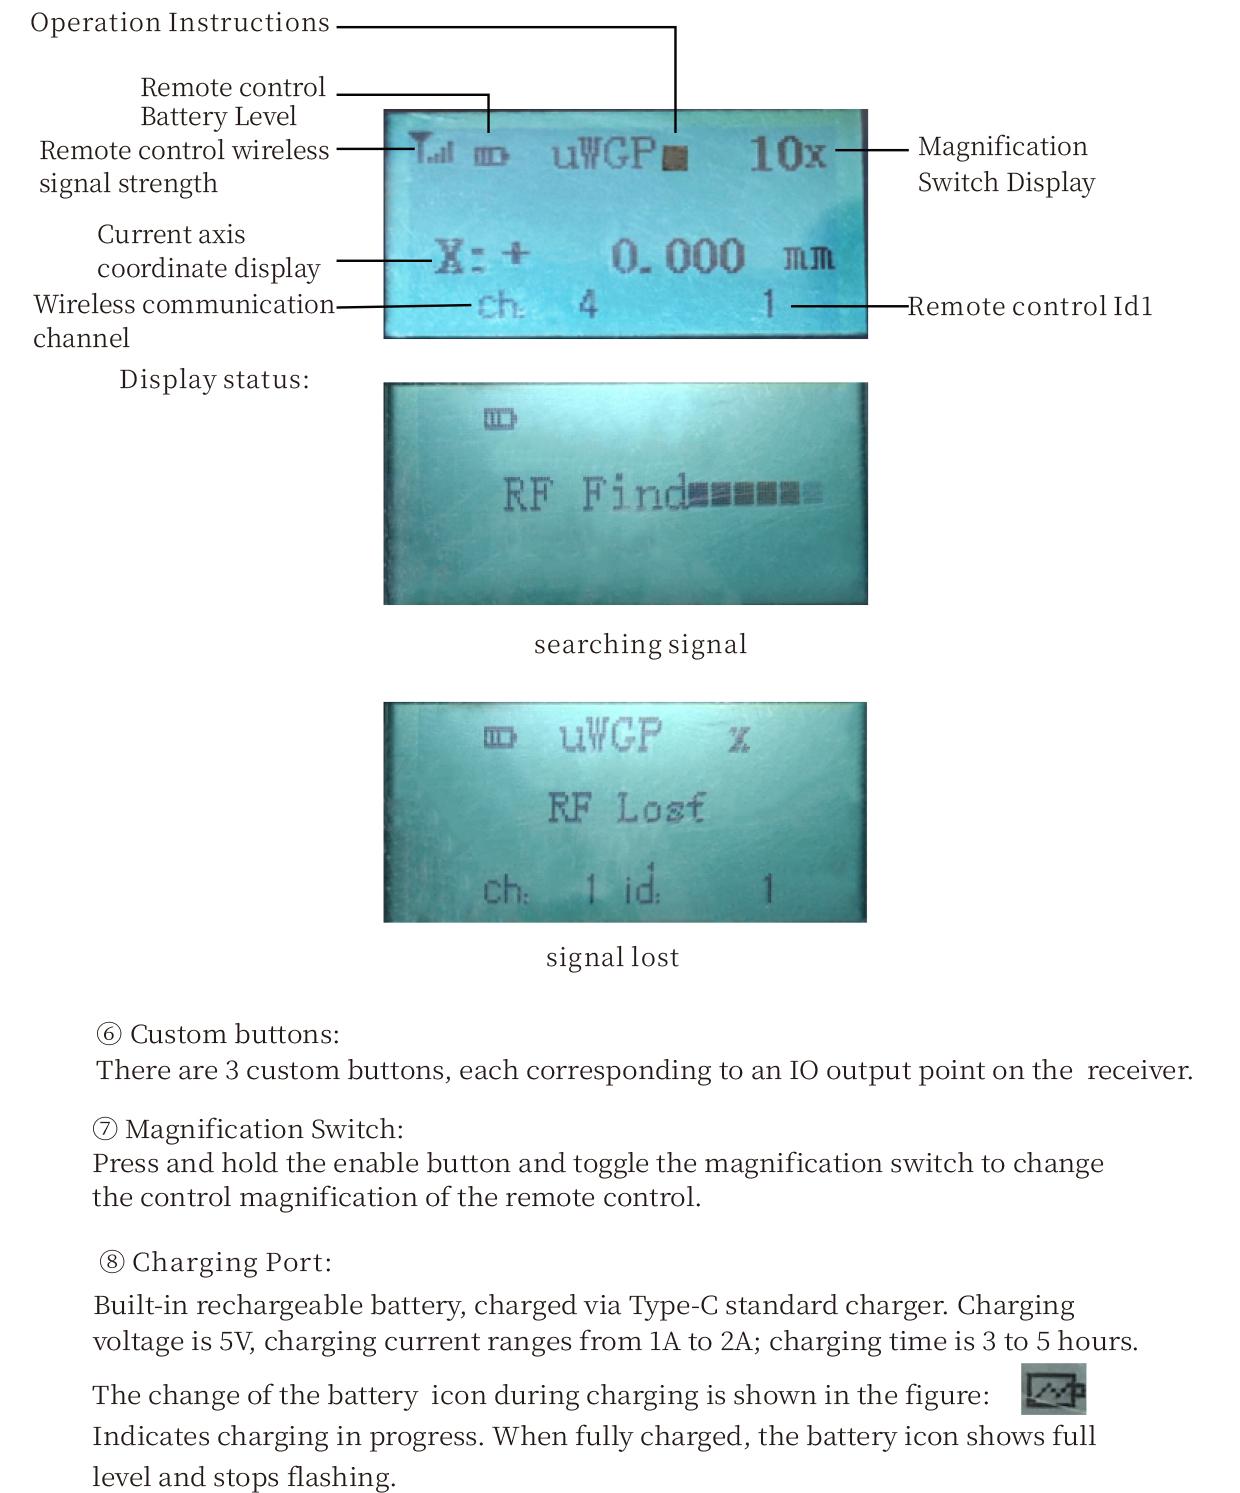
⑤ LCD Display Screen:
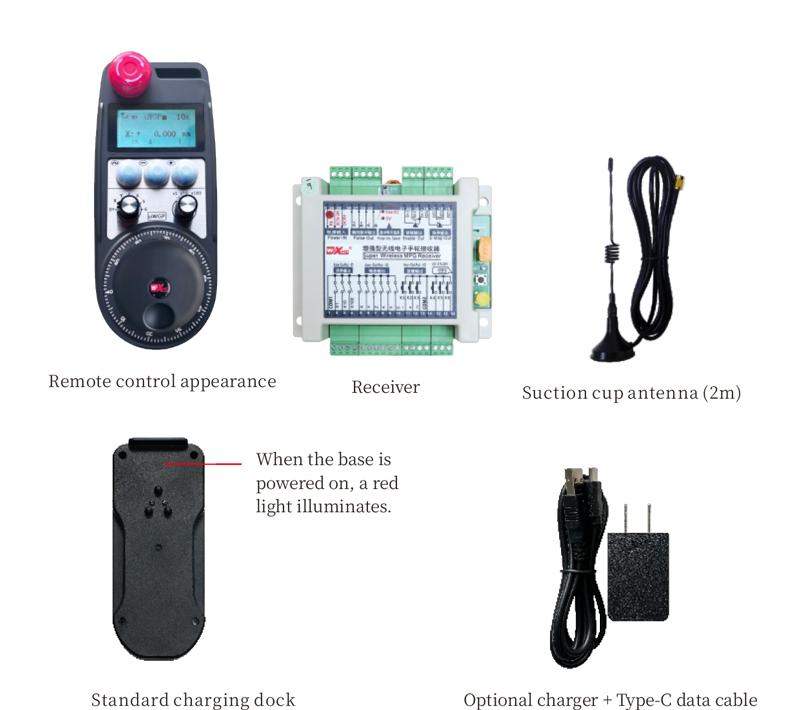
5. Product Accessories Diagram
6. Vodnik za namestitev izdelka
6.1 Koraki namestitve izdelka
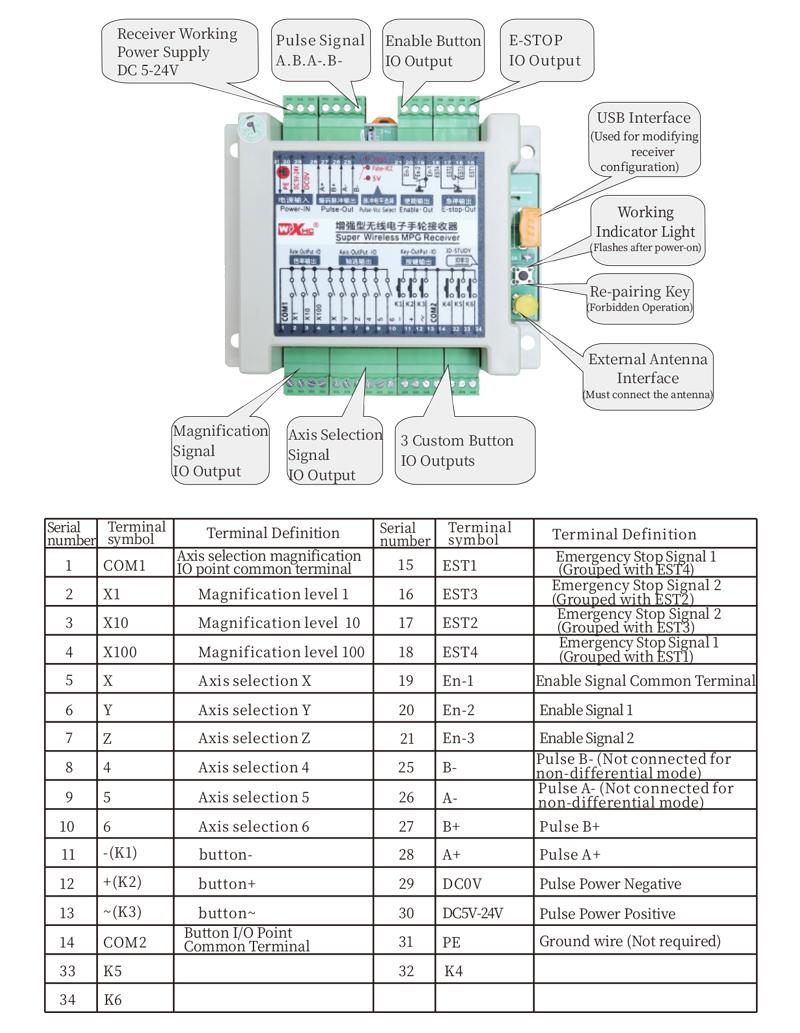
1. Install the receiver in the electrical cabinet via the buckle on its back, or mount it inside the electrical cabinet through the screw holes at the four corners of the receiver.
2. Glej naš diagram ožičenja sprejemnika, primerjajte z vašo opremo na kraju samem, and connect the equipment to the receiver with cables.
3. After the receiver is fixed in place, install the supporting antenna of the receiver properly. Mount or place the outer end of the antenna outside the electrical cabinet. It is recommended to place it on the top of the electrical cabinet for optimal signal performance. Do not leave the antenna uninstalled or place it inside the electrical cabinet; drugače, signal failure may occur.
4. Končno, turn on the remote control power switch, then you can remotely operate the machine via the remote control.
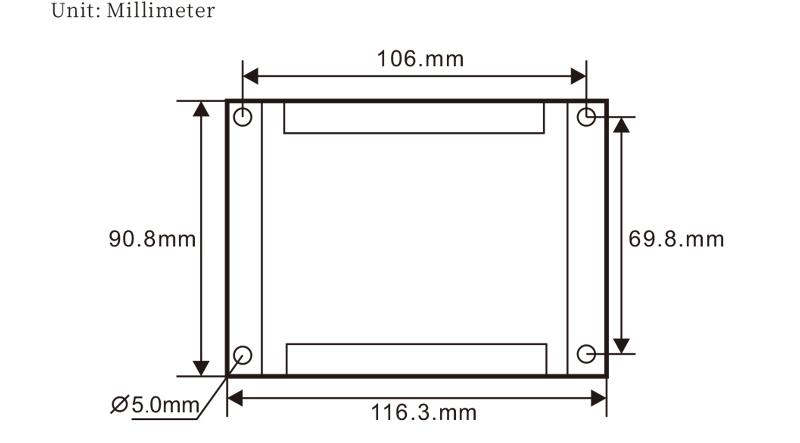
6.2 Receiver Installation Dimensions
6.3 Referenčni diagram ožičenja sprejemnika
7. Navodila za delovanje izdelka
1. Vklopite napravo in sprejemnik. The receiver operation indicator flashes. After the wireless electronic remote control is fully charged, toggle it from the OFF gear to the X-axis gear, and the remote control display lights up.
2. Select the axis : Pritisnite in držite gumb za omogočanje, toggle the axis selection switch to select the axis to be operated.
3. Select the magnification: Pritisnite in držite gumb za omogočanje, toggle the magnification switch to select the required magnification gear.
4. Axis movement: Pritisnite in držite gumb za omogočanje, select the axis selection switch and the magnification switch, then rotate the pulse encoder. Rotate clockwise to move the axis in the positive direction, and rotate counterclockwise to move the axis in the negative direction.
5. Pritisnite in držite poljuben gumb po meri, the corresponding button IO output of the receiver will turn on; release the button, and the output will turn off.
6. Pritisnite gumb za zaustavitev v sili, the corresponding emergency stop IO output of the receiver disconnects and the remote control function becomes invalid. Release the emergency stop button, the emergency stop IO output closes and the remote control function is restored.
7. If the wireless remote control is not operated for a period of time, samodejno preklopi v način mirovanja, da zmanjša porabo energije. It can be used normally again by pressing the enable button again.
8.If the wireless remote control is not used for a long time, turn the axis switch to OFF to turn off the power and extend battery life
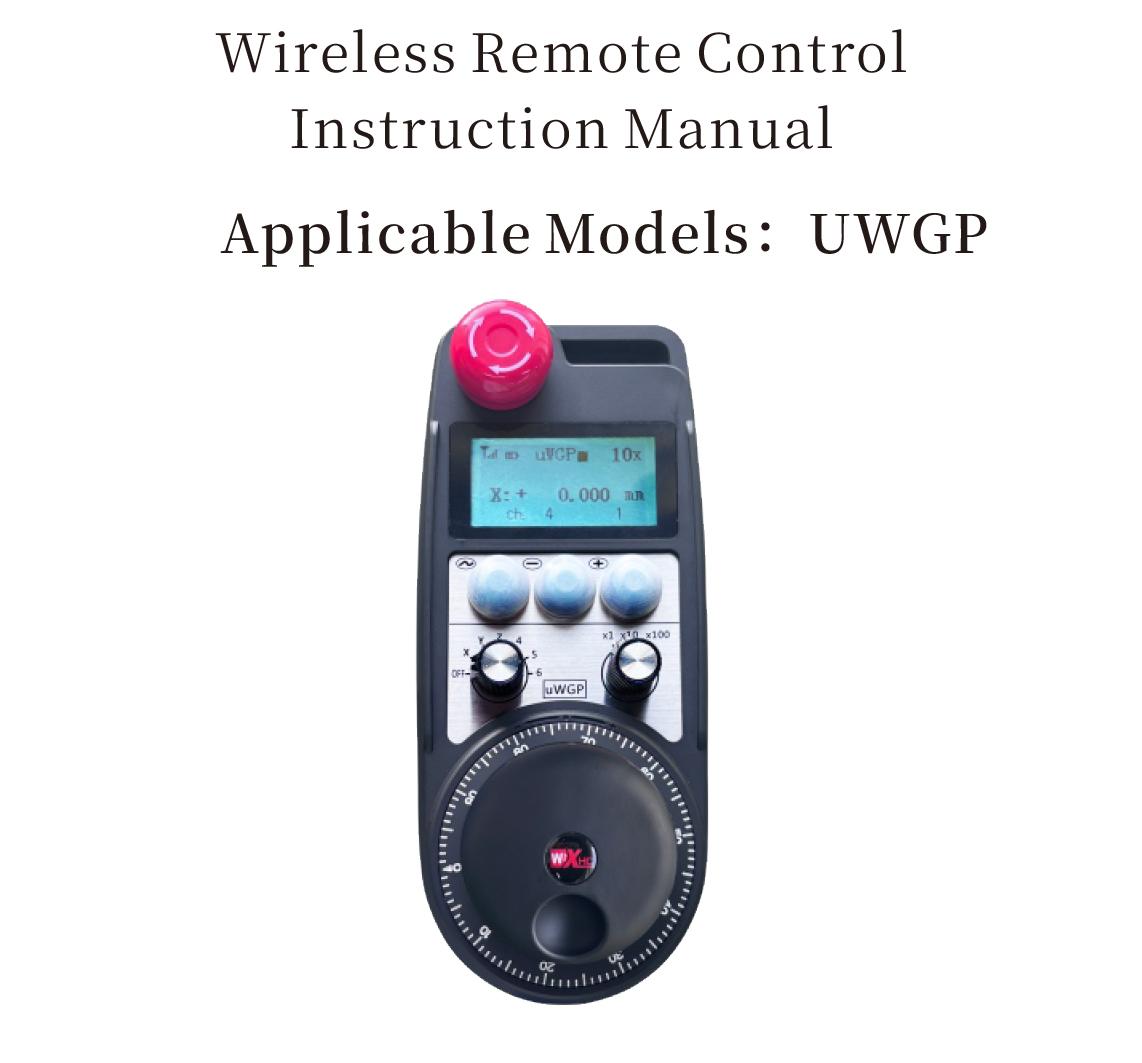
①:UWGP stands for appearance style.
②:Pulse Output Parameters:
01: Označuje, da je impulzni izhodni signal A, B; Impulzna napetost 5V; količina impulza 100PPR.
02: Označuje, da je impulzni izhodni signal A, B; Impulzna napetost 12V; pulse quantity 25PPR.
03: Označuje, da je impulzni izhodni signal A, B, A -, B -; Impulzna napetost 5V; količina impulza 100PPR.
04: Označuje izhod odprtega vezja NPN nizke ravni, z impulznimi izhodnimi signali A in B; The number of pulses is 100PPR.
05: Označuje visokonivojski izhod vira PNP, z impulznimi izhodnimi signali A in B; Število impulzov je 100PPR.
③:Represents the axis selection switch quantity; 6 stands for 6 sekire, 7 stands for 7 sekire, and so on.
④: Represents the signal type of the axis selection switch.A stands for point-to-point output signal, and B stands for encoder output signal.
⑤: Represents the signal type of the magnification switch.A stands for point-to-point output signal, and B stands for encoder output signal.
⑥: Predstavlja število gumbov po meri; 3 corresponds to 6 Gumbi po meri.
⑦: Represents the power supply for the system remote control. 05 stands for 5V power supply, in 24 stands for 24V power supply.
⑧: Represents the contact charging mode. It starts charging automatically when placed back on the charging base.
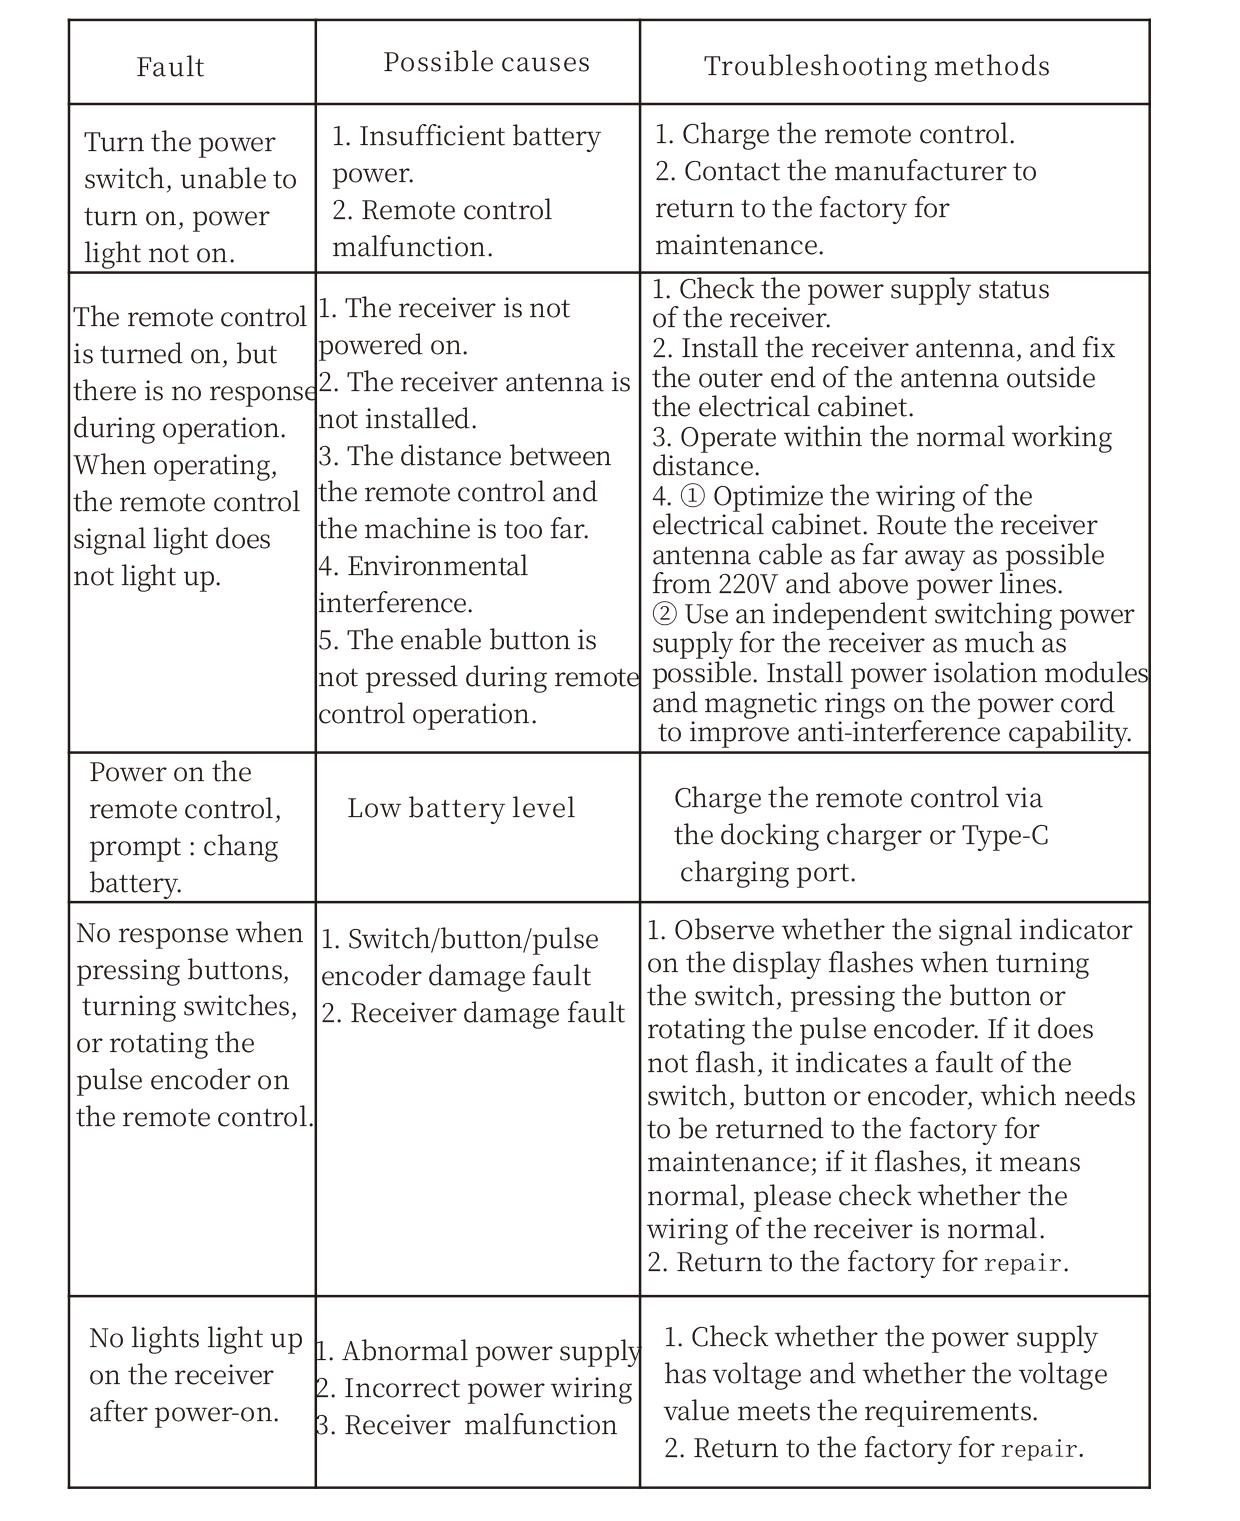
9. Odpravljanje težav z izdelkom
10. Maintenance and upkeep
1. Prosimo, da ga uporabite v suhem okolju pri sobni temperaturi in pritisku, da podaljšate življenjsko dobo.
2. Please avoid using in abnormal environments such as rain and water to extend the service life.
3. Please keep the appearance of the remote control clean to extend its service life.
4. Please avoid crushing, dropping, or bumping, itd. to prevent damage to the precision components inside the remote control or accuracy errors.
5. Če se dolgo ne uporabljate, please store the remote control in a clean and safe place.
6. Avoid moisture and shock during storage and transportation.
11. Informacije o varnosti
1. Pred uporabo natančno preberite navodila in prepovedujte delovati, ki niso strokovnjaki.
2. Please charge the remote control in a timely manner when the battery level is too low, to avoid malfunction and operational errors caused by insufficient power.
3. If you repair it yourself and cause damage, the warranty will be void.