Опис
1. Увод производа
Возило гусеничара Рекот возила Аутоматско сечење даљинског управљача погодан је за машине за резање резања на гусјенице. Усваја 485МОДБУСРТУ протокола за контролу брзине старта и предње и задње леве и десне контроле смјера леве и десне претвараче гусеничар, као и велики протокол за претворбу мотора за контролу брзине почетка и предње и задње леве и десне контроле левог и десног претварача леве и десне гусеничар, и велика конверзија фреквенције мотора прекомерна анализа и поређење, Аутоматско подешавање леве и десне брзине гусеничара у реалном времену за постизање функције аутоматске сечења.
2. Функције производа
1. Усвојити технологију бежичне комуникације 433МХз, Растојање за бежичну операцију је 100 метар.
2. Усвојити аутоматску функцију скакања фреквенције, употреба 32 Поставља бежичне даљинске контролере истовремено, Без утицаја на једно друго.
3. Подржите све претвараче са 485-модбус РТУ протоколом. Брендови претварача који су прилагођени укључују:Шангај Ксиелин, Фуји, Анасенција, Зхонгцхен, Ужурбан, Анцондуанда. Ако бренд није АДА, контактирајте нас за прилагођавање.
4. Подржати велики покретање већег покретања мотора, регулација брзине, и тренутно читање.
5. Подршка уредбу у лијевој и десној широковој квадрату, почети, Предња и задња лева и исправна контрола.
6. Подршка левој и десној инвертерској линији гусеничара исправку исправке да се машина креће у правој линији.
7. Подршка коноп-уп је видео аутоматска функција сечења, Аутоматски подесите брзину леве и десне гусене у реалном времену у складу са великим информацијама о тренутним мотором.
8. Истовремено, Компатибилан је са директним ИО излазом за контролу почетка и заустављања мотора, и аналогни напонски излаз за контролу брзине мотора.
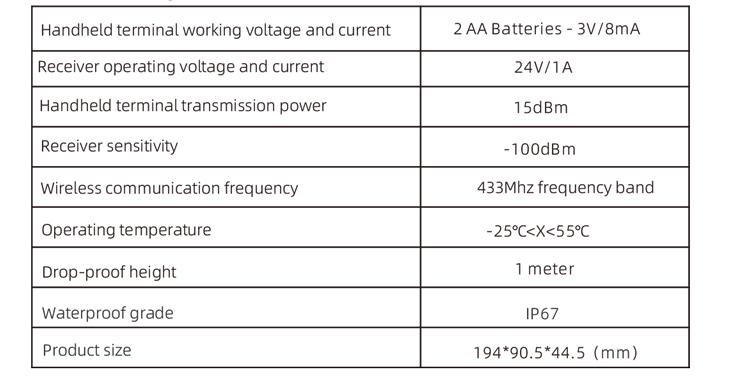
3. Спецификације производа
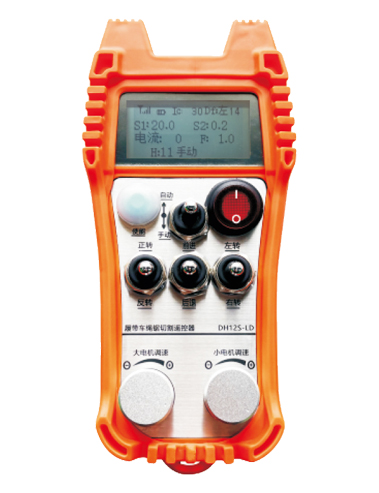
4. Функција производа Увод

Белешке:
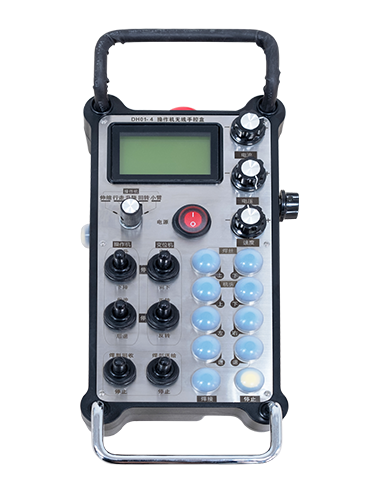
Есцреен дисплеј:

②моде прекидач:
Коришћење прекидача на 2 нивоа, Могуће је пребацивање између аутоматског и ручног режима, и одговарајући начин ће се приказати на екрану за пребацивање.
③ Омогући:
Комбиноване тастере, Неке операције захтевају одржавање дугмета Омогући рад за рад, Молимо погледајте упутства за сваки прекидач за детаље.
④ Велики прекидач мотора:
Коришћење прекидача за ресетовање од 3 брзине, Повлачење овог прекидача може да контролише напред и обрнуто ротацију великог мотора. Након пуштања, држава ће остати, и на екрану ће бити одговарајућих дисплеја. С стрела Т показује ротацију напред, а стрелица означава преокретну ротацију.
⑤Смалл прекидач напред / уназад:
Користећи 3-брзи прекидач за само-закључавање, Повлачење овог прекидача може да контролише мали мотор за кретање напред и назад. Одговарајући екран ће се приказати на екрану, са стрелицом Т означава напред и стрелицу на уназад назад.
Спремни прекидач за контролу управљања:
Екран даљинског управљача је укључен.
⑦ Мали прекидач за окретање мотора:
Коришћење прекидача за ресетовање од 3 брзине, Када ручно управља ручно, мали мотор се може контролисати да скрене лево или удесно. Једном пуштен, Даљински управљач ће аутоматски зауставити ову акцију. Када је у стању напред, Окрените овај прекидач и одговарајући екран ће се појавити на екрану. + Стрелица означава лево окретање, и тхе тхе – Стрелица означава десни ред. Када је обрнутим режимом, Окрените овај прекидач и одговарајући екран ће се појавити на екрану. + Стрелица означава лево окретање, и тхе тхе – Стрелица означава десни отвор. Притисните и држите дугме за омогућавање, Затим окрените овај прекидач да бисте извршили стационарну функцију окретања, брже прављење окрета.
Велика регулација брзине мотора:
Коришћење вишеструког дугмета Енцодер, Закрените дугме да бисте прилагодили брзину С1 великог мотора за свако 1 ротација мреже, вредност брзине великих моторичких промена приближно 0.2 јединице, и брза ротација може брзо да измени вредност брзине великог мотора.
9 Уредба мале моторне брзине (Линеарна корекција):Да бисте користили вишеструко превртање кодер, У ручном режиму, за сваког 1 окретање дугмета, Вредност брзине малих моторичких промена приближно 0.1 јединице. Брза ротација може брзо да измени вредност брзине малог мотора.
У аутоматском режиму, Притисните дугме Омогући и закрените 1 мрежа сваки пут. Вредност ограничења брзине ф од малих моторичких промена приближно 0.1 јединице. Брза ротација може брзо да измени вредност ограничења брзине малог мотора. Притисните дугме ЕНАБЛЕ, окрените дугме удесно, и дисплеј исправљања равне линије показује д ф: лево. Свака ротација дугмета повећава се 1 јединица; Претворити леви дуг, Приказ исправљања равног линије: Дф: у праву. Свака ротација дугмета повећава се 1 јединица, и свака корекцијска јединица одговара томе што на напон управљања брзином мотора 0.02 У.
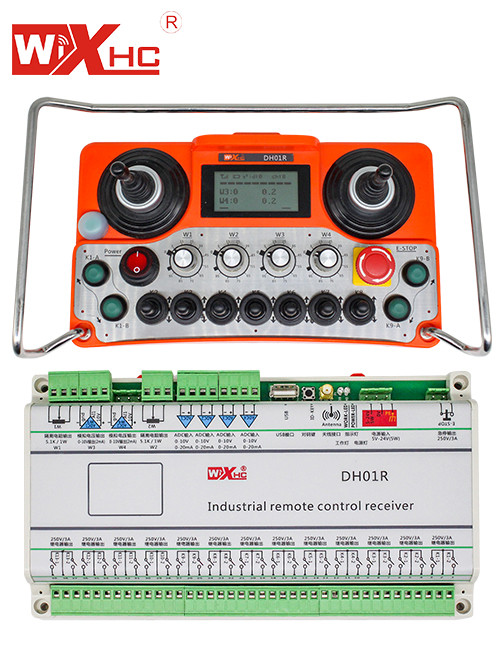
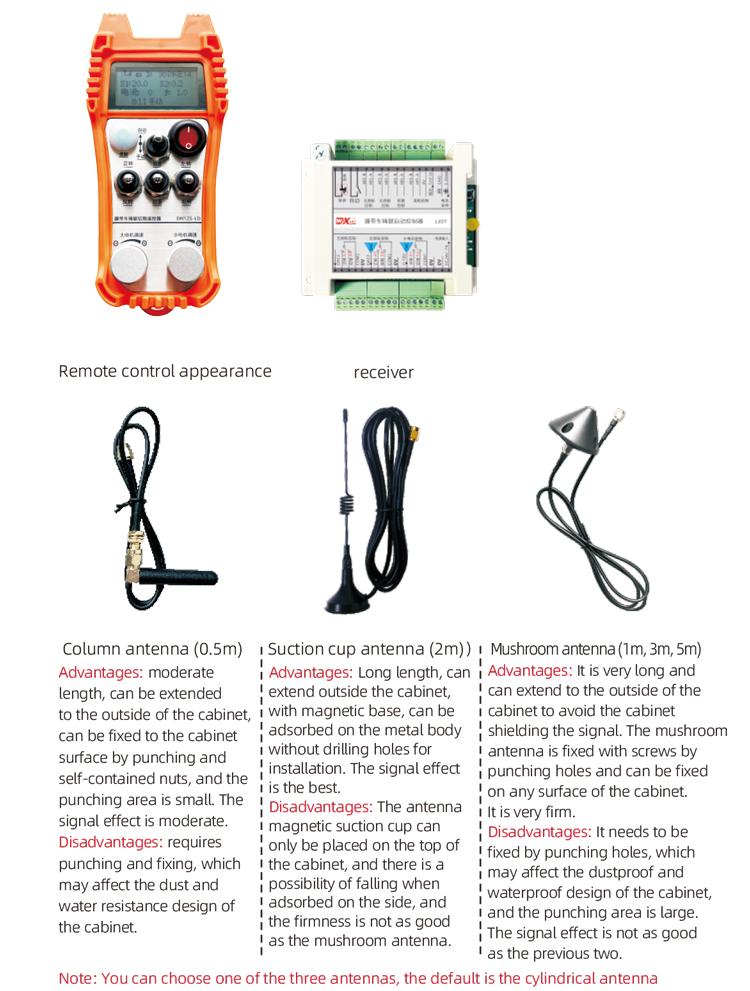
5. Дијаграм додатка за производ
6. Водич за инсталацију производа
6.1 Кораци за инсталацију производа
1. Инсталирајте пријемник у електрични ормар кроз копчу на леђима, или га инсталирајте у електрични ормар кроз рупе за вијке на четири угла пријемника.
2. Погледајте наш дијаграм ожичења пријемника, Упоредите своју опрему на лицу места, и повежите опрему на пријемник кроз жице.
3. Након што је пријемник фиксиран, Антена опремљена пријемником мора бити повезана, А спољни крај антене мора бити постављен или постављен изван електричног ормара. Препоручује се поставити на врх електричног ормара за најбољи ефекат сигнала. Забрањено је да антену оставља неповезану или поставља антену унутар електричног ормара, што може изазвати лош сигнал и неупотребљив.
4. Коначно, Инсталирајте батерију у даљинском управљачу, затегните поклопац батерије, а затим укључите прекидач напајања даљинског управљача. Након што је приказ даљинског управљача показује нормалан радни интерфејс, Можете извршити операцију даљинског управљача.
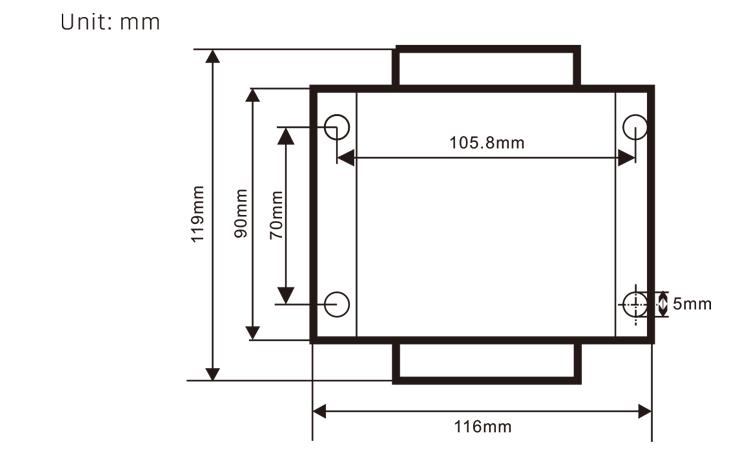
6.2 Димензије инсталације пријемника
6.3 Референтни дијаграм ожичења пријемника

7. Упутство за употребу производа
7.1 Подешавања параметара даљинског управљача
Како уносити позадинске параметре даљинског управљача: Пребаците се пређите на ручни режим, Подесите брзину малог мотора 25, или 0, 10, 20, 40, 50, и окрените прелазак напред велики мотор према горе 3 пута и доле 3 пролаз;
Користити “Мала контрола брзине мотора” дугме за окретање странице, Притисните Омогући и окрените малу гумбу за контролу мотора да бисте модификовали параметре; после модификације, Окрените страницу до краја, Изаберите Сачувај и излазите, и притисните дугме Омогући да бисте изашли из менија;
Параметри су следећи следећи:Максимална струја: Велики опсег тренутне вредности мотора, Распон подешавања 15-200А, подразумевано 60;
Параметри за контролу брзине: Аутоматски режим Мала брзина аутоматског аутоматског убрзања, то је мање брже, распон подешавања 200-1500, подразумевано 1000;
Параметар успоравања: Подесите горњу границу дозвољене промене брзине мотора. Када тренутне промене изван ове вредности, то ће успоравати. То је мањи, Што се брже леви и десни мотори ће успорити. Распон је 05-12, и подразумевано је 06;
Убрзање А1: Што је већа вредност, бржи се повећава брзина мотора, опсег 00-06, подразумевано 01; Успоравање А2: Што је већа вредност, Брже се брзина мотора опада, домет 00-06, подразумевано 02;
Омогућите регулацију брзине: Да ли је потребно да се мале регулације брзине мотора треба омогућити, 00 није омогућено, 01 је омогућено, подразумевано 01;
Покретање само-закључавања: Да ли ће се велики мотор аутоматски задржати само-закључавање након објављивања напред и обрнути прекидач, 00 се не одржава, 01 се одржава, подразумевано 01;
Максимално путовање: Максимална брзина левог и десног мотора, домет 10-100, подразумевано 50;
Струја сечења: Максимална струја сечења, Екран приказује ИЦ вредност, домет 15-160, подразумевано 30, Екран приказује ИЦ: 30. Горња граница овог параметра = максимална струја к 80%;
Подразумевана ограничења брзине: Подразумевана мала аутоматска брзина сечења мотора при покретању, домет 00-100, подразумевано 10, Екран приказује Ф1.0, Овај параметар је тачан само када је постављено максимално путовање 50.
Бежични канал: Подразумевано је 10. Када је сигнал даљинског управљача нестабилан или постоји интерференција сигнала на лицу места, Овај параметар можете да измените да бисте пребацили канале како би се избегло сметње;
Офсет о ограничењу брзине: Горња граница аутоматске брзине сечења малог мотора,домет 00-200, подразумевано 60, Екран приказује 6.0; Екран Времена горња граница = Оффсет ограничења брзине × 0.1;
Максимални домаћин: Максимална брзина великог мотора, домет 10-100, подразумевано 50;
МБУС уређај ( обавезно ): Велики избор мотора мотора, домет 00-03, подразумевано 03;
00- Шангај Ксиелин 01 Фуји
02- Ужурбан 03 Инованце (зхонгцхен, Робицон)
СБУС опрема (обавезно): Избор модела модела мале фреквенције мотора, домет 00-05, подразумевано 03;
00- Шангај Ксиелин 01 Фуји
02- Ужурбан 03 Инованце (зхонгцхен, Робицон)
04-Анцхоанда 05-Ноне
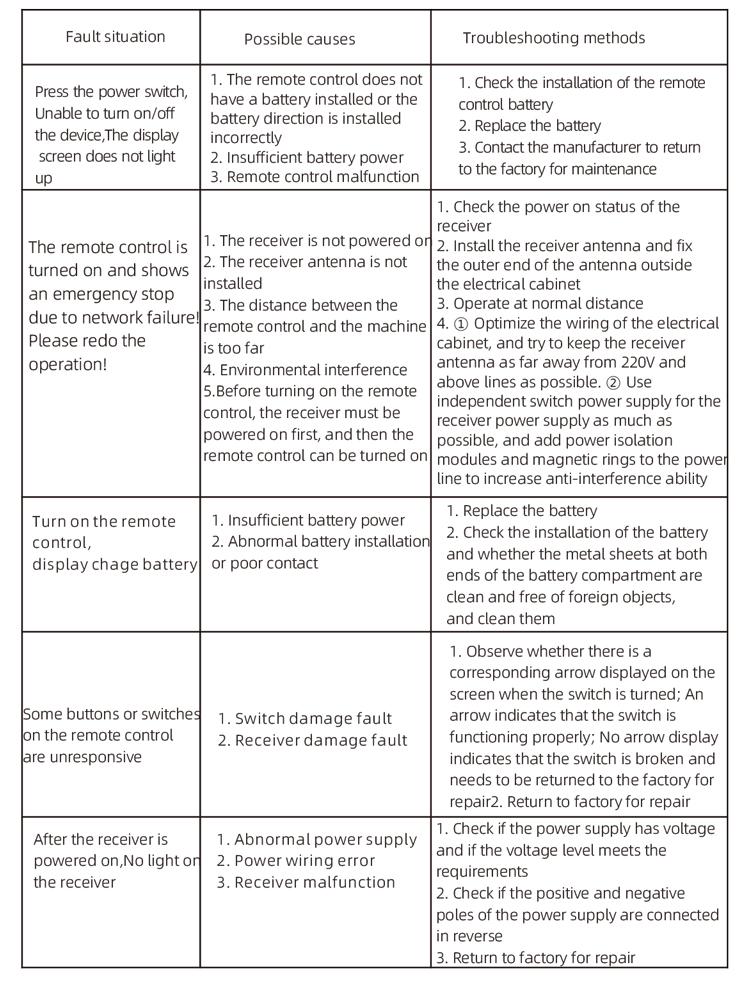
8. Решавање проблема за производ
7.2 Подешавање параметара претварача фреквенције
1. Избор извора команде: Цоммунит Цомманд Цханнел
2. Избор главног фреквенцијског извора: дата комуникација
3. Брзина бауда: 19200
4. Формат података: Нема верификације, Формат података<8-Н-1>
5. Локална адреса: Подесите претварач леве фреквенције у 1, десни претварач фреквенције у 2, и велики претварач фреквенције мотора на 3
7.3 Упутство за употребу даљинског управљача
1. Снага на машини, Укључите даљински управљач, Унесите позадину даљинског управљача, Подесите параметре позадинске позадине даљинског управљача, Маинлиит је постављање модела малих и великих претварача мотора (Прескочите овај корак ако их је произвођач машина већ поставио);
2. Подесите параметре претварача фреквенције (Прескочите овај корак ако је произвођач машине већ поставио);
3. Подесите даљински управљач у ручни режим, а затим користите даљински управљач да бисте машину померали на радни положај;
4. У ручном режиму, Подесите ИЦ вредност за сечење струје великог мотора и брзину великог мотора;
5. Пређите на аутоматско режим и подесите ограничење брзине резање Ф вредност за мали мотор;
6. У аутоматском режиму, Претворите велики прекидач мотора да бисте започели велики мотор, а затим окрените мали прекидач мотора на напред или назад. Даљински управљач улази у аутоматску режим сечења и започиње сечење.
9.Одржавање
1. Користите га у сувом окружењу на собној температури и притиску да бисте продужили свој радни век.
2. Избегавајте употребу у ненормалним окружењима као што су киша и мехурићи воде да бисте продужили радни век услуге.
3. Молимо вас да чистите претинац за батерију и метални шрапнел.
4. Избегавајте оштећење даљинског управљача због стискања и пада.
5. Ако се не користи дуже време, Уклоните батерију и чувајте даљинско управљање и батерију у чистом и сигурном месту.
6.За време складиштења и транспорта, Пажња треба посветити отпорности на влагу и удару.
10. Информације о безбедности
1. Молимо пажљиво прочитајте упутства пре употребе и забраните професионалцима да оперишу.
2. Молимо замените батерију правовремено када је батерија прениска да би се избегле грешке узроковане недовољном снагом, што може резултирати даљинским управљачем који не може да ради.
3. Ако је потребно поправљање, Молимо контактирајте произвођача. Ако је штета узрокована само поправкама, Произвођач неће пружити гаранцију