Опис
1.Увод производа
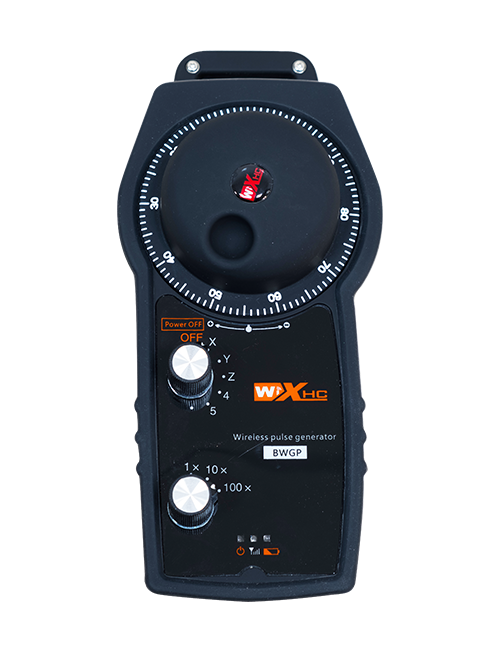
Wireless Remote Control is used for manual guidance, позиционирање, tool setting and other operations of CNC machine tools. Овај производ усваја технологију бежичног преноса, елиминишући традиционалну везу са опругом, смањење кварова опреме узрокованих кабловима, елиминишући недостатке провлачења каблова, уљне мрље, итд., and is more convenient to operate.It is widely applicable to CNC machine tools such as gantry machining centers, gantry vertical lathes, and CNC gear processing machines, and is compatible with various mainstream CNC system brands on the market, including Siemens, Митсубисхи, Фануц, Syntec and more.
2.Функције производа
1. Усваја бежичну комуникациону технологију од 433МХз са бежичном радном удаљености од 20 метар.
2.Адаптивно скакање фреквенције; 32 сетови бежичних даљинских управљача могу се користити истовремено без сметњи.
3.Supports the emergency stop button, and the emergency stop button remains effective even after the remote control is powered off.
4.Подржава 3 прилагођена дугмад са преклопним излазом ИО сигнала.
5.Подржава контролу по 6 оса, и 7 до контроле од 12 оса је прилагодљиво.
6. Подржава контролу увећања са 3 брзине, а контрола увећања са 4 брзине је прилагодљива.
7.подржава функцију дугмета за укључивање, који може да емитује комутационе ИО сигнале, а такође и избор осе контроле, увећање и кодер.
8.Подржава модификацију типа кодирања избора осе и увећања путем софтвера.
9. Supports pulse encoder with specification of 100 импулса по обртају.
10. Supports standard Type-C charging with 5V-2A charging specification; built-in battery
specification: 14500 / 1100мАх.
3. Спецификације производа
| Working Voltage and Current of Handheld Terminal |
3.7V/20.0mA |
| Charging Battery Specification |
3.7V/14500/1100mAh
|
| Low Voltage Alarm Range of Handheld Terminal |
<3.35У |
| Receiver Power Supply Voltage |
DC5V-24V/1A |
| Receiver Emergency Stop Output Load Range |
АЦ125В-1А/ДЦ30В-2А |
| Receiver Enable Output Load Range |
АЦ125В-1А/ДЦ30В-2А |
| Receiver Custom Button Output Load Range |
ДЦ24В/50мА
|
| Receiver Axis Selection Output Load Range |
ДЦ24В/50мА |
| Receiver magnification Output Load Range |
ДЦ24В/50мА |
| Handheld Terminal Transmit Power |
15дБм
|
| Пријемник прима осетљивост |
-100дБм |
| Фреквенција бежичне комуникације |
433МХз фреквенцијски опсег
|
| Wireless Communication Distance |
20 meters barrier-free distance
|
| Operating Temperature |
-25℃<К<55℃ |
| Safe drop height |
1 м
|
| Number of Custom Buttons |
3
|
| Product Weight |
546.86(g) |
| Product Dimensions |
200*87*72(мм) |
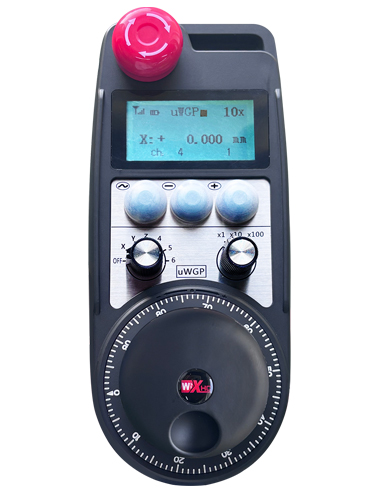
4. Увод у функцију производа
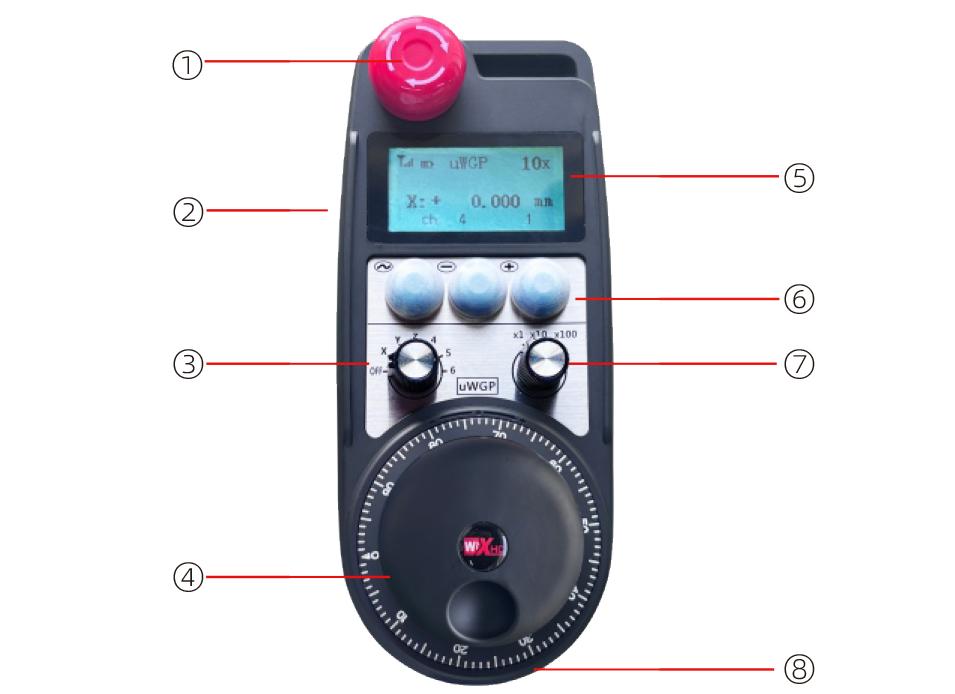
Белешке:
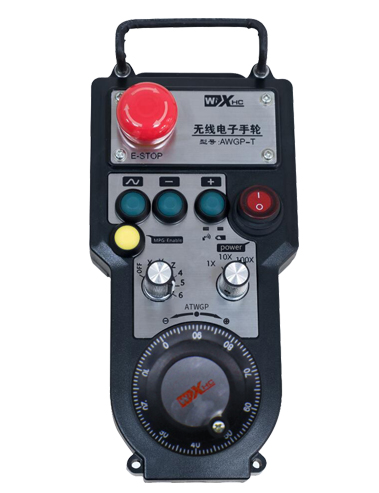
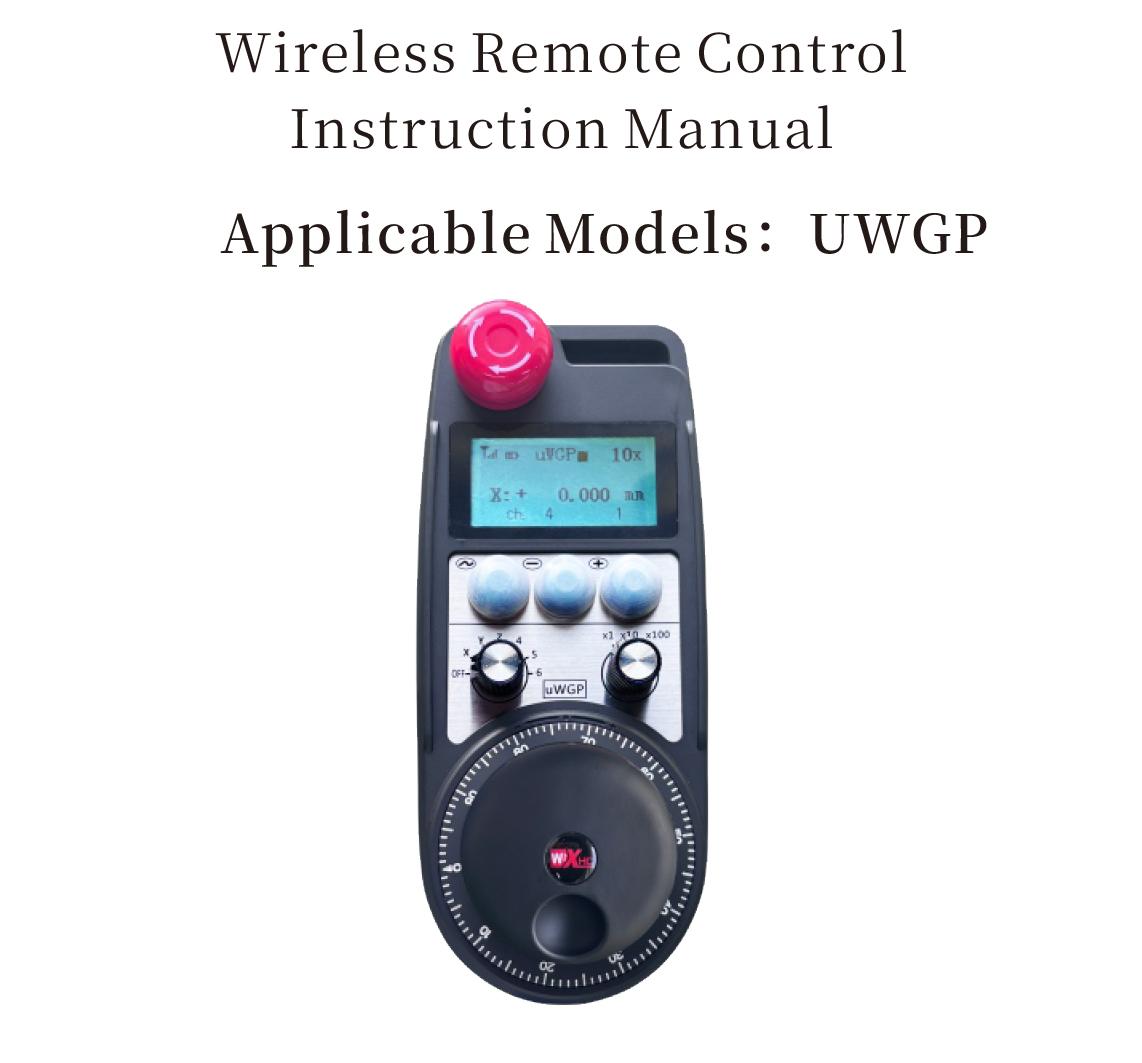
① Emergency Stop Button:
Притисните дугме за заустављање у нужди, the two groups of emergency stop IO outputs on the receiver will disconnect, and all remote control functions will be invalidated.Release the emergency stop button, the emergency stop IO outputs on the receiver will be closed, and all remote control functions will be restored. Поред тога, even if the remote control is powered off, pressing the emergency stop button can still activate the emergency stop IO output of the receiver.
② Enable Button:
Press either enable button on both sides, the two sets of enable IO outputs on the receiver will conduct. Release the enable button, and the enable IO outputs will disconnect. It is necessary to press and hold the enable button before toggling axis selection, magnification or rotating the remote control for the operation to take effect.This function can be canceled through the configuration software.
③ Axis Selection Switch (Power Switch):
Притисните и држите дугме за укључивање, then toggling the axis selection switch can control the movement of axis .Press and hold the enable button, then toggle the axis selection switch to switch the motion axis controlled by the remote control. Toggle the switch from the OFF position to any axis position, and the remote control will power on automatically.
④ Pulse Encoder:
Press and hold the enable button and rotate the pulse encoder, it will output pulse signals to control the movement of the machine axis.
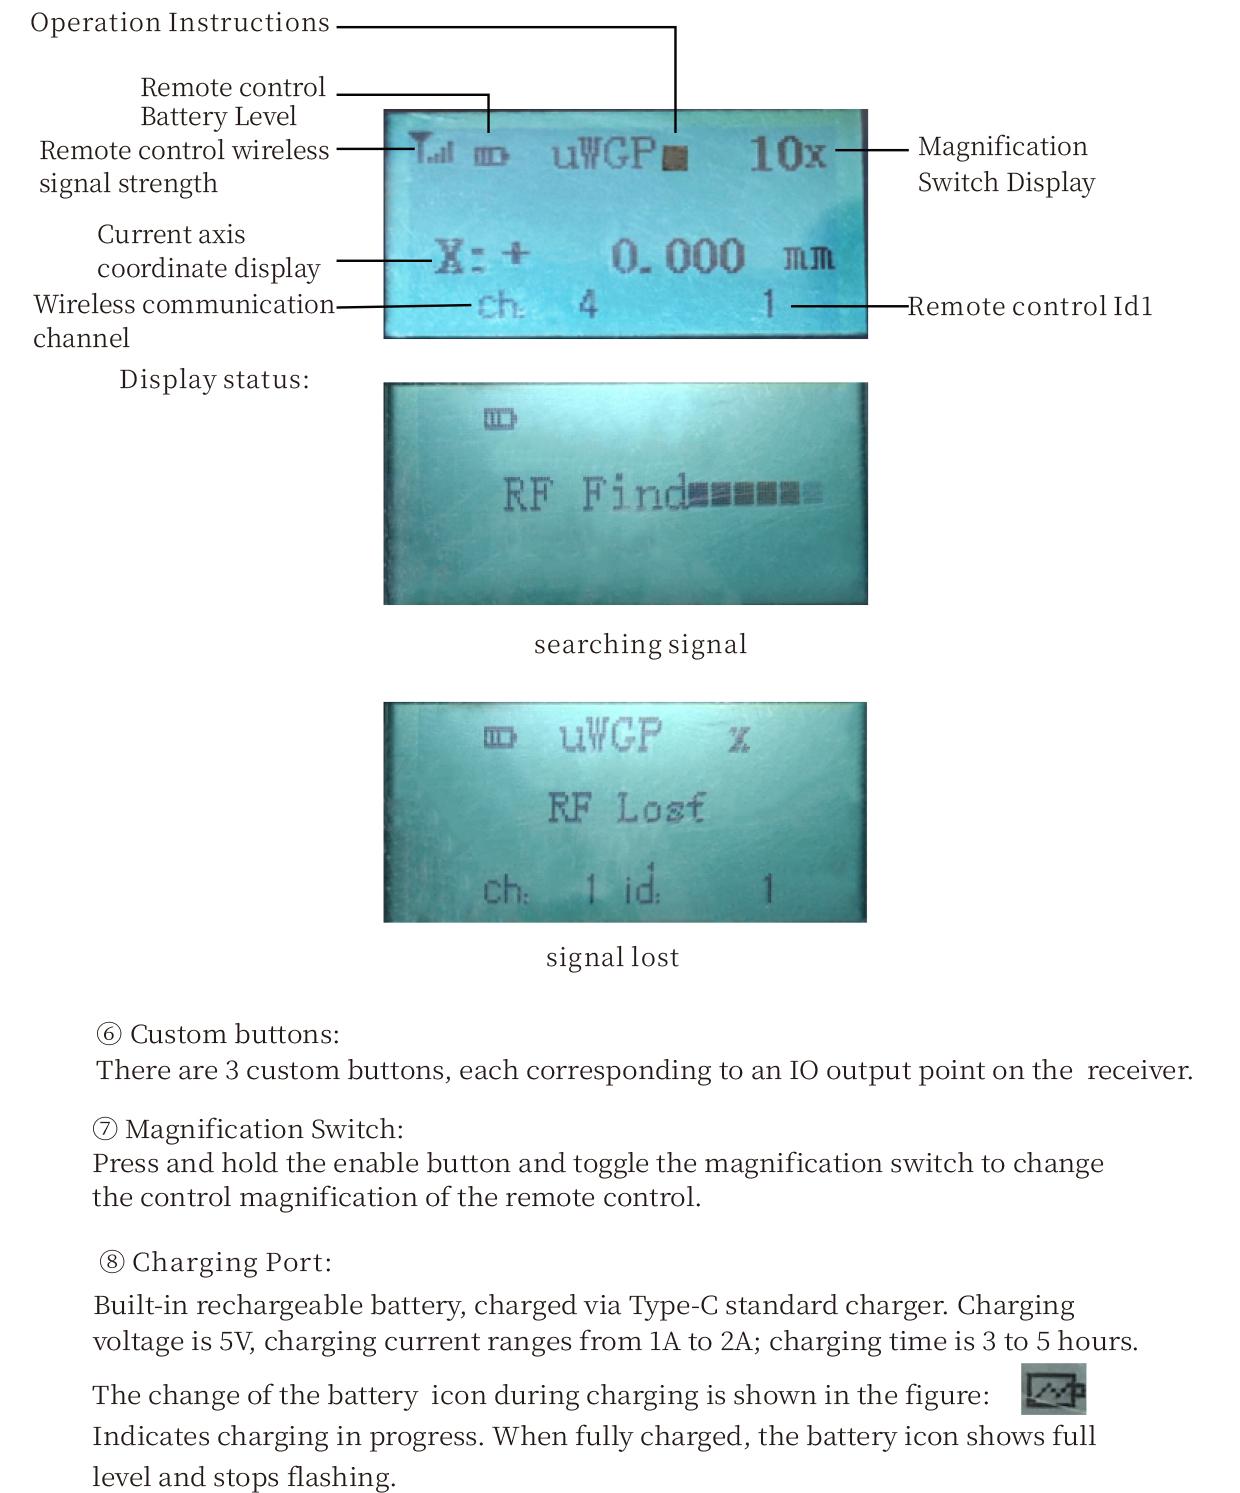
⑤ LCD Display Screen:
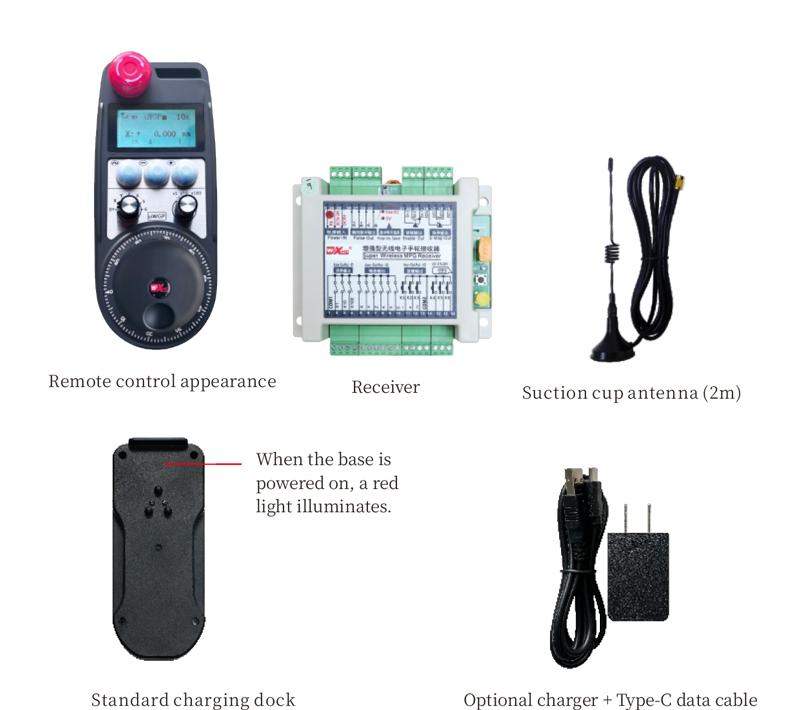
5. Product Accessories Diagram
6. Водич за инсталацију производа
6.1 Кораци за инсталацију производа
1. Install the receiver in the electrical cabinet via the buckle on its back, or mount it inside the electrical cabinet through the screw holes at the four corners of the receiver.
2. Погледајте наш дијаграм ожичења пријемника, упоредите га са вашом опремом на лицу места, and connect the equipment to the receiver with cables.
3. After the receiver is fixed in place, install the supporting antenna of the receiver properly. Mount or place the outer end of the antenna outside the electrical cabinet. It is recommended to place it on the top of the electrical cabinet for optimal signal performance. Do not leave the antenna uninstalled or place it inside the electrical cabinet; иначе, signal failure may occur.
4. Коначно, turn on the remote control power switch, then you can remotely operate the machine via the remote control.
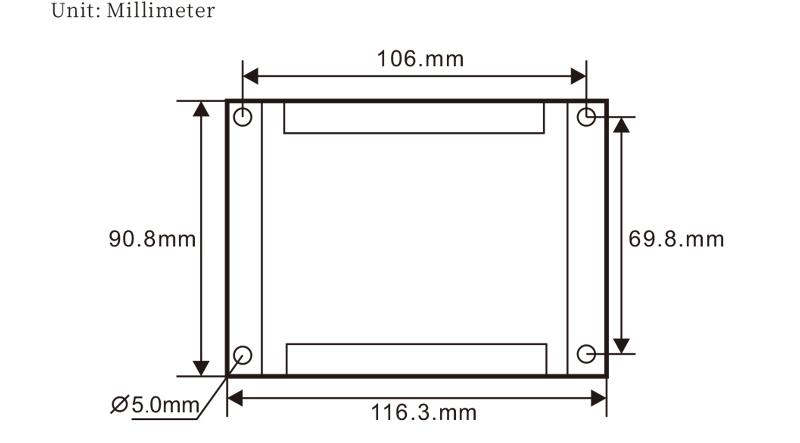
6.2 Receiver Installation Dimensions
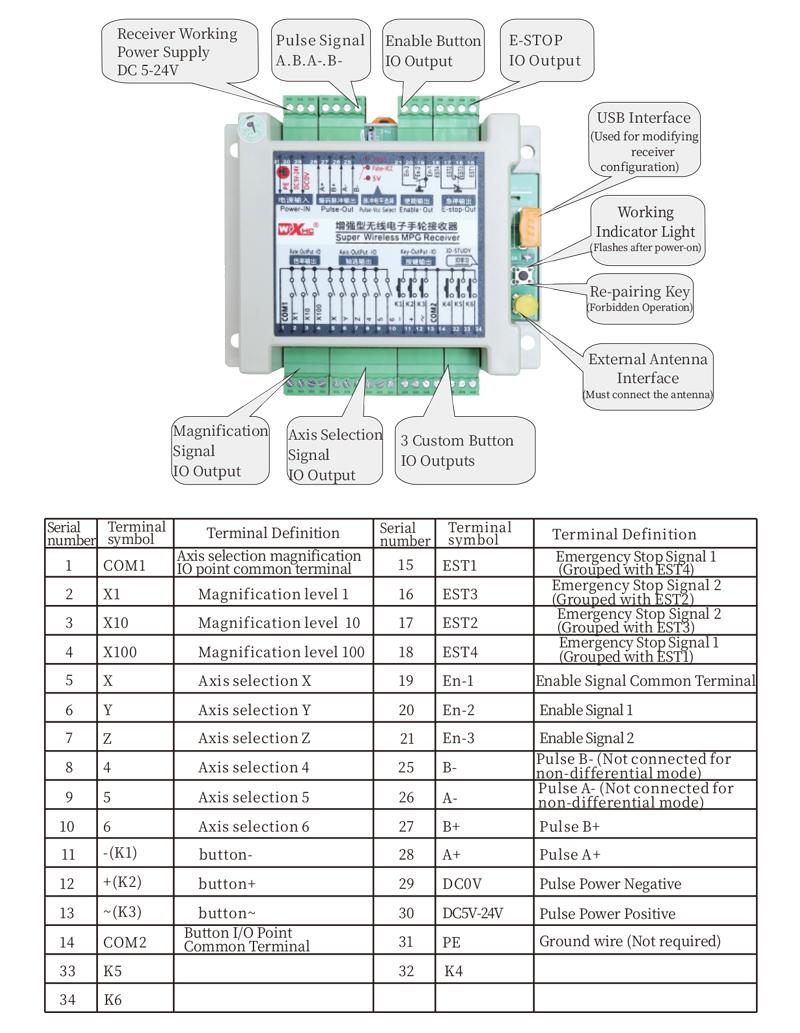
6.3 Референтни дијаграм ожичења пријемника
7. Упутство за употребу производа
1. Укључите машину и пријемник. The receiver operation indicator flashes. After the wireless electronic remote control is fully charged, toggle it from the OFF gear to the X-axis gear, and the remote control display lights up.
2. Select the axis : Притисните и држите дугме за укључивање, toggle the axis selection switch to select the axis to be operated.
3. Select the magnification: Притисните и држите дугме за укључивање, toggle the magnification switch to select the required magnification gear.
4. Axis movement: Притисните и држите дугме за укључивање, select the axis selection switch and the magnification switch, then rotate the pulse encoder. Rotate clockwise to move the axis in the positive direction, and rotate counterclockwise to move the axis in the negative direction.
5. Притисните и држите било које прилагођено дугме, the corresponding button IO output of the receiver will turn on; release the button, and the output will turn off.
6. Притисните дугме за заустављање у нужди, the corresponding emergency stop IO output of the receiver disconnects and the remote control function becomes invalid. Release the emergency stop button, the emergency stop IO output closes and the remote control function is restored.
7. If the wireless remote control is not operated for a period of time, аутоматски ће ући у режим мировања како би се смањила потрошња енергије. It can be used normally again by pressing the enable button again.
8.If the wireless remote control is not used for a long time, turn the axis switch to OFF to turn off the power and extend battery life
①:UWGP stands for appearance style.
②:Pulse Output Parameters:
01: Означава да је импулсни излазни сигнал А, Б; Импулсни напон 5В; количина импулса 100ППР.
02: Означава да је импулсни излазни сигнал А, Б; Импулсни напон 12В; pulse quantity 25PPR.
03: Означава да је импулсни излазни сигнал А, Б, А -, Б -; Импулсни напон 5В; количина импулса 100ППР.
04: Означава излаз отвореног кола ниског нивоа НПН, са импулсним излазним сигналима А и Б; The number of pulses is 100PPR.
05: Означава излаз ПНП извора високог нивоа, са импулсним излазним сигналима А и Б; Број импулса је 100ППР.
③:Represents the axis selection switch quantity; 6 stands for 6 секире, 7 stands for 7 секире, and so on.
④: Represents the signal type of the axis selection switch.A stands for point-to-point output signal, and B stands for encoder output signal.
⑤: Represents the signal type of the magnification switch.A stands for point-to-point output signal, and B stands for encoder output signal.
⑥: Представља број прилагођених дугмади; 3 corresponds to 6 Прилагођени тастери.
⑦: Represents the power supply for the system remote control. 05 stands for 5V power supply, и 24 stands for 24V power supply.
⑧: Represents the contact charging mode. It starts charging automatically when placed back on the charging base.
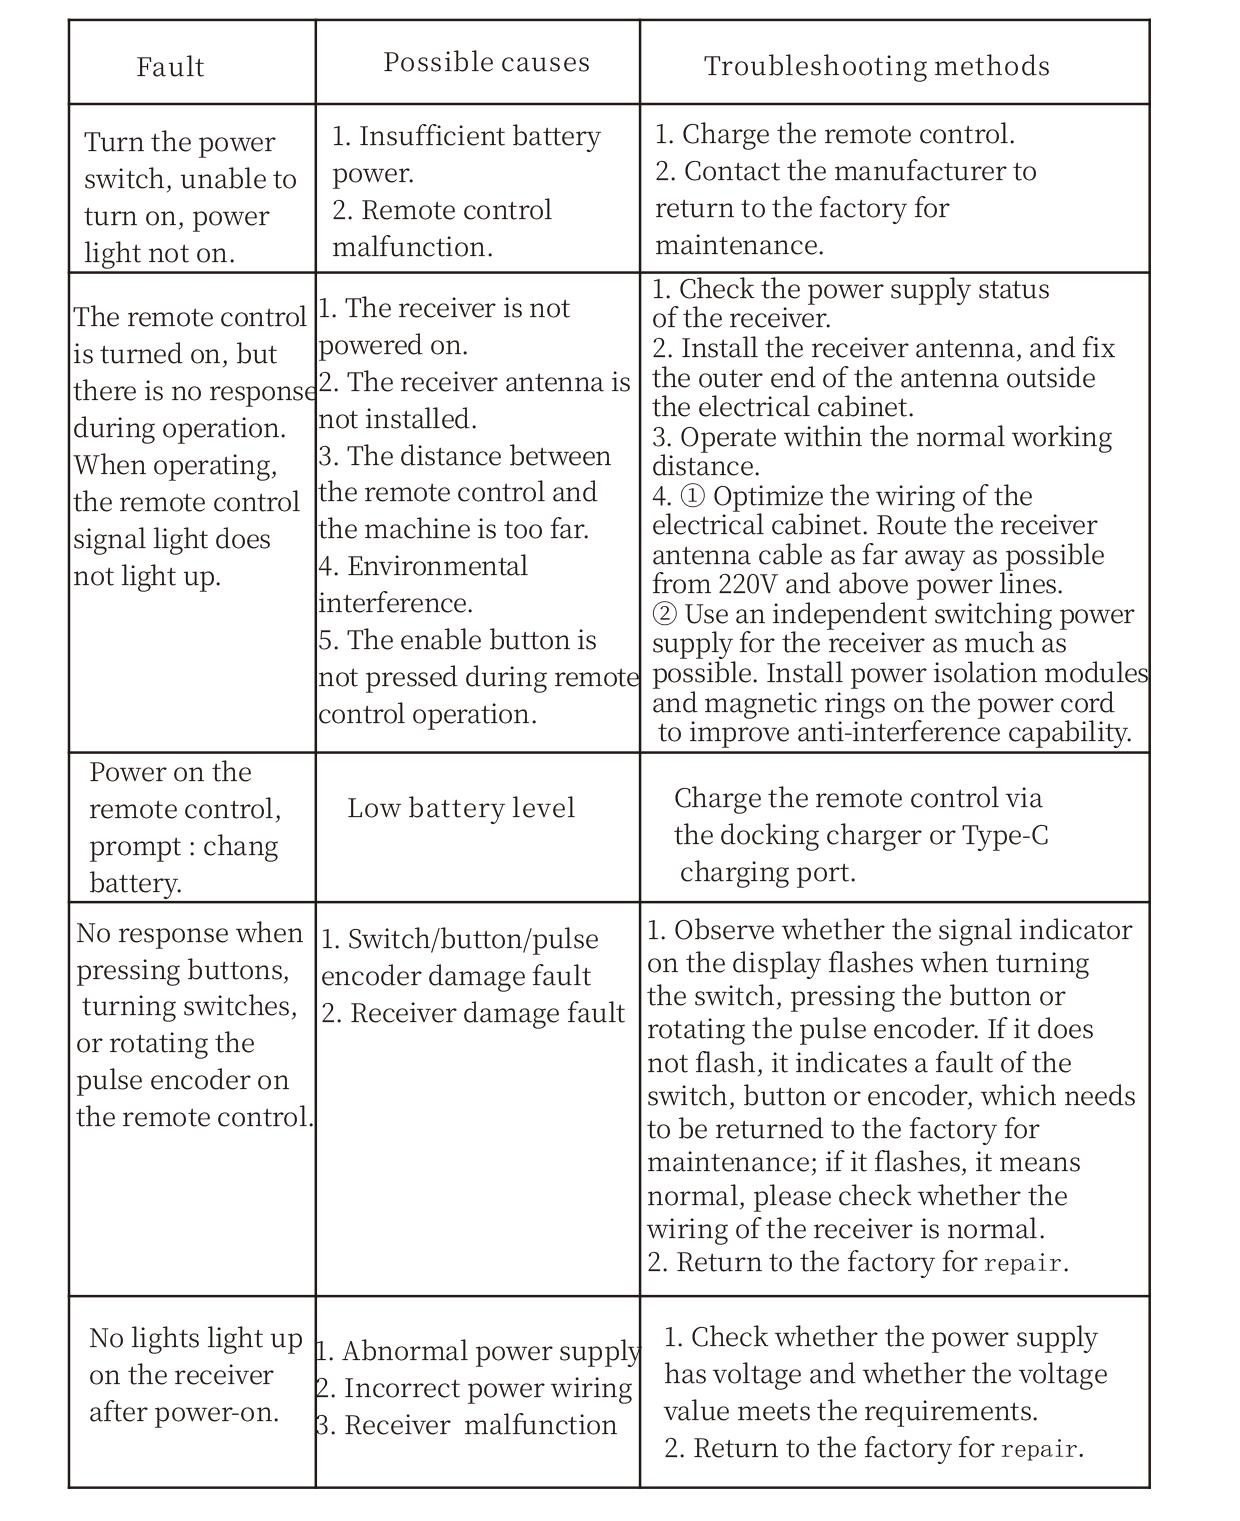
9. Решавање проблема за производ
10. Maintenance and upkeep
1. Користите га у сувом окружењу на собној температури и притиску да бисте продужили свој радни век.
2. Please avoid using in abnormal environments such as rain and water to extend the service life.
3. Please keep the appearance of the remote control clean to extend its service life.
4. Please avoid crushing, dropping, or bumping, итд. to prevent damage to the precision components inside the remote control or accuracy errors.
5. Ако се не користи дуже време, please store the remote control in a clean and safe place.
6. Avoid moisture and shock during storage and transportation.
11. Информације о безбедности
1. Молимо пажљиво прочитајте упутства пре употребе и забраните професионалцима да оперишу.
2. Please charge the remote control in a timely manner when the battery level is too low, to avoid malfunction and operational errors caused by insufficient power.
3. If you repair it yourself and cause damage, the warranty will be void.