Beskrivning
1. Produktintroduktion
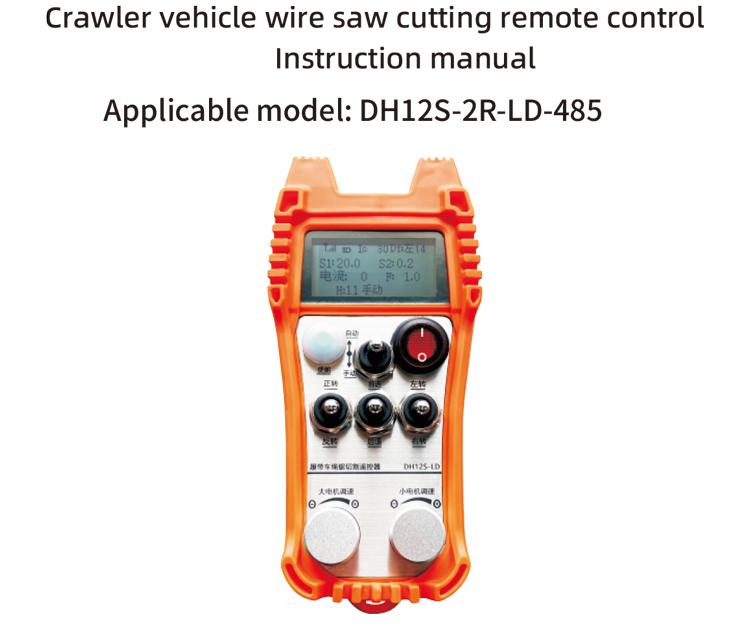
Den automatiska skärfjärrkontrollen för bandrepsågen är lämplig för skärmaskiner för bandrepsågar. Den använder 485ModbusRTU-protokollet för att styra hastighetsstarten och främre och bakre vänster och höger riktningsstyrning av vänster och höger bandväxelriktare, samt det stora motorfrekvensomvandlingsprotokollet RTU för att styra hastighetsstart och främre och bakre vänster och höger riktningsstyrning av vänster och höger bandväxelriktare, och den stora motorfrekvensomvandlingen överströmsanalys och jämförelse, justera automatiskt vänster och höger bandhastighet i realtid för att uppnå automatisk skärfunktion.
2. Produktfunktioner
1. Anta 433 MHz trådlös kommunikationsteknik, Trådlös driftsavstånd är 100 mätare.
2. Använd automatisk frekvenshoppningsfunktion, använda 32 uppsättningar av trådlösa fjärrkontroller samtidigt, utan att påverka varandra.
3. Stöd alla växelriktare med 485-Modbus RTU-protokoll. De invertermärken som har anpassats är bl.a:Shanghai Xielin, Fuji, Innovation, Zhongchen, INVT, Anchuanda. Om varumärket inte är ada, kontakta oss för anpassning.
4. Stöd start av stor motoromriktare, hastighetsreglering, och aktuell läsning.
5. Stöd för vänster och höger bandväxelriktares hastighetsreglering, start, fram och bak vänster och höger kontroll.
6. Stöd vänster och höger bandväxelriktares korrigering av rak linje för att hålla maskinen i rörelse i en rak linje.
7. Stöd repsåg automatisk skärfunktion, justera automatiskt vänster och höger larvhastighet i realtid enligt den stora motorströminformationen.
8. Samtidigt, den är kompatibel med direkt IO-utgång för att styra start och stopp av motorn, och analog spänningsutgång för att styra motorhastigheten.
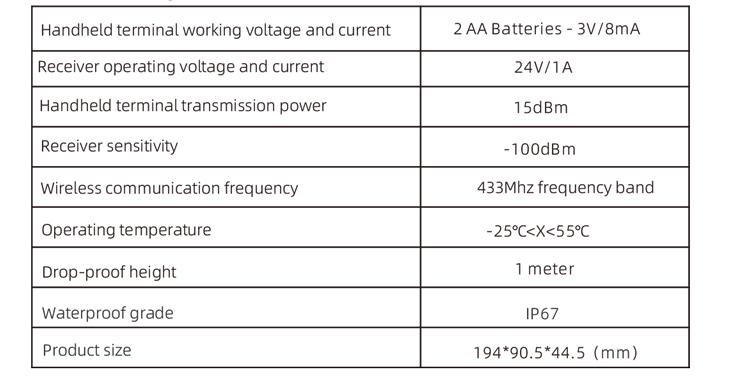
3. Produktspecifikationer
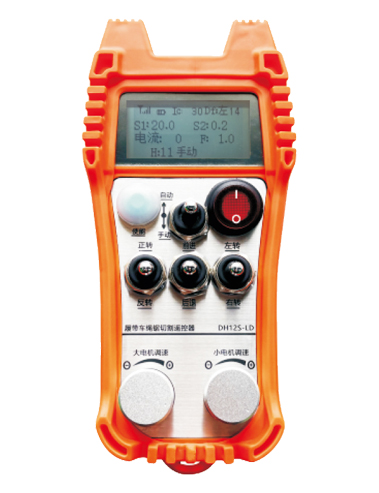
4. Produktfunktion Introduktion

Anteckningar:
①Skärmdisplay:

②Lägesomkopplare:
Använder en 2-nivåomkopplare, det är möjligt att växla mellan automatiskt och manuellt läge, och motsvarande läge kommer att visas på skärmen för växling.
③ Aktivera:
Kombinationsknappar, vissa operationer kräver att du håller ned aktiveringsknappen för drift, vänligen se instruktionerna för varje switch för detaljer.
④ Stor motorströmbrytare:
Använder en 3-växlad återställningsbrytare, Om du drar i den här omkopplaren kan du styra den stora motorns rotation framåt och bakåt. Efter att ha släppt det, staten kommer att finnas kvar, och det kommer att finnas motsvarande displayer på skärmen. t-pilen indikerar rotation framåt, och y-pilen indikerar omvänd rotation.
⑤ Liten motor framåt/backomkopplare:
Använder en 3-växlad självlåsande strömbrytare, genom att dra i den här omkopplaren kan du styra den lilla motorn att röra sig framåt och bakåt. Motsvarande display visas på skärmen, med t-pilen som anger framåt och ↓-pilen anger bakåt.
⑥ Strömbrytare för fjärrkontroll:
Fjärrkontrollens skärm är påslagen.
⑦ liten motoromkopplare:
Använder en 3-växlad återställningsbrytare, när den används manuellt, den lilla motorn kan styras att svänga åt vänster eller höger. En gång släppt, fjärrkontrollen kommer automatiskt att stoppa denna åtgärd. När den är i framåtläge, vrid på den här knappen och motsvarande display visas på skärmen + pil indikerar vänstersväng, och den – pilen indikerar högersväng.När i backläge, vrid på den här knappen och motsvarande display visas på skärmen + pil indikerar vänstersväng, och den – pilen indikerar högersväng. Tryck och håll ned aktiveringsknappen, vrid sedan denna omkopplare för att utföra en stationär svängfunktion, gör svängen snabbare.
⑧ Stor motorhastighetsreglering:
Använda en flervarvs pulsgivare, vrid ratten för att justera hastigheten S1 för den stora motorn För varje 1 nätrotation, hastighetsvärdet för den stora motorn ändras med ungefär 0.2 enheter, och snabb rotation kan snabbt ändra hastighetsvärdet för den stora motorn.
9 Liten motorhastighetsreglering (linjär korrigering):För att använda flervarvskodningsratten, i manuellt läge, för varje 1 vrid på vredet, hastighetsvärdet för den lilla motorn ändras med ungefär 0.1 enheter. Snabb rotation kan snabbt ändra hastighetsvärdet för den lilla motorn.
I automatiskt läge, tryck på aktiveringsknappen och rotera 1 rutnät varje gång. Hastighetsgränsvärdet F för den lilla motorn ändras med ungefär 0.1 enheter. Snabb rotation kan snabbt ändra hastighetsgränsvärdet för den lilla motorn. Tryck på aktiveringsknappen, vrid vredet åt höger, och den raka korrigeringsdisplayen visar D f: vänster. Varje vridning av ratten ökar med 1 enhet; Vrid vänster ratt, korrigeringsdisplay för rak linje: Df: rätt. Varje vridning av ratten ökar med 1 enhet, och varje korrigeringsenhet motsvarar en motorhastighetsstyrande AVI-spänning på ca 0.02 V.
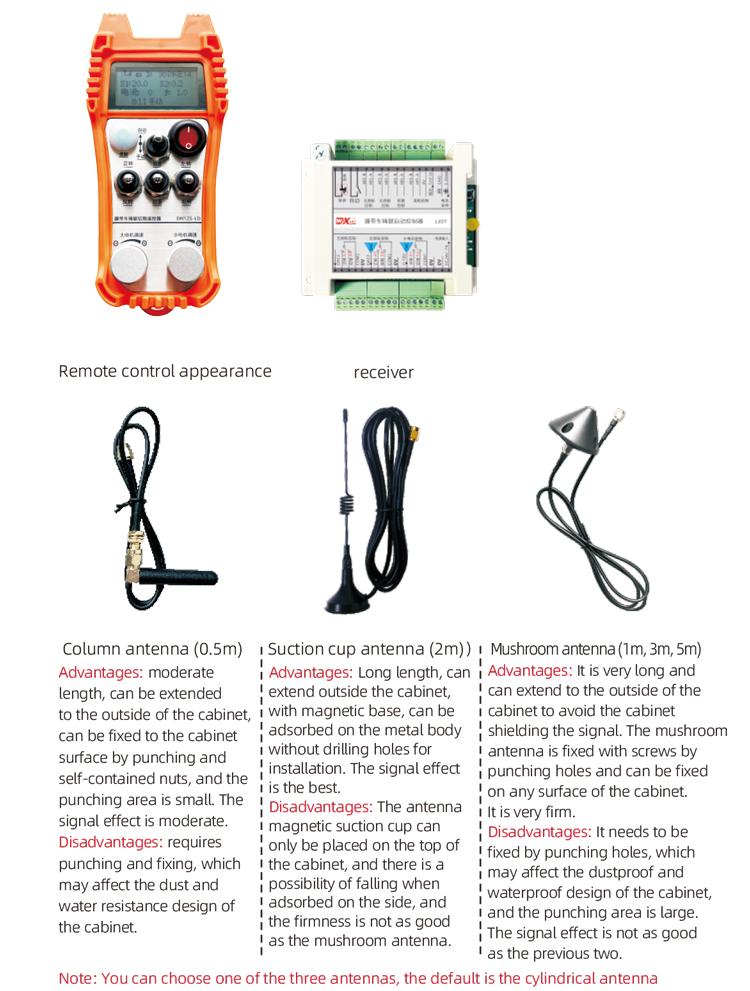
5. Produkttillbehörsdiagram
6. Produktinstallationsguide
6.1 Produktinstallationssteg
1. Installera mottagaren i elskåpet genom spännet på baksidan, eller installera den i elskåpet genom skruvhålen i mottagarens fyra hörn.
2. Se vårt kopplingsschema för mottagaren, jämför din utrustning på plats, och anslut utrustningen till mottagaren genom kablar.
3. Efter att mottagaren är fixerad, antennen som är utrustad med mottagaren måste vara ansluten, och den yttre änden av antennen måste installeras eller placeras utanför elskåpet. Det rekommenderas att placera den ovanpå elskåpet för bästa signaleffekt. Det är förbjudet att lämna antennen oansluten eller placera antennen inuti elskåpet, vilket kan orsaka dålig signal och oanvändbar.
4. Slutligen, installera batteriet i fjärrkontrollen, dra åt batteriluckan, och slå sedan på strömbrytaren på fjärrkontrollen. Efter att fjärrkontrollen visar det normala arbetsgränssnittet, du kan utföra fjärrkontroll.
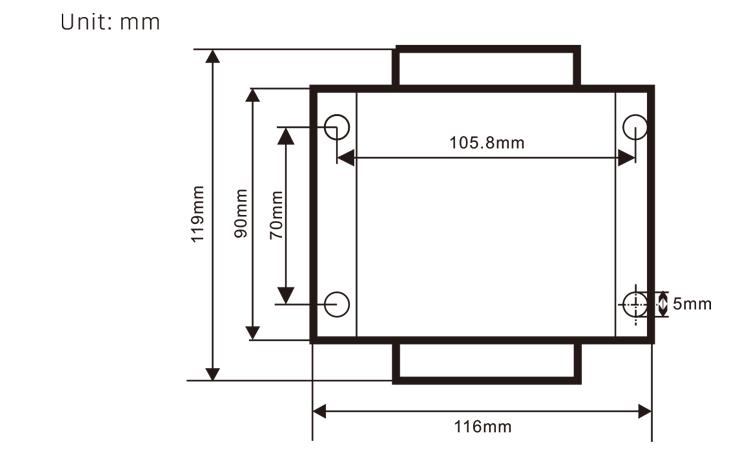
6.2 Monteringsmått för mottagare
6.3 Referensdiagram för mottagaren

7. Produktens bruksanvisning
7.1 Fjärrkontrollparameterinställningar
Hur man anger bakgrundsparametrarna för fjärrkontrollen: vrid lägesomkopplaren till manuellt läge, justera hastigheten på den lilla motorn till 25, eller 0, 10, 20, 40, 50, och vrid framströmställaren på den stora motorn uppåt 3 gånger och nedåt 3 gånger;
Använd “Liten motorhastighetskontroll” ratten för att vända blad, tryck på Aktivera och vrid på den lilla motorhastighetskontrollen för att ändra parametrarna; efter modifiering, vänd sidan till slutet, välj Spara och avsluta, och tryck på knappen Aktivera för att lämna menyn;
Parametrarna är följande:Maximal ström: stort område för återkoppling av motorström, inställningsområde 15-200A, standard 60;
Hastighetskontrollparametrar: automatiskt läge liten motor automatisk accelerationshastighet, ju mindre desto snabbare, inställningsområde 200-1500, standard 1000;
Retardationsparameter: Ställ in den övre gränsen för den tillåtna motorhastighetsändringen. När strömmen ändras bortom detta värde, det kommer att bromsa in. Ju mindre den är, desto snabbare bromsar vänster och höger motorer. Utbudet är 05-12, och standard är 06;
Acceleration A1: Ju större värde, desto snabbare ökar motorhastigheten, intervall 00-06, standard 01; Retardation A2: Ju större värde, desto snabbare minskar motorhastigheten, räckvidd 00-06, standard 02;
Aktivera hastighetsreglering: Om den lilla motorhastighetsregleringen måste aktiveras, 00 är inte aktiverat, 01 är aktiverat, standard 01;
Uppstart självlåsande: Huruvida den stora motorn automatiskt kommer att fortsätta självlåsande efter att framåt- och backreglaget släpps, 00 upprätthålls inte, 01 bibehålls, standard 01;
Maximalt resande: Maximal hastighet för vänster och höger motor, räckvidd 10-100, standard 50;
Skärström: Maximal skärström, skärmen visar IC-värdet, räckvidd 15-160, standard 30, skärmen visar IC: 30. Den övre gränsen för denna parameter = maximal ström x 80%;
Standardhastighetsgräns: Standardinställningen för liten motors automatiska skärhastighet vid start, räckvidd 00-100, standard 10, skärmen visar F1.0, denna parameter är endast korrekt när den maximala färdvägen är inställd på 50.
Trådlös kanal: Standard är 10. När fjärrkontrollens signal är instabil eller det finns signalstörningar på plats, Du kan ändra denna parameter för att byta kanal för att undvika störningar;
Hastighetsgränsförskjutning: Den övre gränsen för den automatiska skärhastigheten för den lilla motorn,räckvidd 00-200, standard 60, skärmen visas 6.0; Visningsvärde övre gräns = hastighetsgräns offset × 0.1;
Maximal värd: Den stora motorns maximala hastighet, räckvidd 10-100, standard 50;
Mbus-enhet ( obligatorisk ): stort urval av motorväxelriktare, räckvidd 00-03, standard 03;
00- Shanghai Xielin 01 Fuji
02- INVT 03 Inovance (Zhongchen, Robicon)
SBUS-utrustning (obligatorisk): Val av modell för liten motorfrekvensomformare, räckvidd 00-05, standard 03;
00- Shanghai Xielin 01 Fuji
02- INVT 03 Inovance (Zhongchen, Robicon)
04-Anchuanda 05-Inga
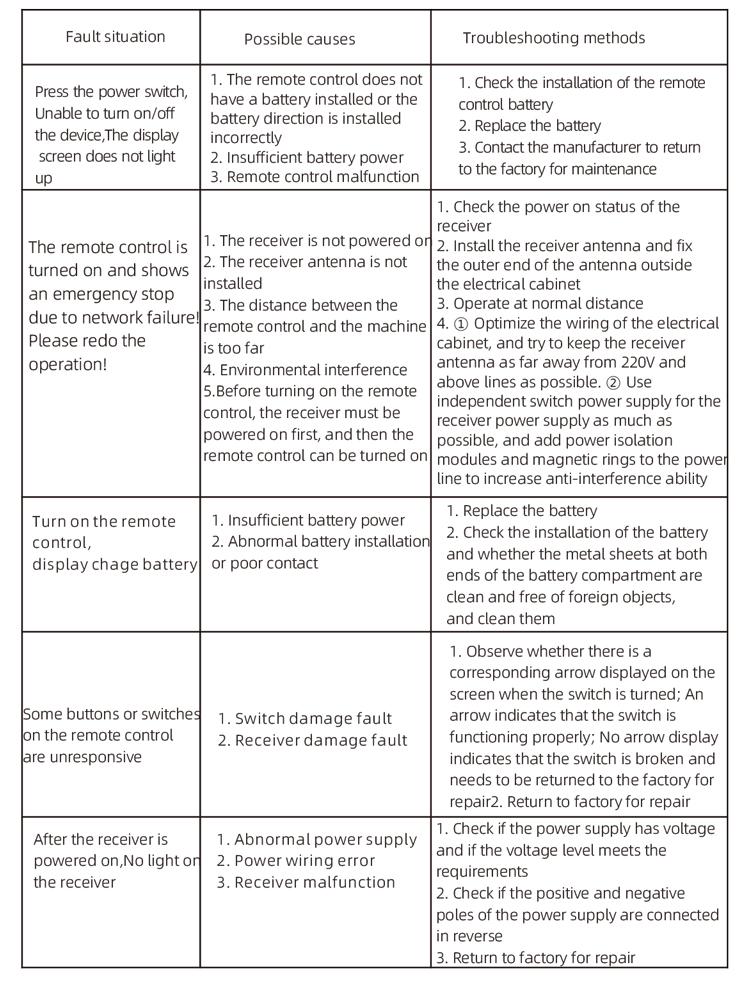
8. Felsökning av produkten
7.2 Parameterinställning av frekvensomformaren
1. Val av kommandokälla: Kommunikationskommandokanal
2. Val av huvudfrekvenskälla: kommunikation ges
3. Baudhastighet: 19200
4. Dataformat: Ingen verifiering, dataformat<8-N-1>
5. Lokal adress: Ställ in den vänstra frekvensomformaren på 1, rätt frekvensomformare till 2, och den stora motorns frekvensomvandlare till 3
7.3 Driftinstruktioner för fjärrkontrollen
1. Slå på maskinen, Slå på fjärrkontrollen, ange fjärrkontrollens bakgrund, ställ in fjärrkontrollens bakgrundsparametrar, Det är främst att ställa in modellerna för små och stora motorfrekvensomvandlare (hoppa över detta steg om maskintillverkaren redan har ställt in dem);
2. Ställ in parametrarna för frekvensomformaren (hoppa över detta steg om maskintillverkaren redan har ställt in det);
3. Ställ in fjärrkontrollen på manuellt läge, och använd sedan fjärrkontrollen för att flytta maskinen till arbetsläge;
4. I manuellt läge, ställ in IC-värdet för skärströmmen för den stora motorn och hastigheten för den stora motorn;
5. Växla till automatiskt läge och ställ in skärhastighetsgränsen F-värde för den lilla motorn;
6. I automatiskt läge, vrid den stora motoromkopplaren framåt för att starta den stora motorn, och vrid sedan den lilla motoromkopplaren till framåt eller bakåt. Fjärrkontrollen går in i automatiskt skärläge och börjar skära.
9.Underhåll
1. Använd den i en torr miljö vid rumstemperatur och tryck för att förlänga dess livslängd.
2. Undvik att använda i onormala miljöer som regn och vattenbubblor för att förlänga livslängden.
3. Håll batterifacket och metallsplitterområdet rena.
4. Undvik att skada fjärrkontrollen på grund av klämning och fall.
5. Om det inte används länge, ta ur batteriet och förvara fjärrkontrollen och batteriet på en ren och säker plats.
6.Under lagring och transport, uppmärksamhet bör ägnas åt fukt och stöttålighet.
10. Säkerhetsinformation
1. Vänligen läs instruktionerna noggrant före användning och förbjud icke-professionella att använda.
2. Vänligen byt ut batteriet i tid när batteriet är för lågt för att undvika fel orsakade av otillräcklig ström, vilket kan leda till att fjärrkontrollen inte fungerar.
3. Om reparation krävs, Kontakta tillverkaren. Om skadan orsakas av självreparation, tillverkaren kommer inte att ge garanti