Stödja 2 anpassningsbara knappar, Med Switch-typ IO-signalutgång;
Stödja -2 axelstyrning;
Stöder förstoringskontroll på 3 nivåer;

1.Produktintroduktion
2. Produktens funktionella egenskaper
| Driftspänning och ström för trådlös fjärrkontroll |
3V/14MA
|
| Batterispecifikationer | 2 AA alkaliska batterier, storlek 5 |
| Lågspänningslarmområde för trådlös fjärrkontroll | < 2.3V |
| Mottagarens strömförsörjningsspänning | DC5V-24V/A |
| Mottagarens nödstopp utgångsbelastningsområde | AC125V-1A/DC30V-2A |
| Mottagaraktivering av utgångsbelastningsområde |
AC125V-1A/DC30V-2A
|
| Mottagarens anpassade belastningsområde för knapputgång | DC24V/50mA |
| Val av utgångslastområde för mottagareaxel | DC24V/50mA |
| Mottagarens förstoring utgående belastningsområde | DC24V/50mA |
| Överföringseffekt för handterminal |
15dBm
|
| Mottagare som tar emot känslighet | -100dBm |
| Trådlös kommunikationsfrekvens | 433MHz frekvensband |
| Trådlöst kommunikationsavstånd | Barriärfritt avstånd av 40 mätare |
| Drifttemperatur | -25℃ < X < 55℃ |
| Anti fallhöjd | 1 (meter) |
| Anpassad knappkvantitet | 2 |


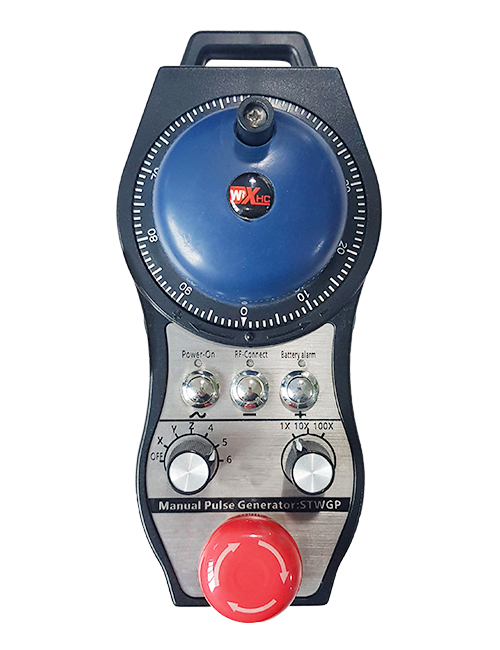
① Pulsgivare:
Tryck och håll ned aktiveringsknappen, skaka pulsgivaren, avge en pulssignal,och styr maskinaxelns rörelse.
② Aktiveringsknapp:
Tryck på endera aktiveringsknappen på vardera sidan, och de två uppsättningarna av aktiverade IO-utgångar på mottagaren kommer att leda. Släpp aktiveringsknappen för att koppla bort aktiverings-IO-utgången; Och innan du byter axelvalsförstoring och skakar handratten,aktiveringsknappen måste hållas nedtryckt för att vara effektiv; Denna funktion kan avbrytas via konfigurationsprogramvara.
③ Indikatorlampor:
Vänster sidoljus: ström på ljus,handratten använder axeln för att välja AV för ström på, och denna lampa förblir tänd efter att strömmen slagits på;
Mellanljus: en signallampa som tänds när man använder någon funktion på handratten, och lyser inte när det inte görs någon operation;
Höger sidoljus: Låga spänningslarm, låg batterinivå,denna lampa blinkar eller förblir tänd, batteriet måste bytas ut.
④ Nödstoppsknapp:
Tryck på nödstoppsknappen, och de två uppsättningarna av nödstopp IO-utgångar på mottagaren kommer att kopplas bort, och alla funktioner på handratten kommer att vara ogiltiga.
⑤ Förstoringsbrytare:
Tryck och håll ned aktiveringsknappen för att byta förstoringsknapp, som kan ändra förstoringen som styrs av handratten.
⑥ Axelvalsomkopplare (strömbrytare):
Tryck och håll ned aktiveringsknappen för att byta axelvalsomkopplare, som kan växla rörelseaxeln som styrs av handratten. Växla denna omkopplare från AV till valfri axel och slå på handratten.
⑦ Anpassad knapp:
Två anpassade knappar, var och en motsvarar en IO-utgångspunkt på mottagaren.

1. Installera mottagaren i elskåpet genom spännet på baksidan, eller installera den i skåpet genom skruvhålen i mottagarens fyra hörn.
2. Se vårt kopplingsschema för mottagaren och jämför det med din utrustning på plats. Anslut utrustningen till mottagaren via kablar.
3.Efter att mottagaren är ordentligt fixerad, antennen som är utrustad med mottagaren måste vara ansluten, och den yttre änden av antennen ska installeras eller placeras utanför elskåpet. Det rekommenderas att placera den ovanpå elskåpet för bästa signaleffekt. Det är förbjudet att lämna antennen oansluten eller placera den inuti elskåpet, eftersom detta kan leda till att signalen blir oanvändbar.
4. Slutligen, slå på strömbrytaren på handratten, och du kan fjärrstyra maskinen med handratten.
6.2 Monteringsmått för mottagare

6.3 Referensdiagram för mottagaren

7. Produktens bruksanvisning
1. Slå på maskinen och mottagaren. Mottagarens funktionsindikator blinkar. Installera batteriet i den trådlösa elektroniska handratten, säkra batteriluckan, och
slå på strömbrytaren på den trådlösa elektroniska handratten. Handrattens batterinivåindikator lyser.
2. Välj koordinataxeln: Tryck och håll ned aktiveringsknappen, växla axelvalsomkopplaren, och välj den axel du vill styra.
3. Välj förstoring: Tryck och håll ned aktiveringsknappen, växla till förstoringsomkopplaren,och välj önskad förstoringsnivå.
4. Rörlig axel: Tryck och håll ned aktiveringsknappen, välj omkopplaren för axelval, välj förstoringsknappen, och rotera sedan pulsgivaren. Vrid medurs för att flytta
positiv axel och moturs för att flytta den negativa axeln.
5. Tryck och håll ned valfri anpassad knapp, och motsvarande knapp IO-utgång på mottagaren slås på. Släpp knappen, och utgången kommer att stängas av.
6. Tryck på nödstoppsknappen, motsvarande nödstopp IO-utgång från mottagaren kommer att kopplas bort, handrattsfunktionen kommer att avaktiveras,släpp nödstoppsknappen, nödstoppets IO-utgång kommer att stängas, och handrattsfunktionen kommer att återställas.
7. Om handratten inte används under en tid, den går automatiskt in i viloläge för att minska strömförbrukningen. När den används igen, handratten kan aktiveras genom att trycka på aktiveringsknappen.
8. Om handratten inte används under en längre tid, det rekommenderas att växla handhjulsaxeln till AV-läget, stäng av strömmen till handratten, och förlänga batteriets livslängd.
8. Produktmodellbeskrivning

① :ZTWGP representerar utseendets stil
②:Pulsutgångsparametrar:
01: Indikerar att pulsutgångssignalen är A, B; Pulsspänning 5V; pulsmängd 100PPR.
02:Indikerar att pulsutgångssignalerna är A och B; Pulsspänning 12V; pulsmängd 100PPR.
03:Indikerar att pulsutgångssignalerna är A, B, A -, B -; Pulsspänning 5V; pulsmängd 100PPR.
04:Indikerar en lågnivå NPN öppen kretsutgång, med pulsutgångssignaler A och B;Antalet pulser är 100PPR.
05:Indikerar PNP-källa på hög nivå, med pulsutgångssignaler A och B; Antalet pulser är 100PPR.
③:Representerar antalet axelvalsomkopplare, 2 representerar 2 yxor.
④:Representerar typen av omkopplarsignal för axelval, A representerar punkt-till-punkt utsignal, och B representerar en kodad utsignal.
⑤:Representerar typen av multiplikationsomkopplarsignal, A representerar punkt-till-punkt utsignal, och B representerar en kodad utsignal.
⑥:Representerar antalet anpassade knappar, 2 representerar 2 anpassade knappar.
⑦:Representerar strömförsörjningen för systemhandratten, och 05 representerar 5V strömförsörjning.
⑧:L representerar den vänstra kolumnen (vänster knivhållare), och R representerar den högra kolumnen (höger knivhållare).
9.Lösning på produktfel

1. Använd den i en torr miljö vid rumstemperatur och tryck för att förlänga dess livslängd.
2. Undvik att använda i onormala miljöer som regn och vattenbubblor för att förlänga livslängden.
3. Håll handrattens utseende rent för att förlänga dess livslängd.
4. Undvik att klämma, fallande, skumpande, etc. för att förhindra skador på precisionskomponenterna inuti handratten eller noggrannhetsfel.
5. Om det inte används länge, förvara ratten på en ren och säker plats. Under lagring och transport, uppmärksamhet bör ägnas åt fukt och stöttålighet.
11. Säkerhetsinformation
1. Vänligen läs instruktionerna noggrant före användning och förbjud icke-professionella att använda.
2. Vänligen byt ut batteriet i tid när batterinivån är för låg för att undvika fel orsakade av otillräcklig batterikraft och oförmåga att använda handratten.
3. Om reparation krävs, Kontakta tillverkaren. Om skadan orsakas av självreparation, tillverkaren kommer inte att ge garanti

-500x650.png)