คำอธิบาย
1.การแนะนำผลิตภัณฑ์
Wireless Remote Control is used for manual guidance, การวางตำแหน่ง, tool setting and other operations of CNC machine tools. ผลิตภัณฑ์นี้ใช้เทคโนโลยีการรับส่งข้อมูลแบบไร้สาย, ขจัดการเชื่อมต่อสายสปริงแบบเดิม, ลดความล้มเหลวของอุปกรณ์ที่เกิดจากสายเคเบิล, ขจัดข้อเสียของการลากสายเคเบิล, คราบน้ำมัน, เป็นต้น, and is more convenient to operate.It is widely applicable to CNC machine tools such as gantry machining centers, gantry vertical lathes, and CNC gear processing machines, and is compatible with various mainstream CNC system brands on the market, including Siemens, มิตซูบิชิ, ฟานัค, Syntec and more.
2.คุณสมบัติของผลิตภัณฑ์
1. ใช้เทคโนโลยีการสื่อสารไร้สาย 433MHz พร้อมระยะการทำงานไร้สายที่ 20 เมตร.
2.การกระโดดความถี่แบบปรับได้; 32 ชุดรีโมทคอนโทรลไร้สายสามารถใช้งานพร้อมกันได้โดยไม่มีการรบกวน.
3.Supports the emergency stop button, and the emergency stop button remains effective even after the remote control is powered off.
4.รองรับ 3 ปุ่มแบบกำหนดเองพร้อมการสลับเอาต์พุตสัญญาณ IO.
5.รองรับการควบคุมแบบ 6 แกน, และ 7 การควบคุมแบบ 12 แกนสามารถปรับแต่งได้.
6. รองรับการควบคุมการขยายความเร็ว 3 ระดับ, และการควบคุมการขยายความเร็ว 4 ระดับสามารถปรับแต่งได้.
7.รองรับฟังก์ชั่นปุ่มเปิดใช้งาน, ซึ่งสามารถส่งสัญญาณสลับ IO ได้, และควบคุมการเลือกแกนด้วย, กำลังขยายและตัวเข้ารหัส.
8.รองรับการแก้ไขประเภทการเข้ารหัสของการเลือกแกนและการขยายผ่านซอฟต์แวร์.
9. Supports pulse encoder with specification of 100 พัลส์ต่อการปฏิวัติ.
10. Supports standard Type-C charging with 5V-2A charging specification; built-in battery
specification: 14500 / 1100มิลลิแอมป์.
3. ข้อมูลจำเพาะของผลิตภัณฑ์
| Working Voltage and Current of Handheld Terminal |
3.7V/20.0mA |
| Charging Battery Specification |
3.7V/14500/1100mAh
|
| Low Voltage Alarm Range of Handheld Terminal |
<3.35วี |
| Receiver Power Supply Voltage |
DC5V-24V/1A |
| Receiver Emergency Stop Output Load Range |
AC125V-1A/DC30V-2A |
| Receiver Enable Output Load Range |
AC125V-1A/DC30V-2A |
| Receiver Custom Button Output Load Range |
กระแสตรง24V/50mA
|
| Receiver Axis Selection Output Load Range |
กระแสตรง24V/50mA |
| Receiver magnification Output Load Range |
กระแสตรง24V/50mA |
| Handheld Terminal Transmit Power |
15เดซิเบลเมตร
|
| ตัวรับสัญญาณรับความไว |
-100เดซิเบลเมตร |
| ความถี่การสื่อสารไร้สาย |
433ย่านความถี่เมกะเฮิรตซ์
|
| Wireless Communication Distance |
20 meters barrier-free distance
|
| Operating Temperature |
-25℃<x<55℃ |
| Safe drop height |
1 ม
|
| Number of Custom Buttons |
3
|
| Product Weight |
546.86(g) |
| Product Dimensions |
200*87*72(มม.) |
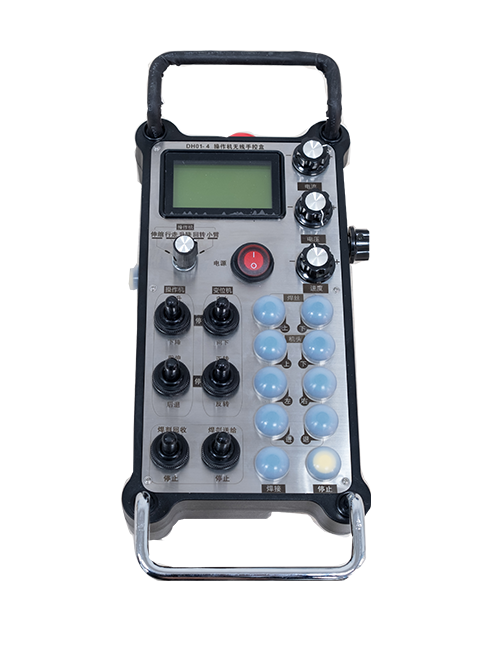
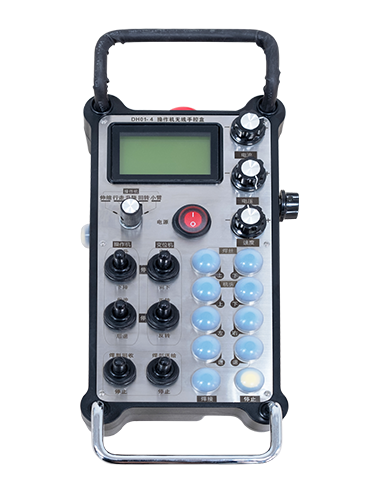
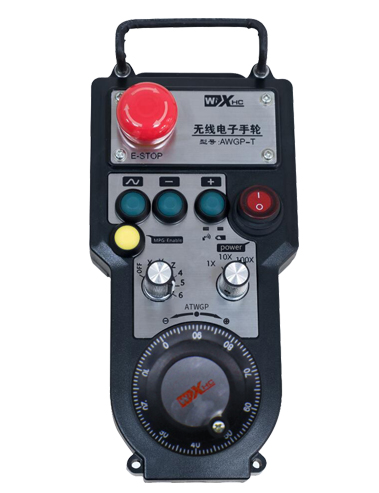
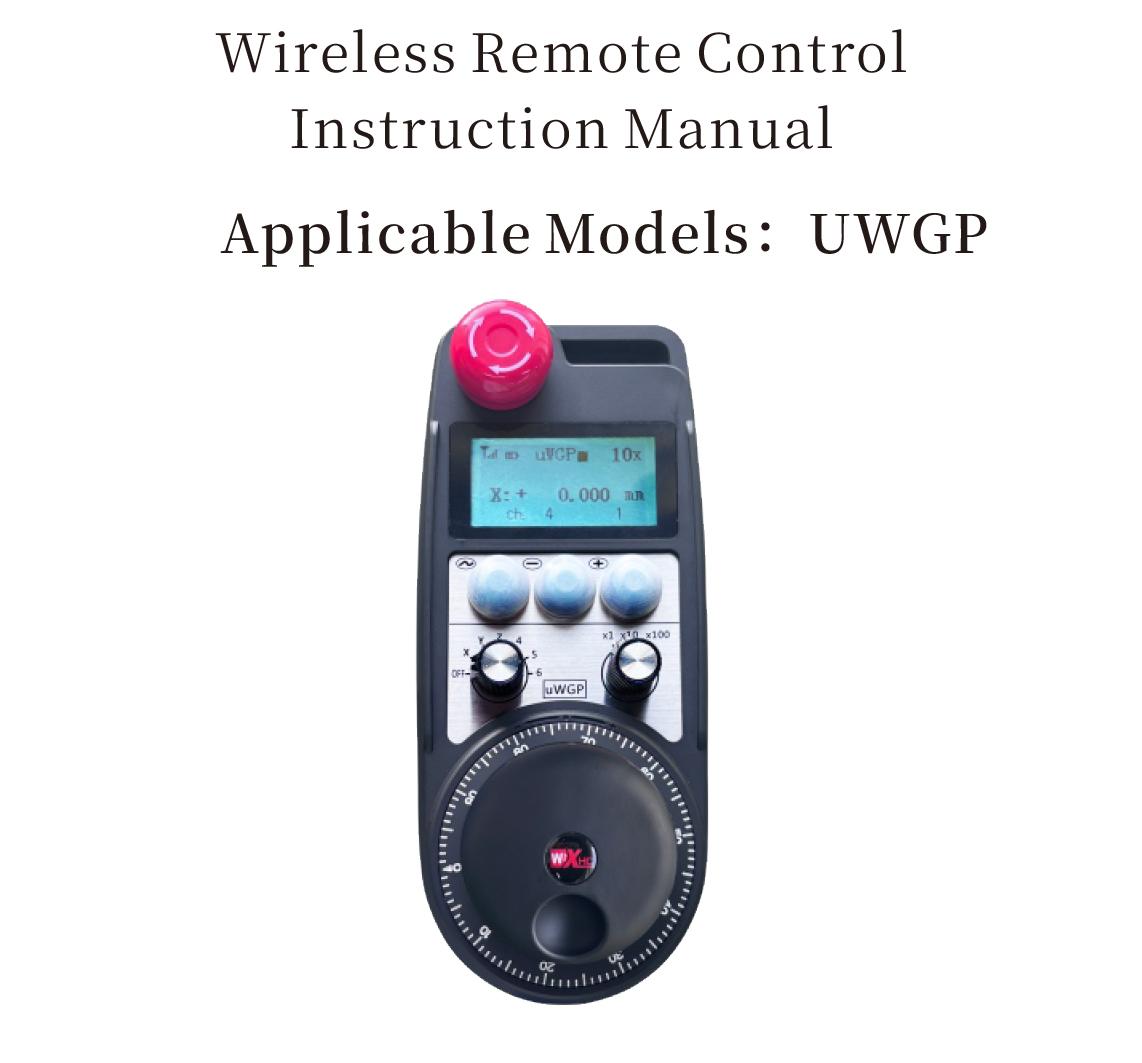
4. บทนำฟังก์ชั่นผลิตภัณฑ์
หมายเหตุ:
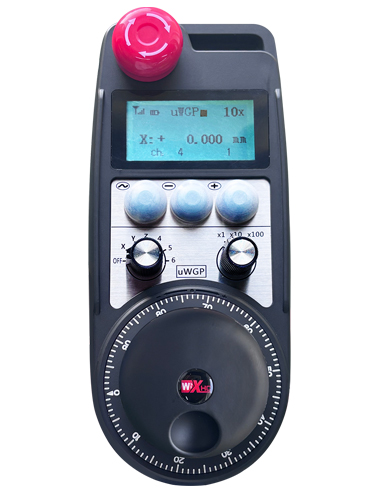
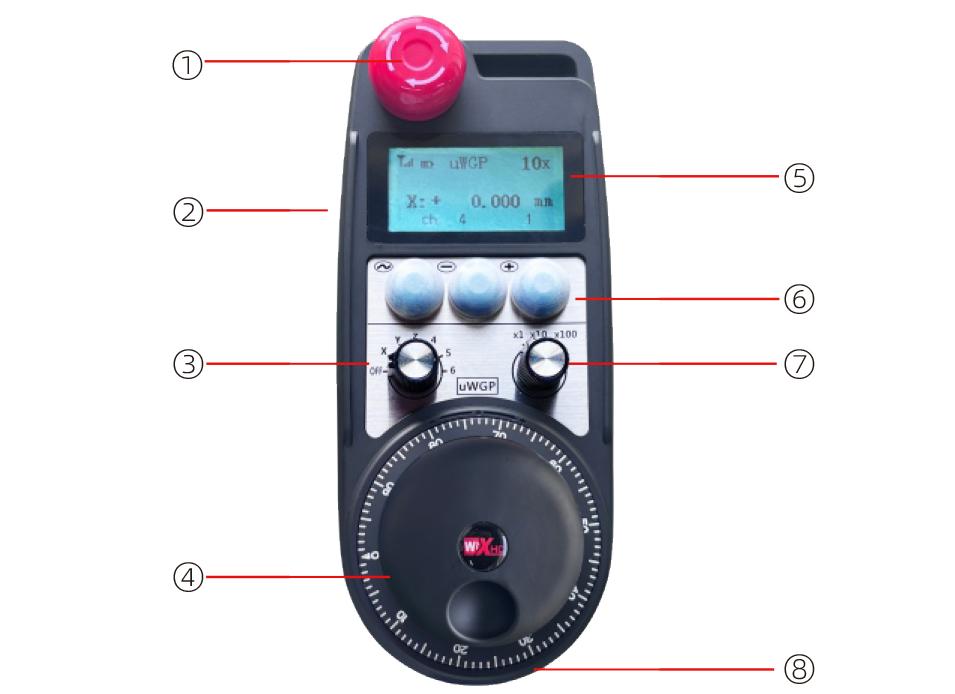
① Emergency Stop Button:
กดปุ่มหยุดฉุกเฉิน, the two groups of emergency stop IO outputs on the receiver will disconnect, and all remote control functions will be invalidated.Release the emergency stop button, the emergency stop IO outputs on the receiver will be closed, and all remote control functions will be restored. นอกจากนี้, even if the remote control is powered off, pressing the emergency stop button can still activate the emergency stop IO output of the receiver.
② Enable Button:
Press either enable button on both sides, the two sets of enable IO outputs on the receiver will conduct. Release the enable button, and the enable IO outputs will disconnect. It is necessary to press and hold the enable button before toggling axis selection, magnification or rotating the remote control for the operation to take effect.This function can be canceled through the configuration software.
③ Axis Selection Switch (Power Switch):
กดปุ่มเปิดใช้งานค้างไว้, then toggling the axis selection switch can control the movement of axis .Press and hold the enable button, then toggle the axis selection switch to switch the motion axis controlled by the remote control. Toggle the switch from the OFF position to any axis position, and the remote control will power on automatically.
④ Pulse Encoder:
Press and hold the enable button and rotate the pulse encoder, it will output pulse signals to control the movement of the machine axis.
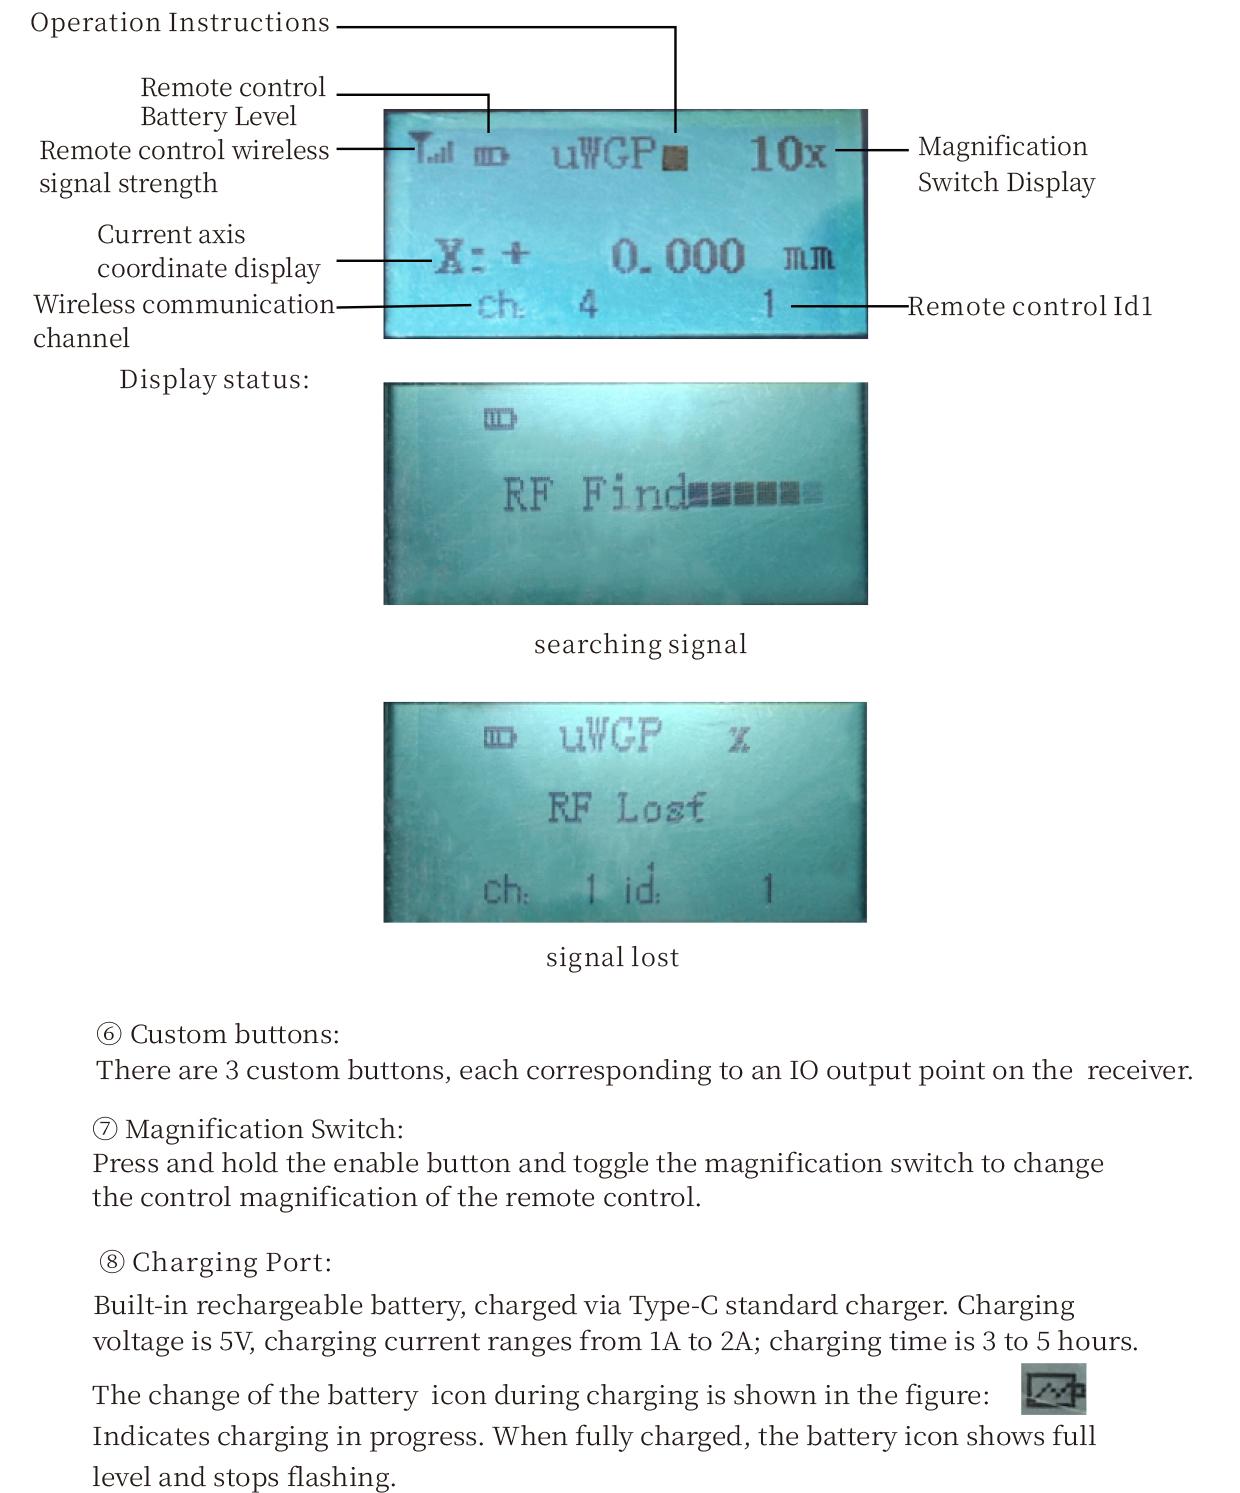
⑤ LCD Display Screen:
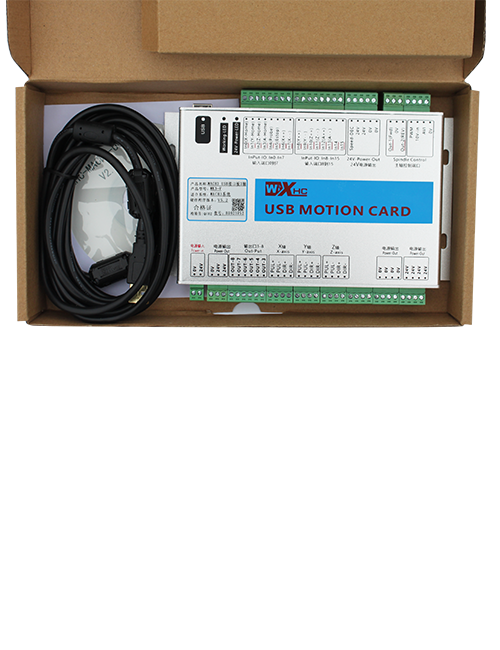
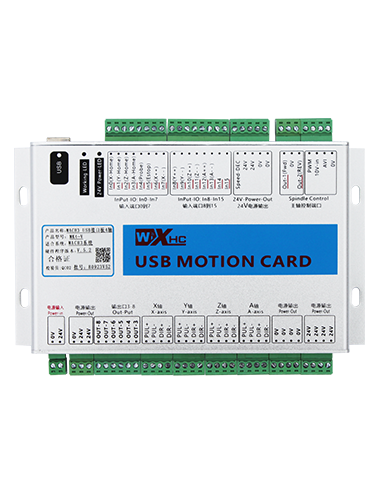
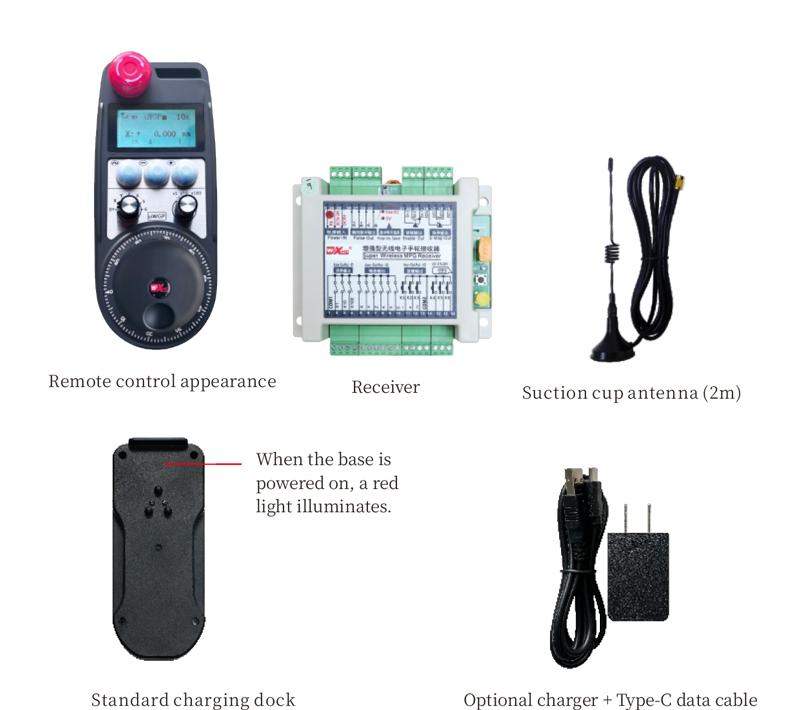
5. Product Accessories Diagram
6. คู่มือการติดตั้งผลิตภัณฑ์
6.1 ขั้นตอนการติดตั้งผลิตภัณฑ์
1. Install the receiver in the electrical cabinet via the buckle on its back, or mount it inside the electrical cabinet through the screw holes at the four corners of the receiver.
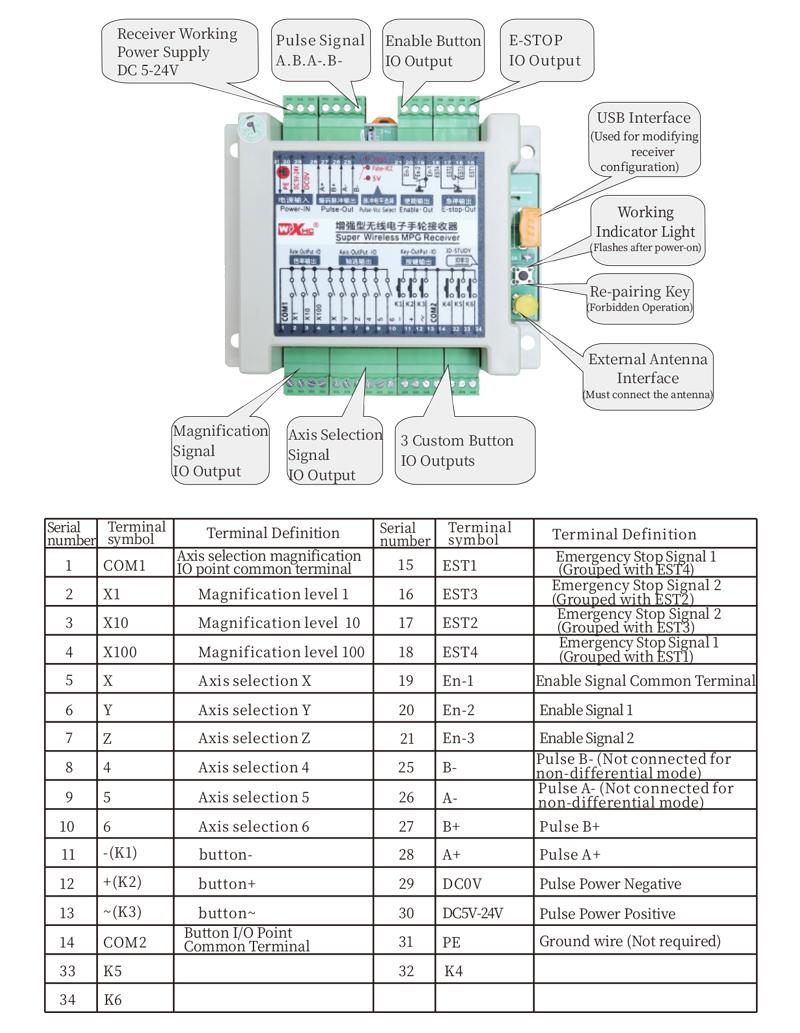
2. โปรดดูแผนภาพการเดินสายไฟเครื่องรับของเรา, เปรียบเทียบกับอุปกรณ์ในสถานที่ของคุณ, and connect the equipment to the receiver with cables.
3. After the receiver is fixed in place, install the supporting antenna of the receiver properly. Mount or place the outer end of the antenna outside the electrical cabinet. It is recommended to place it on the top of the electrical cabinet for optimal signal performance. Do not leave the antenna uninstalled or place it inside the electrical cabinet; มิฉะนั้น, signal failure may occur.
4. ในที่สุด, turn on the remote control power switch, then you can remotely operate the machine via the remote control.
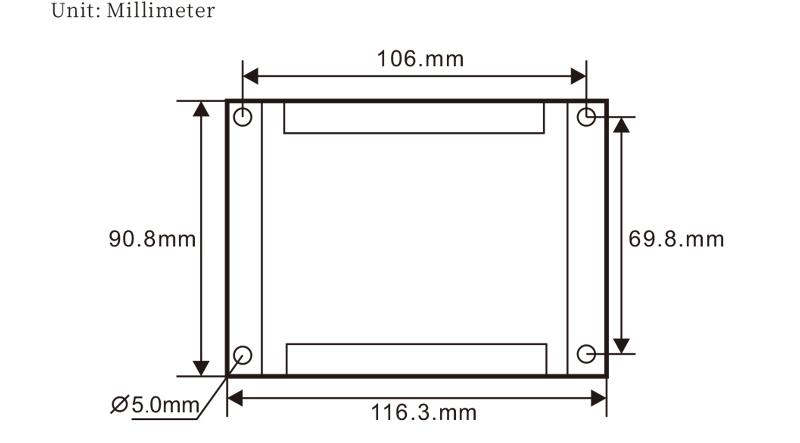
6.2 Receiver Installation Dimensions
6.3 แผนภาพอ้างอิงการเดินสายไฟของผู้รับ
7. คำแนะนำการดำเนินการผลิตภัณฑ์
1. เปิดเครื่องและตัวรับสัญญาณ. The receiver operation indicator flashes. After the wireless electronic remote control is fully charged, toggle it from the OFF gear to the X-axis gear, and the remote control display lights up.
2. Select the axis : กดปุ่มเปิดใช้งานค้างไว้, toggle the axis selection switch to select the axis to be operated.
3. Select the magnification: กดปุ่มเปิดใช้งานค้างไว้, toggle the magnification switch to select the required magnification gear.
4. Axis movement: กดปุ่มเปิดใช้งานค้างไว้, select the axis selection switch and the magnification switch, then rotate the pulse encoder. Rotate clockwise to move the axis in the positive direction, and rotate counterclockwise to move the axis in the negative direction.
5. กดปุ่มกำหนดเองใดๆ ค้างไว้, the corresponding button IO output of the receiver will turn on; release the button, and the output will turn off.
6. กดปุ่มหยุดฉุกเฉิน, the corresponding emergency stop IO output of the receiver disconnects and the remote control function becomes invalid. Release the emergency stop button, the emergency stop IO output closes and the remote control function is restored.
7. If the wireless remote control is not operated for a period of time, มันจะเข้าสู่โหมดสลีปโดยอัตโนมัติเพื่อลดการใช้พลังงาน. It can be used normally again by pressing the enable button again.
8.If the wireless remote control is not used for a long time, turn the axis switch to OFF to turn off the power and extend battery life
①:UWGP stands for appearance style.
②:Pulse Output Parameters:
01: บ่งชี้ว่าสัญญาณพัลส์เอาท์พุตคือ A, บี; แรงดันพัลส์ 5V; ปริมาณชีพจร 100PPR.
02: บ่งชี้ว่าสัญญาณพัลส์เอาท์พุตคือ A, บี; แรงดันพัลส์ 12V; pulse quantity 25PPR.
03: บ่งชี้ว่าสัญญาณพัลส์เอาท์พุตคือ A, บี, ก -, บี -; แรงดันพัลส์ 5V; ปริมาณชีพจร 100PPR.
04: บ่งชี้เอาต์พุตวงจรเปิด NPN ระดับต่ำ, ด้วยสัญญาณพัลส์เอาท์พุตของ A และ B; The number of pulses is 100PPR.
05: บ่งชี้เอาต์พุตแหล่ง PNP ระดับสูง, ด้วยสัญญาณพัลส์เอาท์พุตของ A และ B; จำนวนพัลส์คือ 100PPR.
๓:Represents the axis selection switch quantity; 6 stands for 6 แกน, 7 stands for 7 แกน, and so on.
④: Represents the signal type of the axis selection switch.A stands for point-to-point output signal, and B stands for encoder output signal.
⑤: Represents the signal type of the magnification switch.A stands for point-to-point output signal, and B stands for encoder output signal.
⑥: แสดงถึงจำนวนปุ่มที่กำหนดเอง; 3 corresponds to 6 ปุ่มที่กำหนดเอง.
⑦: Represents the power supply for the system remote control. 05 stands for 5V power supply, และ 24 stands for 24V power supply.
⑧: Represents the contact charging mode. It starts charging automatically when placed back on the charging base.
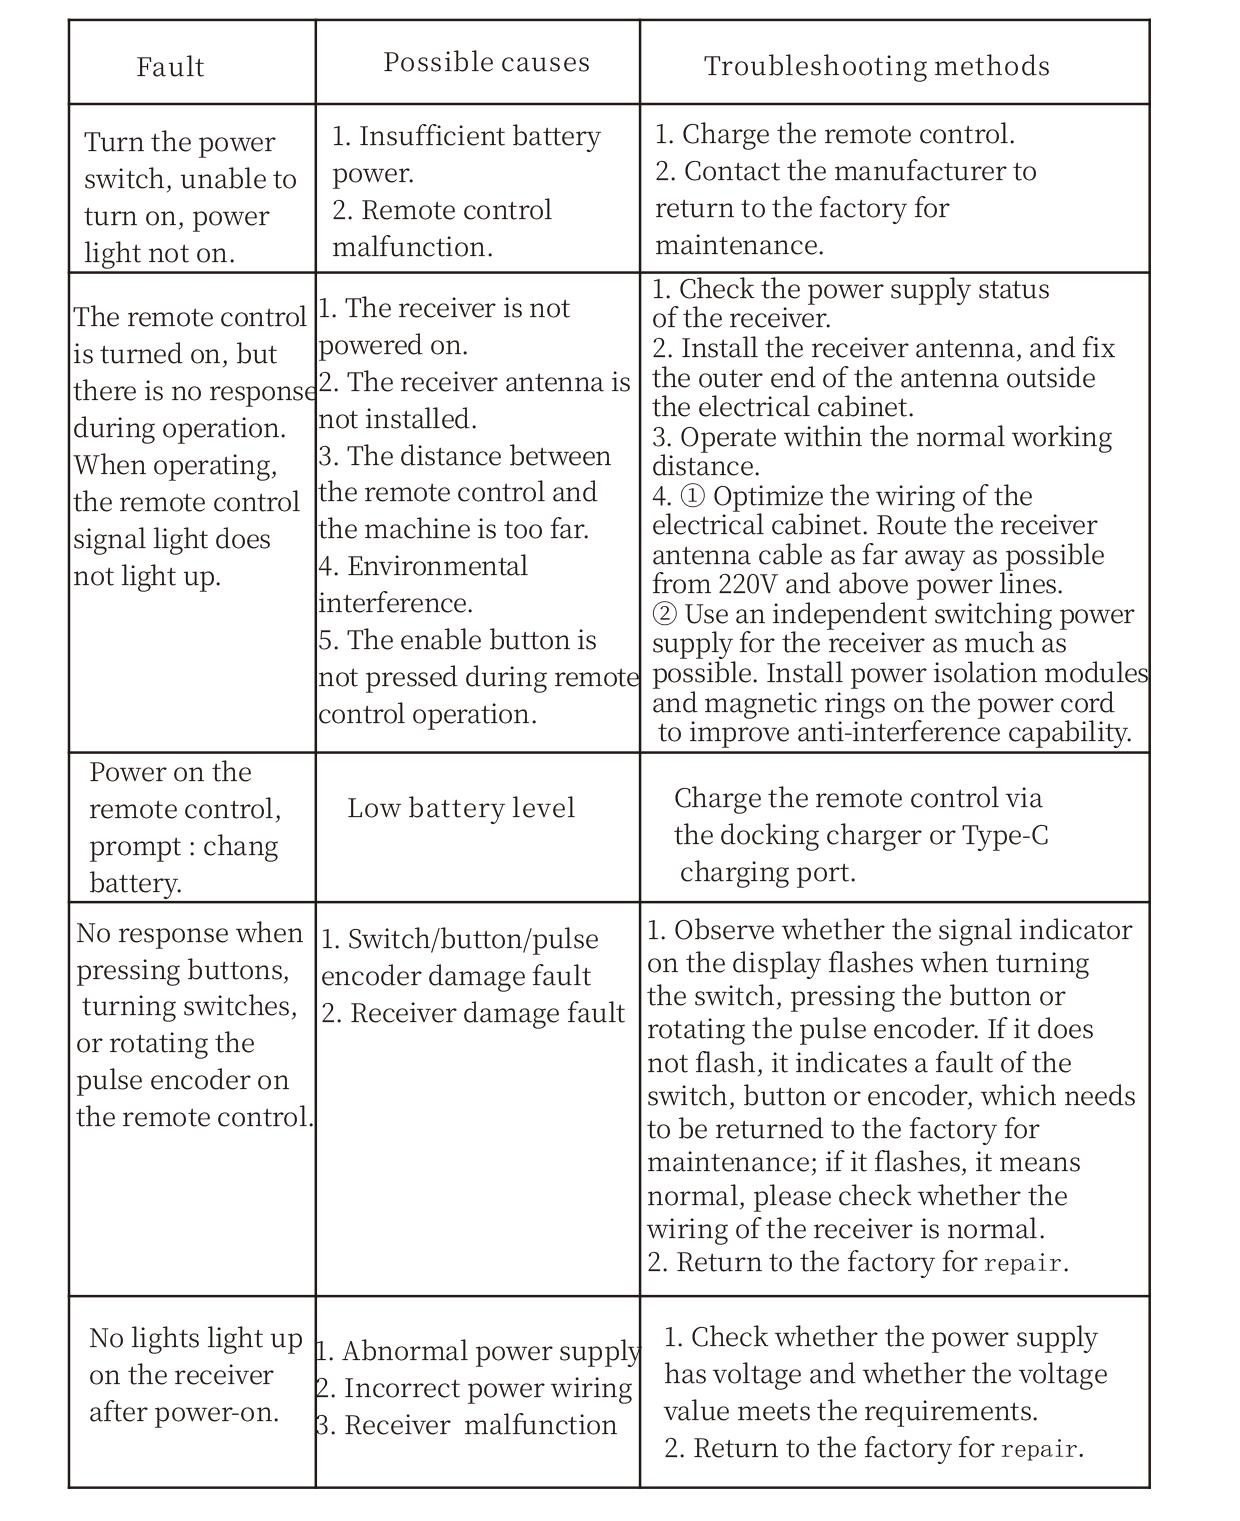
9. การแก้ไขปัญหาผลิตภัณฑ์
10. Maintenance and upkeep
1. โปรดใช้ในสภาพแวดล้อมที่แห้งที่อุณหภูมิห้องและความดันเพื่อยืดอายุการใช้งาน.
2. Please avoid using in abnormal environments such as rain and water to extend the service life.
3. Please keep the appearance of the remote control clean to extend its service life.
4. Please avoid crushing, dropping, or bumping, ฯลฯ. to prevent damage to the precision components inside the remote control or accuracy errors.
5. หากไม่ได้ใช้เป็นเวลานาน, please store the remote control in a clean and safe place.
6. Avoid moisture and shock during storage and transportation.
11. ข้อมูลความปลอดภัย
1. โปรดอ่านคำแนะนำอย่างละเอียดก่อนใช้งานและห้ามมิให้ผู้ที่ไม่ใช่ผู้เชี่ยวชาญใช้งาน.
2. Please charge the remote control in a timely manner when the battery level is too low, to avoid malfunction and operational errors caused by insufficient power.
3. If you repair it yourself and cause damage, the warranty will be void.