Hỗ trợ 2 nút tùy chỉnh, với đầu ra tín hiệu IO loại chuyển mạch;
Hỗ trợ -2 điều khiển trục;
Hỗ trợ điều khiển phóng đại 3 cấp độ;

1.Giới thiệu sản phẩm
2. Tính năng chức năng của sản phẩm
| Điện áp hoạt động và dòng điện của điều khiển từ xa không dây |
3V/14MA
|
| Thông số pin | 2 Pin kiềm AA, kích cỡ 5 |
| Phạm vi báo động điện áp thấp của điều khiển từ xa không dây | < 2.3V |
| Điện áp nguồn máy thu | DC5V-24V/A |
| Phạm vi tải đầu ra dừng khẩn cấp của máy thu | AC125V-1A/DC30V-2A |
| Bộ thu cho phép phạm vi tải đầu ra |
AC125V-1A/DC30V-2A
|
| Phạm vi tải đầu ra nút tùy chỉnh của người nhận | DC24V/50mA |
| Phạm vi tải đầu ra lựa chọn trục máy thu | DC24V/50mA |
| Phạm vi tải đầu ra phóng đại máy thu | DC24V/50mA |
| Công suất truyền tải của thiết bị đầu cuối cầm tay |
15dBm
|
| Độ nhạy thu của máy thu | -100dBm |
| Tần số truyền thông không dây | 433Dải tần MHz |
| Khoảng cách liên lạc không dây | Khoảng cách không có rào cản của 40 mét |
| Nhiệt độ hoạt động | -25oC < X < 55oC |
| Chiều cao chống rơi | 1 (mét) |
| Số lượng nút tùy chỉnh | 2 |


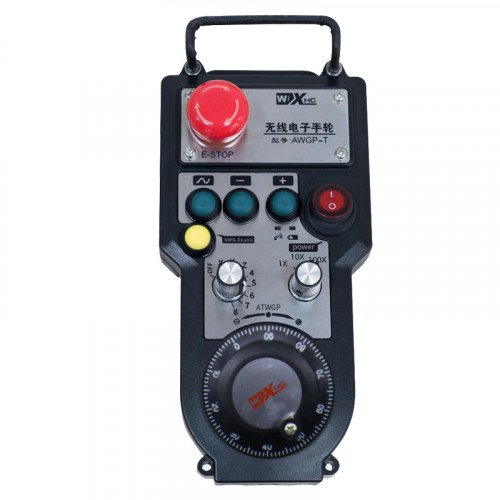
① Bộ mã hóa xung:
Nhấn và giữ nút kích hoạt, lắc bộ mã hóa xung, phát ra tín hiệu xung,và điều khiển chuyển động của trục máy.
② Nút kích hoạt:
Nhấn nút bật ở hai bên, và hai bộ đầu ra IO kích hoạt trên máy thu sẽ tiến hành. Nhả nút kích hoạt để ngắt kết nối đầu ra IO kích hoạt; Và trước khi chuyển độ phóng đại chọn trục và lắc tay quay,nút kích hoạt cần được giữ để có hiệu quả; Chức năng này có thể được hủy bỏ thông qua phần mềm cấu hình.
③ Đèn báo:
Đèn bên trái: bật đèn,tay quay sử dụng trục để chọn TẮT để bật nguồn, và đèn này vẫn sáng sau khi bật nguồn;
Ánh sáng giữa: đèn tín hiệu sáng lên khi vận hành bất kỳ chức năng nào của tay quay, và không sáng khi không có hoạt động;
Đèn bên phải: Đèn báo điện áp thấp, mức pin thấp,đèn này nhấp nháy hoặc sáng liên tục, cần phải thay pin.
④ Nút dừng khẩn cấp:
Nhấn nút dừng khẩn cấp, và hai bộ đầu ra IO dừng khẩn cấp trên máy thu sẽ bị ngắt kết nối, và tất cả các chức năng của tay quay sẽ không hợp lệ.
⑤ Công tắc phóng đại:
Nhấn và giữ nút bật để chuyển đổi công tắc phóng to, có thể chuyển đổi độ phóng đại được điều khiển bằng tay quay.
⑥ Công tắc chọn trục (công tắc nguồn):
Nhấn và giữ nút bật để chuyển công tắc chọn trục, có thể chuyển đổi trục chuyển động được điều khiển bởi tay quay. Chuyển công tắc này từ TẮT sang bất kỳ trục nào và bật nguồn tay quay.
⑦ Nút tùy chỉnh:
Hai nút tùy chỉnh, mỗi cái tương ứng với một điểm đầu ra IO trên máy thu.

1. Lắp đầu thu vào tủ điện thông qua khóa cài phía sau, hoặc lắp vào tủ thông qua các lỗ vít ở bốn góc của đầu thu.
2. Tham khảo sơ đồ nối dây máy thu của chúng tôi và so sánh nó với thiết bị tại chỗ của bạn. Kết nối thiết bị với đầu thu qua cáp.
3.Sau khi máy thu được cố định đúng cách, ăng-ten được trang bị máy thu phải được kết nối, và đầu ngoài của ăng-ten nên được lắp đặt hoặc đặt bên ngoài tủ điện. Nên đặt nó trên nóc tủ điện để có hiệu ứng tín hiệu tốt nhất. Nghiêm cấm để ăng-ten không nối hoặc đặt trong tủ điện, vì điều này có thể dẫn đến tín hiệu không sử dụng được.
4. Cuối cùng, bật công tắc nguồn của tay quay, và bạn có thể vận hành máy từ xa bằng tay quay.
6.2 Kích thước lắp đặt máy thu

6.3 Sơ đồ tham khảo nối dây máy thu

7. Hướng dẫn vận hành sản phẩm
1. Bật nguồn máy và đầu thu. Đèn báo hoạt động của máy thu nhấp nháy. Lắp pin vào tay quay điện tử không dây, cố định nắp pin, Và
bật công tắc nguồn của tay quay điện tử không dây. Đèn báo mức pin của tay quay đang sáng.
2. Chọn trục tọa độ: Nhấn và giữ nút kích hoạt, chuyển đổi công tắc chọn trục, và chọn trục bạn muốn vận hành.
3. Chọn độ phóng đại: Nhấn và giữ nút kích hoạt, chuyển đổi công tắc phóng to,và chọn mức phóng đại mong muốn.
4. Trục di chuyển: Nhấn và giữ nút kích hoạt, chọn công tắc chọn trục, chọn công tắc phóng to, và sau đó xoay bộ mã hóa xung. Xoay theo chiều kim đồng hồ để di chuyển
trục dương và ngược chiều kim đồng hồ để di chuyển trục âm.
5. Nhấn và giữ bất kỳ nút tùy chỉnh nào, và nút tương ứng đầu ra IO của máy thu sẽ được bật. Thả nút, và đầu ra sẽ bị tắt.
6. Nhấn nút dừng khẩn cấp, đầu ra IO dừng khẩn cấp tương ứng của máy thu sẽ bị ngắt kết nối, chức năng tay quay sẽ bị vô hiệu hóa,nhả nút dừng khẩn cấp, đầu ra IO dừng khẩn cấp sẽ bị đóng, và chức năng tay quay sẽ được phục hồi.
7. Nếu tay quay không được vận hành trong một khoảng thời gian, nó sẽ tự động chuyển sang chế độ ngủ để giảm mức tiêu thụ điện năng. Khi nó được sử dụng lại, tay quay có thể được kích hoạt bằng cách nhấn nút kích hoạt.
8. Nếu tay quay không được sử dụng trong một thời gian dài, nên chuyển trục tay quay sang vị trí TẮT, tắt nguồn tay quay, và kéo dài tuổi thọ pin.
8. Mô tả sản phẩm

① :ZTWGP đại diện cho phong cách xuất hiện
②:Thông số đầu ra xung:
01: Cho biết tín hiệu đầu ra xung là A, B; Điện áp xung 5V; lượng xung 100PPR.
02:Chỉ ra rằng các tín hiệu đầu ra xung là A và B; Điện áp xung 12V; lượng xung 100PPR.
03:Chỉ ra rằng các tín hiệu đầu ra xung là A, B, MỘT -, B -; Điện áp xung 5V; lượng xung 100PPR.
04:Cho biết đầu ra mạch hở NPN ở mức thấp, với tín hiệu đầu ra xung của A và B;Số lượng xung là 100PPR.
05:Cho biết đầu ra nguồn PNP cấp cao, với tín hiệu đầu ra xung của A và B; Số lượng xung là 100PPR.
③:Biểu thị số lượng công tắc chọn trục, 2 đại diện cho 2 trục.
④:Biểu thị loại tín hiệu chuyển đổi lựa chọn trục, A đại diện cho tín hiệu đầu ra điểm-điểm, và B đại diện cho tín hiệu đầu ra được mã hóa.
⑤:Biểu thị loại tín hiệu chuyển đổi nhân, A đại diện cho tín hiệu đầu ra điểm-điểm, và B đại diện cho tín hiệu đầu ra được mã hóa.
⑥:Đại diện cho số lượng nút tùy chỉnh, 2 đại diện cho 2 nút tùy chỉnh.
⑦:Đại diện cho nguồn điện cho tay quay hệ thống, Và 05 đại diện cho nguồn điện 5V.
⑧:L đại diện cho cột bên trái (người giữ dao bên trái), và R đại diện cho cột bên phải (người giữ dao bên phải).
9.Giải pháp cho các trục trặc của sản phẩm

1. Vui lòng sử dụng nó trong môi trường khô ráo ở nhiệt độ và áp suất phòng để kéo dài tuổi thọ của nó.
2. Vui lòng tránh sử dụng trong môi trường bất thường như mưa và bong bóng nước để kéo dài tuổi thọ.
3. Hãy giữ cho bề ngoài của tay quay sạch sẽ để kéo dài tuổi thọ của nó.
4. Xin vui lòng tránh ép, rơi xuống, đụng chạm, vân vân. để tránh làm hỏng các bộ phận chính xác bên trong tay quay hoặc các lỗi về độ chính xác.
5. Nếu không sử dụng trong thời gian dài, vui lòng bảo quản tay quay ở nơi sạch sẽ và an toàn. Trong quá trình bảo quản và vận chuyển, cần chú ý đến độ ẩm và khả năng chống sốc.
11. Thông tin an toàn
1. Vui lòng đọc kỹ hướng dẫn trước khi sử dụng và cấm những người không chuyên nghiệp vận hành.
2. Vui lòng thay pin kịp thời khi pin quá yếu để tránh các lỗi do pin không đủ và không thể vận hành tay quay.
3. Nếu cần sửa chữa, vui lòng liên hệ với nhà sản xuất. Nếu hư hỏng do tự sửa chữa, nhà sản xuất sẽ không cung cấp bảo hành