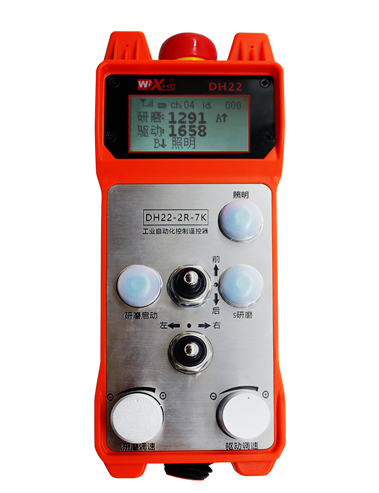
Beskrywing
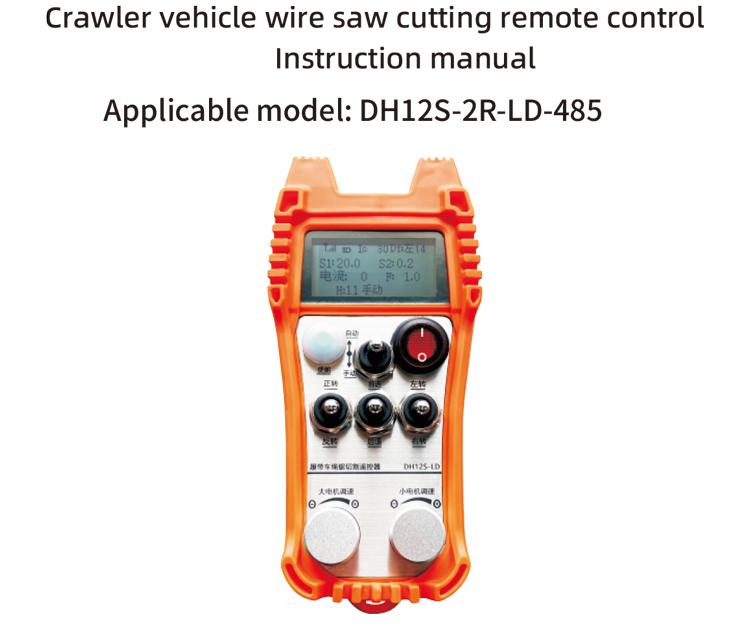
1. Produk Inleiding
Die outomatiese sny-afstandsbediening vir die tou-saag vir kruipvoertuie is geskik vir snymasjiene vir tou-saag. Dit neem 485ModbusRTU-protokol aan om die spoedbegin en voor en agter links en regs rigtingbeheer van die linker- en regterkruipomskakelaars te beheer, sowel as die groot motorfrekwensie-omskakeling RTU-protokol om die spoedbegin en voor en agter links en regs rigtingbeheer van die linker en regter kruipomskakelaars te beheer, en die groot motorfrekwensie omskakeling oorstroom analise en vergelyking, pas outomaties die linker- en regterkruipspoed in reële tyd aan om outomatiese snyfunksie te bereik.
2. Produk kenmerke
1. Neem 433MHz draadlose kommunikasietegnologie aan, draadlose operasie afstand is 100 meter.
2. Neem outomatiese frekwensiesprongfunksie aan, gebruik 32 stelle draadlose afstandbeheerders op dieselfde tyd, sonder om mekaar te beïnvloed.
3. Ondersteun alle omsetters met 485-Modbus RTU-protokol. Die omskakelaarhandelsmerke wat aangepas is, sluit in:Sjanghai Xielin, Fuji, Innovasie, Zhongchen, INVT, Anchuanda. As die handelsmerk nie ada is nie, kontak ons asseblief vir aanpassing.
4. Ondersteun groot motor omskakelaar begin, spoedregulering, en huidige lees.
5. Ondersteun linker en regter kruip-omskakelaar spoedregulering, begin, voor en agter links en regs beheer.
6. Ondersteun reguitlynregstelling van die linker- en regterkruip-omskakelaar om die masjien in 'n reguit lyn te laat beweeg.
7. Ondersteun tou saag outomatiese sny funksie, pas die linker- en regterkruipspoed outomaties intyds aan volgens die groot motorstroominligting.
8. Terselfdertyd, dit is versoenbaar met direkte IO-uitset om die aansit en stop van die motor te beheer, en analoog spanningsuitset om die motorspoed te beheer.
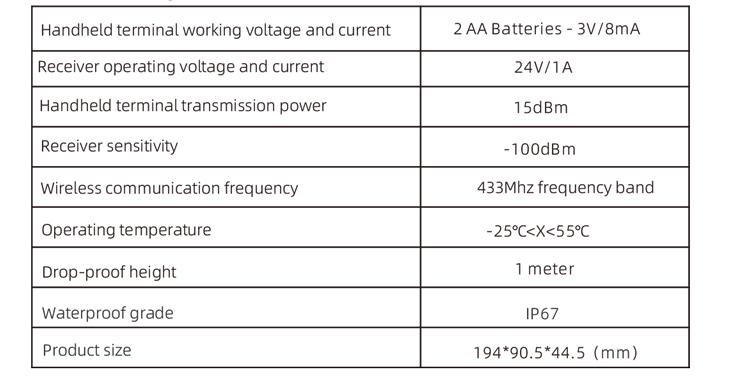
3. Produk spesifikasies
4. Produkfunksie inleiding

Notas:
①Skermvertoning:

② Modusskakelaar:
Gebruik 'n 2-vlak skakelaar, dit is moontlik om tussen outomatiese en handmatige modusse te wissel, en die ooreenstemmende modus sal op die skerm vertoon word vir oorskakeling.
③ Aktiveer:
Kombinasie knoppies, sommige bewerkings vereis dat die aktiveerknoppie ingedruk word vir bewerking, verwys asseblief na die instruksies vir elke skakelaar vir besonderhede.
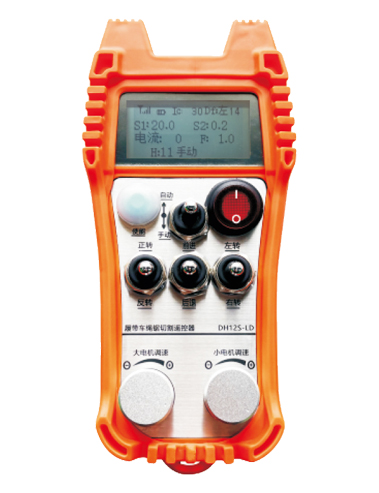
④ Groot motorskakelaar:
Gebruik 'n 3-spoed-terugstelskakelaar, Deur hierdie skakelaar te trek, kan die voorwaartse en agterwaartse rotasie van die groot motor beheer word. Nadat dit vrygestel is, die staat sal bly, en daar sal ooreenstemmende vertonings op die skerm wees. Die t-pyltjie dui vorentoe rotasie aan, en die y-pyltjie dui omgekeerde rotasie aan.
⑤Klein motor vorentoe/tertoe skakelaar:
Gebruik 'n 3-spoed selfsluitende skakelaar, Deur hierdie skakelaar te trek, kan die klein motor beheer word om vorentoe en agtertoe te beweeg. Die ooreenstemmende skerm sal op die skerm wys, met die t-pyltjie wat vorentoe aandui en die ↓-pyltjie wat agtertoe aandui.
⑥ Afstandbeheer kragskakelaar:
Die afstandbeheerskerm is aangeskakel.
⑦ klein motordraaiskakelaar:
Gebruik 'n 3-spoed-terugstelskakelaar, wanneer dit met die hand bedien word, die klein motor kan beheer word om links of regs te draai. Sodra vrygestel, die afstandbeheerder sal hierdie aksie outomaties stop. Wanneer dit in die voorwaartse toestand is, draai hierdie skakelaar en die ooreenstemmende vertoning sal op die skerm verskyn. Die + pyltjie dui linksdraai aan, en die – pyltjie dui regsdraai aan.Wanneer in trumodus, draai hierdie skakelaar en die ooreenstemmende vertoning sal op die skerm verskyn. Die + pyltjie dui linksdraai aan, en die – pyltjie dui regsdraai aan. Druk en hou die aktiveerknoppie in, draai dan hierdie skakelaar om 'n stilstaande draaifunksie uit te voer, maak die draai vinniger.
⑧ Groot motorspoedregulering:
Gebruik 'n multi-draai enkodeerder knop, draai die knop om die spoed S1 van die groot motor aan te pas Vir elke 1 rooster rotasie, die spoedwaarde van die groot motor verander met ongeveer 0.2 eenhede, en vinnige rotasie kan die spoedwaarde van die groot motor vinnig verander.
9 Klein motorspoed regulering (lineêre regstelling):Om die multidraai-enkodeerderknop te gebruik, in handmodus, vir elke 1 draai van die knop, die spoedwaarde van die klein motor verander met ongeveer 0.1 eenhede. Vinnige rotasie kan die spoedwaarde van die klein motor vinnig verander.
In outomatiese modus, druk die aktiveerknoppie en draai 1 rooster elke keer. Die spoedgrenswaarde F van die klein motor verander met ongeveer 0.1 eenhede. Vinnige rotasie kan die spoedgrenswaarde van die klein motor vinnig verander. Druk die aktiveerknoppie, draai die knop na regs, en die reguitlynkorreksievertoning wys D f: links. Elke rotasie van die knop vermeerder met 1 eenheid; Draai links knop, reguit lyn regstelling vertoon: Df: reg. Elke rotasie van die knop vermeerder met 1 eenheid, en elke regstellingseenheid stem ooreen met 'n motorspoedbeheer AVI-spanning van ongeveer 0.02 V.
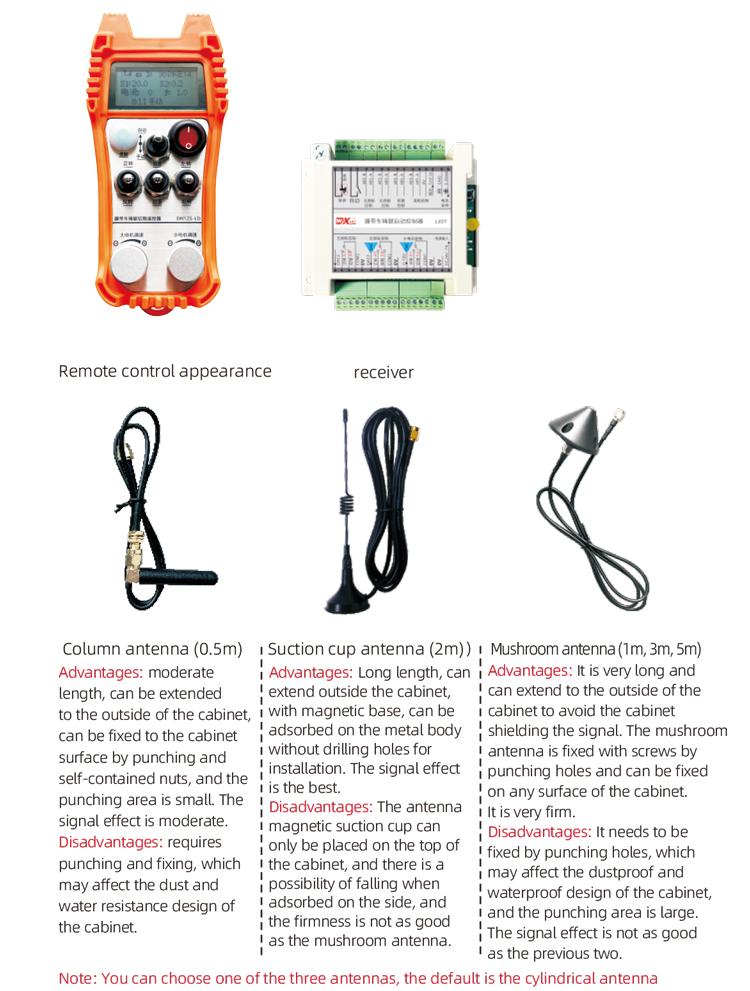
5. Produk bykomstigheid diagram
6. Produk Installasie Gids
6.1 Produk Installasie Stappe
1. Installeer die ontvanger in die elektriese kas deur die gespe aan die agterkant, of installeer dit in die elektriese kas deur die skroefgate by die vier hoeke van die ontvanger.
2. Verwys na ons ontvangerbedradingsdiagram, vergelyk jou toerusting op die terrein, en koppel die toerusting aan die ontvanger deur drade.
3. Nadat die ontvanger vasgestel is, die antenna wat met die ontvanger toegerus is, moet gekoppel wees, en die buitenste punt van die antenna moet buite die elektriese kas geïnstalleer of geplaas word. Dit word aanbeveel om dit bo-op die elektriese kas te plaas vir die beste sein effek. Dit is verbode om die antenna ongekoppel te laat of die antenna binne die elektriese kas te plaas, wat swak sein en onbruikbaar kan veroorsaak.
4. Uiteindelik, installeer die battery in die afstandbeheer, draai die batterydeksel vas, en skakel dan die kragskakelaar van die afstandbeheerder aan. Nadat die afstandbeheerskerm die normale werkende koppelvlak toon, jy kan afstandbeheerbewerkings uitvoer.
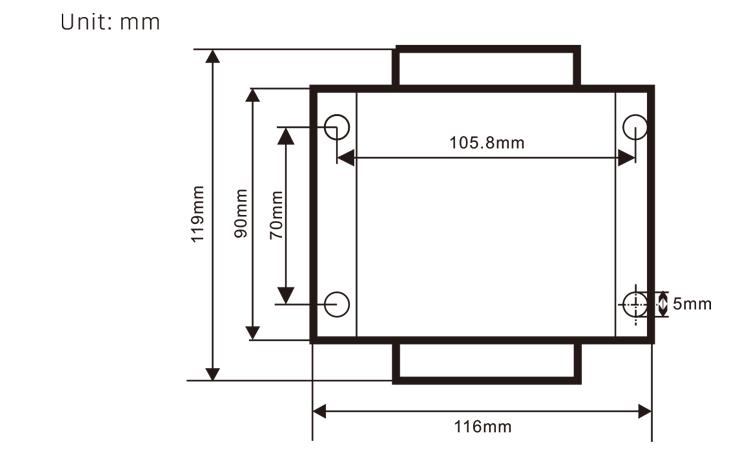
6.2 Ontvanger installasie afmetings
6.3 Ontvanger bedrading verwysingsdiagram

7. Produk werking instruksies
7.1 Afstandbeheerparameterinstellings
Hoe om die agtergrondparameters van die afstandbeheerder in te voer: draai die modusskakelaar na handmodus, pas die spoed van die klein motor aan 25, of 0, 10, 20, 40, 50, en draai die voorwaartse skakelaar van die groot motor opwaarts 3 tye en afwaarts 3 tye;
Gebruik die “Klein motorspoedbeheer” knop om die bladsy om te draai, druk Aktiveer en draai die klein motorspoedbeheerknoppie om die parameters te verander; na wysiging, blaai die bladsy tot die einde, kies Stoor en verlaat, en druk die Aktiveer-knoppie om die kieslys te verlaat;
Die parameters is soos volg:Maksimum stroom: groot motorstroomterugvoerwaardereeks, instelbereik 15-200A, verstek 60;
Spoedbeheerparameters: outomatiese modus klein motor outomatiese versnelling spoed, hoe kleiner hoe vinniger, instellingsreeks 200-1500, verstek 1000;
Vertraging parameter: Stel die boonste limiet van die motorspoedverandering wat toegelaat word. Wanneer die stroom verby hierdie waarde verander, dit sal vertraag. Hoe kleiner dit is, hoe vinniger sal die linker- en regtermotors vertraag. Die reeks is 05-12, en die verstek is 06;
Versnelling a1: Hoe groter die waarde, hoe vinniger neem die motorspoed toe, reeks 00-06, verstek 01; Vertraging a2: Hoe groter die waarde, hoe vinniger verminder die motorspoed, reeks 00-06, verstek 02;
Aktiveer spoedregulering: Of die klein motorspoedregulering geaktiveer moet word, 00 is nie geaktiveer nie, 01 is geaktiveer, verstek 01;
Opstart self-sluitend: Of die groot motor outomaties selfsluitend sal bly nadat die vorentoe- en tru-skakelaar losgelaat is, 00 in stand gehou word nie, 01 in stand gehou word, verstek 01;
Maksimum reis: Maksimum spoed van die linker- en regtermotors, reeks 10-100, verstek 50;
Snystroom: Maksimum snystroom, die skerm vertoon IC-waarde, reeks 15-160, verstek 30, die skerm vertoon IC: 30. Die boonste limiet van hierdie parameter = maksimum stroom x 80%;
Verstek spoedgrens: Die verstek klein motor outomatiese snyspoed by opstart, reeks 00-100, verstek 10, die skerm vertoon F1.0, hierdie parameter is slegs akkuraat wanneer die maksimum reis op gestel is 50.
Draadlose kanaal: Standaard is 10. Wanneer die afstandbeheersein onstabiel is of daar seininterferensie op die terrein is, jy kan hierdie parameter verander om kanale te wissel om inmenging te vermy;
Spoedbeperking verreken: Die boonste limiet van die outomatiese snyspoed van die klein motor,reeks 00-200, verstek 60, die skerm vertoon 6.0; Vertoonwaarde boonste limiet = spoedgrens verstelling × 0.1;
Maksimum gasheer: Die maksimum spoed van die groot motor, reeks 10-100, verstek 50;
Mbus toestel ( verpligtend ): groot motor omskakelaar model keuse, reeks 00-03, verstek 03;
00- Sjanghai Xielin 01 Fuji
02- INVT 03 Innovance (Zhongchen, Robicon)
SBUS toerusting (verpligtend): Klein motorfrekwensie-omskakelaarmodel keuse, reeks 00-05, verstek 03;
00- Sjanghai Xielin 01 Fuji
02- INVT 03 Innovance (Zhongchen, Robicon)
04-Anchuanda 05-Geen
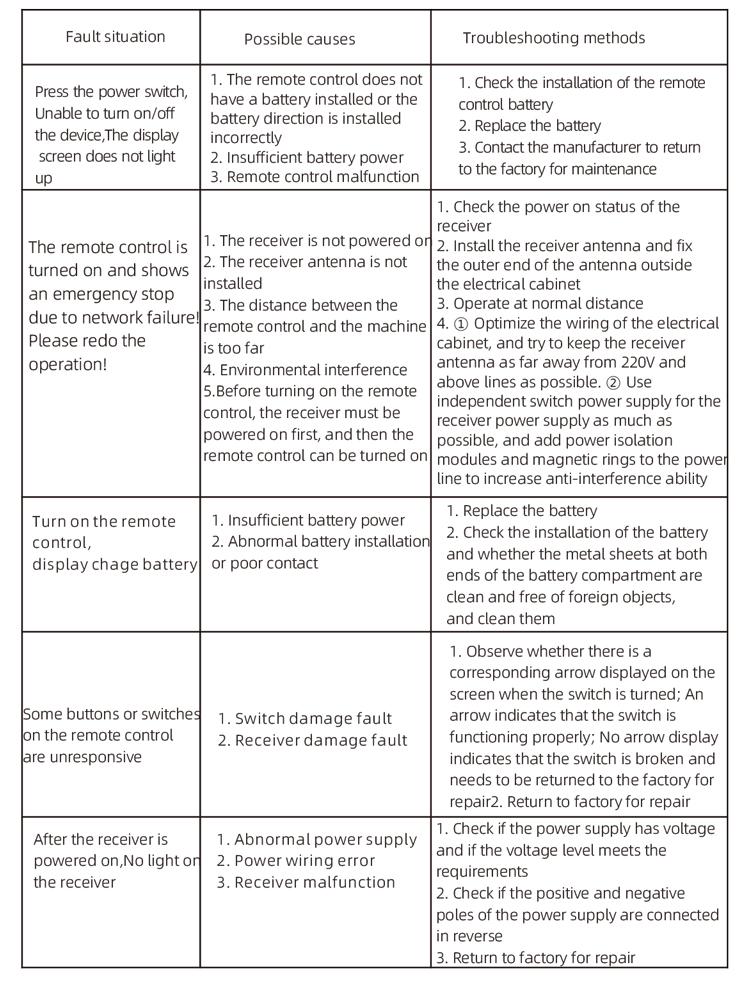
8. Produk probleemoplossing
7.2 Parameterinstelling van frekwensie-omskakelaar
1. Bevelbronkeuse: Kommunikasie opdrag kanaal
2. Hooffrekwensiebronkeuse: kommunikasie gegee
3. Baud koers: 19200
4. Data formaat: Geen verifikasie nie, data formaat<8-N-1>
5. Plaaslike adres: Stel die linker frekwensie-omskakelaar op 1, die regte frekwensie-omskakelaar na 2, en die groot motorfrekwensie-omskakelaar na 3
7.3 Bedryfsinstruksies vir afstandbeheer
1. Skakel die masjien aan, skakel die afstandbeheerder aan, voer die afstandbeheer-agtergrond in, stel die afstandbeheer-agtergrondparameters in, Dit is hoofsaaklik om die modelle van klein en groot motorfrekwensie-omsetters in te stel (slaan hierdie stap oor as die masjienvervaardiger dit reeds gestel het);
2. Stel die parameters van die frekwensie-omskakelaar (slaan hierdie stap oor as die masjienvervaardiger dit reeds gestel het);
3. Stel die afstandbeheerder op handmodus, en gebruik dan die afstandbeheer om die masjien na die werkposisie te skuif;
4. In handmatige modus, stel die IC-waarde vir die snystroom van die groot motor en die spoed van die groot motor;
5. Skakel oor na outomatiese modus en stel die snyspoedgrens F-waarde vir die klein motor in;
6. In outomatiese modus, draai die groot motor skakelaar na vorentoe om die groot motor te begin, en draai dan die klein motorskakelaar na vorentoe of agtertoe. Die afstandbeheer gaan in outomatiese snymodus en begin sny.
9.Onderhoud
1. Gebruik dit asseblief in 'n droë omgewing by kamertemperatuur en druk om sy lewensduur te verleng.
2. Vermy asseblief gebruik in abnormale omgewings soos reën en waterborrels om die lewensduur te verleng.
3. Hou asseblief die batterykompartement en metaal skrapnel area skoon.
4. Vermy asseblief om die afstandbeheerder te beskadig as gevolg van knyp en val.
5. As dit vir 'n lang tyd nie gebruik word nie, verwyder asseblief die battery en bêre die afstandbeheer en battery op 'n skoon en veilige plek.
6.Tydens berging en vervoer, aandag moet gegee word aan vog- en skokweerstand.
10. Veiligheidsinligting
1. Lees asseblief die instruksies noukeurig voor gebruik en verbied nie-professionele persone om te werk.
2. Vervang asseblief die battery betyds wanneer die battery te laag is om foute wat veroorsaak word deur onvoldoende krag te vermy, wat daartoe kan lei dat die afstandbeheerder nie kan werk nie.
3. Indien herstel nodig is, kontak asseblief die vervaardiger. As die skade deur selfherstel veroorsaak word, die vervaardiger sal nie waarborg verskaf nie