Апоры 2 наладжвальныя кнопкі, з выхадам сігналу IO пераключальнага тыпу;
Апоры -2 кантроль восі;
Падтрымлівае 3-ўзроўневы кантроль павелічэння;

1.Уводзіны прадукт Уводзіны
2. Функцыянальныя асаблівасці вырабы
| Працоўнае напружанне і ток бесправаднога пульта |
3V/14MA
|
| Характарыстыкі акумулятара | 2 Шчолачныя батарэйкі АА, памер 5 |
| Дыяпазон сігналізацыі нізкага напружання бесправаднога пульта | < 2.3V |
| Напружанне сілкавання прымача | DC5V-24V/A |
| Дыяпазон выхадных нагрузак аварыйнага прыпынку рэсівера | AC125V-1A/DC30V-2A |
| Дыяпазон выхадных нагрузак для ўключэння прыёмніка |
AC125V-1A/DC30V-2A
|
| Дыяпазон выхадной нагрузкі кнопкі прыёмніка | DC24V/50mA |
| Дыяпазон выхадных нагрузак выбару восі ствольнай скрынкі | DC24V/50mA |
| Дыяпазон выходнай нагрузкі павелічэння прымача | DC24V/50mA |
| Магутнасць перадачы партатыўнага тэрмінала |
15дБм
|
| Адчувальнасць прыёму рэсівера | -100дБм |
| Частата бесправадной сувязі | 433Дыяпазон частот МГц |
| Дыстанцыя бесправадной сувязі | Безбар'ернае адлегласць 40 метры |
| Працоўная тэмпература | -25℃ < X < 55℃ |
| Вышыня супраць падзення | 1 (метр) |
| Нестандартная колькасць кнопак | 2 |


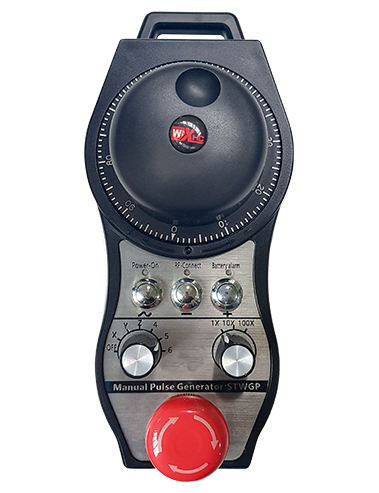
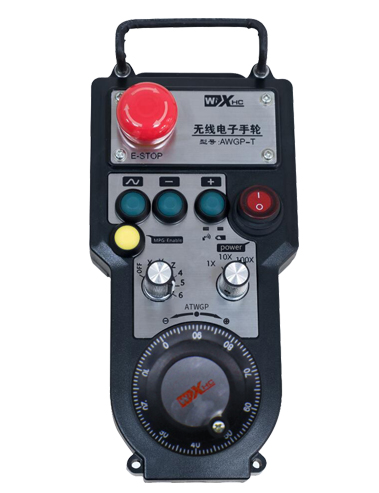
① Імпульсны кадавальнік:
Націсніце і ўтрымлівайце кнопку Enable, падтрасіце імпульсны кадавальнік, выдаваць імпульсны сігнал,і кіраваць рухам восі машыны.
② Кнопка ўключэння:
Націсніце любую кнопку ўключэння з абодвух бакоў, і два наборы выхадаў уводу-вываду дазволу на прымачы будуць праводзіць. Адпусціце кнопку ўключэння, каб адключыць уключаны выхад IO; А перад пераключэннем восі выбару павелічэння і трэсці штурвал,кнопку ўключэння трэба ўтрымліваць націснутай, каб яна была эфектыўнай; Гэтую функцыю можна адмяніць праз канфігурацыйнае праграмнае забеспячэнне.
③ Светавыя індыкатары:
Левы бакавы ліхтар: уключыць святло,штурвал выкарыстоўвае вось, каб выбраць OFF для ўключэння, і гэты індыкатар застаецца гарэць пасля ўключэння;
Сярэдні свет: сігнальная лямпачка, якая загараецца пры выкананні любой функцыі ручнога штурвала, і не гарыць, калі няма ніякіх аперацый;
Правы бакавы ліхтар: Індыкатар сігналізацыі нізкага напружання, нізкі ўзровень батарэі,гэты індыкатар міргае або застаецца гарэць, акумулятар неабходна замяніць.
④ Кнопка аварыйнай прыпынку:
Націсніце кнопку "Аварыйная прыпынак", і два камплекты выхадаў уводу-вываду экстранай прыпынку на прымачы будуць адключаны, і ўсе функцыі штурвала будуць несапраўднымі.
⑤ Пераключальнік павелічэння:
Націсніце і ўтрымлівайце кнопку ўключэння, каб пераключыць пераключальнік павелічэння, які можа пераключаць павелічэнне, якое кіруецца штурвалом.
⑥ Пераключальнік выбару восі (Пераключальнік харчавання):
Націсніце і ўтрымлівайце кнопку ўключэння, каб пераключыць пераключальнік выбару восі, які можа пераключаць вось руху, кіраваную штурвалом. Пераключыце гэты перамыкач з ВЫКЛ на любую вось і ўключыце харчаванне штурвала.
⑦ Карыстальніцкая кнопка:
Дзве спецыяльныя кнопкі, кожны з іх адпавядае кропцы выхаду ўводу-вываду на прымачы.

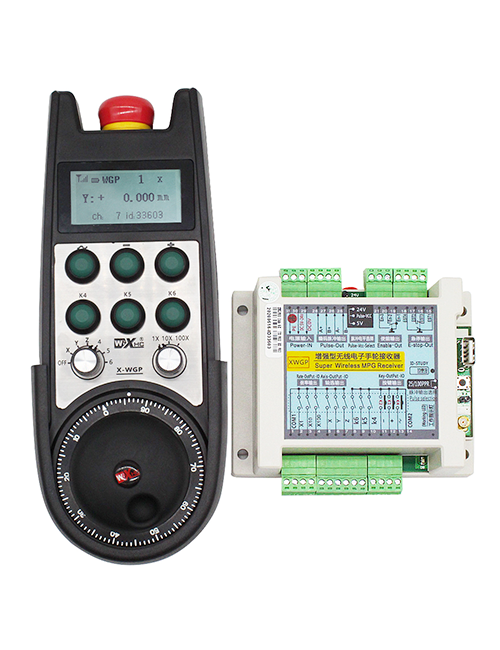
1. Усталюйце прыёмнік у электрычны шафу праз спражку на задняй панэлі, або ўсталюйце яго ў шафу праз адтуліны для шруб у чатырох кутах ствольнай скрынкі.
2. Звярніцеся да схемы падключэння нашага прымача і параўнайце яе з абсталяваннем, якое знаходзіцца на месцы. Падключыце абсталяванне да рэсівера з дапамогай кабеляў.
3.Пасля таго, як ствольная скрынка правільна замацавана, Антэна, абсталяваная прыёмнікам, павінна быць падлучана, і вонкавы канец антэны павінен быць усталяваны або размешчаны па-за электрычнай шафы. Рэкамендуецца размясціць яго ў верхняй частцы электрычнага шафы для лепшага эфекту сігналу. Забараняецца пакідаць антэну непадключанай або размяшчаць яе ўнутры электрычнай шафы, бо гэта можа прывесці да таго, што сігнал стане непрыдатным для выкарыстання.
4. На заканчэнне, уключыце выключальнік харчавання штурвала, і вы можаце кіраваць машынай дыстанцыйна з дапамогай штурвала.
6.2 Памеры ўстаноўкі прыёмніка

6.3 Даведачная схема праводкі прыёмніка

7. Інструкцыя па эксплуатацыі прадукту
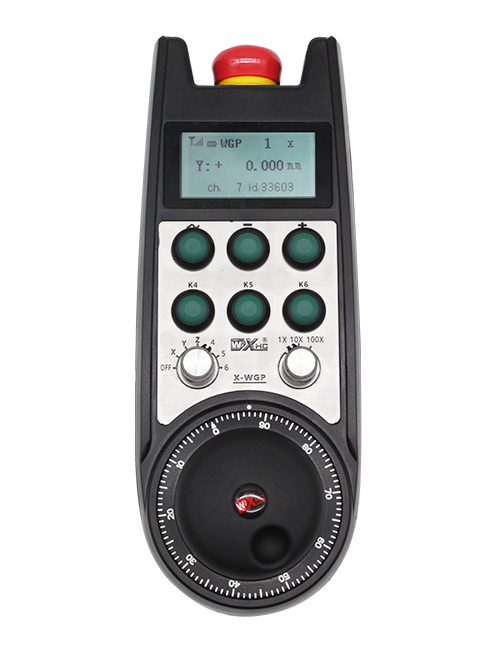
1. Уключыце машыну і прымач. Мігае індыкатар працы прымача. Усталюйце батарэю ў бесправадной электронны штурвал, замацуеце крышку батарэйнага адсека, і
уключыце выключальнік сілкавання бесправаднога электроннага штурвала. Індыкатар узроўню акумулятара штурвала гарыць.
2. Абярыце восі каардынат: Націсніце і ўтрымлівайце кнопку Enable, пераключыць пераключальнік выбару восі, і абярыце вось, якой вы хочаце кіраваць.
3. Выберыце павелічэнне: Націсніце і ўтрымлівайце кнопку Enable, пераключыць пераключальнік павелічэння,і выберыце патрэбны ўзровень павелічэння.
4. Перамяшчэнне восі: Націсніце і ўтрымлівайце кнопку Enable, Выберыце выключальнік выбару AXIS, абярыце пераключальнік павелічэння, а затым павярніце імпульсны кадавальнік. Павярніце па гадзіннікавай стрэлцы, каб перамясціць
станоўчай восі і супраць гадзінны стрэлкі, каб перамясціць адмоўную вось.
5. Націсніце і ўтрымлівайце любую карыстацкую кнопку, і адпаведны выхад кнопкі IO прымача будзе ўключаны. Адпусціце кнопку, і выхад будзе выключаны.
6. Націсніце кнопку "Аварыйная прыпынак", адпаведны выхад IO-вываду аварыйнай прыпынку прымача будзе адключаны, функцыя штурвала будзе адключана,адпусціце кнопку аварыйнага прыпынку, выхад аварыйнага прыпынку IO будзе зачынены, і функцыя штурвала будзе адноўлена.
7. Калі ручка не працуе на працягу перыяду часу, ён аўтаматычна пяройдзе ў рэжым сну, каб знізіць энергаспажыванне. Калі ён выкарыстоўваецца зноў, штурвал можна актываваць, націснуўшы кнопку ўключэння.
8. Калі ручка доўга не выкарыстоўваецца, рэкамендуецца пераключыць вал махавіка ў становішча OFF, Выключыце магутнасць ручнога кола, і падоўжыць тэрмін службы батарэі.
8. Апісанне мадэлі прадукту

① :ZTWGP прадстаўляе стыль знешняга выгляду
②:Параметры вываду імпульсу:
01: Паказвае, што імпульсны выхадны сігнал - A, Б; Імпульснае напружанне 5V; колькасць імпульсу 100PPR.
02:Паказвае, што выхадныя імпульсныя сігналы з'яўляюцца A і B; Імпульснае напружанне 12В; колькасць імпульсу 100PPR.
03:Паказваючы, што выхадныя імпульсныя сігналы з'яўляюцца A, Б, А -, Б -; Імпульснае напружанне 5V; колькасць імпульсу 100PPR.
04:Паказвае на выхад з адкрытым ланцугом на нізкім узроўні, з сігналамі пульса A і B;Колькасць імпульсаў 100PPR.
05:Паказвае на выхад крыніцы PNP высокага ўзроўню, з сігналамі пульса A і B; Колькасць імпульсаў 100PPR.
③:Прадстаўляе колькасць пераключальнікаў выбару восі, 2 прадстаўляе 2 сякеры.
④:Уяўляе тып сігналу пераключэння выбару восі, А ўяўляе выходны сігнал кропкі да кропкі, і B уяўляе сабой закадаваны выхадны сігнал.
⑤:Уяўляе тып сігналу пераключэння множання, А ўяўляе выходны сігнал кропкі да кропкі, і B уяўляе сабой закадаваны выхадны сігнал.
⑥:Прадстаўляе колькасць карыстальніцкіх кнопак, 2 прадстаўляе 2 Карыстальніцкія кнопкі.
⑦:Уяўляе сабой крыніцу харчавання для махавіка сістэмы, і 05 Уяўляе 5V электразабеспячэнне.
⑧:L уяўляе левы слупок (левы трымальнік нажа), і R уяўляе правы слупок (правы трымальнік нажа).
9.Рашэнне праблем з прадуктам

1. Калі ласка, выкарыстоўвайце яго ў сухіх умовах пры пакаёвай тэмпературы і ціску, каб падоўжыць тэрмін службы.
2. Калі ласка, пазбягайце выкарыстання ў ненармальных умовах, такіх як дажджавыя і вадзяныя бурбалкі, каб падоўжыць тэрмін службы.
3. Калі ласка, захоўвайце выгляд ручнога кола, каб падоўжыць тэрмін службы.
4. Калі ласка, пазбягайце сціску, падзенне, націскаць, і г.д.. каб прадухіліць пашкоджанне прэцызійных кампанентаў унутры штурвала або памылак у дакладнасці.
5. Калі не выкарыстоўваецца на працягу доўгага часу, Калі ласка, захоўвайце зручнасць у чыстым і бяспечным месцы. Падчас захоўвання і транспарціроўкі, Увагу трэба звярнуць на вільгаць і ўдарную ўстойлівасць.
11. Інфармацыя пра бяспеку
1. Калі ласка, прачытайце інструкцыі ўважліва перад выкарыстаннем і забараніце не спецыялістам працаваць.
2. Своечасова замяняйце акумулятар, калі ўзровень зарада акумулятара занадта нізкі, каб пазбегнуць памылак, выкліканых недастатковым зарадам акумулятара і немагчымасцю кіраваць штурвалом.
3. Калі неабходны рамонт, Калі ласка, звяжыцеся з вытворцам. Калі шкода выклікана самастойным рамонтам, Вытворца не забяспечыць гарантыю