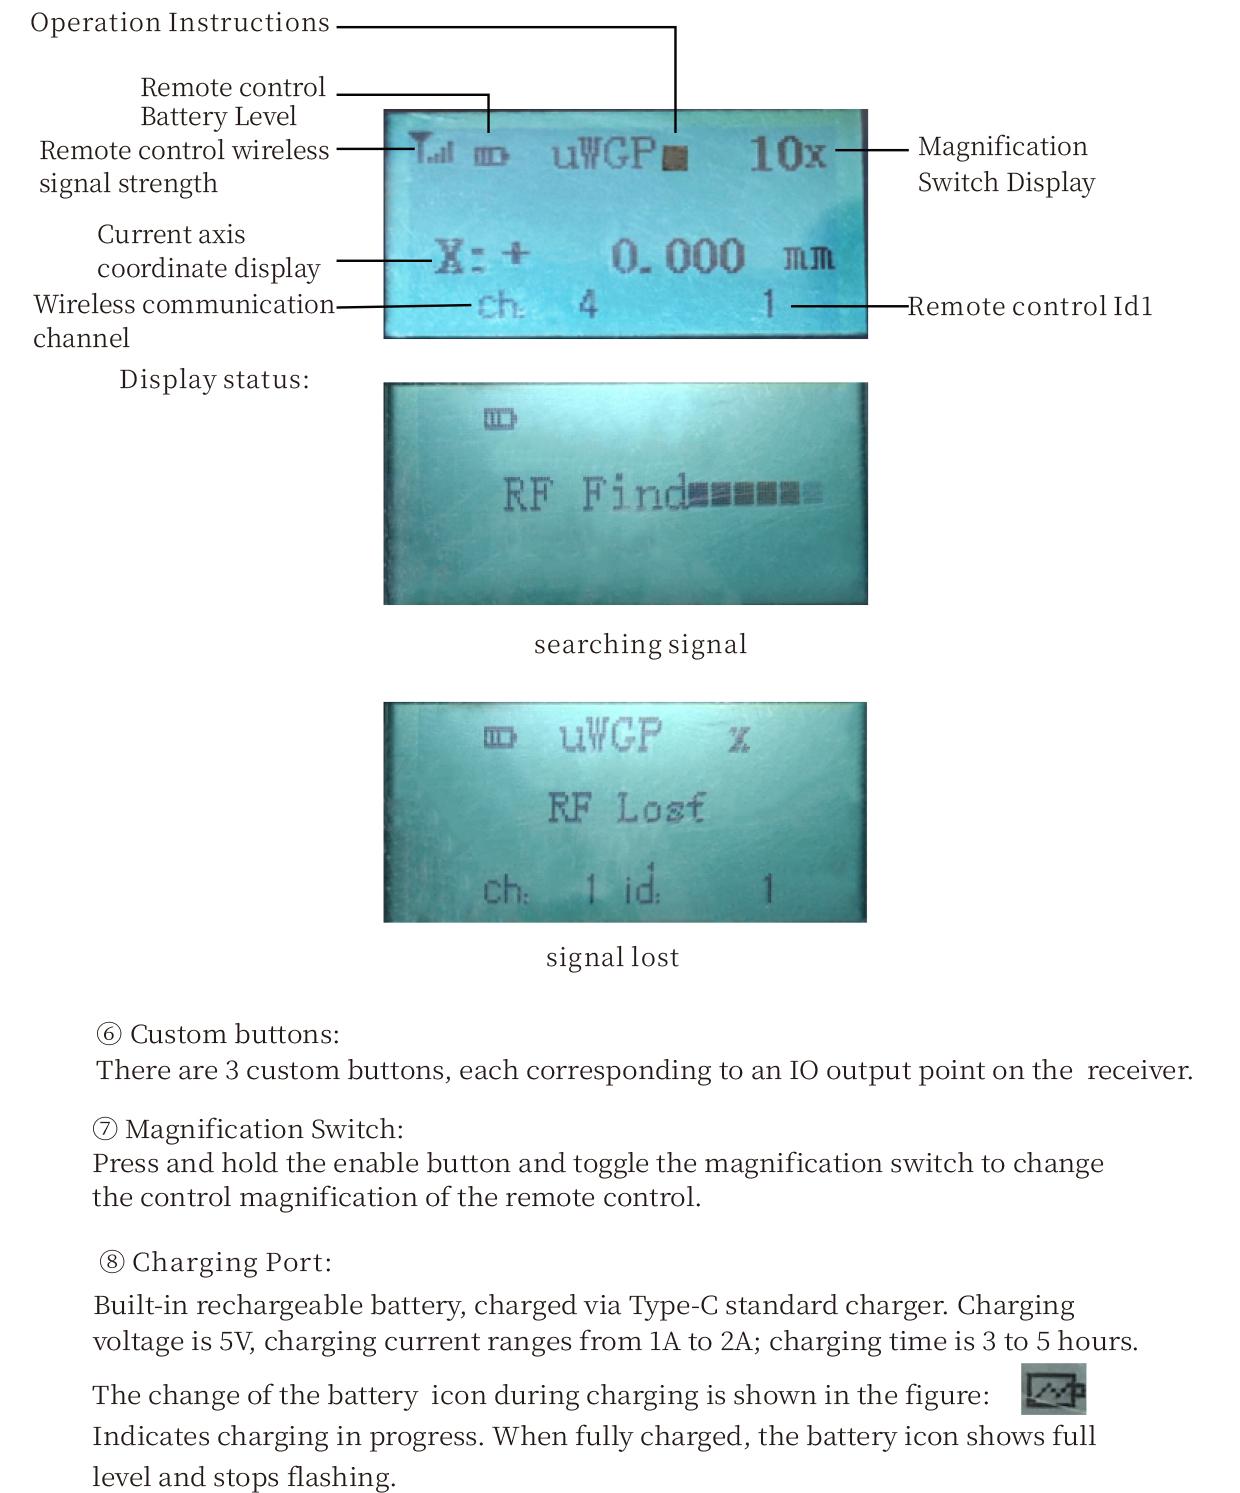
Περιγραφή
1.Εισαγωγή προϊόντος
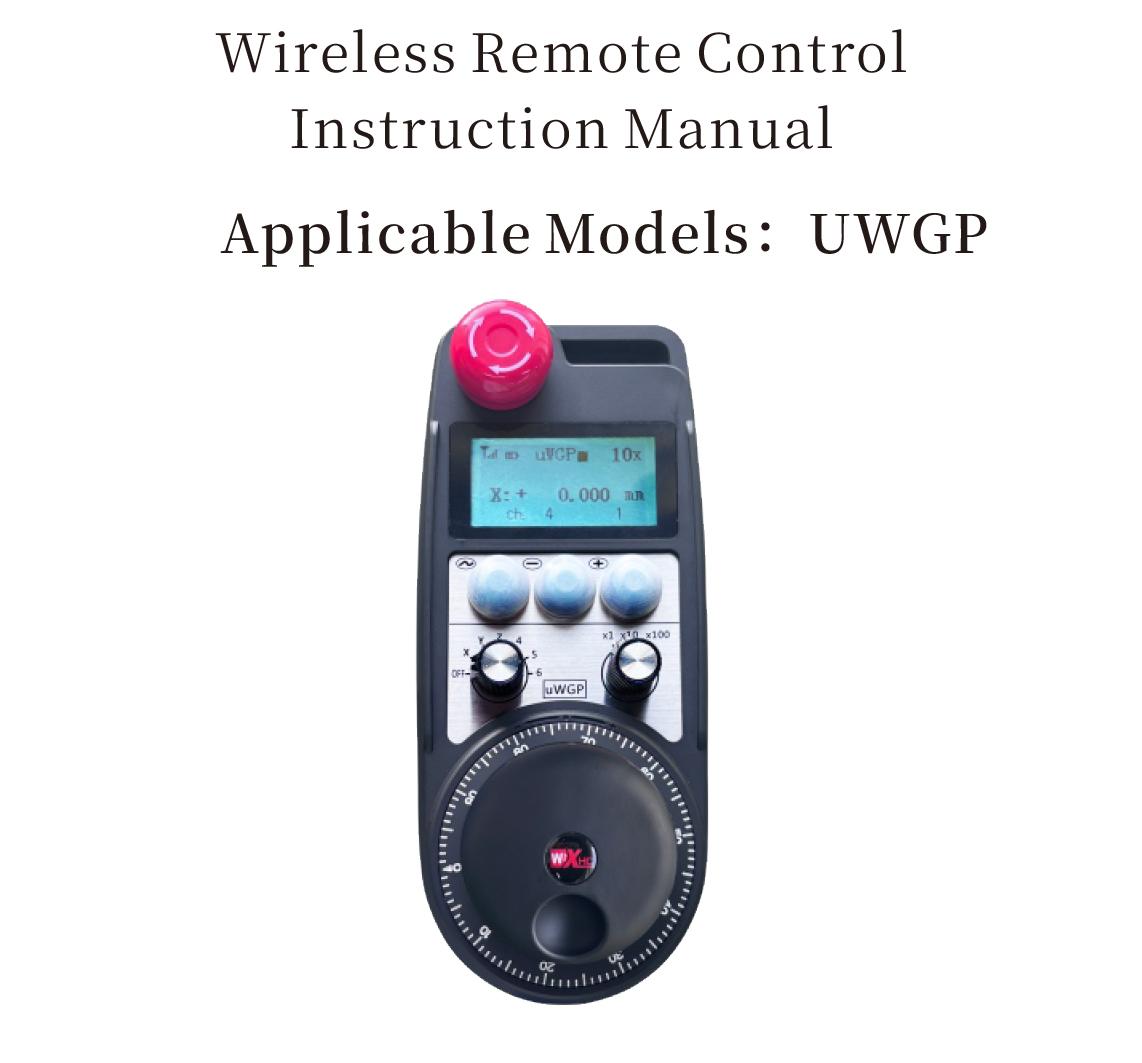
Wireless Remote Control is used for manual guidance, τοποθέτησης, tool setting and other operations of CNC machine tools. Αυτό το προϊόν υιοθετεί τεχνολογία ασύρματης μετάδοσης, εξαλείφοντας την παραδοσιακή σύνδεση καλωδίων ελατηρίου, μείωση των αστοχιών εξοπλισμού που προκαλούνται από καλώδια, εξαλείφοντας τα μειονεκτήματα της σύρσεως καλωδίων, λεκέδες από λάδι, και τα λοιπά., and is more convenient to operate.It is widely applicable to CNC machine tools such as gantry machining centers, gantry vertical lathes, and CNC gear processing machines, and is compatible with various mainstream CNC system brands on the market, including Siemens, Μιτσούμπισι, Fanuc, Syntec and more.
2.Χαρακτηριστικά προϊόντος
1. Adopts 433MHz wireless communication technology with a wireless operating distance of 20 μέτρα.
2.Adaptive frequency hopping; 32 sets of wireless remote controls can be used simultaneously without interference.
3.Supports the emergency stop button, and the emergency stop button remains effective even after the remote control is powered off.
4.Στήριξη 3 προσαρμοσμένα κουμπιά με έξοδο σήματος IO μεταγωγής.
5.Υποστηρίζει έλεγχο 6 αξόνων, και 7 Ο έλεγχος 12 αξόνων είναι προσαρμόσιμος.
6. Υποστηρίζει έλεγχο μεγέθυνσης 3 ταχυτήτων, και ο έλεγχος μεγέθυνσης 4 ταχυτήτων είναι προσαρμόσιμος.
7.υποστηρίζει τη λειτουργία του κουμπιού ενεργοποίησης, που μπορεί να εξάγει σήματα μεταγωγής IO, και επίσης έλεγχος επιλογής άξονα, μεγέθυνση και κωδικοποιητής.
8.Υποστηρίζει την τροποποίηση του τύπου κωδικοποίησης της επιλογής άξονα και της μεγέθυνσης μέσω λογισμικού.
9. Supports pulse encoder with specification of 100 pulses per revolution.
10. Supports standard Type-C charging with 5V-2A charging specification; built-in battery
specification: 14500 / 1100mAh.
3. Προδιαγραφές προϊόντος
| Working Voltage and Current of Handheld Terminal |
3.7V/20.0mA |
| Charging Battery Specification |
3.7V/14500/1100mAh
|
| Low Voltage Alarm Range of Handheld Terminal |
<3.35V |
| Receiver Power Supply Voltage |
DC5V-24V/1A |
| Receiver Emergency Stop Output Load Range |
AC125V-1A/DC30V-2A |
| Receiver Enable Output Load Range |
AC125V-1A/DC30V-2A |
| Receiver Custom Button Output Load Range |
DC24V/50mA
|
| Receiver Axis Selection Output Load Range |
DC24V/50mA |
| Receiver magnification Output Load Range |
DC24V/50mA |
| Handheld Terminal Transmit Power |
15dBm
|
| Receiver receiving sensitivity |
-100dBm |
| Wireless communication frequency |
433MHz frequency band
|
| Wireless Communication Distance |
20 meters barrier-free distance
|
| Operating Temperature |
-25℃<X<55℃ |
| Safe drop height |
1 m
|
| Number of Custom Buttons |
3
|
| Product Weight |
546.86(g) |
| Product Dimensions |
200*87*72(mm) |
4. Λειτουργία προϊόντος Εισαγωγή
Σημειώσεις:
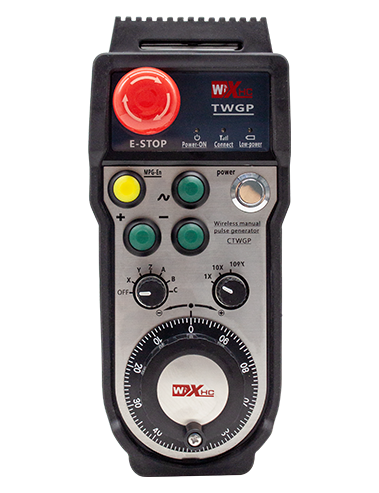
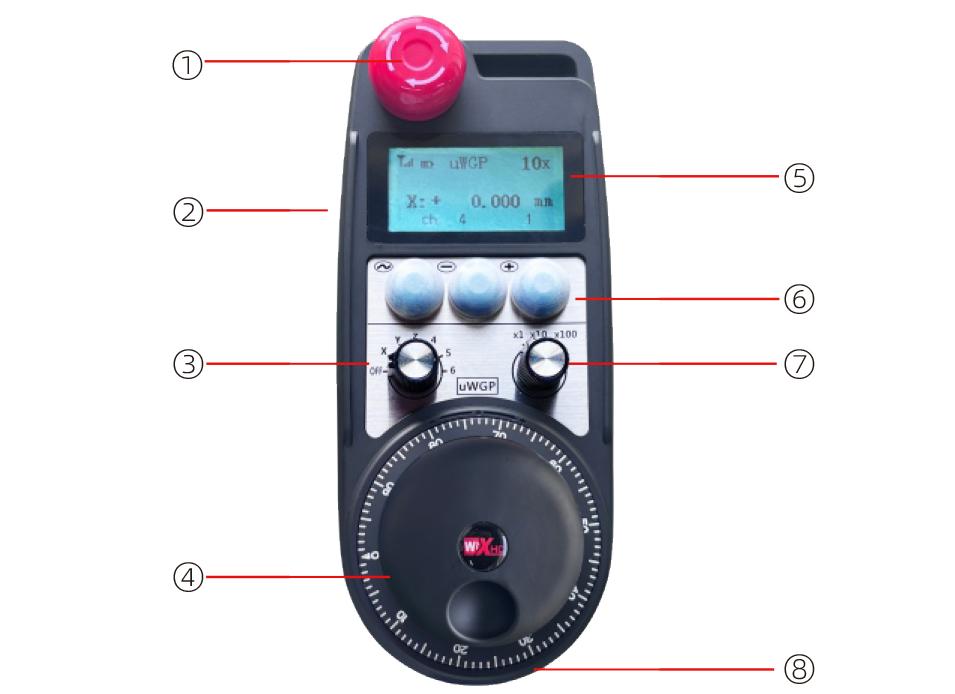
① Emergency Stop Button:
Πατήστε το κουμπί διακοπής έκτακτης ανάγκης, the two groups of emergency stop IO outputs on the receiver will disconnect, and all remote control functions will be invalidated.Release the emergency stop button, the emergency stop IO outputs on the receiver will be closed, and all remote control functions will be restored. Εξάλλου, even if the remote control is powered off, pressing the emergency stop button can still activate the emergency stop IO output of the receiver.
② Enable Button:
Press either enable button on both sides, the two sets of enable IO outputs on the receiver will conduct. Release the enable button, and the enable IO outputs will disconnect. It is necessary to press and hold the enable button before toggling axis selection, magnification or rotating the remote control for the operation to take effect.This function can be canceled through the configuration software.
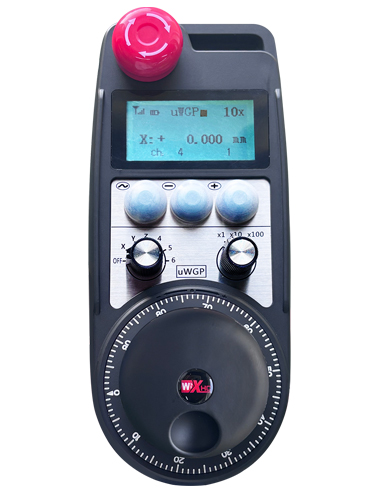
③ Axis Selection Switch (Power Switch):
Πατήστε και κρατήστε πατημένο το κουμπί ενεργοποίησης, then toggling the axis selection switch can control the movement of axis .Press and hold the enable button, then toggle the axis selection switch to switch the motion axis controlled by the remote control. Toggle the switch from the OFF position to any axis position, and the remote control will power on automatically.
④ Pulse Encoder:
Press and hold the enable button and rotate the pulse encoder, it will output pulse signals to control the movement of the machine axis.
⑤ LCD Display Screen:
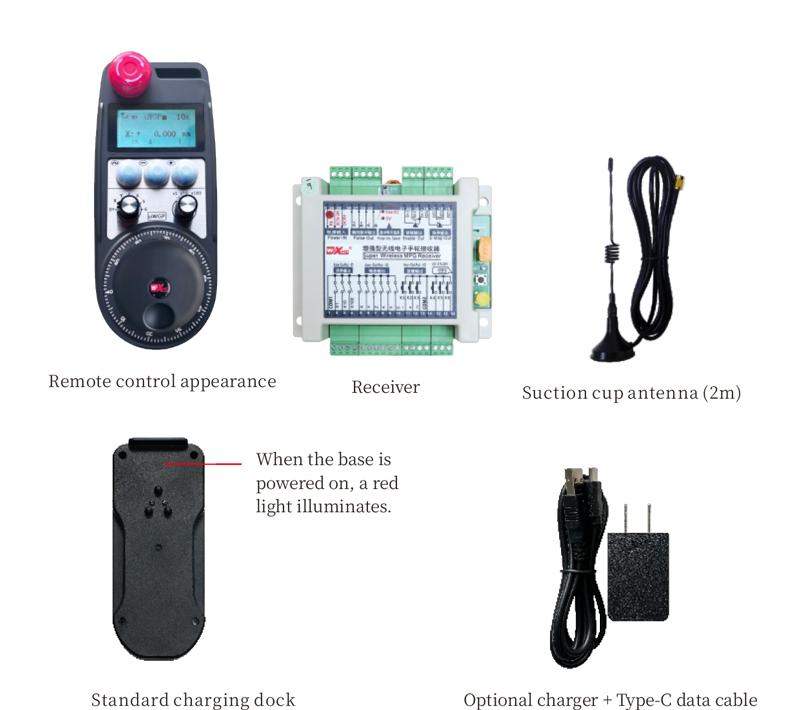
5. Product Accessories Diagram
6. Οδηγός εγκατάστασης προϊόντος
6.1 Βήματα εγκατάστασης προϊόντος
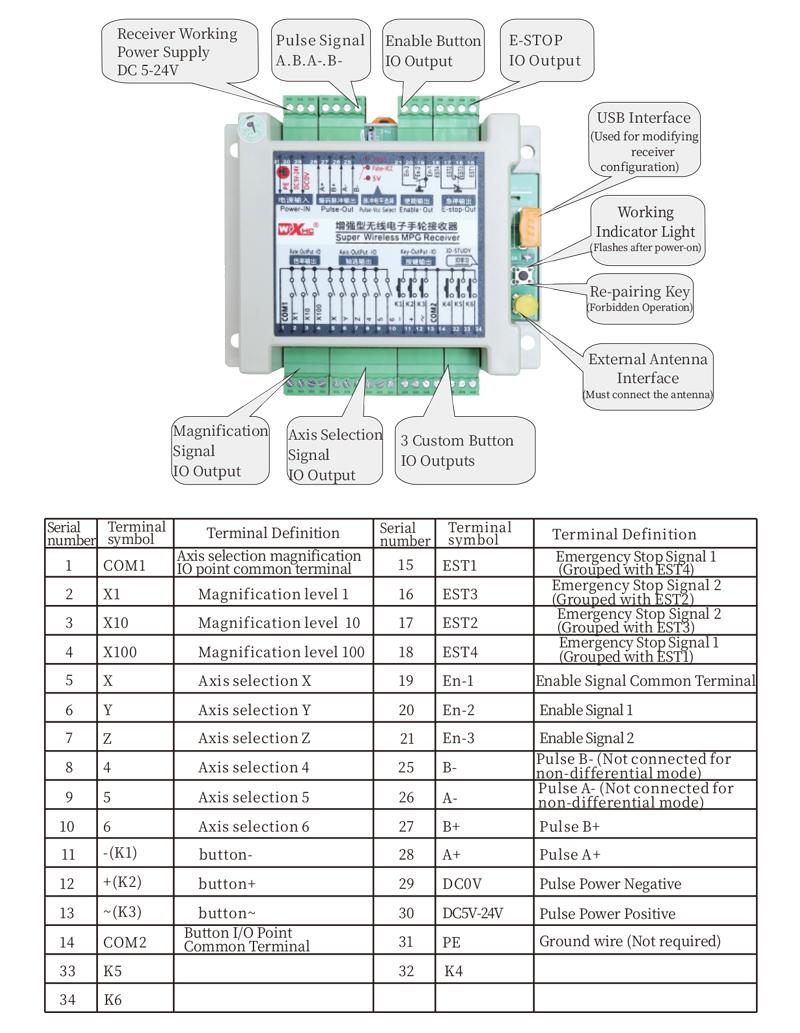
1. Install the receiver in the electrical cabinet via the buckle on its back, or mount it inside the electrical cabinet through the screw holes at the four corners of the receiver.
2. Ανατρέξτε στο διάγραμμα καλωδίωσης του δέκτη μας, συγκρίνετε το με τον εξοπλισμό σας, and connect the equipment to the receiver with cables.
3. After the receiver is fixed in place, install the supporting antenna of the receiver properly. Mount or place the outer end of the antenna outside the electrical cabinet. It is recommended to place it on the top of the electrical cabinet for optimal signal performance. Do not leave the antenna uninstalled or place it inside the electrical cabinet; αλλιώς, signal failure may occur.
4. Τελικά, turn on the remote control power switch, then you can remotely operate the machine via the remote control.
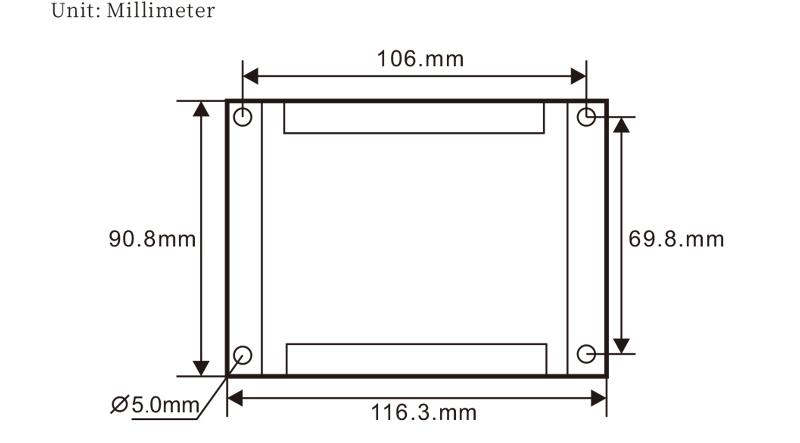
6.2 Receiver Installation Dimensions
6.3 Διάγραμμα αναφοράς καλωδίωσης δέκτη
7. Οδηγίες λειτουργίας προϊόντος
1. Power on the machine and the receiver. The receiver operation indicator flashes. After the wireless electronic remote control is fully charged, toggle it from the OFF gear to the X-axis gear, and the remote control display lights up.
2. Select the axis : Πατήστε και κρατήστε πατημένο το κουμπί ενεργοποίησης, toggle the axis selection switch to select the axis to be operated.
3. Select the magnification: Πατήστε και κρατήστε πατημένο το κουμπί ενεργοποίησης, toggle the magnification switch to select the required magnification gear.
4. Axis movement: Πατήστε και κρατήστε πατημένο το κουμπί ενεργοποίησης, select the axis selection switch and the magnification switch, then rotate the pulse encoder. Rotate clockwise to move the axis in the positive direction, and rotate counterclockwise to move the axis in the negative direction.
5. Πατήστε παρατεταμένα οποιοδήποτε προσαρμοσμένο κουμπί, the corresponding button IO output of the receiver will turn on; release the button, and the output will turn off.
6. Πατήστε το κουμπί διακοπής έκτακτης ανάγκης, the corresponding emergency stop IO output of the receiver disconnects and the remote control function becomes invalid. Release the emergency stop button, the emergency stop IO output closes and the remote control function is restored.
7. If the wireless remote control is not operated for a period of time, it will automatically enter sleep mode to reduce power consumption. It can be used normally again by pressing the enable button again.
8.If the wireless remote control is not used for a long time, turn the axis switch to OFF to turn off the power and extend battery life
8. Περιγραφή μοντέλου προϊόντος
①:UWGP stands for appearance style.
②:Pulse Output Parameters:
01: Indicates that the pulse output signal is A, B; Παλμική τάση 5V; pulse quantity 100PPR.
02: Indicates that the pulse output signal is A, B; Pulse voltage 12V; pulse quantity 25PPR.
03: Indicates that the pulse output signal is A, B, A -, B -; Παλμική τάση 5V; pulse quantity 100PPR.
04: Υποδεικνύει μια έξοδο ανοιχτού κυκλώματος NPN χαμηλού επιπέδου, με σήματα εξόδου παλμού των Α και Β; The number of pulses is 100PPR.
05: Υποδεικνύει έξοδο πηγής PNP υψηλού επιπέδου, με σήματα εξόδου παλμού των Α και Β; The number of pulses is 100PPR.
③:Represents the axis selection switch quantity; 6 stands for 6 τσεκούρια, 7 stands for 7 τσεκούρια, and so on.
④: Represents the signal type of the axis selection switch.A stands for point-to-point output signal, and B stands for encoder output signal.
⑤: Represents the signal type of the magnification switch.A stands for point-to-point output signal, and B stands for encoder output signal.
⑥: Represents the number of custom buttons; 3 corresponds to 6 προσαρμοσμένα κουμπιά.
⑦: Represents the power supply for the system remote control. 05 stands for 5V power supply, και 24 stands for 24V power supply.
⑧: Represents the contact charging mode. It starts charging automatically when placed back on the charging base.
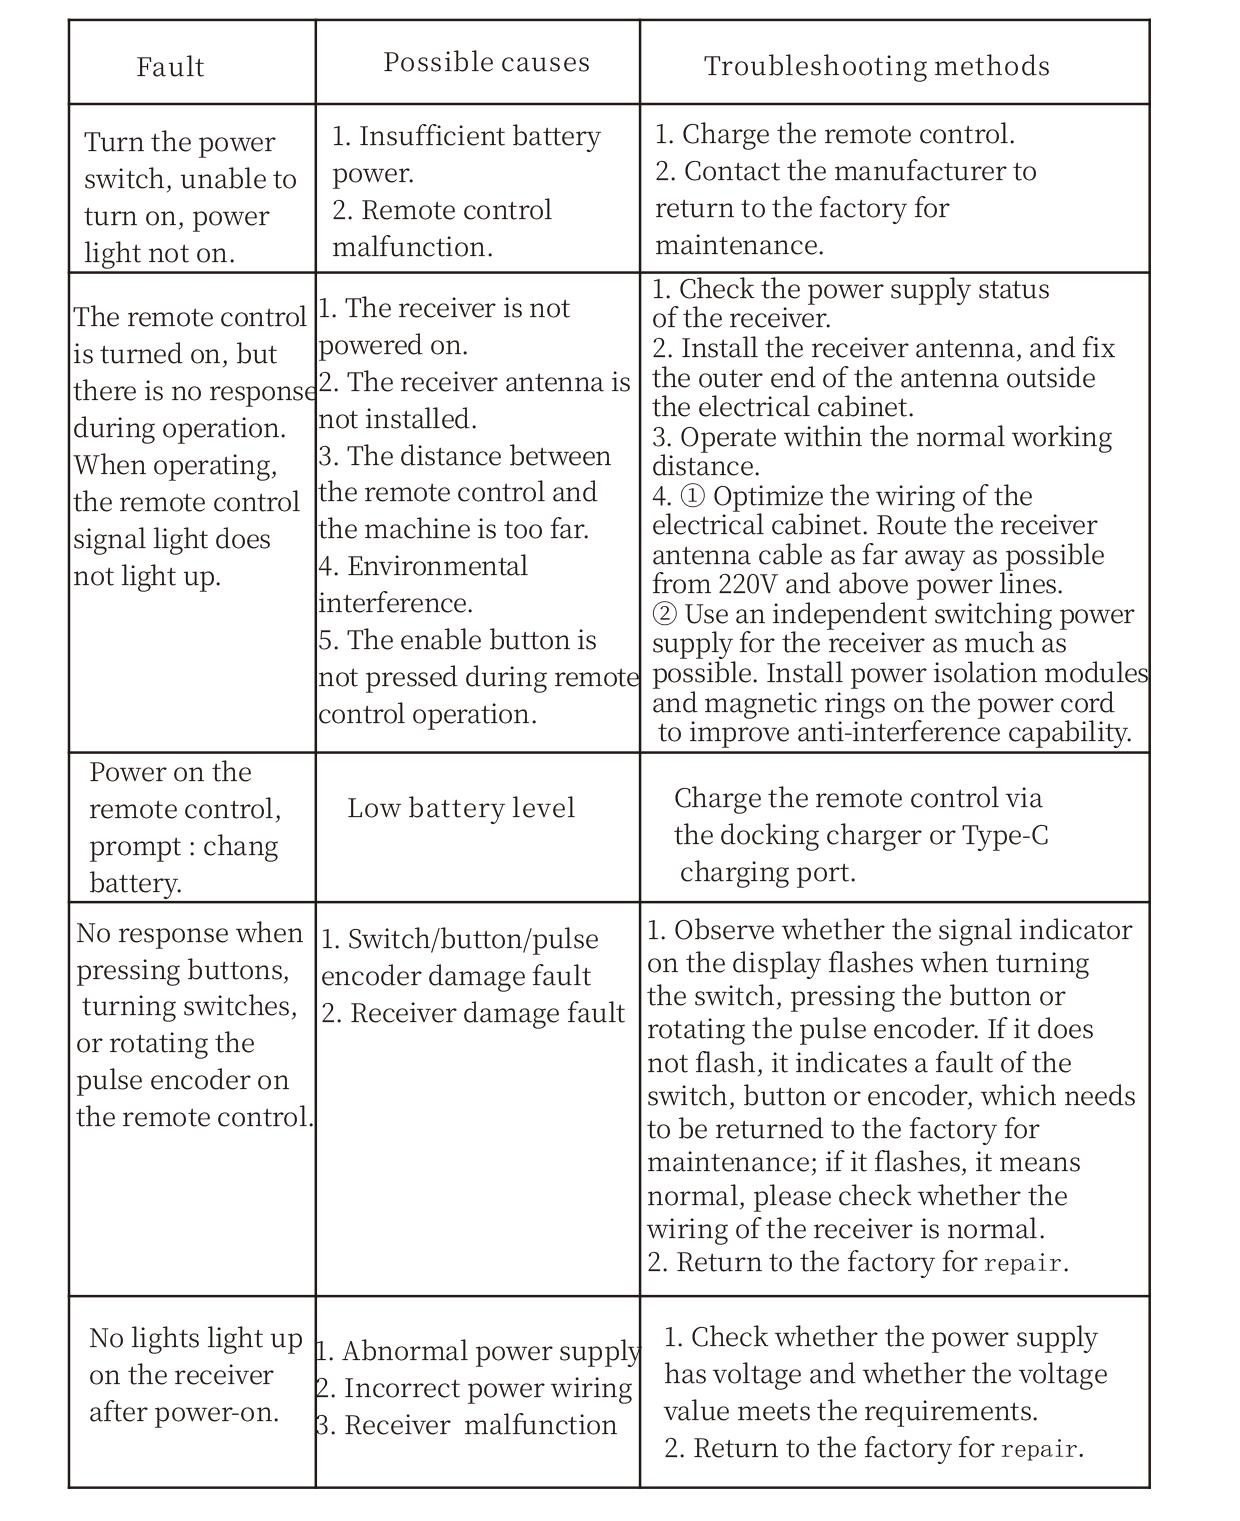
9. Αντιμετώπιση προβλημάτων προϊόντος
10. Maintenance and upkeep
1. Χρησιμοποιήστε το σε ξηρό περιβάλλον σε θερμοκρασία δωματίου και πίεση για να επεκτείνετε τη διάρκεια ζωής του.
2. Please avoid using in abnormal environments such as rain and water to extend the service life.
3. Please keep the appearance of the remote control clean to extend its service life.
4. Please avoid crushing, dropping, or bumping, και τα λοιπά. to prevent damage to the precision components inside the remote control or accuracy errors.
5. Εάν δεν χρησιμοποιείται για μεγάλο χρονικό διάστημα, please store the remote control in a clean and safe place.
6. Avoid moisture and shock during storage and transportation.
11. Πληροφορίες για την ασφάλεια
1. Διαβάστε προσεκτικά τις οδηγίες πριν από τη χρήση και απαγορεύστε στους μη επαγγελματίες να λειτουργούν.
2. Please charge the remote control in a timely manner when the battery level is too low, to avoid malfunction and operational errors caused by insufficient power.
3. If you repair it yourself and cause damage, the warranty will be void.