Descripción
1. Introducción del producto
El control remoto de corte automático de sierra de cuerda para vehículos sobre orugas es adecuado para máquinas cortadoras de sierras de cuerda sobre orugas. Adopta el protocolo 485ModbusRTU para controlar la velocidad de arranque y el control de dirección delantero y trasero izquierdo y derecho de los inversores de orugas izquierdo y derecho., así como el protocolo RTU de conversión de frecuencia de motor grande para controlar la velocidad de arranque y el control de dirección delantero y trasero izquierdo y derecho de los inversores de orugas izquierdo y derecho., y el análisis y comparación de sobrecorriente de conversión de frecuencia de motor grande, ajuste automáticamente las velocidades de las orugas izquierda y derecha en tiempo real para lograr la función de corte automático.
2. Características del producto
1. Adopte la tecnología de comunicación inalámbrica de 433MHZ, La distancia de operación inalámbrica es 100 medidores.
2. Adopte la función de salto de frecuencia automático, usar 32 conjuntos de controladores remotos inalámbricos al mismo tiempo, sin afectarnos unos a otros.
3. Admite todos los inversores con protocolo 485-Modbus RTU. Las marcas de inversores que se han adaptado incluyen:Shanghái Xielín, fuji, Innovación, Zhongchen, INVT, Anchuanda. Si la marca no es ada, contáctenos para personalizarla..
4. Admite arranque de inversor de motor grande, regulación de velocidad, y lectura actual.
5. Admite regulación de velocidad del inversor de orugas izquierda y derecha, comenzar, Control delantero y trasero izquierdo y derecho..
6. Admite la corrección de línea recta del inversor de orugas izquierda y derecha para mantener la máquina en movimiento en línea recta.
7. Función de corte automático de sierra de cuerda de soporte, Ajusta automáticamente la velocidad de la oruga izquierda y derecha en tiempo real de acuerdo con la gran información actual del motor..
8. Al mismo tiempo, Es compatible con salida IO directa para controlar el arranque y parada del motor., y salida de voltaje analógico para controlar la velocidad del motor..
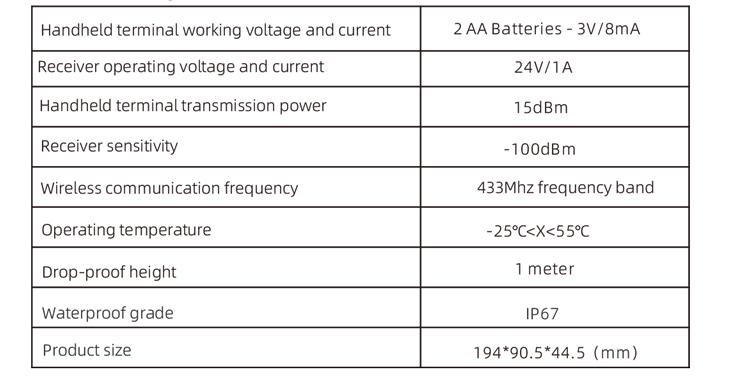
3. Especificaciones del producto
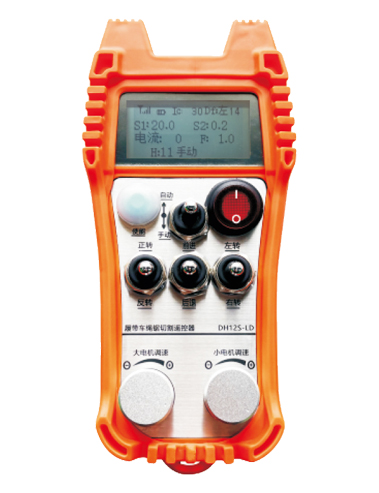
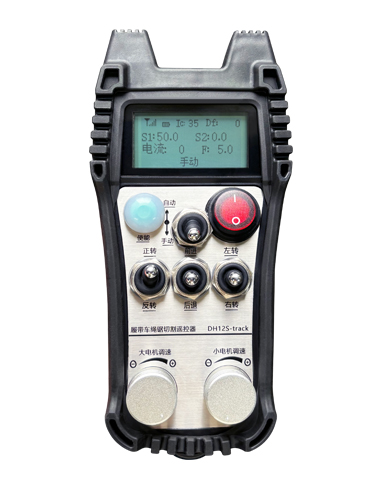
4. Introducción a la función del producto

Notas:
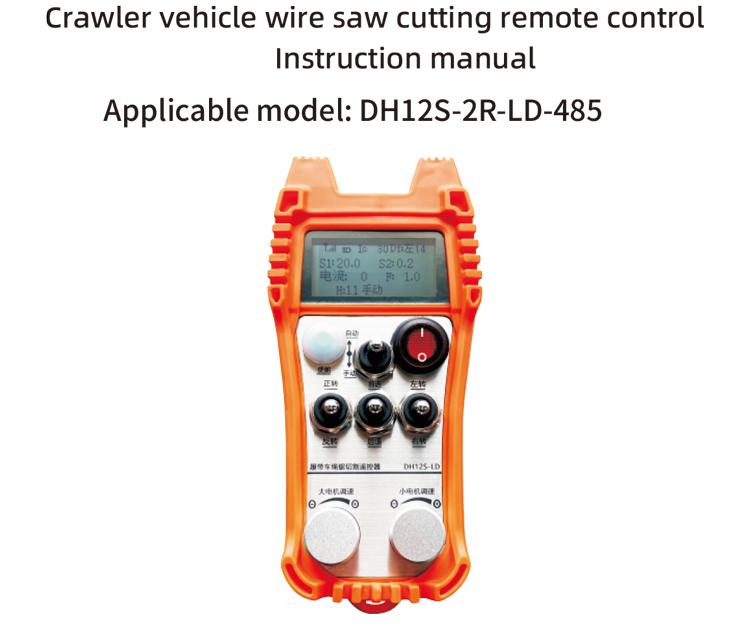
①Pantalla:

②Interruptor de modo:
Usando un interruptor de 2 niveles, Es posible cambiar entre los modos automático y manual., y el modo correspondiente se mostrará en la pantalla para cambiar.
③ Habilitar:
Botones combinados, Algunas operaciones requieren mantener presionado el botón de activación para su funcionamiento., Consulte las instrucciones de cada interruptor para obtener más detalles..
④ Interruptor de motor grande:
Usando un interruptor de reinicio de 3 velocidades, Tirar de este interruptor puede controlar la rotación hacia adelante y hacia atrás del motor grande.. Después de soltarlo, el estado permanecerá, y habrá visualizaciones correspondientes en la pantalla. La flecha t indica rotación hacia adelante., y la flecha y indica rotación inversa.
⑤Interruptor de avance/retroceso de motor pequeño:
Usando un interruptor autoblocante de 3 velocidades, Tirar de este interruptor puede controlar el pequeño motor para moverse hacia adelante y hacia atrás.. La visualización correspondiente se mostrará en la pantalla., con la flecha t indicando hacia adelante y la flecha ↓ indicando hacia atrás.
⑥Interruptor de encendido del control remoto:
La pantalla del control remoto está encendida..
⑦ interruptor giratorio de motor pequeño:
Usando un interruptor de reinicio de 3 velocidades, cuando se opera manualmente, El pequeño motor se puede controlar para girar hacia la izquierda o hacia la derecha.. Una vez liberado, El control remoto detendrá automáticamente esta acción. Cuando esté en el estado de avance, gire este interruptor y la visualización correspondiente aparecerá en la pantalla. + La flecha indica giro a la izquierda., y el – La flecha indica giro a la derecha. Cuando está en modo inverso, gire este interruptor y la visualización correspondiente aparecerá en la pantalla. + La flecha indica giro a la izquierda., y el – La flecha indica giro a la derecha. Mantenga presionado el botón de activación., luego gire este interruptor para realizar una función de giro estacionario, haciendo el giro más rápido.
⑧ Regulación de velocidad del motor grande:
Usando una perilla codificadora de múltiples vueltas, Gire la perilla para ajustar la velocidad S1 del motor grande. Para cada 1 rotación de cuadrícula, el valor de velocidad del motor grande cambia aproximadamente 0.2 unidades, Y la rotación rápida puede modificar rápidamente el valor de velocidad del motor grande.
9 Regulación de velocidad de motor pequeño. (corrección lineal):Para utilizar la perilla codificadora de múltiples vueltas, en modo manual, por cada 1 giro de la perilla, el valor de velocidad del motor pequeño cambia aproximadamente 0.1 unidades. La rotación rápida puede modificar rápidamente el valor de velocidad del motor pequeño.
En modo automático, presione el botón habilitar y gire 1 cuadrícula cada vez. El valor límite de velocidad F del motor pequeño cambia aproximadamente 0.1 unidades. La rotación rápida puede modificar rápidamente el valor límite de velocidad del motor pequeño. Presione el botón de activación, gire la perilla hacia la derecha, y la pantalla de corrección de línea recta muestra D f: izquierda. Cada rotación de la perilla aumenta en 1 unidad; Gire la perilla hacia la izquierda, visualización de corrección de línea recta: df: bien. Cada rotación de la perilla aumenta en 1 unidad, y cada unidad de corrección corresponde a un voltaje AVI de control de velocidad del motor de aproximadamente 0.02 V.
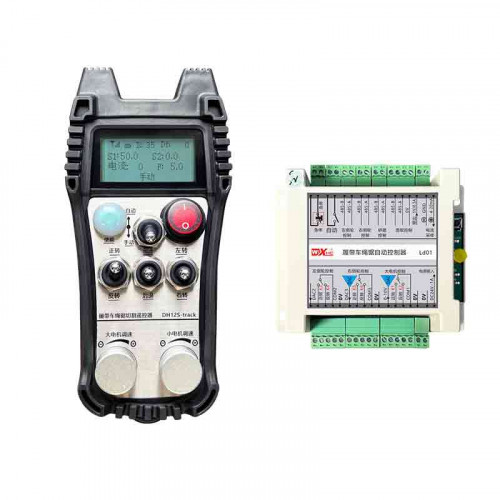
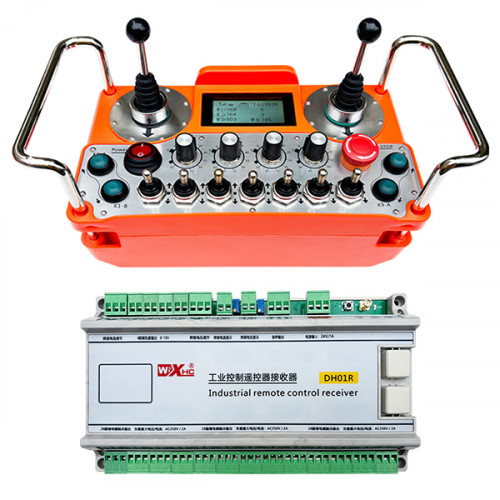
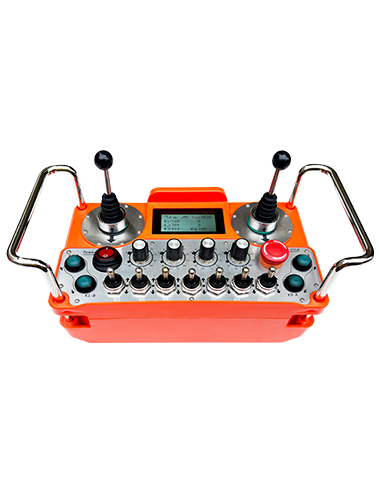
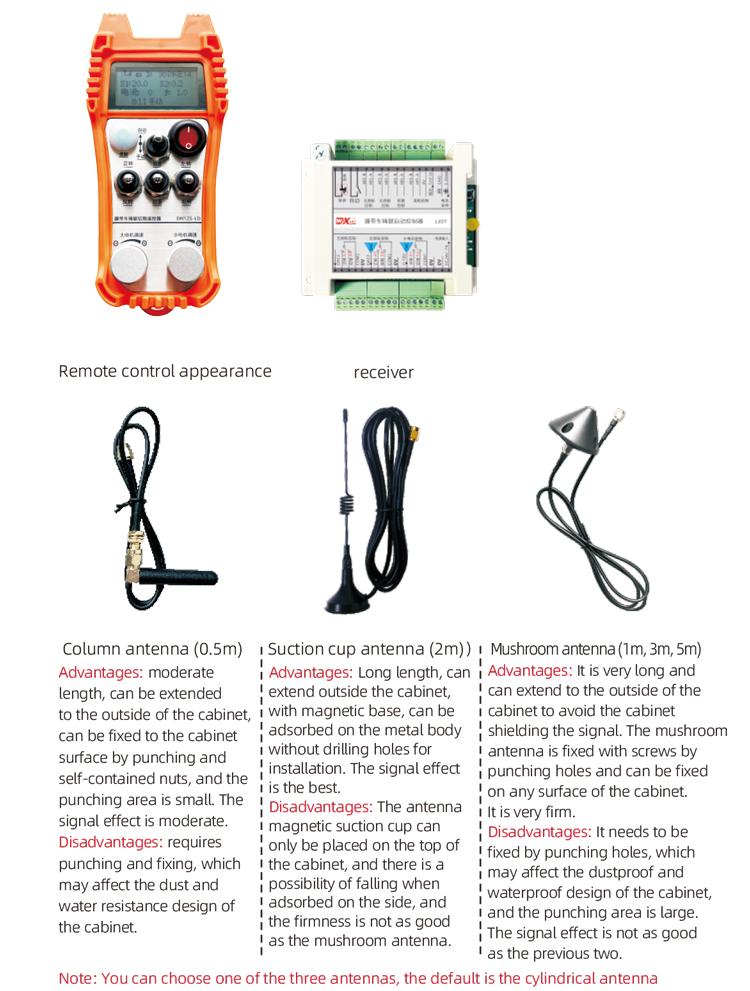
5. Diagrama de accesorios del producto
6. Guía de instalación del producto
6.1 Pasos de instalación del producto
1. Instale el receptor en el gabinete eléctrico a través de la hebilla en la parte posterior., o instálelo en el gabinete eléctrico a través de los orificios para tornillos en las cuatro esquinas del receptor.
2. Consulte nuestro diagrama de cableado del receptor., compare su equipo en sitio, y conectar el equipo al receptor mediante cables.
3. Después de que el receptor esté arreglado, la antena equipada con el receptor debe estar conectada, Y el extremo exterior de la antena debe instalarse o colocarse fuera del gabinete eléctrico.. Se recomienda colocarlo en la parte superior del gabinete eléctrico para obtener el mejor efecto de señal.. Está prohibido dejar la antena desconectada o colocar la antena dentro del armario eléctrico., lo que puede causar mala señal e inutilizable.
4. Finalmente, instale la batería en el control remoto, apriete la tapa de la batería, y luego encienda el interruptor de encendido del control remoto. Después de que la pantalla del control remoto muestre la interfaz de trabajo normal, puede realizar la operación de control remoto.
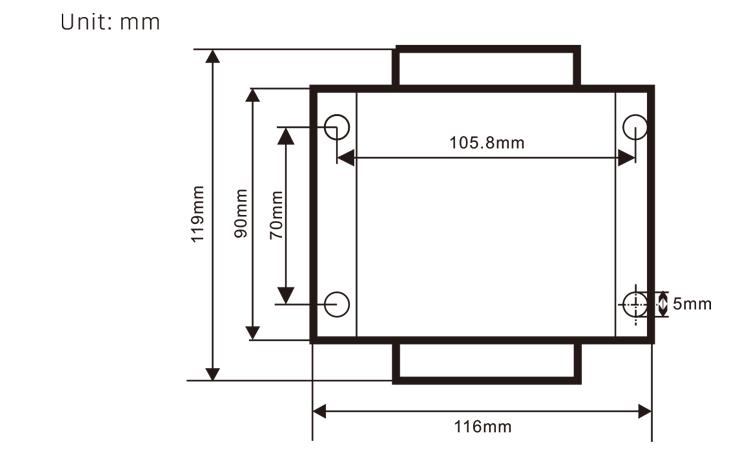
6.2 Dimensiones de instalación del receptor
6.3 Diagrama de referencia del cableado del receptor

7. Instrucciones de funcionamiento del producto
7.1 Configuración de parámetros del control remoto
Cómo ingresar los parámetros de fondo del control remoto: gire el interruptor de modo al modo manual, ajuste la velocidad del motor pequeño para 25, o 0, 10, 20, 40, 50, y gire el interruptor de avance del motor grande hacia arriba 3 veces y hacia abajo 3 veces;
Utilice el “Control de velocidad de motores pequeños” perilla para pasar la página, Presione Habilitar y gire la perilla de control de velocidad del motor pequeño para modificar los parámetros.; después de la modificación, pasa la página hasta el final, seleccione Guardar y salir, y presione el botón Habilitar para salir del menú;
Los parámetros son los siguientes.:Corriente máxima: amplio rango de valores de realimentación de corriente del motor, rango de ajuste 15-200A, por defecto 60;
Parámetros de control de velocidad: modo automático motor pequeño velocidad de aceleración automática, cuanto más pequeño más rápido, rango de ajuste 200-1500, por defecto 1000;
Parámetro de desaceleración: Establecer el límite superior del cambio de velocidad del motor permitido. Cuando la corriente cambia más allá de este valor, se desacelerará. Cuanto más pequeño es, más rápido desacelerarán los motores izquierdo y derecho. El rango es 05-12, y el valor predeterminado es 06;
Aceleración a1: Cuanto mayor sea el valor, cuanto más rápido aumenta la velocidad del motor, rango 00-06, predeterminado 01; Deceleración a2: Cuanto mayor sea el valor, cuanto más rápido disminuye la velocidad del motor, rango 00-06, por defecto 02;
Habilitar regulación de velocidad: Si es necesario habilitar la regulación de velocidad del motor pequeño, 00 no está habilitado, 01 está habilitado, por defecto 01;
Autobloqueo de inicio: Si el motor grande mantendrá automáticamente el bloqueo automático después de soltar el interruptor de avance y retroceso, 00 no se mantiene, 01 se mantiene, por defecto 01;
Recorrido máximo: Velocidad máxima de los motores izquierdo y derecho., rango 10-100, por defecto 50;
Corriente de corte: Corriente máxima de corte, la pantalla muestra el valor IC, rango 15-160, por defecto 30, la pantalla muestra IC: 30. El límite superior de este parámetro = corriente máxima x 80%;
Límite de velocidad predeterminado: La velocidad de corte automática del motor pequeño predeterminada al inicio, rango 00-100, por defecto 10, la pantalla muestra F1.0, Este parámetro sólo es preciso cuando el recorrido máximo está establecido en 50.
canal inalámbrico: El valor predeterminado es 10. Cuando la señal del control remoto es inestable o hay interferencia de señal en el sitio, Puedes modificar este parámetro para cambiar de canal y evitar interferencias.;
Compensación del límite de velocidad: El límite superior de la velocidad de corte automático del motor pequeño.,rango 00-200, por defecto 60, la pantalla muestra 6.0; Valor mostrado límite superior = compensación del límite de velocidad × 0.1;
anfitrión máximo: La velocidad máxima del motor grande., rango 10-100, por defecto 50;
dispositivo mbus ( obligatorio ): selección de modelo de inversor de motor grande, rango 00-03, por defecto 03;
00- Shanghái Xielín 01 fuji
02- INVT 03 Innovación(Zhongchen, Robicón)
Equipo SBUS (obligatorio): Selección de modelo de convertidor de frecuencia de motor pequeño, rango 00-05, por defecto 03;
00- Shanghái Xielín 01 fuji
02- INVT 03 Innovación(Zhongchen, Robicón)
04-Anchuanda 05-Ninguno
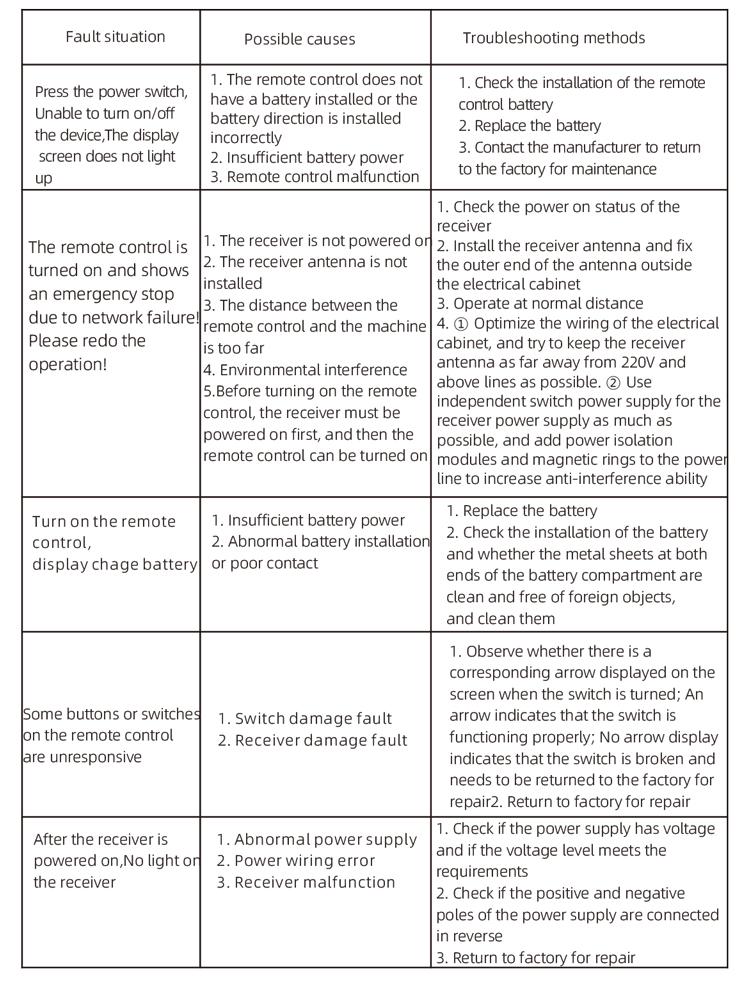
8. Solución de problemas del producto
7.2 Configuración de parámetros del convertidor de frecuencia
1. Selección de fuente de comando: Canal de comando de comunicación
2. Selección de fuente de frecuencia principal: comunicación dada
3. Velocidad de baudios: 19200
4. Formato de datos: Sin verificación, formato de datos<8-N-1>
5. dirección local: Configure el convertidor de frecuencia izquierdo en 1, el convertidor de frecuencia adecuado para 2, y el gran convertidor de frecuencia del motor para 3
7.3 Instrucciones de operación del control remoto
1. Encienda la máquina, enciende el control remoto, ingrese al fondo del control remoto, configurar los parámetros de fondo del control remoto, Principalmente es para configurar los modelos de convertidores de frecuencia de motores pequeños y grandes. (omita este paso si el fabricante de la máquina ya los ha configurado);
2. Establecer los parámetros del convertidor de frecuencia. (omita este paso si el fabricante de la máquina ya lo ha configurado);
3. Configure el control remoto en modo manual, y luego use el control remoto para mover la máquina a la posición de trabajo;
4. En modo manual, Establezca el valor IC para la corriente de corte del motor grande y la velocidad del motor grande.;
5. Cambie al modo automático y establezca el valor F del límite de velocidad de corte para el motor pequeño;
6. En modo automático, Gire el interruptor del motor grande hacia adelante para arrancar el motor grande., Y luego gire el pequeño interruptor del motor para avanzar o retroceder.. El control remoto entra en modo de corte automático y comienza a cortar..
9.Mantenimiento
1. Úselo en un ambiente seco a temperatura y presión ambiente para extender su vida útil..
2. Evite el uso en ambientes anormales como lluvia y burbujas de agua para extender la vida útil.
3. Mantenga limpio el compartimento de la batería y el área de metralla metálica..
4. Evite dañar el control remoto debido a apretarlo y caerlo..
5. Si no se usa durante mucho tiempo, Retire la batería y guarde el control remoto y la batería en un lugar limpio y seguro..
6.Durante el almacenamiento y transporte, Se debe prestar atención a la humedad y la resistencia a los golpes..
10. Información de seguridad
1. Lea atentamente las instrucciones antes de usar y prohíba que los no profesionales operen..
2. Reemplace la batería de manera oportuna cuando la batería esté demasiado baja para evitar errores causados por energía insuficiente., lo que puede provocar que el control remoto no pueda funcionar.
3. Si se requiere reparación, por favor contacte al fabricante. Si el daño es causado por reparación propia, el fabricante no proporcionará garantía