شرح
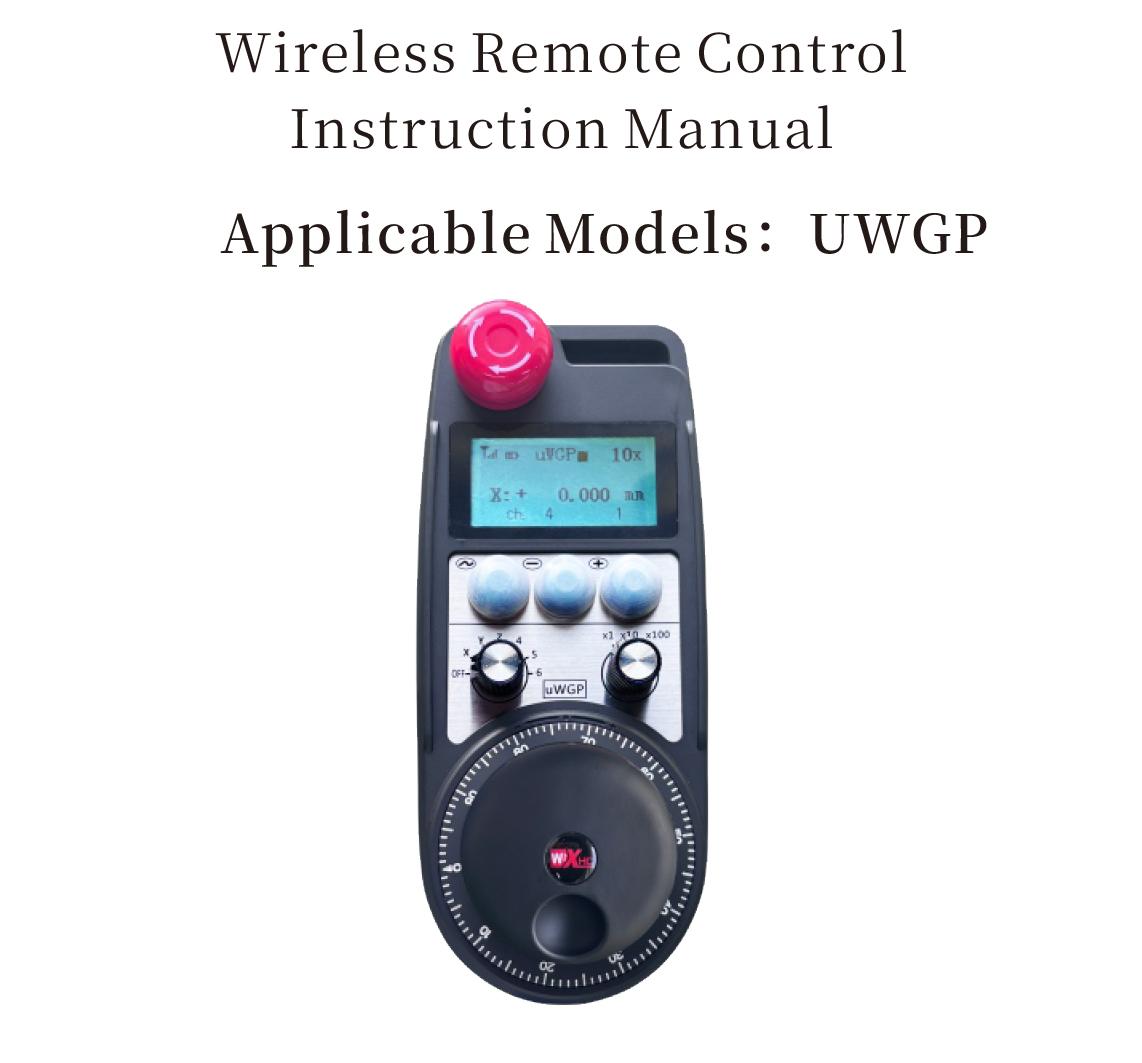
1.معرفی محصول
Wireless Remote Control is used for manual guidance, موقعیت یابی, tool setting and other operations of CNC machine tools. این محصول فناوری انتقال بی سیم را اتخاذ می کند, از بین بردن اتصال سیم فنری سنتی, کاهش خرابی تجهیزات ناشی از کابل ها, از بین بردن معایب کشیدن کابل, لکه های روغن, و غیره, and is more convenient to operate.It is widely applicable to CNC machine tools such as gantry machining centers, gantry vertical lathes, and CNC gear processing machines, and is compatible with various mainstream CNC system brands on the market, including Siemens, میتسوبیشی, فنوک, Syntec and more.
2.ویژگی های محصول
1. از فناوری ارتباط بی سیم 433 مگاهرتز با فاصله عملیاتی بی سیم استفاده می کند 20 متر.
2.پرش فرکانس تطبیقی; 32 مجموعه ای از کنترل از راه دور بی سیم را می توان به طور همزمان بدون تداخل استفاده کرد.
3.Supports the emergency stop button, and the emergency stop button remains effective even after the remote control is powered off.
4.حمایت 3 دکمه های سفارشی با خروجی سیگنال IO سوئیچینگ.
5.پشتیبانی از کنترل 6 محوره, وت 7 کنترل 12 محوری قابل تنظیم است.
6. پشتیبانی از کنترل بزرگنمایی 3 سرعته, و کنترل بزرگنمایی 4 سرعته قابل تنظیم است.
7.از عملکرد دکمه فعال کردن پشتیبانی می کند, که می تواند سیگنال های سوئیچینگ IO را خروجی دهد, و همچنین انتخاب محور را کنترل کنید, بزرگنمایی و رمزگذار.
8.از تغییر نوع رمزگذاری انتخاب محور و بزرگنمایی از طریق نرم افزار پشتیبانی می کند.
9. Supports pulse encoder with specification of 100 نبض در هر انقلاب.
10. Supports standard Type-C charging with 5V-2A charging specification; built-in battery
specification: 14500 / 1100ماه.
| Working Voltage and Current of Handheld Terminal |
3.7V/20.0mA |
| Charging Battery Specification |
3.7V/14500/1100mAh
|
| Low Voltage Alarm Range of Handheld Terminal |
<3.35حرفهای |
| Receiver Power Supply Voltage |
DC5V-24V/1A |
| Receiver Emergency Stop Output Load Range |
AC125V-1A/DC30V-2A |
| Receiver Enable Output Load Range |
AC125V-1A/DC30V-2A |
| Receiver Custom Button Output Load Range |
DC24V/50mA
|
| Receiver Axis Selection Output Load Range |
DC24V/50mA |
| Receiver magnification Output Load Range |
DC24V/50mA |
| Handheld Terminal Transmit Power |
15DBM
|
| گیرنده دریافت کننده حساسیت |
-100DBM |
| فرکانس ارتباطی بی سیم |
433باند فرکانس MHz
|
| Wireless Communication Distance |
20 meters barrier-free distance
|
| Operating Temperature |
-25℃<x<55℃ |
| Safe drop height |
1 مگس
|
| Number of Custom Buttons |
3
|
| Product Weight |
546.86(g) |
| Product Dimensions |
200*87*72(میلی متر) |
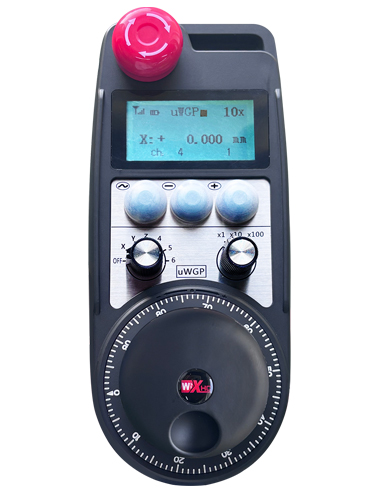
4. مقدمه عملکرد محصول
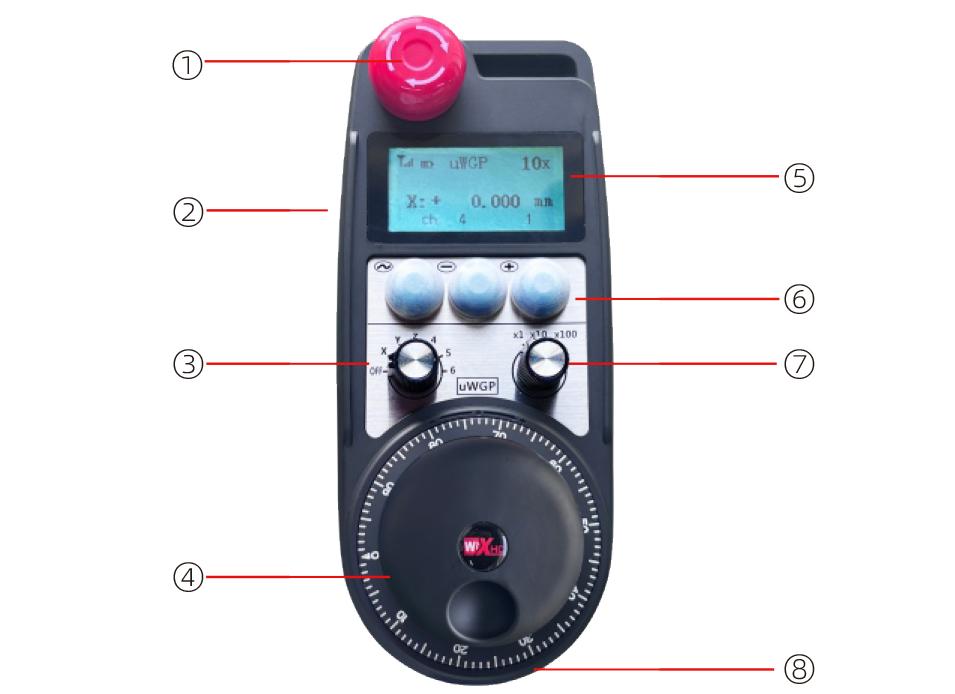
یادداشت ها:
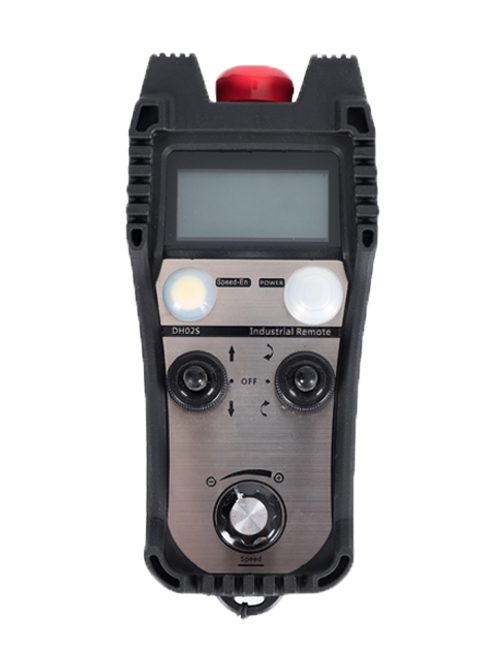
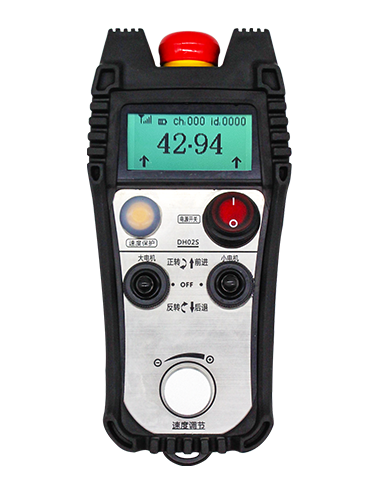
① Emergency Stop Button:
دکمه توقف اضطراری را فشار دهید, the two groups of emergency stop IO outputs on the receiver will disconnect, and all remote control functions will be invalidated.Release the emergency stop button, the emergency stop IO outputs on the receiver will be closed, and all remote control functions will be restored. علاوه بر این, even if the remote control is powered off, pressing the emergency stop button can still activate the emergency stop IO output of the receiver.
② Enable Button:
Press either enable button on both sides, the two sets of enable IO outputs on the receiver will conduct. Release the enable button, and the enable IO outputs will disconnect. It is necessary to press and hold the enable button before toggling axis selection, magnification or rotating the remote control for the operation to take effect.This function can be canceled through the configuration software.
③ Axis Selection Switch (Power Switch):
دکمه Enable را فشار داده و نگه دارید, then toggling the axis selection switch can control the movement of axis .Press and hold the enable button, then toggle the axis selection switch to switch the motion axis controlled by the remote control. Toggle the switch from the OFF position to any axis position, and the remote control will power on automatically.
④ Pulse Encoder:
Press and hold the enable button and rotate the pulse encoder, it will output pulse signals to control the movement of the machine axis.
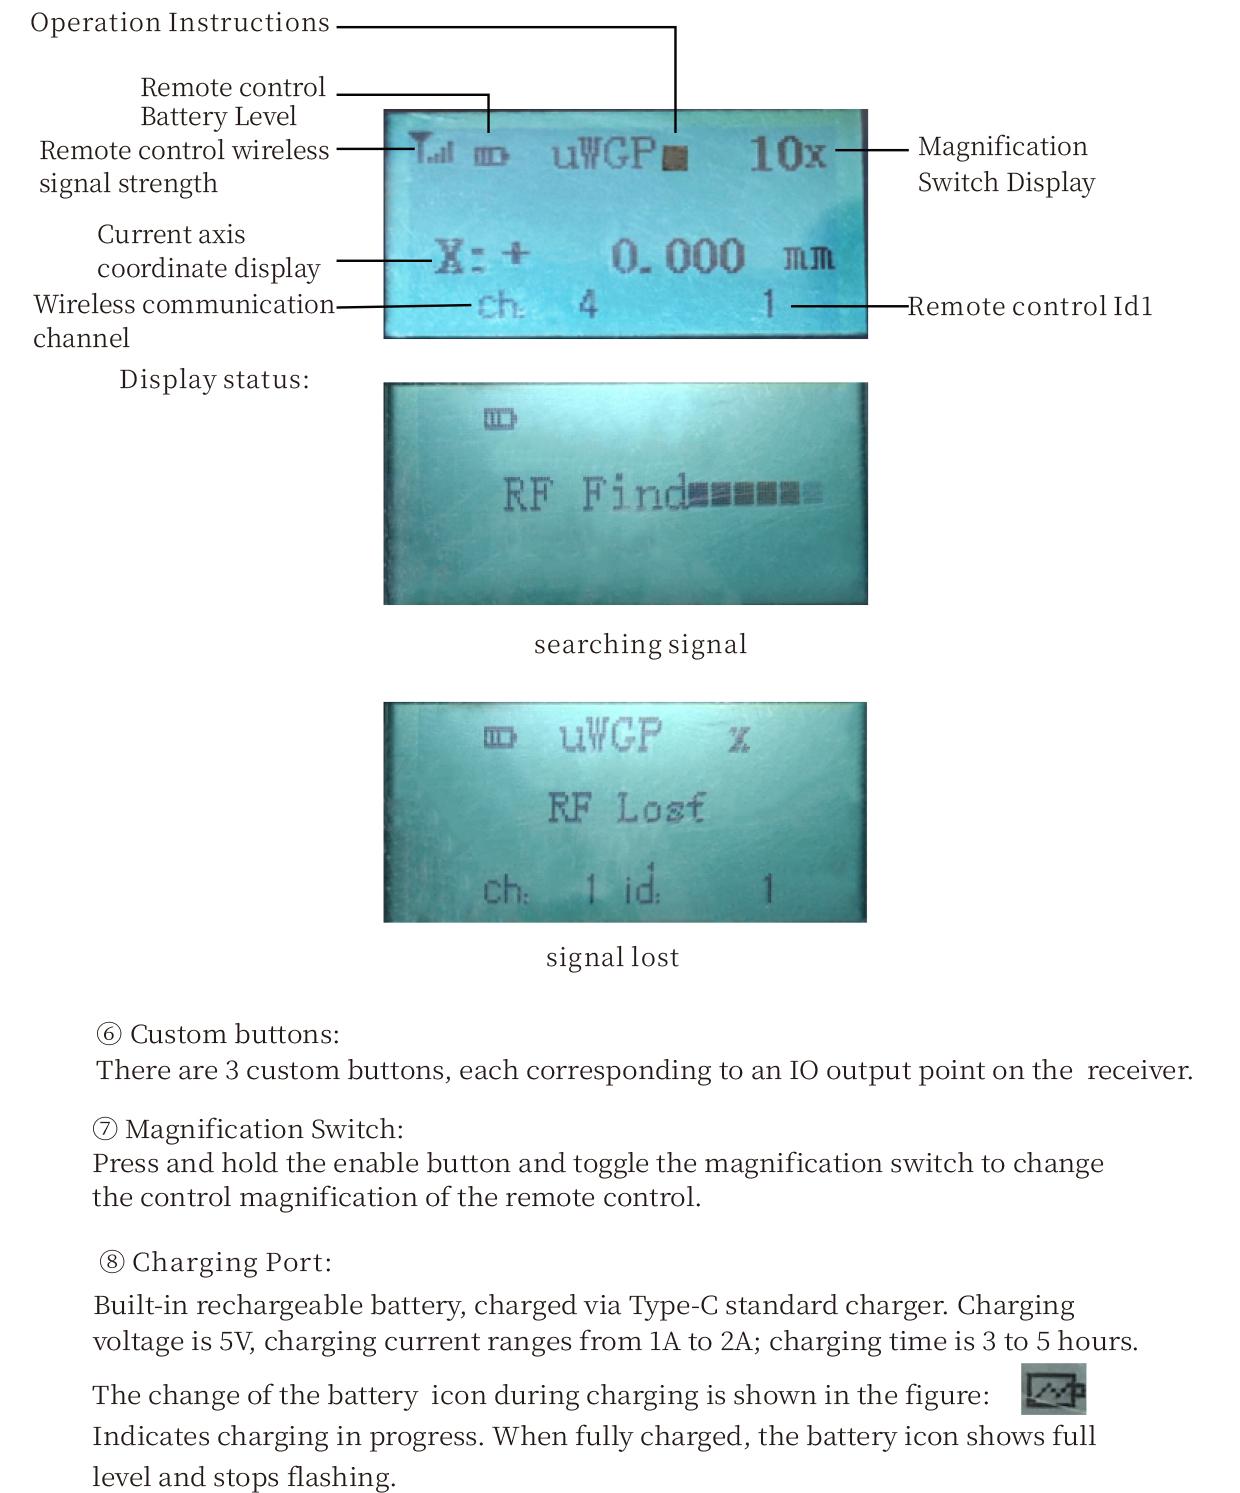
⑤ LCD Display Screen:
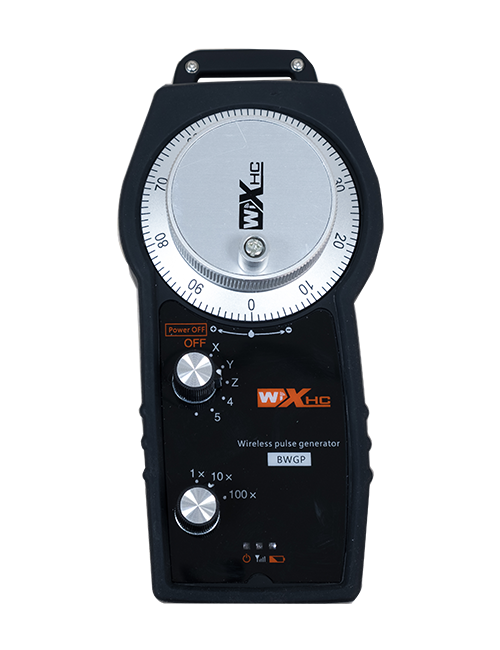
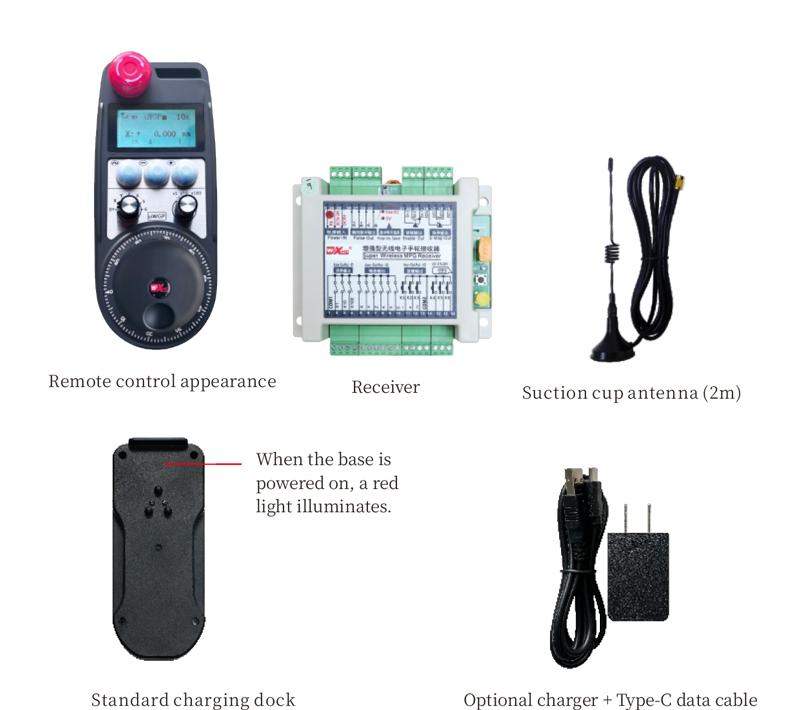
5. Product Accessories Diagram
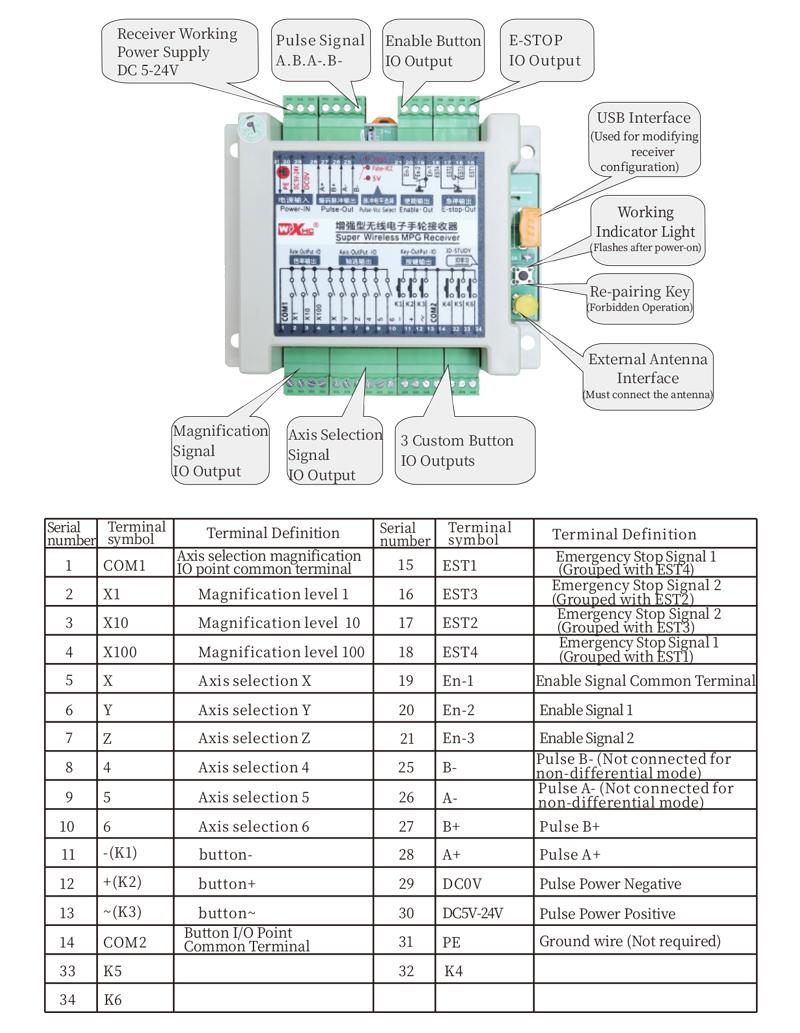
6. راهنمای نصب محصول
6.1 مراحل نصب محصول
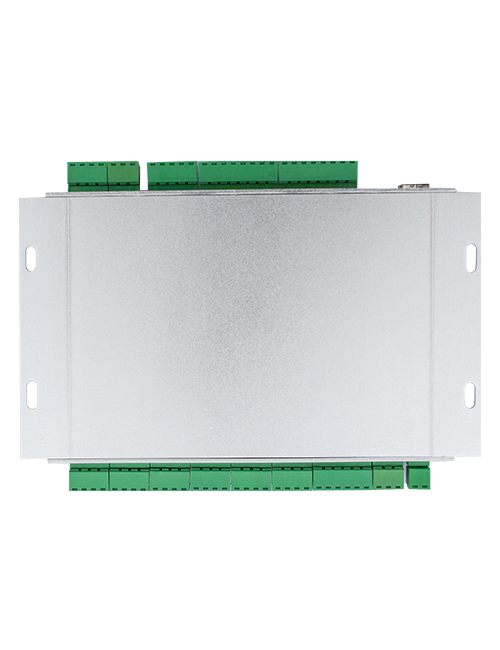
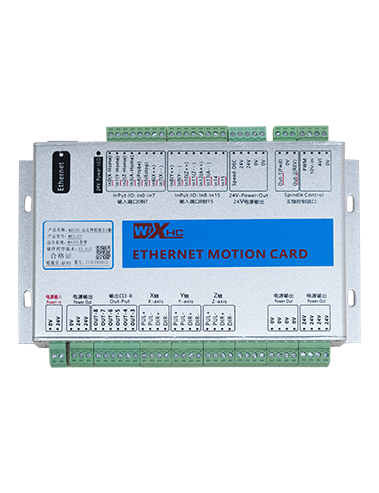
1. Install the receiver in the electrical cabinet via the buckle on its back, or mount it inside the electrical cabinet through the screw holes at the four corners of the receiver.
2. به نمودار سیم کشی گیرنده ما مراجعه کنید, آن را با تجهیزات در محل خود مقایسه کنید, and connect the equipment to the receiver with cables.
3. After the receiver is fixed in place, install the supporting antenna of the receiver properly. Mount or place the outer end of the antenna outside the electrical cabinet. It is recommended to place it on the top of the electrical cabinet for optimal signal performance. Do not leave the antenna uninstalled or place it inside the electrical cabinet; otherwise, signal failure may occur.
4. بالاخره, turn on the remote control power switch, then you can remotely operate the machine via the remote control.
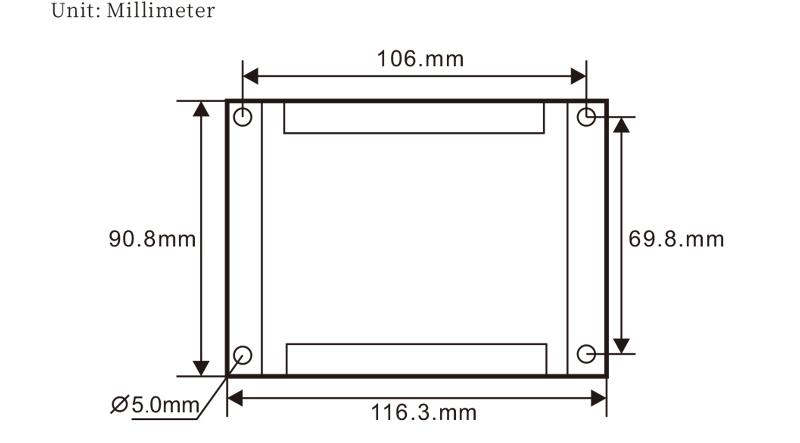
6.2 Receiver Installation Dimensions
6.3 نمودار مرجع سیم کشی گیرنده
7. دستورالعمل عملکرد محصول
1. قدرت روی دستگاه و گیرنده. The receiver operation indicator flashes. After the wireless electronic remote control is fully charged, toggle it from the OFF gear to the X-axis gear, and the remote control display lights up.
2. Select the axis : دکمه Enable را فشار داده و نگه دارید, toggle the axis selection switch to select the axis to be operated.
3. Select the magnification: دکمه Enable را فشار داده و نگه دارید, toggle the magnification switch to select the required magnification gear.
4. Axis movement: دکمه Enable را فشار داده و نگه دارید, select the axis selection switch and the magnification switch, then rotate the pulse encoder. Rotate clockwise to move the axis in the positive direction, and rotate counterclockwise to move the axis in the negative direction.
5. هر دکمه سفارشی را فشار داده و نگه دارید, the corresponding button IO output of the receiver will turn on; release the button, and the output will turn off.
6. دکمه توقف اضطراری را فشار دهید, the corresponding emergency stop IO output of the receiver disconnects and the remote control function becomes invalid. Release the emergency stop button, the emergency stop IO output closes and the remote control function is restored.
7. If the wireless remote control is not operated for a period of time, برای کاهش مصرف برق به طور خودکار وارد حالت خواب می شود. It can be used normally again by pressing the enable button again.
8.If the wireless remote control is not used for a long time, turn the axis switch to OFF to turn off the power and extend battery life
①:UWGP stands for appearance style.
②:Pulse Output Parameters:
01: نشان می دهد که سیگنال خروجی پالس a است, شرح; ولتاژ نبض 5 ولت; پالس مقدار 100ppr.
02: نشان می دهد که سیگنال خروجی پالس a است, شرح; ولتاژ پالس 12 ولت; pulse quantity 25PPR.
03: نشان می دهد که سیگنال خروجی پالس a است, شرح, بوها -, شرح -; ولتاژ نبض 5 ولت; پالس مقدار 100ppr.
04: خروجی مدار باز NPN سطح پایین را نشان می دهد, با سیگنال های خروجی پالس A و B; The number of pulses is 100PPR.
05: خروجی منبع PNP سطح بالا را نشان می دهد, با سیگنال های خروجی پالس A و B; تعداد پالس 100ppr است.
③:Represents the axis selection switch quantity; 6 stands for 6 محورها, 7 stands for 7 محورها, and so on.
④: Represents the signal type of the axis selection switch.A stands for point-to-point output signal, and B stands for encoder output signal.
⑤: Represents the signal type of the magnification switch.A stands for point-to-point output signal, and B stands for encoder output signal.
⑥: تعداد دکمه های سفارشی را نشان می دهد; 3 corresponds to 6 دکمه های سفارشی.
⑦: Represents the power supply for the system remote control. 05 stands for 5V power supply, وت 24 stands for 24V power supply.
⑧: Represents the contact charging mode. It starts charging automatically when placed back on the charging base.
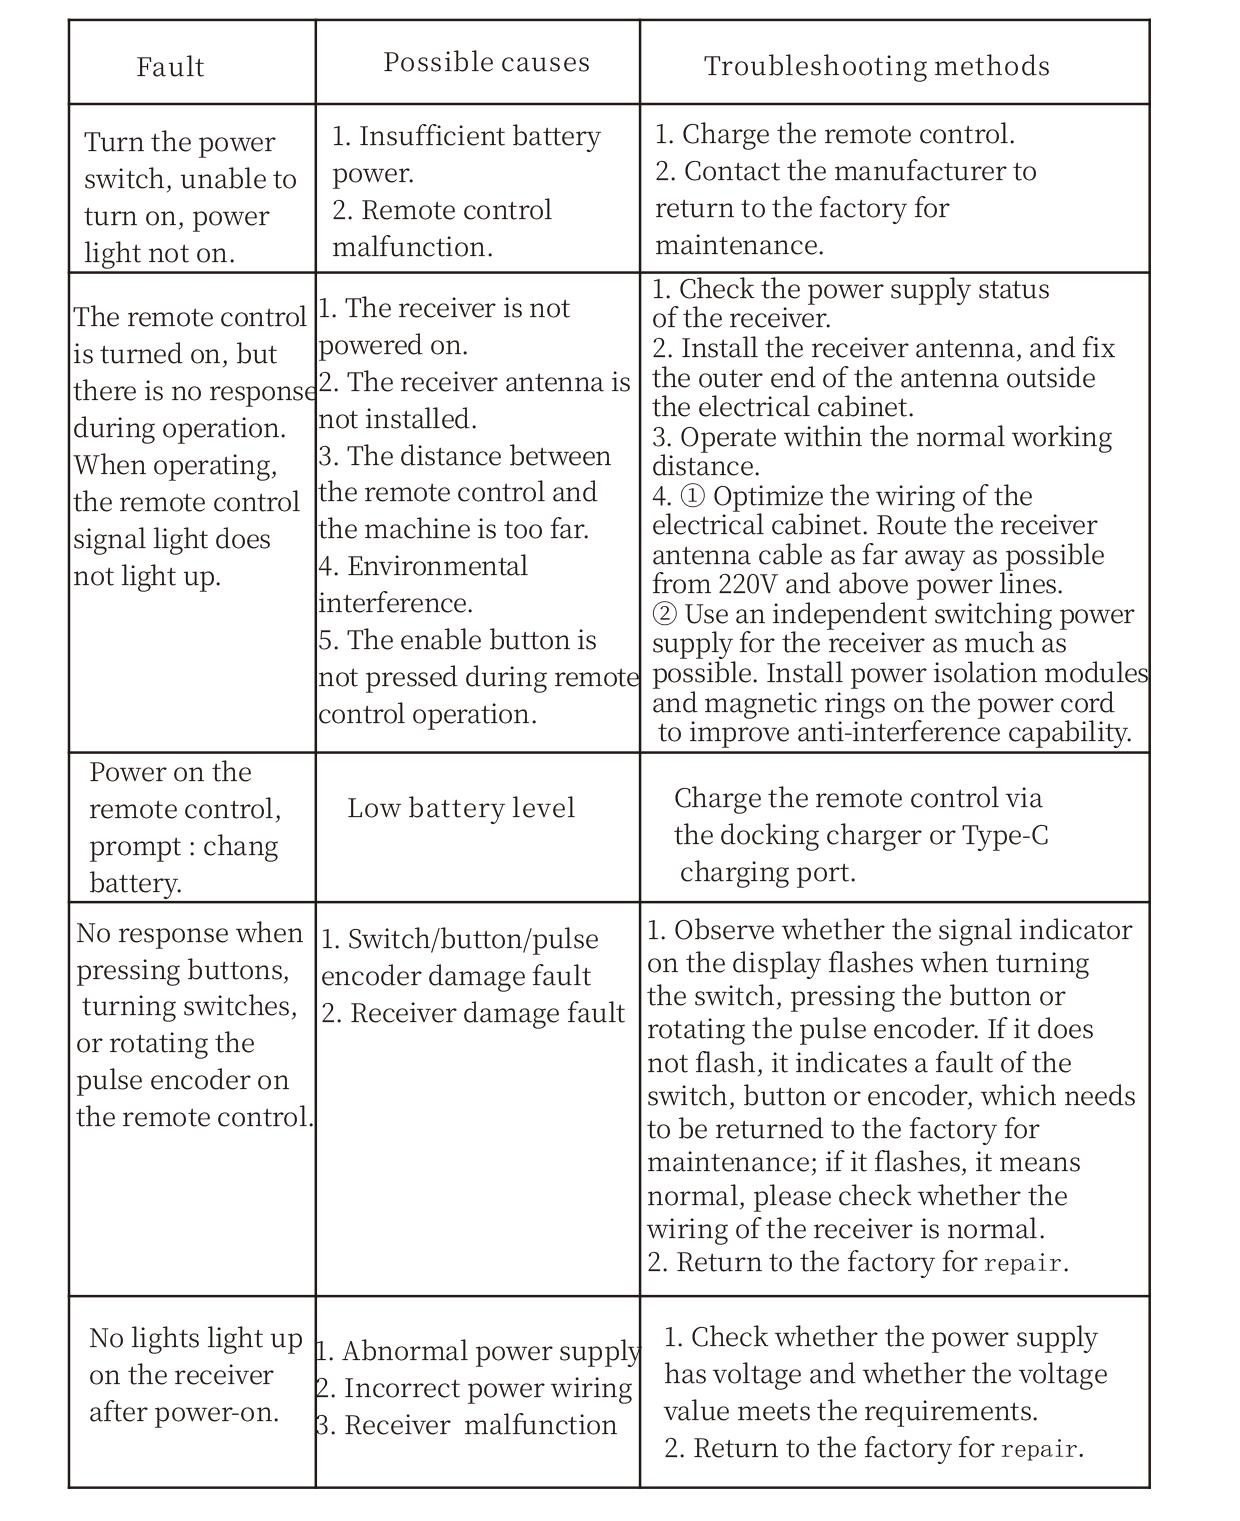
9. عیب یابی محصول
10. Maintenance and upkeep
1. لطفاً از آن در یک محیط خشک در دمای اتاق و فشار استفاده کنید تا عمر خدمات آن افزایش یابد.
2. Please avoid using in abnormal environments such as rain and water to extend the service life.
3. Please keep the appearance of the remote control clean to extend its service life.
4. Please avoid crushing, dropping, or bumping, OTC. to prevent damage to the precision components inside the remote control or accuracy errors.
5. اگر برای مدت طولانی استفاده نشود, please store the remote control in a clean and safe place.
6. Avoid moisture and shock during storage and transportation.
11. اطلاعات ایمنی
1. لطفاً قبل از استفاده دستورالعمل ها را با دقت بخوانید و غیر متخصصان را از عملیات ممنوع کنید.
2. Please charge the remote control in a timely manner when the battery level is too low, to avoid malfunction and operational errors caused by insufficient power.
3. If you repair it yourself and cause damage, the warranty will be void.