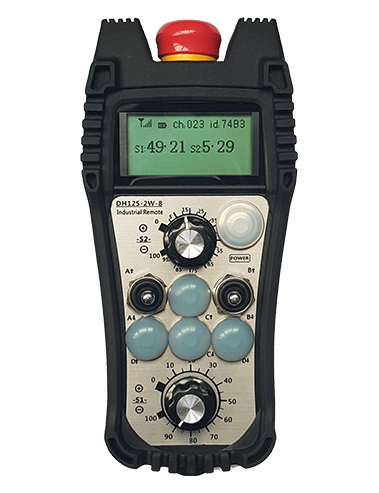
Beskriuwing
1. Produkt Yntroduksje
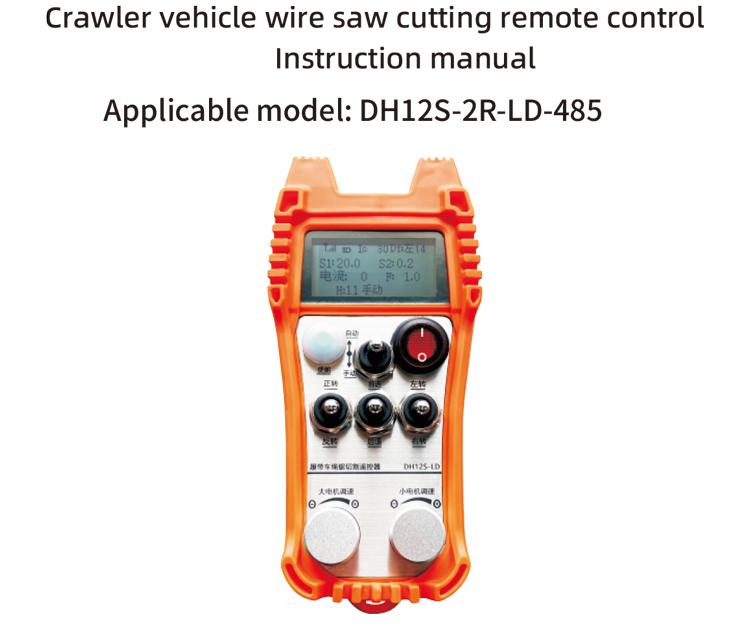
De crawler auto tou seach automatyske cutting remote control is geskikt foar crawler tou saw cutting masines. It oannimt 485ModbusRTU-protokol om de snelheidsstart te kontrolearjen en kontrôle fan 'e lofter en rjochter rjochting fan' e foar- en efterkant fan 'e lofter en rjochter crawler-ynverters, lykas it grutte RTU-protokol foar konverzje fan motorfrekwinsje om de startsnelheid te kontrolearjen en kontrôle fan 'e lofter en rjochter rjochting foar en efter fan' e lofter en rjochter crawler-ynverters, en de grutte motor frekwinsje ombou over-current analyze en ferliking, oanpasse automatysk de lofter- en rjochter-crawler-snelheden yn realtime om automatyske snijfunksje te berikken.
2. Produktfunksjes
1. Adoptearje 433mhz draadloze kommunikaasjechnology, draadloze operaasjeôfstân is 100 Meters.
2. ANDINSTEN ANDULD FREKENCY HOPPORD, gebrûk 32 sets fan draadloze remote controllers tagelyk, Sûnder inoar beynfloedzje.
3. Stypje alle ynverters mei 485-Modbus RTU-protokol. De ynvertermerken dy't binne oanpast binne ûnder oaren:Shanghai xielin, Fuji, Ynnovaasje, Zhongchen, Oprjochtsje, Anchuanda. As it merk net ada is, nim dan kontakt mei ús op foar maatwurk.
4. Stypje grutte motor inverter start, snelheid regeljouwing, en aktuele lêzing.
5. Stypje lofts en rjochts crawler inverter snelheidsregeling, start, foar- en efterkant lofts en rjochts kontrôle.
6. Stypje rjochte line-korreksje fan lofter en rjochter crawler-ynverter om de masine yn in rjochte line te hâlden.
7. Stypje tou seach automatyske snijfunksje, oanpasse automatysk de lofter en rjochter crawler snelheid yn real time neffens de grutte motor hjoeddeistige ynformaasje.
8. Tagelyk, it is kompatibel mei direkte IO-útfier om de start en stop fan 'e motor te kontrolearjen, en analoge spanningsútfier om de motorsnelheid te kontrolearjen.
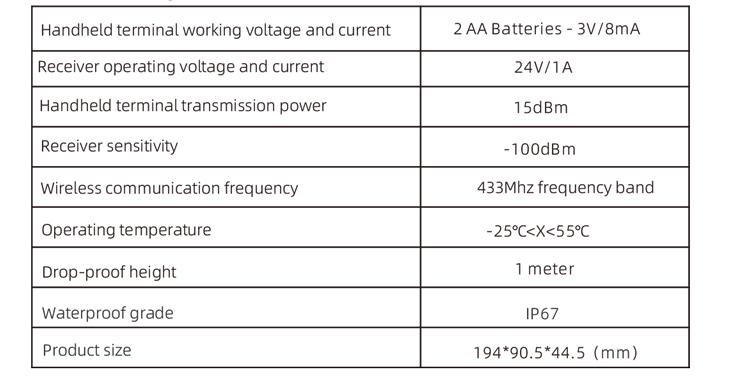
3. Produkt spesifikaasjes
4. Produktfunksje ynlieding

Notysjes:
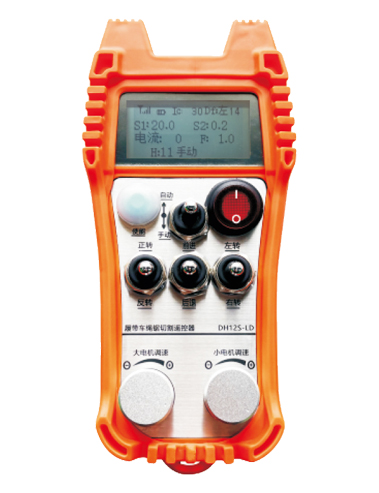
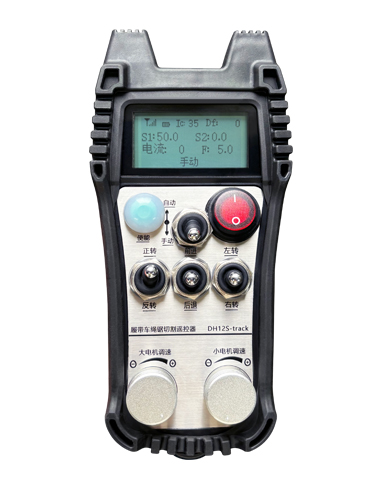
Ęscreen werjaan:

②MODE SWITCH:
Mei help fan in 2-nivo switch, it is mooglik om te wikseljen tusken automatyske en hânmjittige modus, en de oerienkommende modus wurdt werjûn op it skerm foar wikseljen.
③ Ynskeakelje:
Kombinaasje knoppen, Guon operaasjes fereaskje de knop yn te hâlden foar operaasje, nim dan ferwize nei de ynstruksjes foar eltse switch foar details.
④ Grutte motor switch:
Mei help fan in 3-snelheid Reset-skeakel, Dizze switch lûke kin de foarút- en reverse rotaasje fan 'e grutte motor kontrolearje. Nei it frij te litten, De steat sil bliuwe, en d'r sil oerienkomme mei oerienkommende byldskermen op it skerm. De t pylk jout foarút rotaasje, en de pylk y jout omkearde rotaasje oan.
⑤small motor foarút / omkearde switch:
Mei help fan in 3-snelheid sels-locking switch, it lûken fan dizze skeakel kin de lytse motor kontrolearje om foarút en efterút te bewegen. De oerienkommende werjefte sil op it skerm sjen litte, mei de t-pylk foar foarút en de ↓-pylk foar efterút.
⑥ Power Switch op ôfstân:
It skermôfbyldingskerm op ôfstân kontrôle is ynskeakele.
⑦ lytse motor draaiende switch:
Mei help fan in 3-snelheid Reset-skeakel, Doe't hânmjittich eksploitearre, De lytse motor kin wurde regele om links of rjochts te draaien. Ienris frijlitten, de ôfstânsbetsjinning sil automatysk stopje dizze aksje.When yn 'e foarút steat, draaie dizze switch en de oerienkommende werjefte sil ferskine op it skerm.The + pylk jout lofts beurt, en de – pylk jout rjochts turn.When yn reverse modus, draaie dizze switch en de oerienkommende werjefte sil ferskine op it skerm.The + pylk jout lofts beurt, en de – pylk jout rjochts turn.Press en hâld de ynskeakelje knop, Draai dan dizze skeakel om in stasjonêre draaifunksje út te fieren, it meitsjen fan de beurt flugger.
⑧ Grutte regeling fan grutte motor:
Mei help fan in multi beurt-kodearknop, draaie de knop te passen de snelheid S1 fan de grutte motor Foar eltse 1 grid rotaasje, de snelheidswearde fan 'e grutte motor feroaret troch sawat 0.2 ienheden, en rappe rotaasje kin de snelheidswearde fan 'e grutte motor fluch feroarje.
9 Lytse motor snelheid regeling (lineêre korreksje):Om de multi-turn-encoderknop te brûken, Yn hânmjittige modus, foar elk 1 draai fan de knop, de snelheid wearde fan de lytse motor feroaret troch likernôch 0.1 ienheden. Snelle rotaasje kin de snelheidswearde fan 'e lytse motor fluch feroarje.
Yn automatyske modus, druk op de ynskeakelje knop en draaie 1 grid elke kear. De snelheid limyt wearde F fan de lytse motor feroaret troch likernôch 0.1 ienheden. Rapid rotaasje kin fluch feroarje de snelheid limyt wearde fan de lytse motor.Press de ynskeakelje knop, draai de knop nei rjochts, en de rjochte line korreksje werjefte lit D f: links. Elke rotaasje fan 'e knop nimt ta mei 1 ienheid; Sla linksknop, RJOCHTSJOCHTJOCHTSJOCHTSJOCHT: DF: rjochts. Elke rotaasje fan 'e knop nimt ta mei 1 ienheid, en elke korreksje ienheid komt oerien mei in motor snelheid kontrôle AVI spanning fan likernôch 0.02 V.
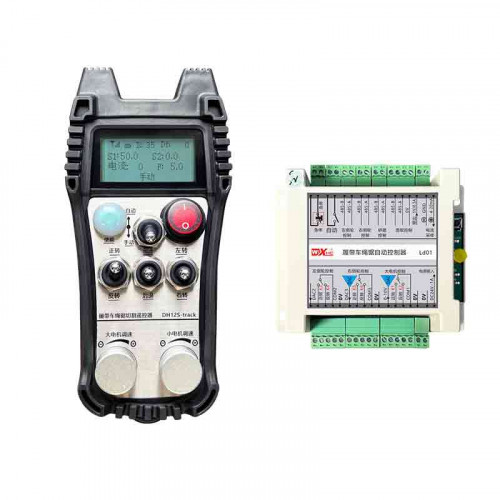
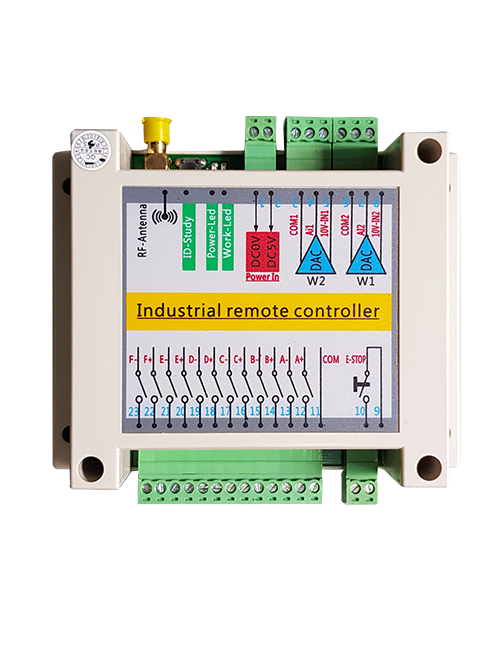
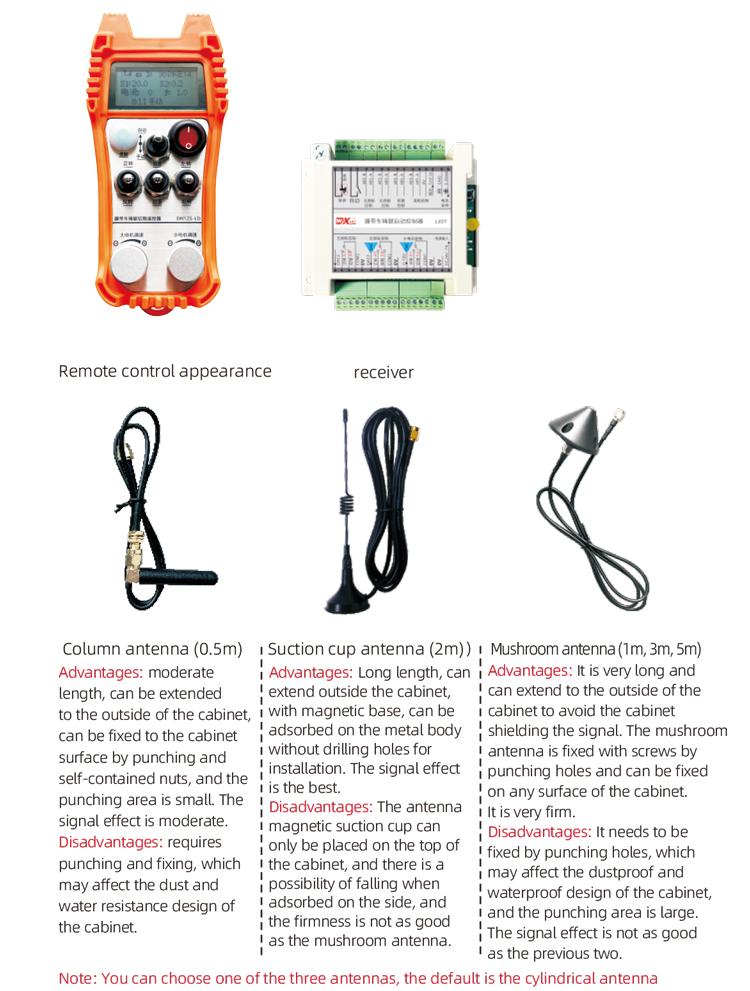
5. Produkt accessoiry-diagram
6. Gids foar ynstallaasje fan produkt
6.1 Stappen foar ynstallaasje fan produkt
1. Ynstallearje de ûntfanger yn 'e elektryske kast troch de gesp op' e rêch, of ynstallearje it yn de elektryske kabinet troch de skroef gatten oan de fjouwer hoeken fan de ûntfanger.
2. Ferwize nei ús ûntfanger draaddiagram, ferlykje jo apparatuer op it terrein, en ferbine de apparatuer mei de ûntfanger fia draden.
3. Neidat de ûntfanger is fêst, de antenne foarsjoen fan 'e ûntfanger moat ferbûn wêze, en it bûtenste ein fan 'e antenne moat wurde ynstalleare of bûten it elektryske kabinet pleatst. It wurdt oanrikkemandearre om it te pleatsen op 'e boppekant fan it elektryske kabinet foar it bêste sinjaaleffekt. It is ferbean om de antenne net ferbûn te litten of de antenne yn 'e elektryske kast te pleatsen, wat kin feroarsaakje min sinjaal en ûnbrûkber.
4. Úteinlik, ynstallearje de batterij yn de ôfstânsbetsjinning, draai de batterijdekking oan, en dan de macht switch fan de ôfstânsbetsjinning oansette. Nei de ôfstânsbetsjinning werjefte toant de normale wurkje ynterface, kinne jo útfiere remote control operaasje.
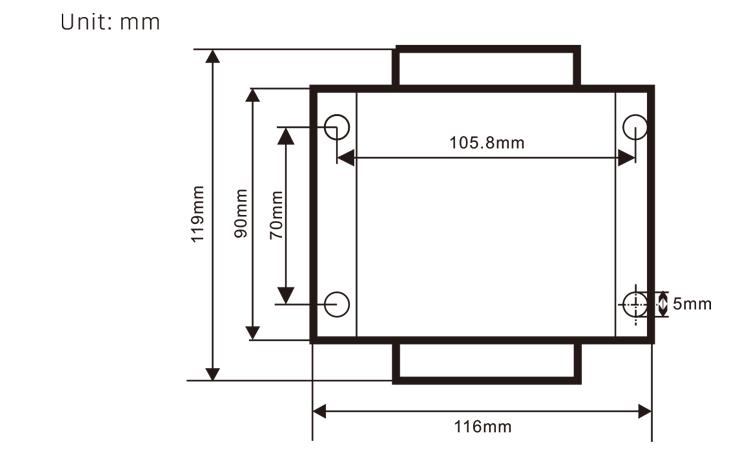
6.2 Untfange fan ynstallaasje Dimensions
6.3 Untfang fan ûntfangende referinsjediagram

7. Produktryske ynstruksjes
7.1 Ynstellings foar ôfstân fan kontrôle op ôfstân
Hoe kinne jo de eftergrûnparameters fan 'e remote controller ynfiere: keare de modus switch nei hânmjittich modus, oanpasse de snelheid fan 'e lytse motor oan 25, of 0, 10, 20, 40, 50, en draaie de foarút switch fan de grutte motor omheech 3 kearen en nei ûnderen 3 kear;
Brûk de “Lytse motor snelheidskontrôle” knop om de side te draaien, druk op Ynskeakelje en draaie de lytse motorsnelheidskontrôleknop om de parameters te feroarjen; nei modifikaasje, Skeakelje de pagina oan it ein, selektearje Bewarje en ôfslute, en druk op de knop ynskeakelje om it menu te ferlitten;
De parameters binne as folgjend:Maksimum hjoeddeistige: grut motor hjoeddeistige feedback wearde berik, setting berik 15-200A, ôfwêzichheid 60;
Parameters foar snelheidskontrôle: automatyske modus lytse motor automatyske fersnelling snelheid, de lytsere de rapper, setting berik 200-1500, ôfwêzichheid 1000;
Deceleraasjeparameter: Stel de boppegrins fan 'e motorsnelheidsferoaring tastien. As de hjoeddeistige feroaringen boppe dizze wearde, it sil ôfnimme. Hoe lytser it is, de flugger de lofter en rjochter motors sille decelerate. It berik is 05-12, en de standert is 06;
Fersnelling A1: De grutter de wearde, de flugger de motor snelheid nimt ta, berik 00-06, standert 01; Deceleration A2: De grutter de wearde, de flugger de motor snelheid nimt ôf, berik 00-06, ôfwêzichheid 02;
Skea regeling ynskeakelje: Oft de lytse motorsnelheidsregeling moat wurde ynskeakele, 00 is net ynskeakele, 01 is ynskeakele, ôfwêzichheid 01;
Startup sels-locking: Oft de grutte motor sil automatysk bliuwe sels-locking neidat de foarút en reverse switch wurdt útbrocht, 00 wurdt net ûnderhâlden, 01 wurdt ûnderhâlden, ôfwêzichheid 01;
Maksimum reis: Maksimum snelheid fan de linker en rjochter motors, berik 10-100, ôfwêzichheid 50;
Cutting Aktuele: Maksimum snijstrom, it skerm toant IC wearde, berik 15-160, ôfwêzichheid 30, it skerm toant IC: 30. De boppegrins fan dizze parameter = maksimale stroom x 80%;
Standert snelheidsgrins: De standert lytse motor automatyske snijsnelheid by it opstarten, berik 00-100, ôfwêzichheid 10, it skerm toant F1.0, dizze parameter is allinnich krekt as de maksimum reis wurdt ynsteld op 50.
Wireless kanaal: Standert is 10. As it sinjaal fan 'e ôfstânsbetsjinning ynstabyl is of d'r is sinjaal ynterferinsje op side, jo kinne dizze parameter feroarje om kanalen te wikseljen om ynterferinsje te foarkommen;
Faasje limyt offset: De boppegrins fan 'e automatyske snijsnelheid fan' e lytse motor,berik 00-200, ôfwêzichheid 60, it skerm toant 6.0; Display wearde boppegrins = snelheid limyt offset × 0.1;
Maksimum Host: De maksimale snelheid fan de grutte motor, berik 10-100, ôfwêzichheid 50;
Mbus apparaat ( ferplicht ): grutte motor inverter model seleksje, berik 00-03, ôfwêzichheid 03;
00- Shanghai xielin 01 Fuji
02- Oprjochtsje 03 Inovance (Zhongchen, Robicon)
SBUS-apparatuer (ferplicht): Seleksje fan lytse motorfrekwinsje, berik 00-05, ôfwêzichheid 03;
00- Shanghai xielin 01 Fuji
02- Oprjochtsje 03 Inovance (Zhongchen, Robicon)
04-Anschuanda 05-gjin
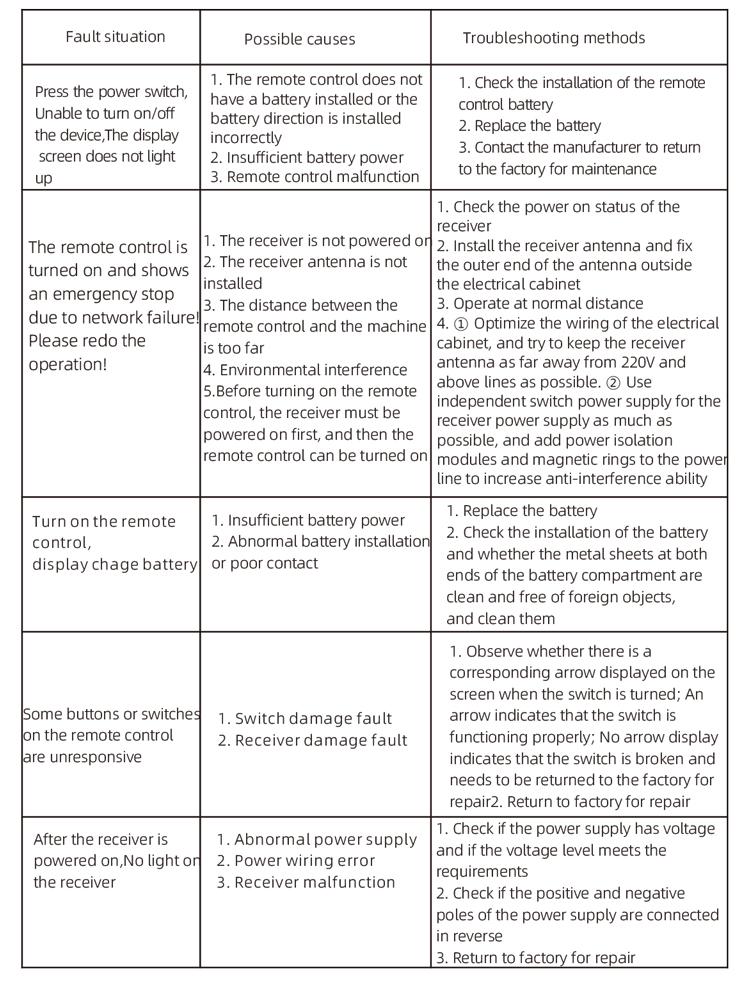
8. Produkt Troubleshooting
7.2 Parameter-ynstelling fan frekwinsje omrekkener
1. Kommando-boarne-seleksje: Kommandel fan kommunikaasje
2. Seleksje fan haadfrekwinsje: kommunikaasje jûn
3. Baud Rate: 19200
4. Data formaat: Gjin ferifikaasje, Data formaat<8-N-1>
5. Lokaal adres: Stel de linkerfrekwinsje omrekkening oan 1, De rjochterfrekwinsje omrekkener oan 2, en de grutte motor frekwinsje converter oan 3
7.3 Ynstruksjes op ôfstân kontrôle
1. Krêft op 'e masine, Skeakelje de ôfstânskontrôle oan, fier de eftergrûn fan de ôfstânsbetsjinning yn, set de eftergrûnparameters op ôfstânsbetsjinning yn, It is benammen om de modellen fan lytse en grutte motorfrekwinsje-omrekkeners yn te stellen (skip dizze stap oer as de masinefabrikant se al ynsteld hat);
2. Stel de parameters fan 'e frekwinsje omrekkener yn (Oerslaan dizze stap as de masine-fabrikant al hat ynsteld);
3. Stel de ôfstânskontrôle yn nei hânmjittige modus, en brûk dan de ôfstânsbetsjinning om de masine nei de wurkposysje te ferpleatsen;
4. Yn hânmjittige modus, set de IC-wearde foar de snijstroom fan 'e grutte motor en de snelheid fan' e grutte motor;
5. Wikselje nei Automatyske modus en set de snijvelheid fan 'e snelheidsnelheid F-wearde foar de lytse motor;
6. Yn automatyske modus, Skeakelje de grutte motor yn om nei foaren om de grutte motor te begjinnen, en dan draaie de lytse motor switch nei foarút of reverse. De ôfstânsbetsjinning komt yn automatyske snijmodus en begjint te snijen.
9.Ûnderhâld
1. Brûk it asjebleaft yn in droege omjouwing by keamertemperatuer en druk om syn tsjinstferliening te ferlingjen.
2. Foarkom asjebleaft te brûken yn abnormale omjouwings lykas rein en wetterbellen fan rein en wetter om it tsjinst libben út te wreidzjen.
3. Hâld asjebleaft it batterijkomparty en metaal Shrapnel-gebiet skjin.
4. Foarkom asjebleaft de ôfstânskontrôle te beskeadigjen fanwegen drukjen en falle.
5. As net lang brûkt, fuortsmite asjebleaft de batterij en bewarje de ôfstânsbetsjinning en batterij op in skjin en feilich plak.
6.Tidens opslach en ferfier, Oandacht moat wurde betelle foar focht en skokbestindich.
10. Feiligensynformaasje
1. Lês asjebleaft de ynstruksjes soarchfâldich foardat jo brûke en ferbiede net profesjoen fan operearjen.
2. Ferfang asjebleaft de batterij op 'e tiid as de batterij te leech is om flaters te foarkommen feroarsake troch te min macht, dat kin resultearje yn 'e ôfstânskontrôle dy't net kinne operearje.
3. As reparaasje nedich is, Nim dan kontakt op mei de fabrikant. As de skea wurdt feroarsake troch selsreparaasje, De fabrikant sil gjin garânsje leverje