Unterstitteren 2 Oanpasbere knoppen, Mei it Signal-útfier fan 'e skeakel;
Unterstitteren -2 Axis Control;
Unterstützt MOVAL-kontrôle fan 3 nivo;

1.Produkt Yntroduksje
2. Produkt funksjonele funksjes
| Bedriuwsspanning en stroom fan draadloze ôfstân |
3V/14MA
|
| Batterij spesifikaasjes | 2 AA alkaline batterijen, grutte 5 |
| Lege spanning alarmberik fan draadloze ôfstân | < 2.3V |
| Untfanger Netzteil spanning | DC5V-24V/A |
| Untfanger emergency stop útfier load berik | AC125V-1A/DC30V-2A |
| Untfanger ynskeakelje útfier load berik |
AC125V-1A/DC30V-2A
|
| Untfanger oanpaste knop útfier load berik | DC24V/50mA |
| Untfanger as seleksje útfier load berik | DC24V/50mA |
| Untfanger fergrutting útfier load berik | DC24V/50mA |
| Transmission macht fan handheld terminal |
15dBm
|
| Untfanger ûntfangt gefoelichheid | -100dBm |
| Wireless kommunikaasje frekwinsje | 433MHz frekwinsje band |
| Wireless kommunikaasje ôfstân | Barriêre frije ôfstân fan 40 Meters |
| Operaasje temperatuer | -25℃ < X < 55℃ |
| Anti fallhichte | 1 (meter) |
| Oanpaste knop kwantiteit | 2 |


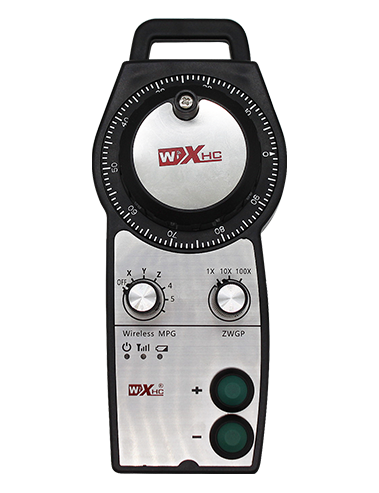
① Pulse encoder:
Druk op en hâld de knop yn, skodzje de pols encoder, emit in puls sinjaal,en kontrolearje de beweging fan 'e masine-as.
② Knop ynskeakelje:
Druk op beide ynskeakelje knop oan beide kanten, en de twa sets fan ynskeakelje IO útgongen op de ûntfanger sil fiere. Los de ynskeakelje knop los om de ynskeakelje IO-útfier los te meitsjen; En foardat it wikseljen fan de as seleksje fergrutting en skodzje de handwheel,de ynskeakelje knop moat holden wurde om effektyf te wêzen; Dizze funksje kin annulearre wurde fia konfiguraasjesoftware.
③ Indicator ljochten:
Linkerkant ljocht: macht op ljocht,it hânwiel brûkt de as om OFF te selektearjen foar macht oan, en dit ljocht bliuwt op nei macht op;
Middelljocht: in sinjaalljocht dat opljochtet by it betsjinjen fan elke funksje fan it hânwiel, en net ljocht op as der gjin operaasje;
Rjochterkant ljocht: Low voltage alarm ljocht, leech batterij nivo,dit ljocht knippert of bliuwt oan, batterij moat wurde ferfongen.
④ Noodstopknop:
Druk op de knop Emergency Stop, en de twa sets fan needstop IO útgongen op 'e ûntfanger wurdt loskeppele, en alle funksjes fan it handwiel sille wêze ûnjildich.
⑤ Fergrutting switch:
Druk en hâld de ynskeakelje knop te wikseljen de fergrutting switch, dy't de fergrutting kinne wikselje kontrolearre troch it handwiel.
⑥ As seleksje switch (Power Switch):
Druk en hâld de ynskeakelje knop te wikseljen de as seleksje switch, dy't de bewegingsas kin wikselje kontroleare troch it handwiel. Skeakelje dizze switch fan OFF nei elke as en skeakelje de hânwielkrêft oan.
⑦ Oanpaste knop:
Twa oanpaste knoppen, elk oerienkomt mei in IO útfier punt op de ûntfanger.

1. Ynstallearje de ûntfanger yn it elektryske kabinet fia de bik op 'e rêch, of ynstallearje it yn it kabinet fia de skroef gatten by de fjouwer hoeken fan 'e ûntfanger.
2. Ferwize nei ús ûntfanger draaddiagram en fergelykje it mei jo apparatuer foar on-site. Ferbine de apparatuer mei de ûntfanger fia kabels.
3.Nei de ûntfanger is goed fêst, de antenne foarsjoen fan 'e ûntfanger moat ferbûn wêze, en it bûtenste ein fan 'e antenne moat wurde ynstallearre of pleatst bûten it elektryske kabinet. It wurdt oanrikkemandearre om it te pleatsen op 'e boppekant fan it elektryske kabinet foar it bêste sinjaaleffekt. It is ferbean om de antenne net ferbûn te litten of yn 'e elektryske kast te pleatsen, as dit kin resultearje yn it sinjaal is ûnbrûkber.
4. Úteinlik, oansette de macht switch fan it hânwiel, en jo kinne de masine op ôfstân betsjinje mei it hânwiel.
6.2 Untfange fan ynstallaasje Dimensions

6.3 Untfang fan ûntfangende referinsjediagram

7. Produktryske ynstruksjes
1. Strom op 'e masine en de ûntfanger. It wurkjende yndikatorljocht fan de ûntfanger flitst. Ynstallearje de batterij yn it draadloze elektroanyske handwiel, feilich de batterij cover, en
ynskeakelje de macht switch fan de draadloze elektroanyske handwheel. It batterijnivo-yndikaasjeljocht fan it hânwiel is oan.
2. Selektearje de koördinaatas: Druk op en hâld de knop yn, wikselje de as seleksje switch, en selektearje de as dy't jo wolle betsjinje.
3. Selektearje fergrutting: Druk op en hâld de knop yn, skeakelje de fergrutting switch,en selektearje de winske fergrutting nivo.
4. Ferpleatse as: Druk op en hâld de knop yn, Selektearje de Seleksje Seleksje-switch, selektearje de fergrutting switch, en dan draaie de puls encoder. Draaie mei de klok yn te ferpleatsen de
positive as en tsjin de klok yn om de negative as te ferpleatsen.
5. Druk op en hâld alle oanpaste knop, en de oerienkommende knop IO útfier fan de ûntfanger wurdt ynskeakele. Los de knop los, en de útfier sil wurde útskeakele.
6. Druk op de knop Emergency Stop, de oerienkommende needstop IO útfier fan de ûntfanger wurdt loskeppele, de handwheel funksje wurdt útskeakele,loslitte de needstopknop, de needstop IO útfier sil wurde sletten, en de handwheel funksje wurdt restaurearre.
7. As de Handwheel is net foar in perioade opereare, it sil automatysk yn 'e sliepmodus gean om enerzjyferbrûk te ferminderjen. As it opnij wurdt brûkt, it handwiel kin aktivearre wurde troch te drukken op de ynskeakelje knop.
8. As de hânwiel net lang brûkt wurdt, it is oan te rieden om de handwheel skacht te skeakeljen nei de OFF posysje, Skeakelje de hânwielskrêft út, en ferlingje it batterijlibben.
8. Produktmodelbeskriuwing

① :ZTWGP stiet foar it uterlik styl
②:Pulse útfierparameters:
01: Jout oan dat it pulsútfiersinjaal A is, B; Puls spanning 5v; puls kwantiteit 100PPR.
02:Wat oanjout dat de pulsútgongssignalen A en B binne; Pulse voltage 12V; puls kwantiteit 100PPR.
03:Wat oanjout dat de pulsútgongssignalen A binne, B, IN -, B -; Puls spanning 5v; puls kwantiteit 100PPR.
04:Tsjut op in NPN Open Circuit-útfier oan, mei puls útfier sinjalen fan A en B;It oantal pulses is 100PPR.
05:Jout oan om High-nivo PNP Boarne-útfier oan, mei puls útfier sinjalen fan A en B; It oantal pulses is 100PPR.
③:It fertsjinwurdigjen fan it oantal as seleksje switches, 2 fertsjintwurdiget 2 assen.
④:Fertsjintwurdet it type as seleksje switch sinjaal, In fertsjintwurdiget it punt-oan-punt-útfier-sinjaal, en B stiet foar kodearre útfier sinjaal.
⑤:Fertsjintwurdet it type fan multiplikaasje switch sinjaal, In fertsjintwurdiget it punt-oan-punt-útfier-sinjaal, en B stiet foar kodearre útfier sinjaal.
⑥:Fertsjintwurdet it oantal oanpaste knoppen, 2 fertsjintwurdiget 2 Oanpaste knoppen.
⑦:Fertsjintwurdet de stroomfoarsjenning foar it systeemhandwiel, en 05 fertsjintwurdiget 5V-stroomferliening.
⑧:L stiet foar de linker kolom (lofts mes holder), en R stiet foar de rjochter kolom (rjochts mes holder).
9.Oplossing foar produkt malfunctions

1. Brûk it asjebleaft yn in droege omjouwing by keamertemperatuer en druk om syn tsjinstferliening te ferlingjen.
2. Foarkom asjebleaft te brûken yn abnormale omjouwings lykas rein en wetterbellen fan rein en wetter om it tsjinst libben út te wreidzjen.
3. Hâld asjebleaft it uterlik fan 'e Handwheel skjin om syn tsjinstferliening te ferlingjen.
4. Asjebleaft foarkomme asjebleaft, Falling, bulten, etc. om skea oan 'e presyzjekomponinten yn' e handwiel of krektensflaters te foarkommen.
5. As net lang brûkt, bewarje asjebleaft de hânwiel yn in skjin en feilich plak. Tidens opslach en ferfier, Oandacht moat wurde betelle foar focht en skokbestindich.
11. Feiligensynformaasje
1. Lês asjebleaft de ynstruksjes soarchfâldich foardat jo brûke en ferbiede net profesjoen fan operearjen.
2. Ferfang asjebleaft de batterij op 'e tiid as it batterijnivo te leech is om flaters te foarkommen dy't feroarsake binne troch ûnfoldwaande batterijkrêft en ûnfermogen om it handwiel te betsjinjen.
3. As reparaasje nedich is, Nim dan kontakt op mei de fabrikant. As de skea wurdt feroarsake troch selsreparaasje, De fabrikant sil gjin garânsje leverje