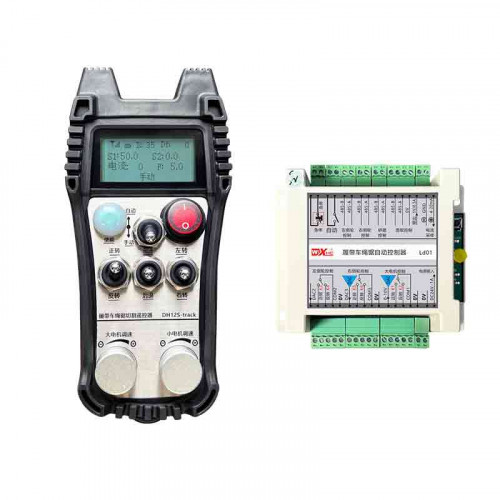
Descrición
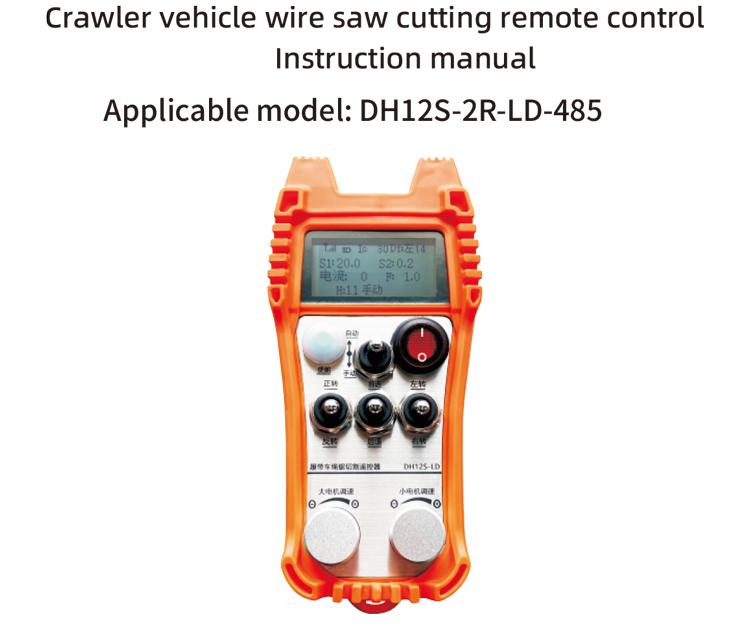
1. Introdución do produto
O control remoto de corte automático da serra de corda para vehículos de orugas é axeitado para máquinas de corte de serras de corda de orugas. Adopta o protocolo 485ModbusRTU para controlar o inicio da velocidade e o control da dirección esquerda e dereita dianteira e traseira dos inversores de rastrexo esquerdo e dereito., así como o protocolo RTU de conversión de frecuencia do motor grande para controlar o inicio da velocidade e o control da dirección esquerda e dereita dianteira e traseira dos inversores de rastrexo esquerdo e dereito., e a análise e comparación de sobreintensidade de conversión de frecuencia do motor grande, axusta automaticamente as velocidades de rastrexo esquerdo e dereito en tempo real para lograr a función de corte automático.
2. Características do produto
1. Adopte a tecnoloxía de comunicación sen fíos 433MHZ, a distancia de operación sen fíos é 100 contadores.
2. Adopte a función automática de salto de frecuencia, usar 32 conxuntos de mandos a distancia sen fíos ao mesmo tempo, sen afectarnos mutuamente.
3. Admite todos os inversores co protocolo 485-Modbus RTU. As marcas de inversores que se adaptaron inclúen:Xangai Xielin, Fuji, Innovación, Zhongchen, INVT, Anchuanda. Se a marca non é ADA, póñase en contacto connosco para a personalización.
4. Admite o arranque do convertidor de motor grande, regulación da velocidade, e lectura actual.
5. Admite a regulación de velocidade do inversor de orugas esquerda e dereita, comezar, control dianteiro e traseiro esquerdo e dereito.
6. Admite a corrección da liña recta do inversor de rastrexo esquerdo e dereito para manter a máquina en movemento en liña recta.
7. Función de corte automático da serra de corda de apoio, axusta automaticamente a velocidade do rastreador esquerdo e dereito en tempo real segundo a información actual do motor grande.
8. Ao mesmo tempo, é compatible coa saída IO directa para controlar o arranque e parada do motor, e saída de tensión analóxica para controlar a velocidade do motor.
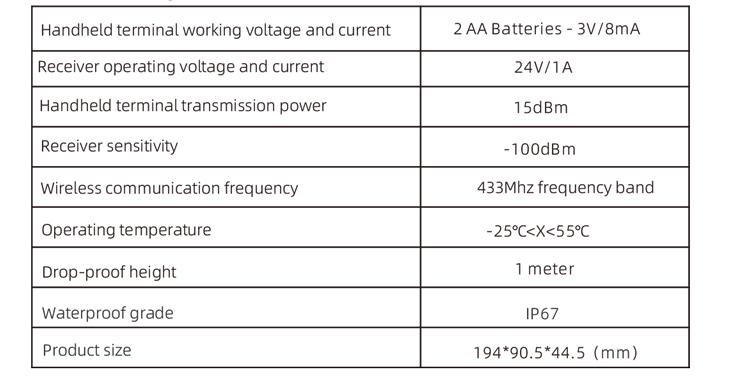
3. Especificacións do produto
4. Introdución da función do produto

Notas:
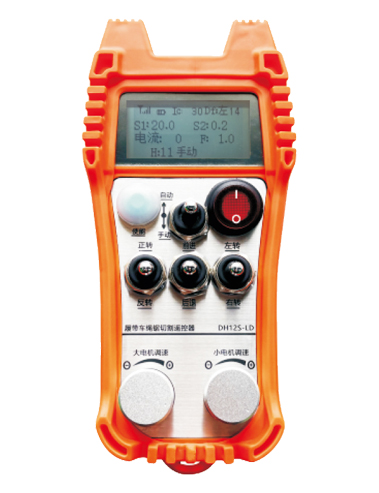
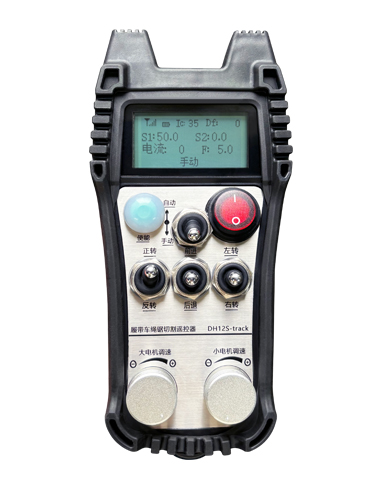
① Visualización da pantalla:

②Interruptor de modo:
Usando un interruptor de 2 niveis, é posible cambiar entre os modos automático e manual, e aparecerá o modo correspondente na pantalla para cambiar.
③ Activar:
Botóns combinados, algunhas operacións requiren manter premido o botón de activación para operar, consulte as instrucións de cada interruptor para obter máis detalles.
④ Interruptor de motor grande:
Usando un interruptor de reinicio de 3 velocidades, tirando deste interruptor pódese controlar a rotación cara adiante e atrás do motor grande. Despois de soltalo, permanecerá o estado, e haberá visualizacións correspondentes na pantalla. A frecha t indica a rotación cara adiante, e a frecha y indica a rotación inversa.
⑤Interruptor de avance/retroceso do motor pequeno:
Usando un interruptor de bloqueo automático de 3 velocidades, tirando deste interruptor pode controlar o pequeno motor para avanzar e retroceder. A pantalla correspondente mostrarase na pantalla, coa frecha t indicando cara adiante e a frecha ↓ indicando cara atrás.
⑥ Interruptor de alimentación do control remoto:
A pantalla do control remoto está activada.
⑦ pequeno interruptor de xiro do motor:
Usando un interruptor de reinicio de 3 velocidades, cando se opera manualmente, o pequeno motor pódese controlar para virar á esquerda ou á dereita. Unha vez liberado, o mando a distancia deterá automaticamente esta acción.Cando estea en estado de avance, xira este interruptor e aparecerá na pantalla a visualización correspondente.O + a frecha indica o xiro á esquerda, e o – a frecha indica o xiro á dereita.Cando está en modo inverso, xira este interruptor e aparecerá na pantalla a visualización correspondente.O + a frecha indica o xiro á esquerda, e o – a frecha indica o xiro á dereita. Manteña premido o botón de activación, a continuación, xire este interruptor para realizar unha función de xiro estacionario, facendo o xiro máis rápido.
⑧ Gran regulación da velocidade do motor:
Usando un botón codificador multixiro, xire a perilla para axustar a velocidade S1 do motor grande Para cada 1 rotación da reixa, o valor da velocidade do motor grande cambia aproximadamente 0.2 unidades, e a rotación rápida pode modificar rapidamente o valor da velocidade do motor grande.
9 Regulación de velocidade do motor pequeno (corrección lineal):Para usar o botón codificador multixiro, en modo manual, para cada 1 xiro do pomo, o valor da velocidade do pequeno motor cambia aproximadamente 0.1 unidades. A rotación rápida pode modificar rapidamente o valor da velocidade do motor pequeno.
En modo automático, prema o botón de activación e xira 1 reixa cada vez. O valor límite de velocidade F do pequeno motor cambia aproximadamente 0.1 unidades. A rotación rápida pode modificar rapidamente o valor límite de velocidade do pequeno motor.Preme o botón de activación, xira o botón cara á dereita, e a pantalla de corrección de liña recta mostra D f: esquerda. Cada xiro do botón aumenta en 1 unidade; Xire o botón esquerdo, visualización de corrección de liña recta: Df: certo. Cada xiro do botón aumenta en 1 unidade, e cada unidade de corrección corresponde a unha tensión AVI de control de velocidade do motor de aproximadamente 0.02 V.
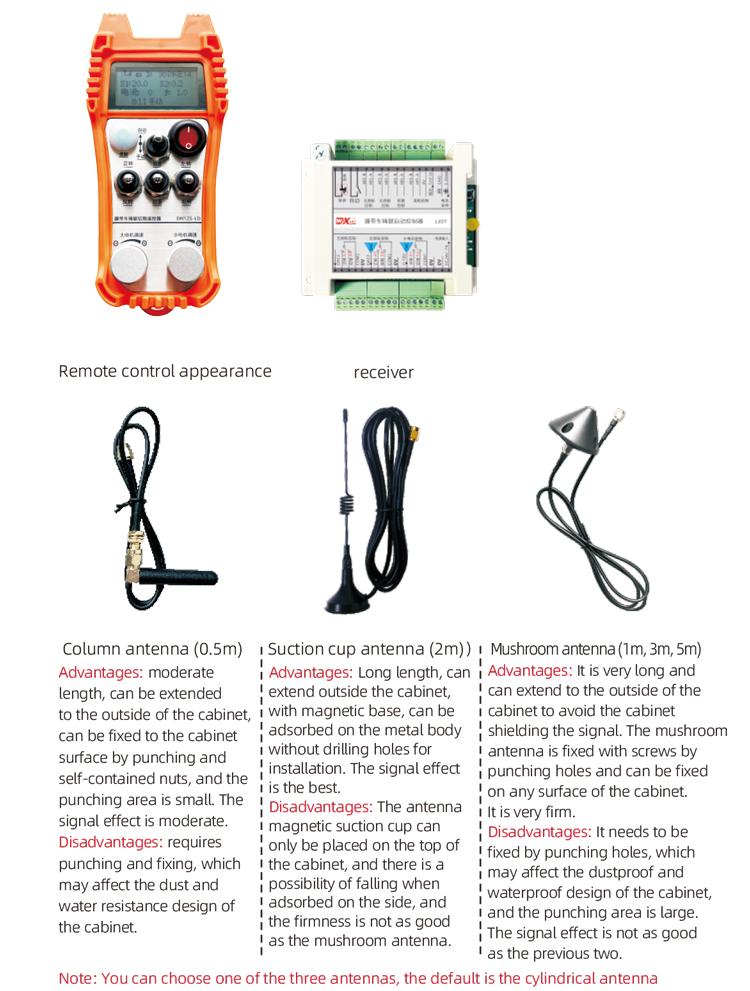
5. Diagrama de accesorios de produtos
6. Guía de instalación de produtos
6.1 Pasos de instalación do produto
1. Instale o receptor no armario eléctrico a través da fibela da parte traseira, ou instálaa no armario eléctrico a través dos orificios dos parafusos nas catro esquinas do receptor.
2. Consulte o noso diagrama de cableado do receptor, compare o seu equipo no lugar, e conectar o equipo ao receptor mediante cables.
3. Despois de que o receptor estea fixado, a antena equipada co receptor debe estar conectada, e o extremo exterior da antena debe instalarse ou colocarse fóra do armario eléctrico. Recoméndase colocalo na parte superior do armario eléctrico para o mellor efecto do sinal. Queda prohibido deixar a antena desconectada ou colocar a antena dentro do armario eléctrico, que pode causar un sinal deficiente e inutilizable.
4. Finalmente, instalar a batería no control remoto, aperta a tapa da batería, e despois acende o interruptor de acendido do control remoto. Despois de que a pantalla do control remoto mostra a interface de traballo normal, pode realizar operacións de control remoto.
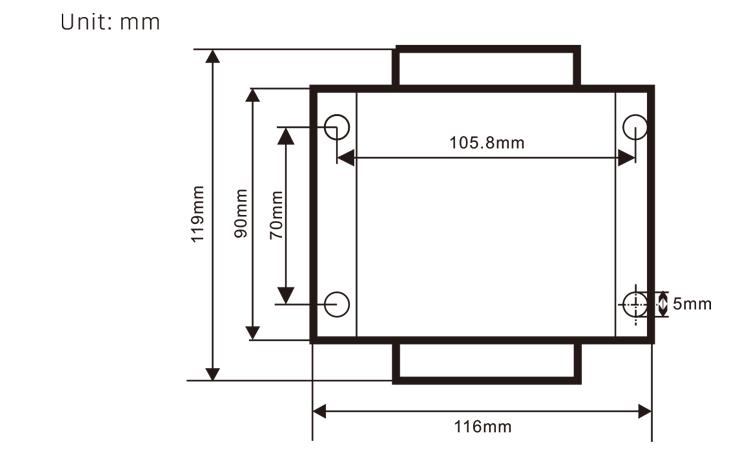
6.2 Dimensións da instalación do receptor
6.3 Diagrama de referencia do cableado do receptor

7. Instrucións de funcionamento do produto
7.1 Configuración de parámetros de control remoto
Como introducir os parámetros de fondo do mando a distancia: coloque o interruptor de modo no modo manual, axustar a velocidade do pequeno motor para 25, ou 0, 10, 20, 40, 50, e xire o interruptor de avance do motor grande cara arriba 3 veces e cara abaixo 3 veces;
Usa o “Control de velocidade do motor pequeno” botón para pasar páxina, prema Habilitar e xire a perilla de control de velocidade do motor pequeno para modificar os parámetros; despois da modificación, pasar a páxina ata o final, seleccione Gardar e saír, e prema o botón Activar para saír do menú;
Os parámetros son os seguintes:Corriente máxima: gran intervalo de valores de retroalimentación da corrente do motor, Rango de configuración 15-200A, por defecto 60;
Parámetros de control de velocidade: modo automático motor pequeno velocidade de aceleración automática, canto máis pequeno, máis rápido, rango de configuración 200-1500, por defecto 1000;
Parámetro de desaceleración: Establece o límite superior do cambio de velocidade do motor permitido. Cando a corrente cambia máis aló deste valor, vai desacelerar. Canto máis pequeno é, canto máis rápido se desacelerarán os motores esquerdo e dereito. O rango é 05-12, e o predeterminado é 06;
Aceleración a1: Canto maior sexa o valor, canto máis rápido aumenta a velocidade do motor, rango 00-06, por defecto 01; Desaceleración a2: Canto maior sexa o valor, canto máis rápido diminúe a velocidade do motor, rango 00-06, por defecto 02;
Activar a regulación de velocidade: Se é necesario activar a regulación de velocidade do motor pequeno, 00 non está activado, 01 está activado, por defecto 01;
Autobloqueo de arranque: Indica se o motor grande manterá o autobloqueo automaticamente despois de soltar o interruptor de avance e retroceso, 00 non se mantén, 01 mantense, por defecto 01;
Máxima viaxe: Velocidade máxima dos motores esquerdo e dereito, rango 10-100, por defecto 50;
Corriente de corte: Máxima corrente de corte, a pantalla mostra o valor IC, rango 15-160, por defecto 30, a pantalla mostra IC: 30. O límite superior deste parámetro = intensidade máxima x 80%;
Límite de velocidade predeterminado: Velocidade de corte automático do motor pequeno predeterminado ao inicio, rango 00-100, por defecto 10, a pantalla mostra F1.0, este parámetro só é preciso cando se establece a viaxe máxima 50.
Canle sen fíos: O predeterminado é 10. Cando o sinal do control remoto é inestable ou hai interferencias de sinal no lugar, pode modificar este parámetro para cambiar de canle para evitar interferencias;
Compensación do límite de velocidade: O límite superior da velocidade de corte automático do pequeno motor,rango 00-200, por defecto 60, aparece a pantalla 6.0; Valor de visualización límite superior = compensación límite de velocidade × 0.1;
Anfitrión máximo: A velocidade máxima do motor grande, rango 10-100, por defecto 50;
dispositivo Mbus ( obrigatorio ): selección de modelos de convertidor de motor grande, rango 00-03, por defecto 03;
00- Xangai Xielin 01 Fuji
02- INVT 03 Inovance (Zhongchen, Robicon)
Equipos SBUS (obrigatorio): Selección do modelo do convertidor de frecuencia do motor pequeno, rango 00-05, por defecto 03;
00- Xangai Xielin 01 Fuji
02- INVT 03 Inovance (Zhongchen, Robicon)
04-Anchuanda 05-Ningún
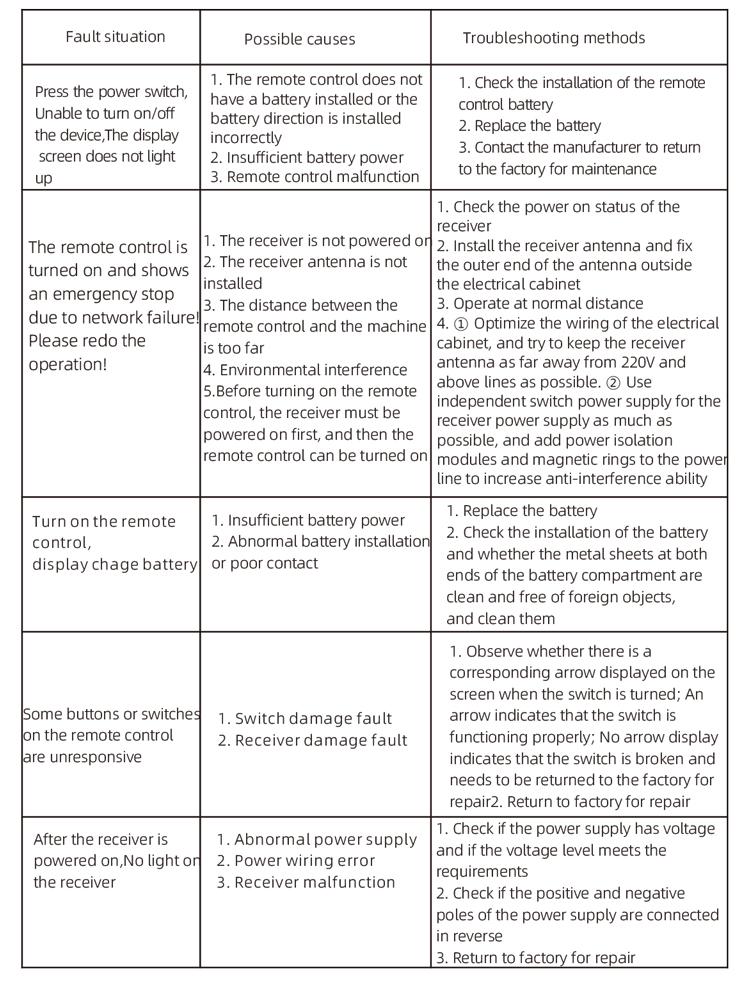
8. Resolución de problemas do produto
7.2 Configuración de parámetros do convertidor de frecuencia
1. Selección da fonte do comando: Canle de mando de comunicación
2. Selección da fonte de frecuencia principal: comunicación dada
3. Velocidade en baudios: 19200
4. Formato de datos: Sen verificación, formato de datos<8-N-1>
5. Enderezo local: Establece o conversor de frecuencia esquerdo en 1, o conversor de frecuencia adecuado para 2, e o convertidor de frecuencia do motor grande para 3
7.3 Instrucións de funcionamento do control remoto
1. Encender a máquina, Activa o control remoto, introduza o fondo do control remoto, establecer os parámetros de fondo do control remoto, principalmente é establecer os modelos de convertidores de frecuencia de motores pequenos e grandes (omita este paso se o fabricante da máquina xa os estableceu);
2. Establecer os parámetros do convertidor de frecuencia (omita este paso se xa o fixou o fabricante da máquina);
3. Establece o control remoto no modo manual, e despois use o control remoto para mover a máquina á posición de traballo;
4. En modo manual, establece o valor IC para a corrente de corte do motor grande e a velocidade do motor grande;
5. Cambie ao modo automático e configure o valor F límite de velocidade de corte para o motor pequeno;
6. En modo automático, xira o interruptor do motor grande para adiante para arrancar o motor grande, e, a continuación, xira o pequeno interruptor do motor para avanzar ou retroceder. O control remoto entra no modo de corte automático e comeza a cortar.
9.Mantemento
1. Utilízao nun ambiente seco a temperatura ambiente e presión para ampliar a súa vida útil.
2. Evite usar en ambientes anormais como a choiva e as burbullas de auga para prolongar a vida útil.
3. Mantén limpos o compartimento da batería e a zona da metralla metálica.
4. Evite danar o mando a distancia debido ao espremer e caer.
5. Se non se usa durante moito tempo, retire a batería e garde o control remoto e a batería nun lugar limpo e seguro.
6.Durante o almacenamento e o transporte, Débese prestar atención á resistencia á humidade e ao choque.
10. Información de seguridade
1. Lea atentamente as instrucións antes de usar e prohibir que os profesionais non funcionen.
2. Substitúe a batería de forma oportuna cando a batería estea demasiado baixa para evitar erros causados por unha enerxía insuficiente, o que pode provocar que o control remoto non poida funcionar.
3. Se é necesaria a reparación, Póñase en contacto co fabricante. Se o dano é causado pola auto -reparación, O fabricante non proporcionará garantía