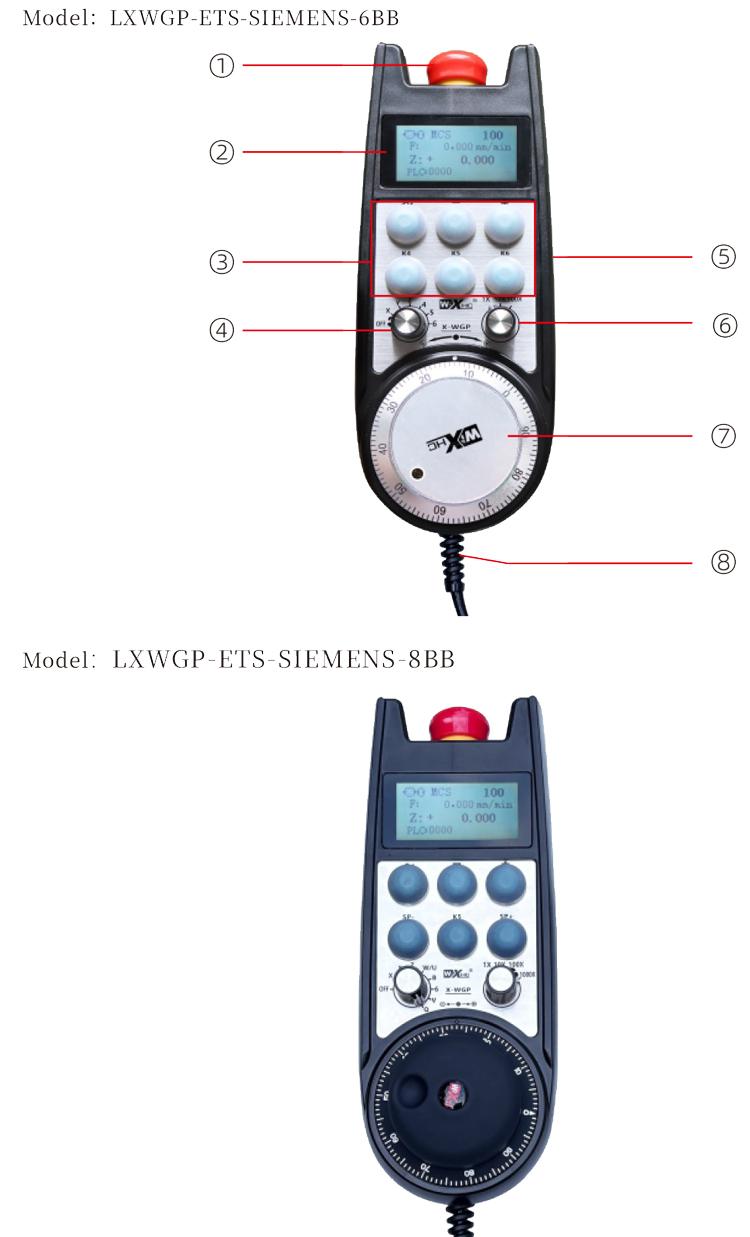
1. Ji bo girêdanê kabloyek fîşa hewavaniyê ya 6-core bikar bînin, bi dirêjahiya kabloya handwheel ya 10 metre.
2. Dîmendera destikê dikare hevrêzên xebata pergalê nîşan bide, koordînatên mekanîkî,rêjeya xwarinê, hilbijartina eksê, mezinkirin, û agahiyên din.
3. Bişkojka rawestandina acîl piştgirî bike, Derketina nîşana io veguherînin, û rawestana awarte ya girtina çerxa destan hîn jî derbasdar e.
4. Piştgirî dike 6 Bişkojkên xwerû, îşaretên IO veguherînin, û dikare bi têlên IO an ragihandinê sînyalan derxe pergalê.
Manual Instruction handwheel elektronîk Wired
Terîf
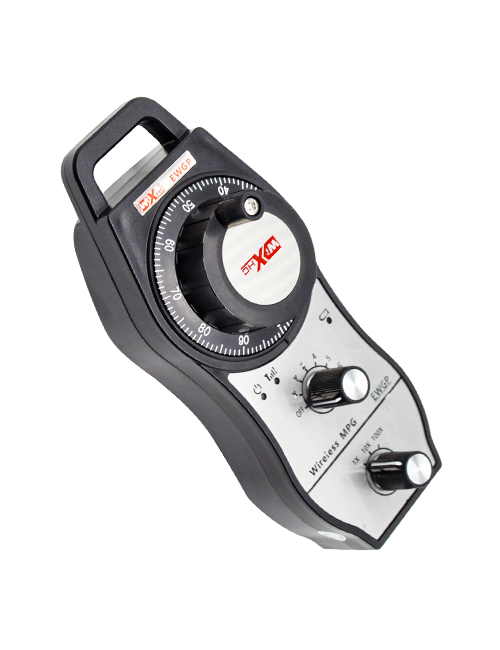
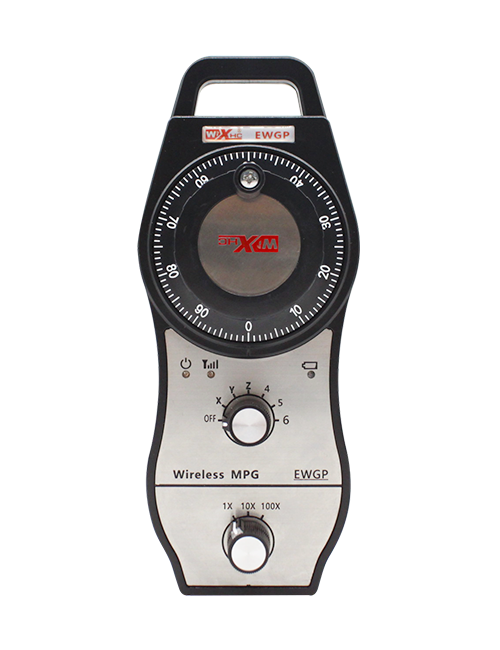
1. Nasandina Hilberê
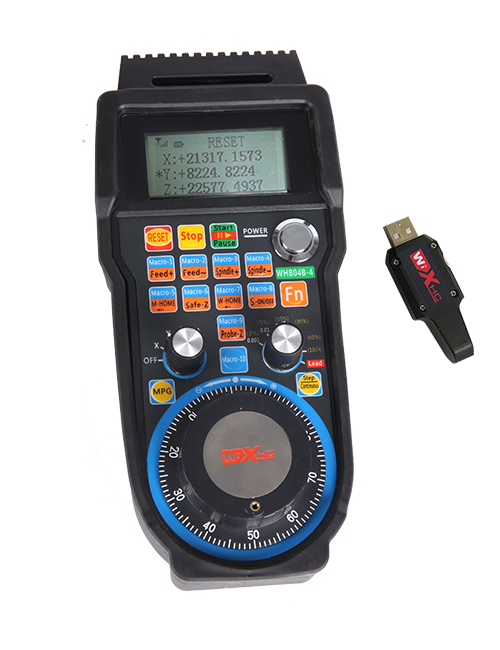
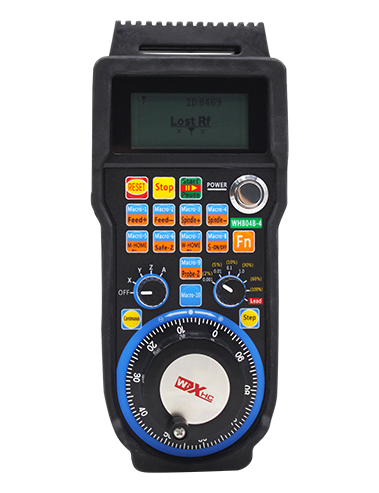
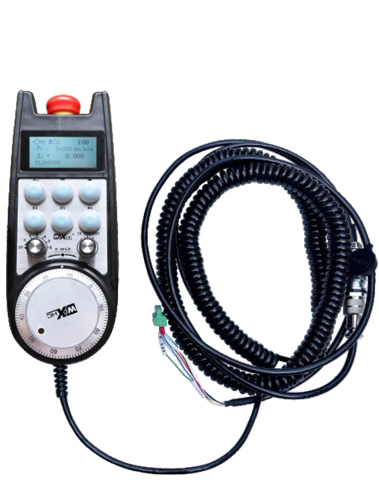
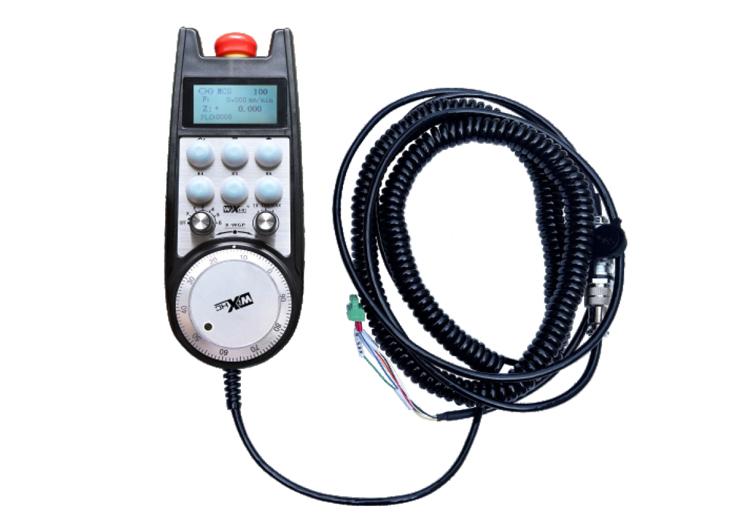
Wheel-destê elektronîkî ji bo rêberiya destan tê bikar anîn, positioning, alignment tool, û operasyonên din ên li ser amûrên makîneya CNC. Ev modela destmala elektronîkî dîmenderek rastîn a Siemens-ê ye ku destanek elektronîkî ya pêvekirî ye. Destê bi kabloya torê ve bi navbeynkariya X130 ya pergala Siemens ve girêdayî ye, û koordînatên pergalê bi riya ragihandina protokola S7 ve têne xwendin û li ser ekrana LCD ya destikê têne xuyang kirin. Rêzeya destan dikare hilbijartina eksê pergalê jî kontrol bike, mezinkirin, bişkokên, û sînyalên din bi rêya ragihandinê.
2.Taybetmendiyên fonksiyonel ên hilberê
1. Ji bo girêdanê kabloyek fîşa hewavaniyê ya 6-core bikar bînin, bi dirêjahiya kabloya handwheel ya 10 metre.
2. Dîmendera destikê dikare hevrêzên xebata pergalê nîşan bide, koordînatên mekanîkî,rêjeya xwarinê, hilbijartina eksê, mezinkirin, û agahiyên din.
3. Bişkojka rawestandina acîl piştgirî bike, Derketina nîşana io veguherînin, û rawestana awarte ya girtina çerxa destan hîn jî derbasdar e.
4. Piştgirî dike 6 Bişkojkên xwerû, îşaretên IO veguherînin, û dikare bi têlên IO an ragihandinê sînyalan derxe pergalê.
5. Piştgirî dike 6 an 8 Kontrola Axis, bi îşaretên IO-ya guheztinê ku dikarin bi têlkirin an pêwendiya IO-yê ji pergalê re werin derxistin.
6. Piştgirî dike 3 an 4 asta kontrolkirina mezinbûnê, bi îşaretên IO-ya guheztinê ku dikarin bi têlkirin an pêwendiya IO-yê ji pergalê re werin derxistin.
7. Encoder pulse piştgirî, 100 pêldan / zivirandin, dikare bi têlkirina pêldana AB sînyalan derxe pergalê.
8. Protokola Siemens S7 û Siemens 828D piştgirî dike, 840DSL, YEK û pergalên modela din.
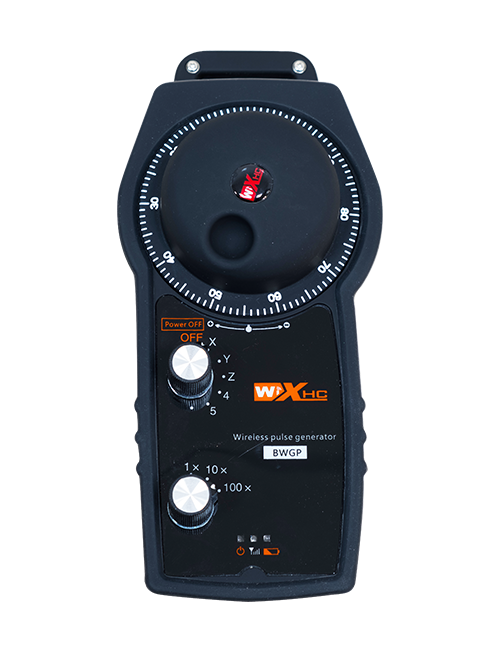
3. Taybetmendiyên hilberê
| Handwheel kar voltaja dabînkirina hêzê | DC24V/1A |
| voltaja dabînkirina hêzê ya wergir | DC24V/1A |
| Receiver IO range load encam | DC24V |
| Hand wheel dawiya cable dirêjahiya | 10M |
| Dirêjahiya kabloya dawiya wergirê | 1M |
| Dirêjahiya kabloya torê ya dawiya wergir | 3M |
| Germahiya xebitandinê | -25℃<X<55℃ |
| Bilindahiya dijî-ketina | 1M |
| Quantity Bişkojka Custom | 6 |
| Pîvanên hilberê | 233*90.7*77.4(mm) |
4.Danasîna fonksiyona hilberê
Not:
Bişkoka rawestandina acîl:
Bişkojka rawestandina acîl bikirtînin, û du komên IO yên rawestana awarte yên li ser wergirê dê bêne qut kirin, û hemî fonksiyonên destikê dê nederbasdar bin.
Piştî berdana rawestgeha acîl, derketina acîl ya IO ya li ser wergirê girtî ye, û hemî fonksiyonên destikê têne vegerandin.
② Nîşandana ekranê:
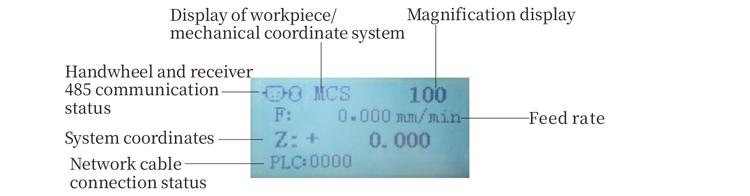
PLC: 0000 nîşan dide ku kabloya torê ne girêdayî ye, PLC: 1010 destnîşan dike ku kabloya torê bi serfirazî bi pergala PLC ve girêdayî ye.
PLC: 1110 nivîsandina serketî ya daneyên pergalê li ser destikê nîşan dide, PLC: 0001 girêdana serketî ya bi komputerê re temsîl dike.
③ Bişkojka Xweser:
6 Bişkojkên xwerû, her yek bi xalek derana IO ya li ser wergirê re têkildar e, jî bi rêya ragihandinê bi sîstemê ve girêdayî ye.
④ Guhestina Hilbijartina Axe:
Guhestina bijartina eksê dikare eksê tevgerê ku ji hêla çerxa destan ve tê kontrol kirin biguhezîne.
⑤ Bişkojka çalak bike:
Bişkojka çalakkirinê li her du aliyan bikirtînin û bihêlin da ku bi hejandina wê şîfreya pêlê çalak bikin. Û her du komên li ser wergirê rê dide derketina IO-yê, bişkoka çalakkirinê berdin da ku veqetandina IO-yê çalak bike.
⑥ Guhestina mezinbûnê:Guhestina mezinbûnê dikare mezinbûnê biguherîne
ji hêla handwheel ve têne kontrol kirin.
⑦ Şîfrekera Pulse:
Bişkojka çalak bikirtînin û bigirin, şîfreya nebşê bihejînin, sînyalek pêlê derdixin, û tevgera eksê makîneyê kontrol bikin.
⑧ Kabloya Handwheel:
Kabloya dest û wergirê girêdide, fîşa hewavaniyê, ji bo dabînkirina hêzê û ragihandinê ya handwheel tê bikar anîn.
5. Diagrama pêveberê ya hilberê
6. Rêbernameya Sazkirina Hilberê
6.1 gavên sazkirinê Product
6.1 gavên sazkirinê Product
1. Di nav kunên pêçanê yên li çar goşeyan re wergirê di kabîneya elektrîkê de saz bikin.
2. Li diyagrama têlgirêdana wergirê me binihêrin û wê bi alavên xweya cîhê re bidin ber hev. Amûrê bi kabloyan bi wergirê ve girêdin û bi kabloyên Ethernet ve wergirê bi navgîniya X130 ya pergalê ve girêdin..
3. Piştî rastkirina wergirê, bingeha fîşa hewavaniyê li cîhê vekirina destikê li ser panelê saz bikin, û dawiya din ê bingehê têxin navrûya destikê ya li ser wergirê. Dûv re fîşa hewavaniyê ya kabloya destikê têxin nav bingehê û cîhaza rastkirinê hişk bikin.
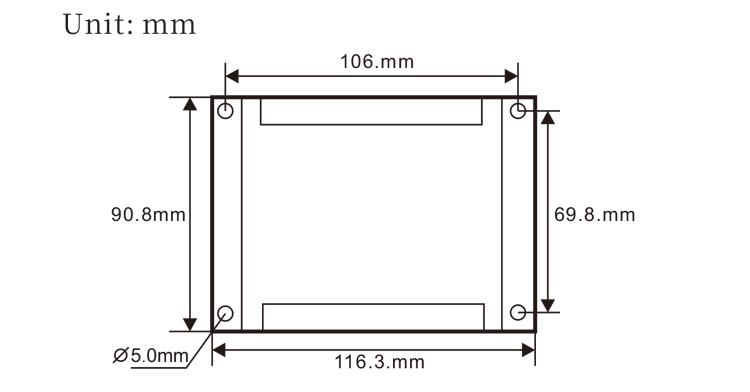
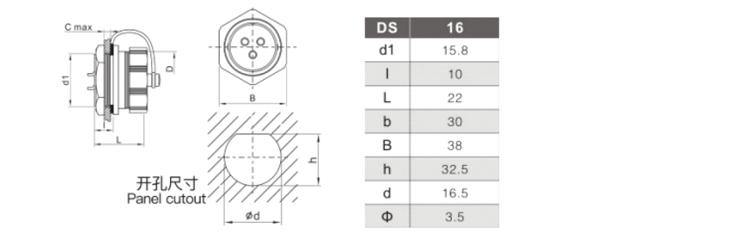
6.2 Pîvanên sazkirinê yên wergirê
6.3 Pîvana sazkirinê ya pêlên hewavaniyê
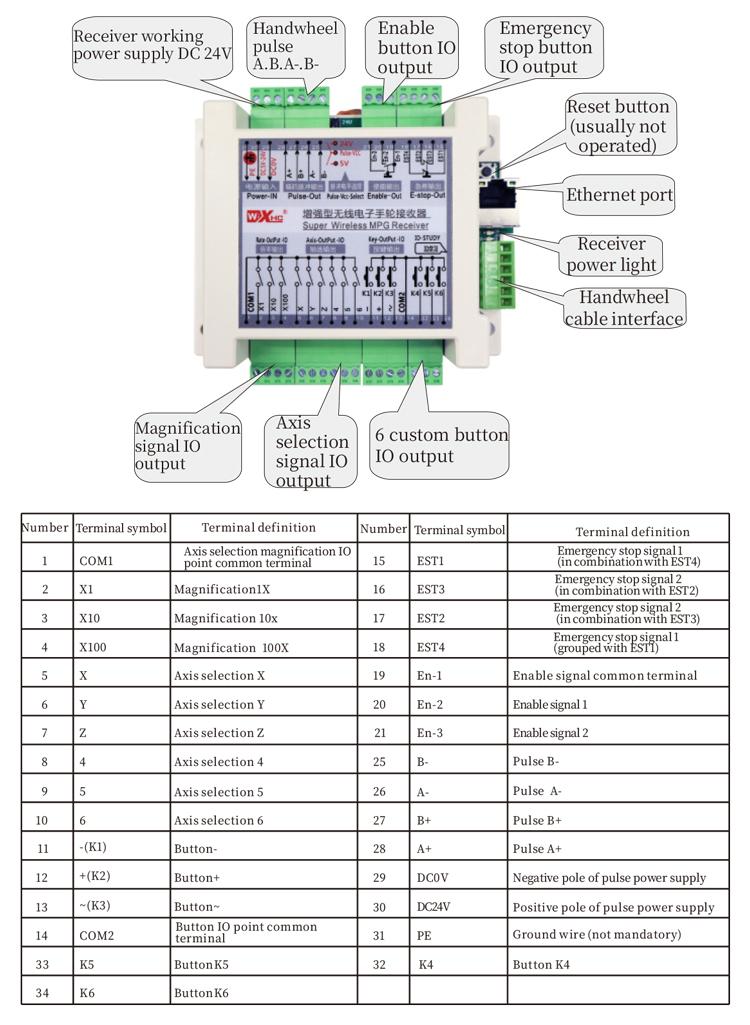
6.4 Receiver Wiring Reference Diagram
 7.Talîmatên Operasyona Hilberê
7.Talîmatên Operasyona Hilberê
1. Dema ku wergir tê vekêşandin û ronahiya nîşana xebatê ya wergirê dibiriqe, wergirê bi kabloya torê ve bi komputerê ve girêdin, navnîşana IP-ya rast a komputerê saz bikin, û nermalava amûra veavakirina torê bikar bînin da ku pîvanên torê yên fonksiyona destikê saz bikin. Ji bo rêbazên sazkirinê yên taybetî, serî lê bidin “Destûra Bikarhêner a LXWGP-ETS Wired Handwheel”.
2.Piştî ku wergirê tê sazkirin, pêdivî ye ku pergal bernameyek PLC bername bike. Ji kerema xwe serî li “LXWGP-ETS Rêbazên Sazkirina Pergala Kontrola Hejmara Cihê ya Siemens” û ji bo hûrguliyan materyalên rûtîn ên bernameya PLC.
3.Piştî temamkirina mîhengên jorîn, wergirê bigirin kabîneya elektrîkê ya makîneyê û saz bikin. Kabloya torê ji kompîturê derxe û têxe navbera X130 ya pergalê. Pêveka hêzê ya wergirê û xeta pêlê girêde.3.
4.Piştî temamkirina mîhengên jorîn, wergirê bigirin kabîneya elektrîkê ya makîneyê û saz bikin. Kabloya torê ji komputerê derxînin û wê têxin navrûya X-ê ya pergalê. Hêza wergirê û xeta nebzê ve girêdin.
5. Hilbijartina eksê hilbijêre: Guhestina bijartina eksê biguherînin û eksê ku hûn dixwazin li ser bixebitin hilbijêrin.
6. Mezinkirina hilbijêre: Guhestina mezinbûnê biguherînin û asta mezinkirina ku hûn hewce ne hilbijêrin.
7. Tevgera eksê: Bişkojka çalak bikirtînin û bigirin, guhêrbar hilbijartina eksê hilbijêre, guhertoya mezinbûnê hilbijêrin, û dûv re şîfrekera nebşê bizivirîne da ku eksa tevgerê ya erênî li gorî demjimêr û eksê negatîf li hemberê demjimêrê bizivirîne.
8. Bişkojkek xwerû bikirtînin û bihêlin da ku derketina IO ya bişkoja têkildar a di wergirê de vebike, û bişkojkê berdin da ku derketinê qut bikin.
9. Bişkojka rawestandina acîl bikirtînin, Dê derketina IO ya rawestana acîl ya têkildar a wergirê were qut kirin, fonksiyona destikê dê bête neçalak kirin, bişkoka rawestandina acîl berdin, derketina IO ya rawestandina acîl dê were girtin, û fonksiyona destikê dê were vegerandin.
8.Danasîna Modela Hilberê

① LXWGP şêwazek xuyangiya têlkirî temsîl dike, û pêwendiya pêwendiya wergirê
pêwendiyek Ethernetê ye.
② : Pergala taybetî ya Siemens temsîl dike.
③ : hejmara guhertoyên hilbijartina eksê temsîl dike, eksê temsîl dike, û temsîl dike
eksê.
④ : cureyê hilbijartina eksê û sînyala mezinkirinê temsîl dike, A temsîl dike
sînyala derana xal-bi-point, û B sînyala derana kodkirî temsîl dike.

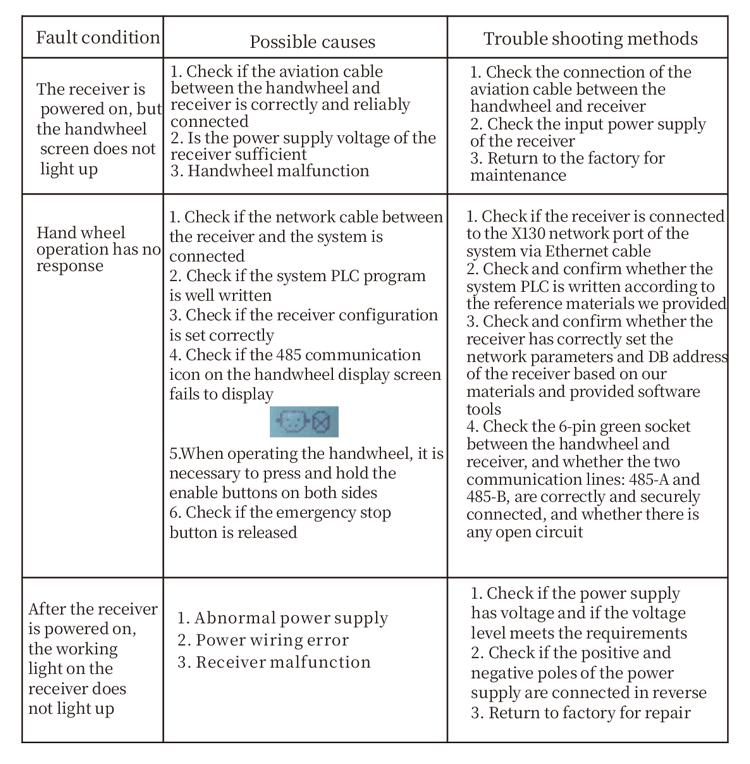
9.gulebarana pirsgirêka Product
10.Lênerrînî
1. Ji kerema xwe wê li hawîrdorek hişk di germahiya odeyê û zextê de bikar bînin da ku jiyana karûbarê wê dirêj bikin.
2. Ji kerema xwe ji karanîna li hawîrdorên nenormal ên wekî baran û pêlên avê dûr bixin da ku jiyana karûbarê dirêj bikin.
3. Ji kerema xwe xuyangê çerxa destan paqij bihêlin da ku jiyana karûbarê wê dirêj bikin.
4. Ji kerema xwe ji çewisandinê dûr bikevin, dikeve, bumping, hwd. ji bo pêşîgirtina zirarê li hêmanên rast ên di hundurê destikê an xeletiyên rastbûnê de.
5. Heke ji bo demek dirêj neyê bikaranîn, ji kerema xwe çerxa destan li cîhek paqij û ewle hilînin.Dema hilanîn û veguhastinê, divê baldarî li berxwedana şil û şokê bê dayîn.
11. Agahiyên Ewlekariyê
1. Ji kerema xwe berî ku bikar bînin rêwerzan bi baldarî bixwînin û ne pisporan ji xebatê qedexe bikin.
2. Ger rewşek anormal bi destikê re çêbibe, ji kerema xwe tavilê karanîna wê rawestînin û pirsgirêkê çareser bikin. Berî çareserkirina pirsgirêkê, qedexe ye ku ji nû ve çerxa desta xelet bikar bînin da ku ji qezayên ewlehiyê yên ku ji ber xeletiyên çerxa destan nenas çêdibin nebin.;
3. Heke tamîr hewce ye, ji kerema xwe bi çêker re têkilî daynin. Ger zerar ji hêla xwe tamîrkirinê ve çêbibe, çêker dê garantiyê nede