Aprašymas
1. Produkto įvadas
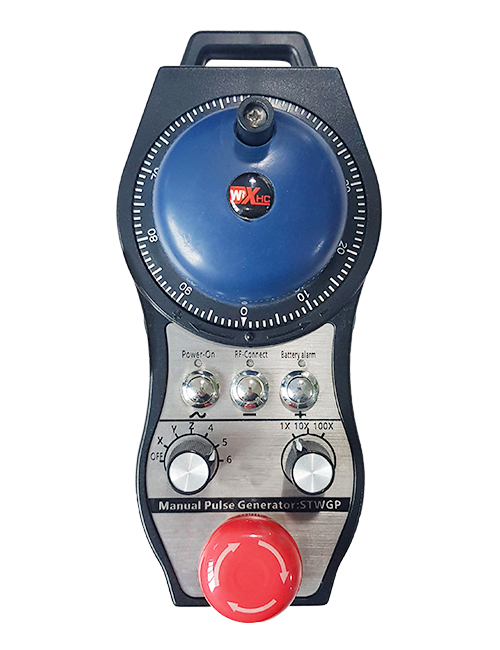
The remote control for automatic cutting of track car rope saw is suitable for track type rope saw
cutting machines. It uses the 485 Modbus RTU protocol to control the left and right track frequency
converters, as well as the large motor frequency conversion speed control start and the front, rear,
left and right direction controllers. And it can read the working current of the large motor frequency
converter through the 485 Modbus RTU protocol. By analyzing and comparing the current of the
large motor, the speed of the left and right tracks can be automatically adjusted in real time to
achieve automatic cutting function.
2. Produkto funkcinės savybės
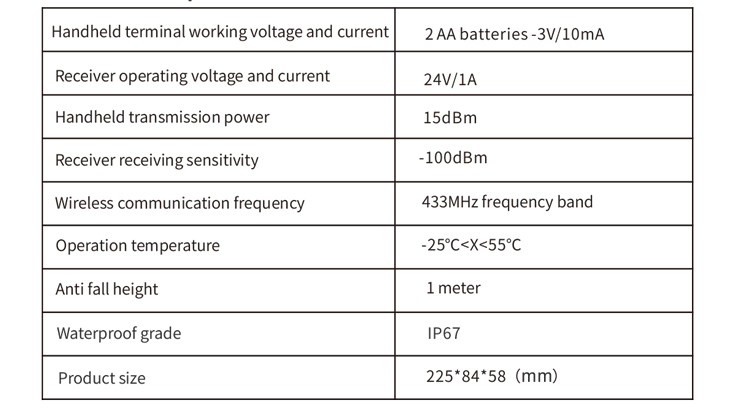
1. Adopting 433MHz wireless communication technology, su belaidžiu veikimo atstumu 100 metrai.
2. Priimkite automatinio dažnio šuolio funkciją ir naudojimą 32 sets of wireless remote controllers
simultaneously, nedarydami įtakos vienas kitam.
3. Supports all frequency converters with 485 Modbus RTU protocol, and currently compatible frequency
converter brands include:Šanchajus Xielinas, Fuji, Huichuan, Zhongchen, INVT, ir . For brands
that are not compatible, please contact us for customization.
4. Palaikymo greičio reguliavimas, pradžia, ir dabartinis didelių motorinių dažnių keitiklių skaitymas.
5. Palaikymo kairės ir dešinės takelių dažnio keitiklio greičio reguliavimas, pradžia, priekis, atgal, kairėje ir dešinėje kontrolėje.
6. Palaikykite kairiojo ir dešiniojo bėgių kelio dažnio keitiklių tiesinę korekciją, kad mašina vaikščiotų a
tiesi linija.
7. Support automatic cutting function of rope saw, automatically adjust the left and right track speed in
real time according to the current information of the large motor.
8. It is also compatible with direct IO output control for motor start and stop, and analog voltage output
control for motor speed.
3. Produkto specifikacijos
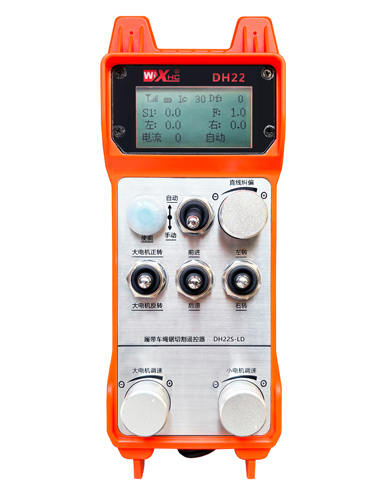
4. Produkto funkcijos įvadas
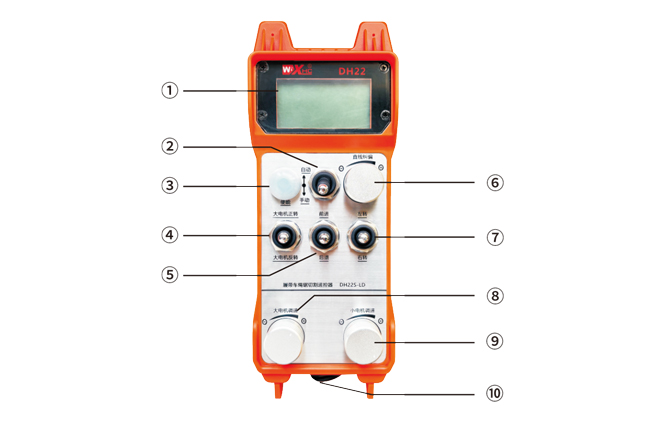
Pastabos:
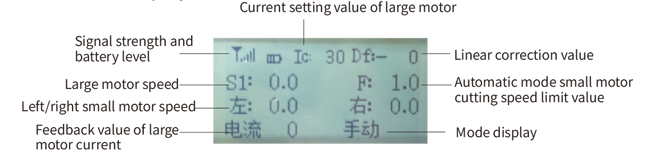
①Ekrano ekranas:
② Režimo jungiklis:
③Enable:
Kombinuoti mygtukai, Norint atlikti kai kurias operacijas, reikia palaikyti nuspaudus įjungimo mygtuką,see the instructions for each switch for details.
④Large motor switch:
Naudojant 3 greičių atstatymo jungiklį, traukdami šį jungiklį galite valdyti didelio variklio sukimąsi pirmyn ir atgal. Išleidus, valstybė išliks, ir ekrane bus atitinkami rodmenys. The S1↑ arrow indicates forward rotation, and the S1 ↓ arrow indicates everse rotation.
⑤ Mažas variklio pirmyn/atgal jungiklis:
The small motor is equipped with a 3-speed self-locking switch in front of it. Pressing the enable button and pulling this switch can control the small motor to move forward and backward, and the corresponding display will appear on the screen.The ↑↑ arrow represents forward, and the ↓↓ arrow represents backward.
⑥ Straight line correction:
Naudojant kelių pasukimų kodavimo rankenėlę, press the enable button, turn the knob right, and display the straight line correction: Df: The left turn knob increases by 1 unit per rotation, and the left
motor speed increases by 0.1 vienetas; Pasukite kairę rankenėlę, tiesios linijos korekcijos ekranas: Df: On the right, every turn of the knob increases by 1 vienetas, and the speed of the right motor increases
by 0.1 vienetas.
⑦Small motor turning switch:
Naudojant 3 greičių atstatymo jungiklį, kai valdoma rankiniu būdu, mažas variklis gali būti valdomas sukant į kairę arba į dešinę. Kartą paleistas, the remote control will automatically stop this action. In the forward state, when this switch is turned, the corresponding display will appear on the screen. The ←↑ arrow indicates left turn, and the ↑→ arrow indicates right turn.When in reverse mode, turn this switch and the corresponding display will appear on the screen. The ←↓ arrow indicates left turn, and the ↓→ arrow indicates right turn.
⑧ Didelis variklio greičio reguliavimas:
Naudojant kelių pasukimų kodavimo rankenėlę, rotating 1 tinklelis kiekvieną kartą, didelio variklio greičio reikšmė pasikeičia apytiksliai 0.2 vienetų. Fast rotation can quickly modify the speed value of the large motor.
⑨ Small motor speed regulation:
Naudojant kelių pasukimų kodavimo rankenėlę, rankiniu režimu, press the enable button and then rotate one grid at a time,the speed value of the left and right small motors changes by about 0.1 vienetų, and quick rotation can quickly modify the speed value of the small motor.In automatic mode, press the enable button and rotate one grid at a time,the speed limit value F of the small motor changes by approximately 0.1 vienetų. Rapid rotation can quickly modify the speed limit value of the small motor.
⑩ Remote control power switch
Įjungtas nuotolinio valdymo pulto ekranas.
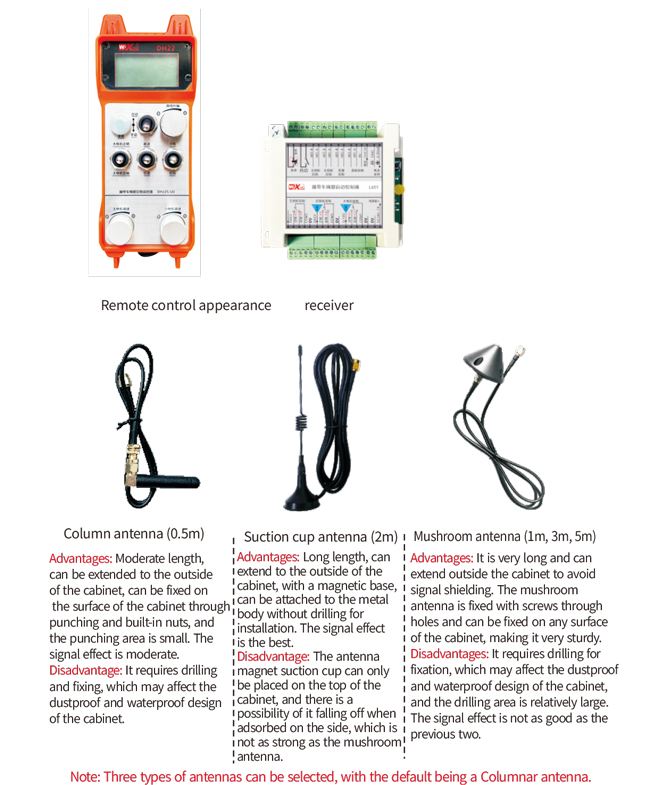
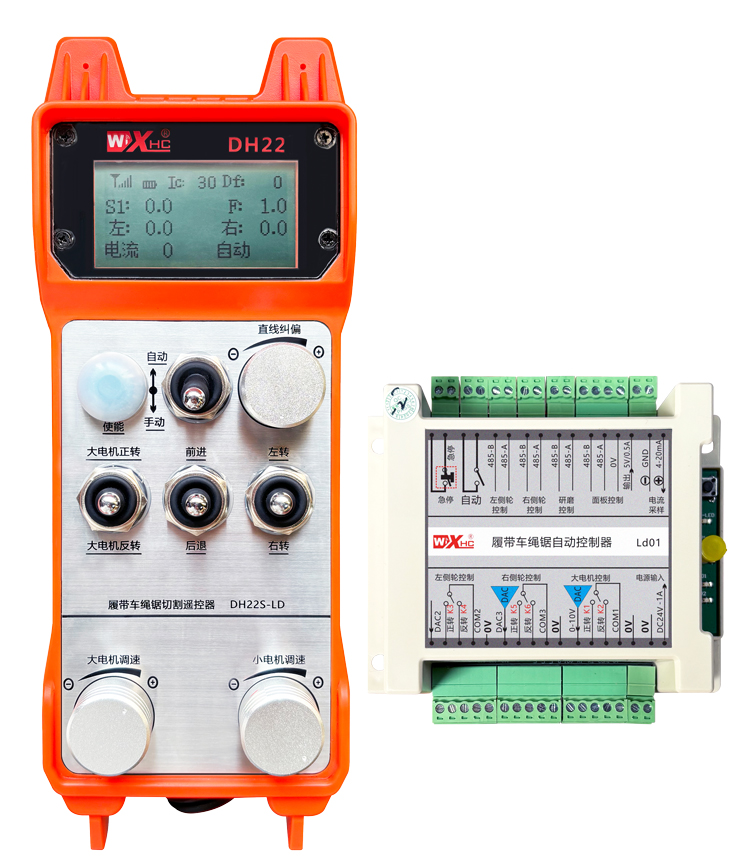
5. Gaminio priedų schema
6. Produkto diegimo vadovas
6.1 Produkto montavimo žingsniai
1. Įstatykite imtuvą į elektros spintelę per užpakalinėje dalyje esančią sagtį, arba įdėkite jį į spintelę per varžtų skylutes keturiuose imtuvo kampuose.
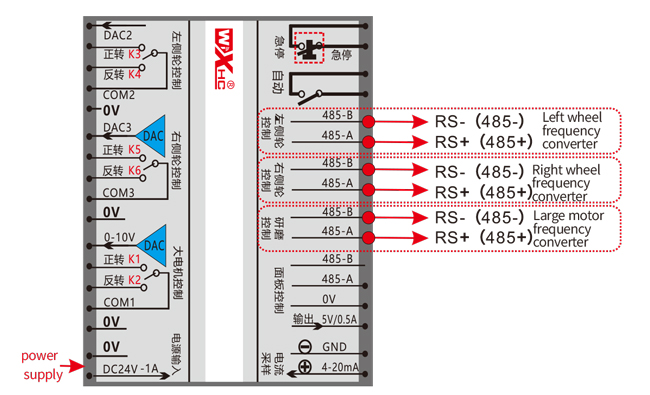
2. Peržiūrėkite mūsų imtuvo laidų schemą ir palyginkite ją su savo vietoje esančia įranga. Connect the equipment to the receiver through wires.
3. Sutvarkius imtuvą, it is necessary to connect the antenna equipped with the receiver and install or place the outer end of the antenna outside the electrical cabinet. Norint gauti geriausią signalo efektą, rekomenduojama jį pastatyti ant elektros spintelės viršaus. It is forbidden to leave the antenna unconnected or place it inside the electrical cabinet, as it may cause the signal to be unusable.
4. Pagaliau, install the battery on the remote control, priveržkite akumuliatoriaus dangtelį, and turn on the power switch of the remote control. After the remote control display screen shows the normal
working interface, remote control operations can be performed.
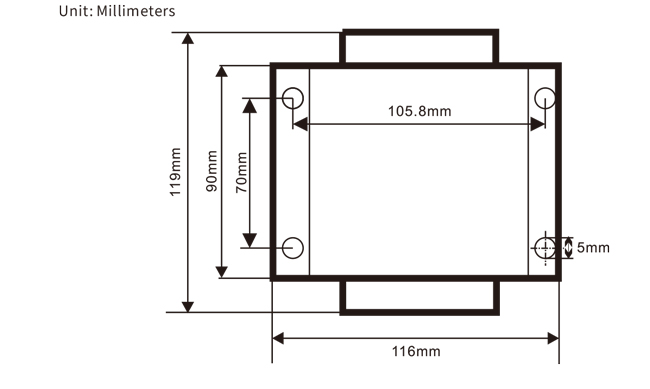
6.2 Imtuvo montavimo matmenys
6.3 Imtuvo laidų atskaitos schema
7. Gaminio naudojimo instrukcijos
7.1 Nuotolinio valdymo pulto parametrų nustatymai
Method to enter the remote control backend parameters:
Turn the mode switch to manual mode, sureguliuokite mažo variklio greitį 25 on both sides, arba 0, 10, 20, 40, 50 on all sides, and continuously turn the forward switch of the large motor up 3 times and down 3 kartų;
Naudokite “Mažo variklio greičio valdymas” knob to flip pages, press the enable button, and then turn the small motor speed control knob to modify parameters. After modification, paversk puslapį iki galo,pasirinkite “Save” to exit, and press the enable button to exit the menu;
Parametrai yra tokie:
Maksimali srovė: feedback range of large motor current, set range 15-200A, Numatytasis 100;
Greičio valdymo parametrai: Automatinis režimas, small motor automatically accelerates faster or slower,kuo mažesnis tuo greičiau, set range 200-1500, Numatytasis 800;
Lėtėjimo parametras: Set the upper limit that allows the motor speed to change. Kai srovė pasikeičia virš šios vertės, the deceleration will occur. The smaller, the faster the deceleration of the left and right motors, su asortimentu 05-12 and a default of 06;
Pagreitis A1: The larger the motor speed, the faster it increases, su asortimentu 00-06 and a default of 01;
Lėtėjimas A2: The larger the motor speed, the faster it decreases, su asortimentu 00-06 and a default of 02;
Įjungti greičio reguliavimą: Does the small motor speed regulation need to be enabled? 00 does not enable, 01 enables, default is 01;
Pradėkite užsiblokuoti: Does the large motor automatically maintain self-locking after the forward and reverse switches are released? 00 does not hold, 01 holds, Numatytasis 01
Maksimalus vaikščiojimas: maximum speed of left and right motors, diapazonas 10-100, Numatytasis 50;
Pjaustymo srovė: maximum cutting current, displayed on the screen as IC value, diapazonas 15-160, Numatytasis 30,
corresponding to IC: 30 displayed on the screen. The upper limit of this parameter is 80% of the maximum current;
Numatytasis greičio apribojimas: The default small motor automatic cutting speed when turned on is within the range of 0-100, with a default of 10. The screen displays F1.0, and this parameter is only accurate when the maximum walking is set to 50.
Automatinis režimas: Set to 00, the automatic/manual switch is a mode switch. Set to 01, the automatic/manual switch is set to the automatic position, the display screen shows lighting, and the automatic terminal output on the receiver is closed. When set to manual, the automatic output terminal is disconnected;
Speed limit deviation: The upper limit of the automatic cutting speed of the small motor ranges from 00 į 200, with a default of 60 and a corresponding display of 6.0 on the screen; Upper limit of display value=speed limit offset x 0.1;
Maksimalus šeimininkas: maximum speed of the large motor, diapazonas 10-100, Numatytasis 50;
Mbus equipment (privalomas): Selection of large motor frequency converter model, diapazonas 00-03, Numatytasis 03;
00- Shanghai Xielin 01-Fuji
02-INVT 03-Inovance(Zhongchen, Robicon)
SBUS įranga (privalomas): Mažo variklio dažnio keitiklio modelio pasirinkimas, diapazonas 00-05, Numatytasis 03;
00- Shanghai Xielin 01-Fuji
02-INVT 03-Inovance(Zhongchen, Robicon)
04-Anchuanda 05 – Nėra
7.2 Dažnio keitiklio parametrų nustatymas
1. Komandų šaltinio pasirinkimas: Komunikacijos komandų kanalas
2. Pagrindinio dažnio šaltinio pasirinkimas: duotas bendravimas
3. Perdavimo greitis: 19200
4. Duomenų formatas: Jokio patikrinimo, duomenų formatą<8-N-1>
5. Vietinis adresas: Kairįjį dažnio keitiklį nustatykite į 1, tinkamas dažnio keitiklis 2, ir
the large motor frequency converter to 3
7.3 Nuotolinio valdymo pulto naudojimo instrukcijos
1. Įjunkite mašiną, įjunkite nuotolinio valdymo pultą, enter the remote control backend, set the
remote control backend parameters, mainly setting the small motor and large motor frequency
converter models: (praleiskite šį veiksmą, jei mašinos gamintojas jį jau nustatė);
2. Nustatykite dažnio keitiklio parametrus (skip this step if the machine manufacturer
has already set it);
3. Nustatykite nuotolinio valdymo pultą į rankinį režimą, and then use the remote control to move the machine to
the working position;
4. Rankiniu režimu, set the cutting current of the large motor to IC and the speed of the large motor
5. Perjunkite į automatinį režimą ir nustatykite mažo variklio pjovimo greičio ribą F;
6. Automatiniu režimu, pasukite didelio variklio jungiklį į priekį, kad paleistumėte didelį variklį, then turn
the small motor switch to forward or reverse, and the remote control enters automatic cutting
mode to start cutting.
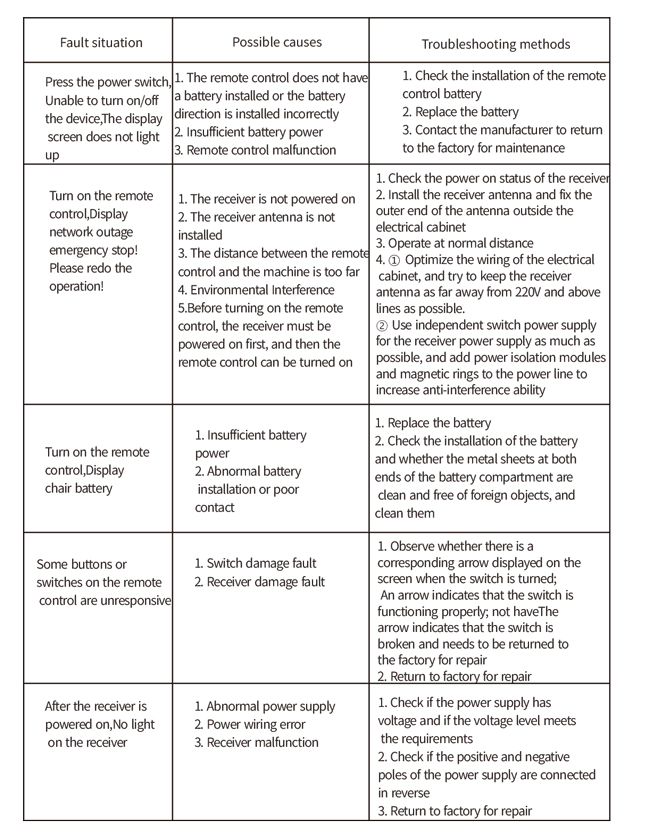
8.Produkto trikčių šalinimas
9.Priežiūra
1. Naudokite jį sausoje aplinkoje kambario temperatūroje ir slėgyje, kad prailgintumėte tarnavimo laiką.
2. Kad prailgintumėte tarnavimo laiką, nenaudokite neįprastose aplinkose, tokiose kaip lietus ir vandens burbuliukai.
3. Laikykite švarų akumuliatoriaus skyrių ir metalinių skeveldrų sritį.
4. Nepažeiskite nuotolinio valdymo pulto dėl suspaudimo ir kritimo.
5. Jei ilgai nenaudojamas, please remove the battery and store the remote control and battery in a clean
and safe place.
6.Sandėliavimo ir transportavimo metu, reikia atkreipti dėmesį į atsparumą drėgmei ir smūgiams.
10. Informacija apie saugą
1. Prieš naudodami atidžiai perskaitykite instrukcijas ir neprofesionalams uždrausti dirbti.
2. Please replace the battery in a timely manner when the battery is too low to avoid errors caused by
insufficient power, dėl to nuotolinio valdymo pultas gali neveikti.
3. Jei reikia remonto, Kreipkitės į gamintoją. Jei žala atsirado dėl savarankiško remonto, the manufacturer
will not provide warranty.

-500x650.png)