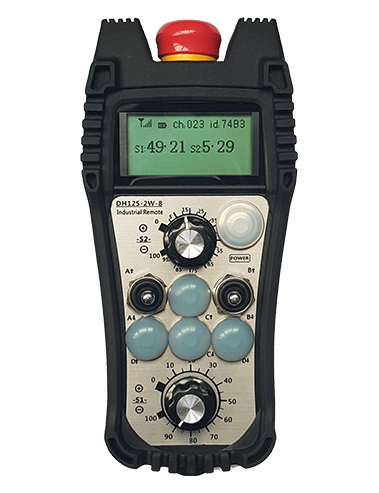
Aprašymas
1. Produkto įvadas
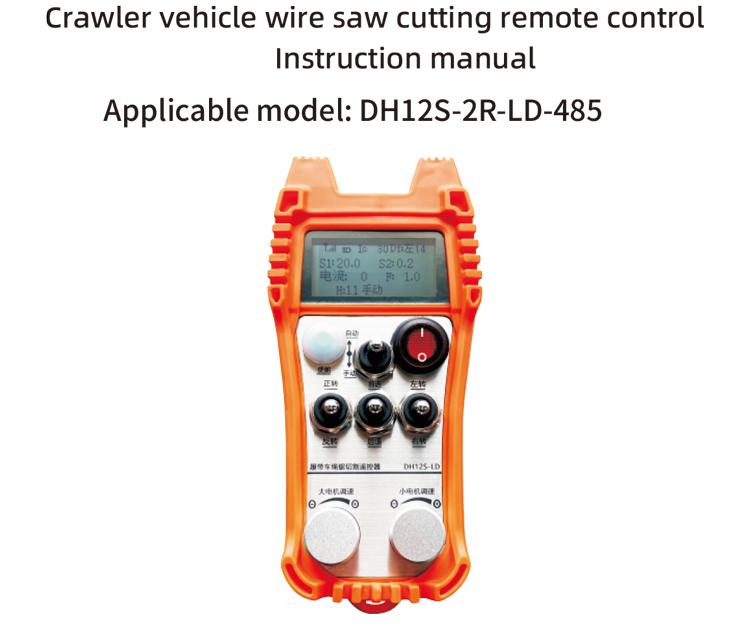
Vikšrinės transporto priemonės lynų pjūklo automatinio pjovimo nuotolinio valdymo pultas tinka vikšrinių lynų pjūklo pjovimo staklėms. Jis naudoja 485ModbusRTU protokolą, kad valdytų kairiojo ir dešiniojo vikšrinių keitiklių greičio paleidimą ir priekinį bei galinį kairės ir dešinės krypties valdymą., taip pat didelio variklio dažnio konvertavimo RTU protokolas, skirtas valdyti kairiojo ir dešiniojo vikšrinių keitiklių greičio paleidimą ir priekinį bei galinį kairės ir dešinės krypties valdymą., ir didelio variklio dažnio konvertavimo viršsrovių analizė ir palyginimas, automatiškai sureguliuokite kairiojo ir dešiniojo vikšro greitį realiuoju laiku, kad būtų pasiekta automatinio pjovimo funkcija.
2. Produkto savybės
1. Priimkite 433MHz belaidžio ryšio technologiją, Belaidžio veikimo atstumas yra 100 metrai.
2. Priimkite automatinio dažnio šuolio funkciją, naudoti 32 belaidžių nuotolinio valdymo pultelių rinkiniai vienu metu, nedarydami įtakos vienas kitam.
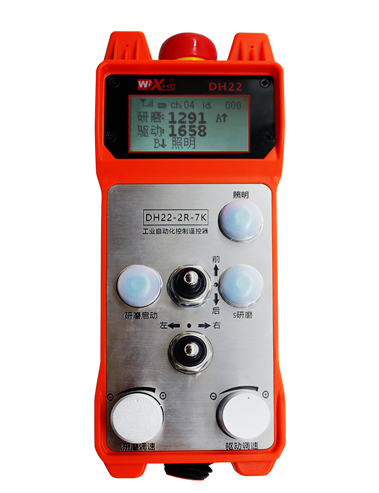
3. Palaikykite visus keitiklius su 485-Modbus RTU protokolu. Inverterių prekės ženklai buvo pritaikyti, įskaitant:Šanchajus Xielinas, Fuji, Inovacijos, Zhongchen, INVT, Ančuanda. Jei prekės ženklas nėra ada, susisiekite su mumis dėl pritaikymo.
4. Palaikykite didelio variklio keitiklio paleidimą, greičio reguliavimas, ir dabartinis skaitymas.
5. Palaikykite kairiojo ir dešiniojo vikšrinio keitiklio greičio reguliavimą, pradėti, valdymas priekyje ir gale kairėje ir dešinėje.
6. Palaikykite kairiojo ir dešiniojo vikšrinio keitiklio tiesios linijos korekciją, kad mašina judėtų tiesia linija.
7. Atraminio lyno pjūklo automatinio pjovimo funkcija, automatiškai sureguliuoja kairiojo ir dešiniojo vikšro greitį realiuoju laiku pagal didelę variklio srovės informaciją.
8. Tuo pačiu metu, jis suderinamas su tiesioginiu IO išėjimu, kad būtų galima valdyti variklio paleidimą ir sustabdymą, ir analoginės įtampos išėjimas, skirtas valdyti variklio greitį.
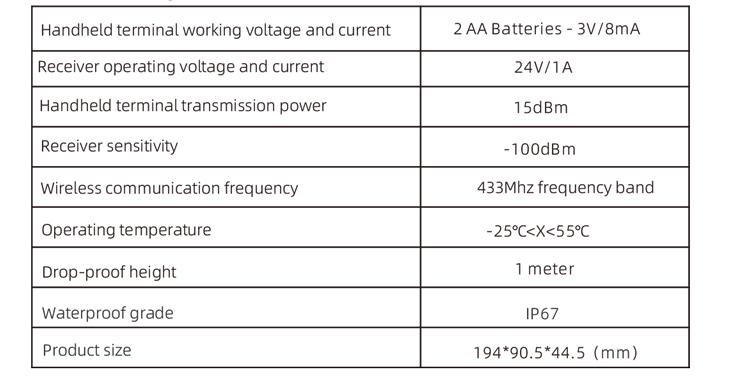
3. Produkto specifikacijos
4. Produkto funkcijos įvadas

Pastabos:
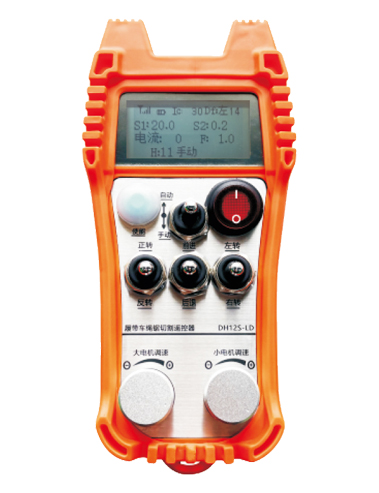
①Ekrano ekranas:

② Režimo jungiklis:
Naudojant 2 lygių jungiklį, galima perjungti automatinį ir rankinį režimus, ir atitinkamas režimas bus rodomas perjungimo ekrane.
③ Įjungti:
Kombinuoti mygtukai, Norint atlikti kai kurias operacijas, reikia palaikyti nuspaudus įjungimo mygtuką, Daugiau informacijos rasite kiekvieno jungiklio instrukcijose.
④ Didelis variklio jungiklis:
Naudojant 3 greičių atstatymo jungiklį, traukdami šį jungiklį galite valdyti didelio variklio sukimąsi pirmyn ir atgal. Išleidus, valstybė išliks, ir ekrane bus atitinkami rodmenys. T rodyklė rodo sukimąsi į priekį, o rodyklė y rodo sukimąsi atgal.
⑤ Mažas variklio pirmyn/atgal jungiklis:
Naudojant 3 greičių savaime užsifiksuojantį jungiklį, traukdami šį jungiklį galite valdyti mažą variklį, kad jis judėtų pirmyn ir atgal. Ekrane bus rodomas atitinkamas ekranas, t rodyklė rodo pirmyn ir ↓ rodyklė atgal.
⑥ Nuotolinio valdymo maitinimo jungiklis:
Įjungtas nuotolinio valdymo pulto ekranas.
⑦ mažas variklio pasukimo jungiklis:
Naudojant 3 greičių atstatymo jungiklį, kai valdoma rankiniu būdu, mažas variklis gali būti valdomas sukant į kairę arba į dešinę. Kartą paleistas, nuotolinio valdymo pultas automatiškai sustabdys šį veiksmą.Kai į priekį, pasukite šį jungiklį ir ekrane pasirodys atitinkamas ekranas + rodyklė rodo posūkį į kairę, ir – rodyklė rodo posūkį į dešinę.Kai veikia atbuline eiga, pasukite šį jungiklį ir ekrane pasirodys atitinkamas ekranas + rodyklė rodo posūkį į kairę, ir – rodyklė rodo posūkį į dešinę. Paspauskite ir palaikykite įjungimo mygtuką, tada pasukite šį jungiklį, kad atliktumėte stacionaraus sukimo funkciją, greitinant posūkį.
⑧ Didelis variklio greičio reguliavimas:
Naudojant kelių pasukimų kodavimo rankenėlę, pasukite rankenėlę, kad sureguliuotumėte didelio variklio greitį S1 Kiekvienam 1 tinklelio sukimasis, didelio variklio greičio reikšmė pasikeičia apytiksliai 0.2 vienetų, ir greitas sukimasis gali greitai pakeisti didelio variklio greičio vertę.
9 Mažas variklio greičio reguliavimas (tiesinė korekcija):Norėdami naudoti kelių pasukimų kodavimo rankenėlę, rankiniu režimu, už kiekvieną 1 pasukti rankenėlę, mažo variklio greičio reikšmė pasikeičia apytiksliai 0.1 vienetų. Greitas sukimasis gali greitai pakeisti mažo variklio greičio vertę.
Automatiniu režimu, paspauskite įjungimo mygtuką ir pasukite 1 tinklelis kiekvieną kartą. Mažo variklio greičio ribinė vertė F pasikeičia maždaug 0.1 vienetų. Greitas sukimasis gali greitai pakeisti mažo variklio greičio ribinę vertę. Paspauskite įjungimo mygtuką, pasukite rankenėlę į dešinę, o tiesios linijos korekcijos ekrane rodoma D f: kairėje. Kiekvienas rankenėlės pasukimas didėja 1 vienetas; Pasukite kairę rankenėlę, tiesios linijos korekcijos ekranas: Df: Teisingai. Kiekvienas rankenėlės pasukimas didėja 1 vienetas, ir kiekvienas korekcijos blokas atitinka variklio greičio valdymo AVI įtampą apie 0.02 V.
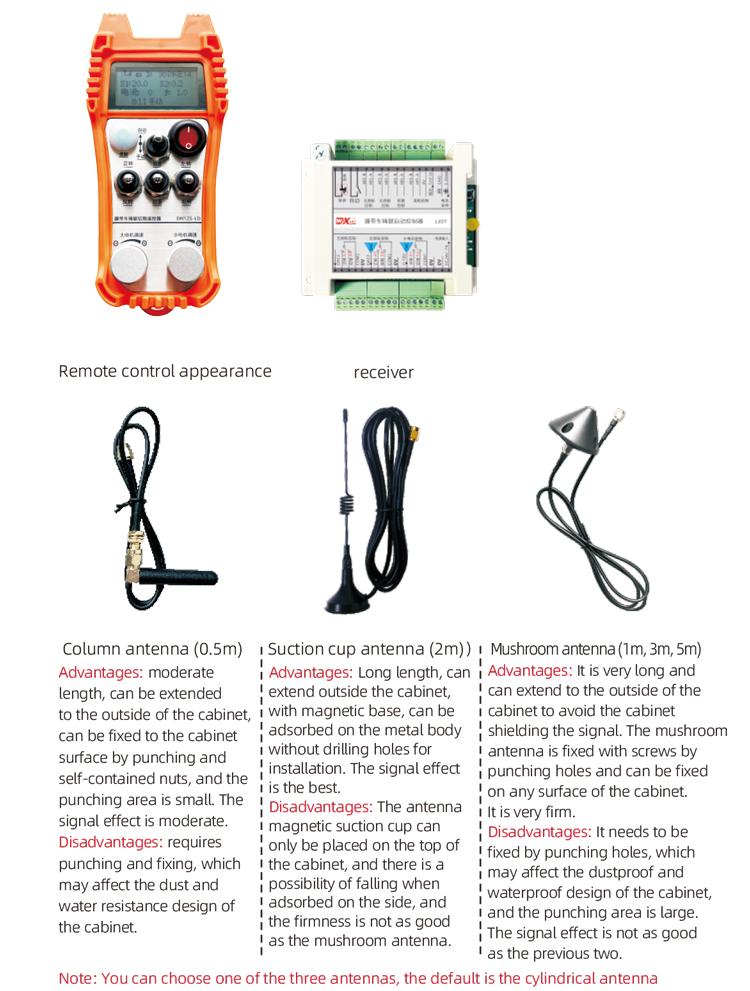
5. Gaminio priedų schema
6. Produkto diegimo vadovas
6.1 Produkto diegimo žingsniai
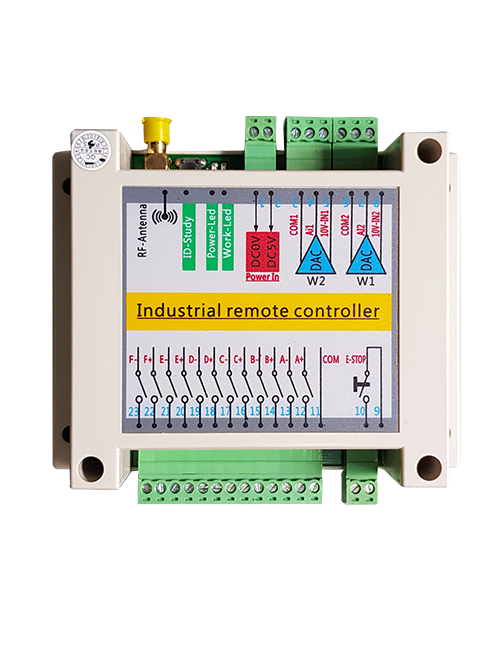
1. Įstatykite imtuvą į elektros spintelę per užpakalinėje dalyje esančią sagtį, arba įstatykite jį į elektros spintelę per varžtų skylutes keturiuose imtuvo kampuose.
2. Žiūrėkite mūsų imtuvo laidų schemą, palyginkite savo įrangą vietoje, ir laidais prijunkite įrangą prie imtuvo.
3. Sutvarkius imtuvą, turi būti prijungta antena su imtuvu, o išorinis antenos galas turi būti sumontuotas arba dedamas už elektros spintos. Norint gauti geriausią signalo efektą, rekomenduojama jį pastatyti ant elektros spintelės viršaus. Draudžiama anteną palikti neprijungtą arba dėti anteną elektros spintelės viduje, dėl to signalas gali prastai ir gali būti netinkamas naudoti.
4. Pagaliau, įdėkite bateriją į nuotolinio valdymo pultą, priveržkite akumuliatoriaus dangtelį, tada įjunkite nuotolinio valdymo pulto maitinimo jungiklį. Po to, kai nuotolinio valdymo pulto ekrane rodoma įprasta darbo sąsaja, galite atlikti nuotolinio valdymo pultą.
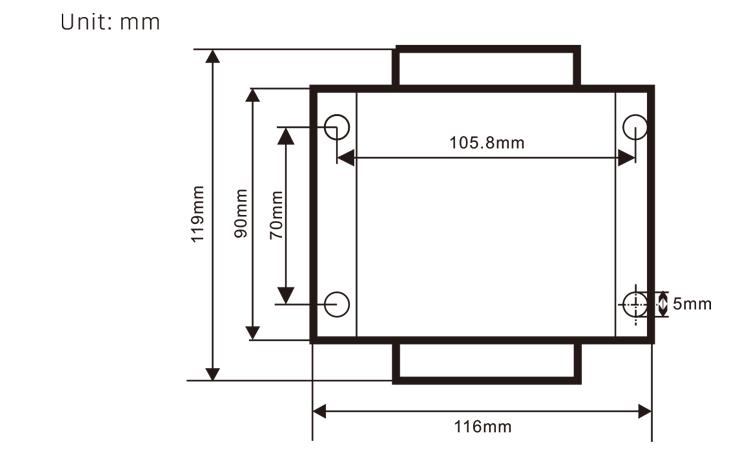
6.2 Imtuvo montavimo matmenys
6.3 Imtuvo laidų atskaitos schema

7. Gaminio naudojimo instrukcijos
7.1 Nuotolinio valdymo pulto parametrų nustatymai
Kaip įvesti nuotolinio valdymo pulto foninius parametrus: pasukite režimo jungiklį į rankinį režimą, sureguliuokite mažo variklio greitį 25, arba 0, 10, 20, 40, 50, ir pasukite didelio variklio priekinį jungiklį aukštyn 3 kartus ir žemyn 3 kartų;
Naudokite “Mažo variklio greičio valdymas” rankenėlę, kad atvertumėte puslapį, paspauskite Įjungti ir pasukite mažo variklio greičio valdymo rankenėlę, kad pakeistumėte parametrus; po modifikavimo, paversk puslapį iki galo, pasirinkite Išsaugoti ir išeiti, ir paspauskite mygtuką Įjungti, kad išeitumėte iš meniu;
Parametrai yra tokie:Maksimali srovė: didelis variklio srovės grįžtamojo ryšio verčių diapazonas, nustatymo diapazonas 15-200A, Numatytasis 60;
Greičio valdymo parametrai: automatinis režimas mažas variklis automatinis pagreičio greitis, kuo mažesnis tuo greičiau, nustatymo diapazonas 200-1500, Numatytasis 1000;
Lėtėjimo parametras: Nustatykite viršutinę leistino variklio greičio pokyčio ribą. Kai srovė pasikeičia virš šios vertės, jis sulėtės. Kuo jis mažesnis, tuo greičiau sulėtės kairysis ir dešinysis varikliai. Diapazonas yra 05-12, ir numatytasis yra 06;
Pagreitis A1: Kuo didesnė vertė, tuo greičiau didėja variklio greitis, diapazonas 00-06, numatytasis 01; Lėtėjimas A2: Kuo didesnė vertė, tuo greičiau mažėja variklio greitis, diapazonas 00-06, Numatytasis 02;
Įjungti greičio reguliavimą: Ar reikia įjungti mažo variklio greičio reguliavimą, 00 nėra įjungtas, 01 yra įjungtas, Numatytasis 01;
Paleidimo savaiminis užraktas: Ar didelis variklis automatiškai užsifiksuos atleidus pirmyn ir atgal jungiklį, 00 nėra prižiūrimas, 01 yra išlaikomas, Numatytasis 01;
Maksimali kelionė: Maksimalus kairiojo ir dešiniojo variklių greitis, diapazonas 10-100, Numatytasis 50;
Pjaustymo srovė: Maksimali pjovimo srovė, ekrane rodoma IC reikšmė, diapazonas 15-160, Numatytasis 30, ekrane rodomas IC: 30. Viršutinė šio parametro riba = didžiausia srovė x 80%;
Numatytasis greičio apribojimas: Numatytasis mažo variklio automatinio pjovimo greitis paleidžiant, diapazonas 00-100, Numatytasis 10, ekrane rodoma F1.0, šis parametras yra tikslus tik tada, kai nustatyta maksimali eiga 50.
Belaidis kanalas: Numatytasis yra 10. Kai nuotolinio valdymo pulto signalas nestabilus arba vietoje yra signalo trukdžių, galite pakeisti šį parametrą, kad perjungtumėte kanalus, kad išvengtumėte trikdžių;
Greičio apribojimo poslinkis: Viršutinė mažo variklio automatinio pjovimo greičio riba,diapazonas 00-200, Numatytasis 60, ekrane rodoma 6.0; Ekrano vertės viršutinė riba = greičio ribos poslinkis × 0.1;
Maksimalus šeimininkas: Didžiausias didelio variklio greitis, diapazonas 10-100, Numatytasis 50;
Mbus įrenginys ( privalomas ): didelis variklio keitiklio modelių pasirinkimas, diapazonas 00-03, Numatytasis 03;
00- Šanchajus Xielinas 01 Fuji
02- INVT 03 Inovacija (Zhongchen, Robicon)
SBUS įranga (privalomas): Mažo variklio dažnio keitiklio modelio pasirinkimas, diapazonas 00-05, Numatytasis 03;
00- Šanchajus Xielinas 01 Fuji
02- INVT 03 Inovacija (Zhongchen, Robicon)
04-Anchuanda 05 – Nėra
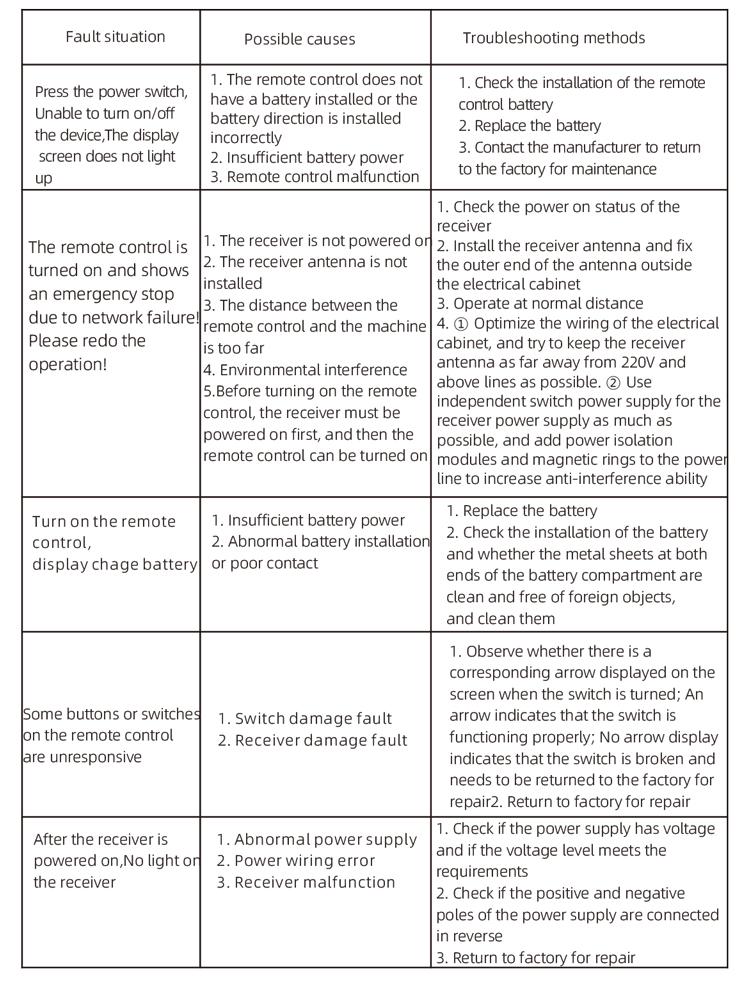
8. Produkto trikčių šalinimas
7.2 Dažnio keitiklio parametrų nustatymas
1. Komandų šaltinio pasirinkimas: Komunikacijos komandų kanalas
2. Pagrindinio dažnio šaltinio pasirinkimas: duotas bendravimas
3. Perdavimo greitis: 19200
4. Duomenų formatas: Jokio patikrinimo, duomenų formatą<8-N-1>
5. Vietinis adresas: Kairįjį dažnio keitiklį nustatykite į 1, tinkamas dažnio keitiklis 2, ir didelio variklio dažnio keitiklio į 3
7.3 Nuotolinio valdymo pulto naudojimo instrukcijos
1. Įjunkite mašiną, įjunkite nuotolinio valdymo pultą, įveskite nuotolinio valdymo pulto foną, nustatyti nuotolinio valdymo pulto fono parametrus, Daugiausia tai yra mažų ir didelių variklių dažnio keitiklių modelių nustatymas (praleiskite šį veiksmą, jei mašinos gamintojas juos jau nustatė);
2. Nustatykite dažnio keitiklio parametrus (praleiskite šį veiksmą, jei mašinos gamintojas jį jau nustatė);
3. Nustatykite nuotolinio valdymo pultą į rankinį režimą, ir tada nuotolinio valdymo pultu perkelkite mašiną į darbinę padėtį;
4. Rankiniu režimu, nustatykite didelio variklio pjovimo srovės IC vertę ir didelio variklio greitį;
5. Perjunkite į automatinį režimą ir nustatykite mažo variklio pjovimo greičio ribą F;
6. Automatiniu režimu, pasukite didelio variklio jungiklį į priekį, kad paleistumėte didelį variklį, tada pasukite mažo variklio jungiklį į pirmyn arba atgal. Nuotolinio valdymo pultas įjungia automatinio pjovimo režimą ir pradeda pjauti.
9.Priežiūra
1. Naudokite jį sausoje aplinkoje kambario temperatūroje ir slėgyje, kad prailgintumėte tarnavimo laiką.
2. Kad prailgintumėte tarnavimo laiką, nenaudokite neįprastose aplinkose, tokiose kaip lietus ir vandens burbuliukai.
3. Laikykite švarų akumuliatoriaus skyrių ir metalinių skeveldrų sritį.
4. Nepažeiskite nuotolinio valdymo pulto dėl suspaudimo ir kritimo.
5. Jei ilgai nenaudojamas, išimkite bateriją ir laikykite nuotolinio valdymo pultą bei bateriją švarioje ir saugioje vietoje.
6.Sandėliavimo ir transportavimo metu, reikia atkreipti dėmesį į atsparumą drėgmei ir smūgiams.
10. Informacija apie saugą
1. Prieš naudodami atidžiai perskaitykite instrukcijas ir neprofesionalams uždrausti dirbti.
2. Pakeiskite bateriją laiku, kai akumuliatorius yra per mažas, kad išvengtumėte klaidų dėl nepakankamos energijos, dėl to nuotolinio valdymo pultas gali neveikti.
3. Jei reikia remonto, Kreipkitės į gamintoją. Jei žala atsirado dėl savarankiško remonto, Gamintojas nepateiks garantijos