Atramos 2 pritaikomi mygtukai, Su „Switch“ tipo IO signalo išvestimi;
Atramos -2 ašies valdymas;
Palaiko 3 lygio padidinimo valdymą;

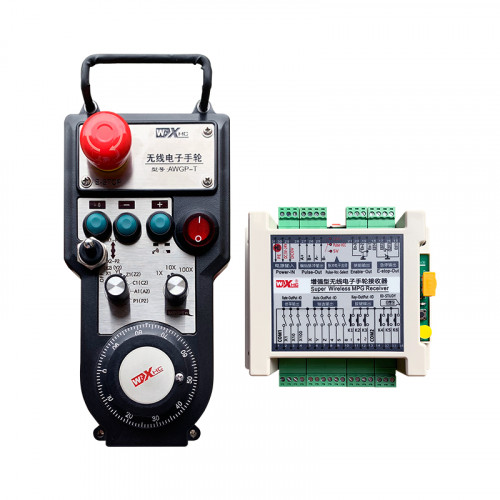
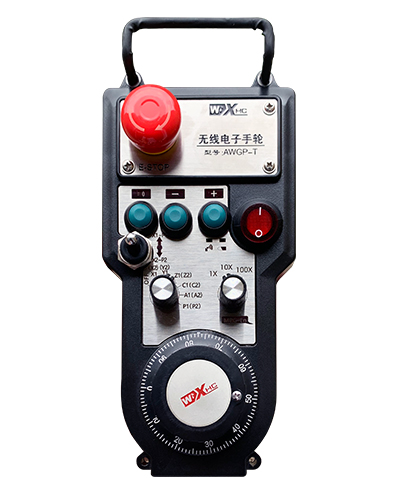
1.Produkto įvadas
2. Produkto funkcinės savybės
| Belaidžio nuotolinio valdymo pulto darbinė įtampa ir srovė |
3V/14MA
|
| Baterijos specifikacijos | 2 AA šarminės baterijos, dydis 5 |
| Belaidžio nuotolinio valdymo pulto žemos įtampos signalizacijos diapazonas | < 2.3V |
| Imtuvo maitinimo įtampa | DC5V-24V/A |
| Imtuvo avarinio sustabdymo išėjimo apkrovos diapazonas | AC125V-1A/DC30V-2A |
| Imtuvo išvesties apkrovos diapazonas |
AC125V-1A/DC30V-2A
|
| Imtuvo pasirinktinio mygtuko išvesties apkrovos diapazonas | DC24V/50mA |
| Imtuvo ašies pasirinkimo išėjimo apkrovos diapazonas | DC24V/50mA |
| Imtuvo padidinimo išvesties apkrovos diapazonas | DC24V/50mA |
| Rankinio terminalo perdavimo galia |
15dBm
|
| Imtuvo priėmimo jautrumas | -100dBm |
| Belaidžio ryšio dažnis | 433MHz dažnių juosta |
| Belaidžio ryšio atstumas | Atstumas be kliūčių 40 metrai |
| Darbinė temperatūra | -25℃ < X < 55℃ |
| Aukštis nuo kritimo | 1 (matuoklis) |
| Pasirinktinis mygtukų kiekis | 2 |


① Impulsų kodavimo įrenginys:
Paspauskite ir palaikykite įjungimo mygtuką, papurtykite impulsų kodavimo įrenginį, skleidžia impulsinį signalą,ir valdyti mašinos ašies judėjimą.
② Įjungti mygtukas:
Paspauskite bet kurį įjungimo mygtuką iš abiejų pusių, ir du imtuvo įgalinimo IO išėjimų rinkiniai veiks. Atleiskite įjungimo mygtuką, kad atjungtumėte įgalinimo IO išvestį; Ir prieš perjungdami ašies pasirinkimą padidinkite ir papurtykite rankratį,Įjungimo mygtuką reikia palaikyti nuspaudus, kad jis veiktų; Šią funkciją galima atšaukti naudojant konfigūravimo programinę įrangą.
③ Indikacinės lemputės:
Kairės pusės šviesa: įjungti šviesą,rankratis naudoja ašį, kad pasirinktų OFF, kad įjungtumėte maitinimą, ir ši lemputė dega įjungus maitinimą;
Vidutinė šviesa: signalinė lemputė, kuri užsidega, kai veikia bet kuri rankinio rato funkcija, ir neužsidega, kai nėra operacijos;
Dešinės pusės šviesa: Žemos įtampos aliarmo lemputė, žemas akumuliatoriaus lygis,ši šviesa mirksi arba lieka įjungta, bateriją reikia pakeisti.
④ Avarinio stabdymo mygtukas:
Paspauskite avarinio stabdymo mygtuką, ir du imtuvo avarinio sustabdymo IO išėjimų rinkiniai bus atjungti, ir visos rankinio rato funkcijos neveiks.
⑤ Didinimo jungiklis:
Paspauskite ir palaikykite įjungimo mygtuką, kad perjungtumėte didinimo jungiklį, kuriuo galima perjungti rankračiu valdomą didinimą.
⑥ Ašies pasirinkimo jungiklis (maitinimo jungiklis):
Paspauskite ir palaikykite įjungimo mygtuką, kad perjungtumėte ašies pasirinkimo jungiklį, kuri gali perjungti rankračiu valdomą judėjimo ašį. Perjunkite šį jungiklį iš OFF į bet kurią ašį ir įjunkite rankinio rato maitinimą.
⑦ Pasirinktinis mygtukas:
Du pasirinktiniai mygtukai, kiekvienas atitinka IO išvesties tašką imtuve.

1. Įstatykite imtuvą į elektros spintelę per užpakalinėje dalyje esančią sagtį, arba įdėkite jį į spintelę per varžtų skylutes keturiuose imtuvo kampuose.
2. Peržiūrėkite mūsų imtuvo laidų schemą ir palyginkite ją su savo vietoje esančia įranga. Prijunkite įrangą prie imtuvo kabeliais.
3.Tinkamai pritvirtinus imtuvą, turi būti prijungta antena su imtuvu, o išorinis antenos galas turi būti sumontuotas arba dedamas už elektros spintos. Norint gauti geriausią signalo efektą, rekomenduojama jį pastatyti ant elektros spintelės viršaus. Draudžiama anteną palikti neprijungtą arba dėti į elektros spintelę, nes dėl to signalas gali būti netinkamas naudoti.
4. Pagaliau, įjunkite rankinio rato maitinimo jungiklį, ir jūs galite valdyti mašiną nuotoliniu būdu, naudodami rankinį ratą.
6.2 Imtuvo montavimo matmenys

6.3 Imtuvo laidų atskaitos schema

7. Gaminio naudojimo instrukcijos
1. Įjunkite mašiną ir imtuvą. Imtuvo veikimo indikatoriaus lemputė mirksi. Įdėkite akumuliatorių į belaidį elektroninį rankratį, pritvirtinkite akumuliatoriaus dangtelį, ir
įjunkite belaidžio elektroninio rankračio maitinimo jungiklį. Šviečia rankinio rato akumuliatoriaus lygio indikatoriaus lemputė.
2. Pasirinkite koordinačių ašį: Paspauskite ir palaikykite įjungimo mygtuką, perjunkite ašies pasirinkimo jungiklį, ir pasirinkite ašį, kurią norite valdyti.
3. Pasirinkite padidinimą: Paspauskite ir palaikykite įjungimo mygtuką, perjunkite didinimo jungiklį,ir pasirinkite norimą padidinimo lygį.
4. Judanti ašis: Paspauskite ir palaikykite įjungimo mygtuką, pasirinkite ašies pasirinkimo jungiklį, pasirinkite didinimo jungiklį, tada pasukite impulsų kodavimo įrenginį. Pasukite pagal laikrodžio rodyklę, kad judintumėte
teigiama ašis ir prieš laikrodžio rodyklę, kad judintumėte neigiamą ašį.
5. Paspauskite ir palaikykite bet kurį pasirinktinį mygtuką, ir bus įjungta atitinkamo mygtuko IO išvestis imtuve. Atleiskite mygtuką, ir išėjimas bus išjungtas.
6. Paspauskite avarinio stabdymo mygtuką, bus atjungtas atitinkamas imtuvo avarinio sustabdymo IO išėjimas, rankinio rato funkcija bus išjungta,atleiskite avarinio stabdymo mygtuką, avarinio sustabdymo IO išėjimas bus uždarytas, ir bus atkurta rankinio rato funkcija.
7. Jei rankratis tam tikrą laiką nenaudojamas, jis automatiškai persijungs į miego režimą, kad sumažintų energijos suvartojimą. Kai jis vėl naudojamas, rankratį galima įjungti paspaudus įjungimo mygtuką.
8. Jei rankratis nenaudojamas ilgą laiką, rekomenduojama rankinio rato veleną perjungti į OFF padėtį, išjunkite rankračio maitinimą, ir prailginti baterijos veikimo laiką.
8. Gaminio modelio aprašymas

① :ZTWGP atstovauja išvaizdos stiliui
②:Impulsų išvesties parametrai:
01: Nurodo, kad impulso išvesties signalas yra A, B; Impulsinė įtampa 5V; impulsų kiekis 100PPR.
02:Nurodo, kad impulsų išvesties signalai yra A ir B; Impulsinė įtampa 12V; impulsų kiekis 100PPR.
03:Nurodo, kad impulsų išvesties signalai yra A, B, A -, B -; Impulsinė įtampa 5V; impulsų kiekis 100PPR.
04:Nurodo žemo lygio NPN atviros grandinės išvestį, su A ir B impulsiniais išvesties signalais;Impulsų skaičius yra 100 PPR.
05:Nurodo aukšto lygio PNP šaltinio išvestį, su A ir B impulsiniais išvesties signalais; Impulsų skaičius yra 100 PPR.
③:Nurodo ašies pasirinkimo jungiklių skaičių, 2 atstovauja 2 kirvius.
④:Nurodo ašies pasirinkimo jungiklio signalo tipą, A reiškia išvesties signalą iš taško į tašką, ir B reiškia užkoduotą išvesties signalą.
⑤:Nurodo daugybos jungiklio signalo tipą, A reiškia išvesties signalą iš taško į tašką, ir B reiškia užkoduotą išvesties signalą.
⑥:Nurodo pasirinktinių mygtukų skaičių, 2 atstovauja 2 Pasirinktiniai mygtukai.
⑦:Rodo sistemos rankinio rato maitinimo šaltinį, ir 05 reiškia 5V maitinimo šaltinį.
⑧:L žymi kairįjį stulpelį (kairysis peilio laikiklis), ir R reiškia dešinįjį stulpelį (dešinysis peilio laikiklis).
9.Produkto gedimų sprendimas

1. Naudokite jį sausoje aplinkoje kambario temperatūroje ir slėgyje, kad prailgintumėte tarnavimo laiką.
2. Kad prailgintumėte tarnavimo laiką, nenaudokite neįprastose aplinkose, tokiose kaip lietus ir vandens burbuliukai.
3. Išlaikykite švarią rankinio rato išvaizdą, kad prailgintumėte jo tarnavimo laiką.
4. Prašome vengti suspaudimo, krintantis, trankymas, ir tt. kad nesugadintumėte rankračio viduje esančių precizinių komponentų ar nepadarytų tikslumo klaidų.
5. Jei ilgai nenaudojamas, laikykite rankratį švarioje ir saugioje vietoje. Sandėliavimo ir transportavimo metu, reikia atkreipti dėmesį į atsparumą drėgmei ir smūgiams.
11. Informacija apie saugą
1. Prieš naudodami atidžiai perskaitykite instrukcijas ir neprofesionalams uždrausti dirbti.
2. Jei akumuliatoriaus įkrovos lygis per žemas, pakeiskite akumuliatorių laiku, kad išvengtumėte klaidų, atsirandančių dėl nepakankamos baterijos energijos ir negalėjimo valdyti rankračio..
3. Jei reikia remonto, Kreipkitės į gamintoją. Jei žala atsirado dėl savarankiško remonto, Gamintojas nepateiks garantijos