Tautoko 2 pātene whakarite, me te putanga tohu-momo io;
Tautoko -2 Te whakahaere Axis;
Ka tautokohia te mana whakanui 3-taumata;

1.Kupu whakataki
2. Nga waahanga mahi hua
| Ngaohiko whakahaere me te naianei o te mamao ahokore |
3V/14MA
|
| Nga korero mo te pākahiko | 2 AA pākahiko kawakore, rahi 5 |
| Ngaohiko iti awhe whakaoho o te mamao ahokore | < 2.3K |
| Kaituku Tohunga Kaitiaki Mana | DC5V-24V/A |
| Awhe kawenga putanga ohotata kairiiwhi | AC125V-1A/DC30V-2A |
| Ka taea e te kaiwhiwhi te awhe kawenga putanga |
AC125V-1A/DC30V-2A
|
| Awhe kawenga putanga o te paatene ritenga a te Kaiwhiwhi | DC24V/50mA |
| Awhe kawenga putanga tuaka kaiwhiwhi | DC24V/50mA |
| Awhe kawenga putanga whakanuia te kaiwhiwhi | DC24V/50mA |
| Te mana tuku o te tauranga-a-ringa |
15dBm
|
| Kaiwhiwhi whiwhi tairongo | -100dBm |
| Te auau whakawhitiwhiti ahokore | 433MHz roopu auau |
| Te tawhiti whakawhitiwhiti ahokore | Te tawhiti kore arai o 40 mita |
| Te pāmahana mahi | -25℃ < Whakaahua x < 55℃ |
| Anti hinga teitei | 1 (mīta) |
| Te rahinga paatene ritenga | 2 |


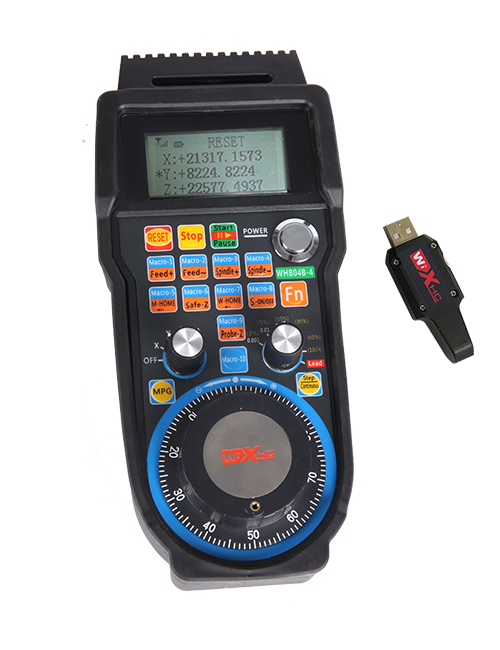
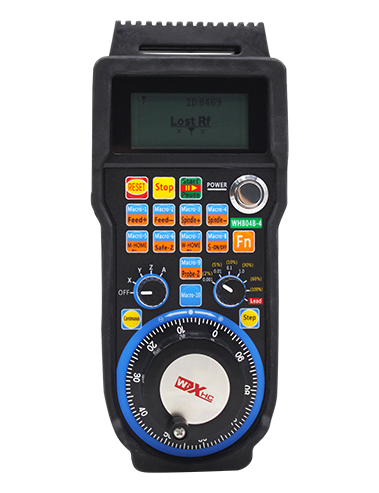
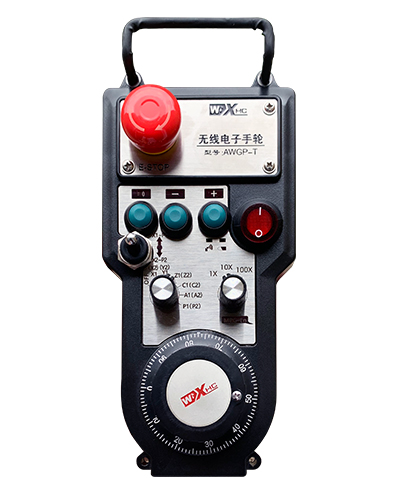
① Whakawaehere puoro:
Pēhi me te pupuri i te pātene Whakahohe, Wiri i te kaimau pulse, Te whakaputa i tetahi tohu Pulse,me te whakahaere i te nekehanga o te tuaka miihini.
② Patene Whakahohe:
Patohia te paatene whakahohe i tetahi taha, me nga huinga e rua o nga putanga IO i runga i te kaiwhiwhi ka whakahaere. Tukua te patene whakahohe hei momotu i te putanga IO whakahohe; A i mua i te huri i te whakanui i te kowhiringa tuaka me te wiri i te wira ringaringa,me pupuri te paatene whakahohe kia whai hua ai; Ka taea te whakakore i tenei mahi ma te rorohiko whirihoranga.
③ Nga rama tohu:
Maama taha maui: mana ki te marama,ka whakamahi te wīra ringa i te tuaka hei kowhiri i te OFF mo te hiko, a ka noho tonu tenei rama i muri i te hiko;
Maama waenga: he rama tohu e whiti ana i te wa e whakahaere ana i tetahi mahi o te wira ringaringa, a kare e marama ana karekau he mahi;
Marama taha matau: He iti te marama whakaohooho, taumata pākahiko iti,ka whiti tenei rama, ka noho tonu ranei, me whakakapi te pākahiko.
④ Patene mutu ohorere:
Pēhi i te pātene aukati ohorere, me nga huinga e rua o te wa ohorere o te aukati io i te kaiwhiwhi ka whakakorehia, me nga mahi katoa o te ringaringa ka kore e tika.
⑤ Whakanuia te whakawhiti:
Pēhia me te pupuri i te paatene whakahohe hei huri i te pana whakanui, ka taea te huri i te whakanui e whakahaeretia ana e te wira ringaringa.
⑥ Whakawhiti kōwhiringa tuaka (Huringa Poto):
Pēhia me te pupuri i te paatene whakahohe hei huri i te pana whiriwhiri tuaka, ka taea te huri i te tuaka nekehanga e whakahaeretia ana e te wira ringaringa. Hurihia tenei pana mai i OFF ki tetahi tuaka ka whakakāhia te hiko wīra ringa.
⑦ Patene ritenga:
E rua nga patene ritenga, ia tangata e hāngai ana ki te wāhi putanga IO ki te kaiwhiwhi.

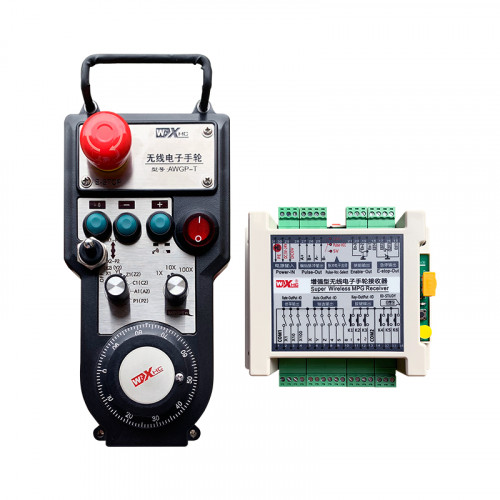
1. Tāutahia te kaiwhiwhi ki te rūnanga hiko na roto i te maaka i te taha o muri, Ka whakauruhia ranei ki roto i te rūnanga na roto i nga kohinga whiu i nga kokonga e wha o te kaiwhiwhi.
2. Tirohia ki to maatau kaiwhiwhi i te hoahoa me te whakataurite i o taputapu taputapu-a-papa. Honoa te taputapu ki te kaikawe ma nga taura.
3.I muri i te whakatika tika te kaiwhiwhi, Ko te antena e rite ana ki te kaiwhiwhi me hono, a ko te pito o waho o te antenna me whakanoho ki waho ranei o te rūnanga hiko. E taunaki ana kia whakatakotoria ki runga i te tihi o te rūnanga hiko mo te paanga tohu pai. Karekau kia waiho te antenna kia kore e hono, ka tuu ranei ki roto i te rūnanga hiko, na te mea ka kore e taea te whakamahi te tohu.
4. Rawa, whakakāhia te whakakā hiko o te wīra ringa, a ka taea e koe te whakahaere mamao i te miihini ma te whakamahi i te wira ringaringa.
6.2 Nga Taumata Whakauru

6.3 He hoahoa tohutoro a te kaiwhiwhi

7. Tohutohu Mahi Hua
1. Te hiko i runga i te miihini me te kaiwhiwhi. Ka whiti te rama tohu mahi a te kaiwhiwhi. Tāutahia te pākahiko ki roto i te wira hiko ahokore, whakamau te uhi pākahiko, me
whakakāhia te whakakā hiko o te wira hiko ahokore. Kei te ka te rama tohu taumata pākahiko o te wiriwiri.
2. Tīpakohia te toki whakarite: Pēhi me te pupuri i te pātene Whakahohe, takahurihia te pana whiriwhiri tuaka, ka tohua te tuaka e hiahia ana koe ki te whakahaere.
3. Tīkina te whakanui: Pēhi me te pupuri i te pātene Whakahohe, takahurihia te pana whakanui,ka tohua te taumata whakanui e hiahiatia ana.
4. Neke toki: Pēhi me te pupuri i te pātene Whakahohe, Tīpakohia te huringa whiriwhiri Axis, Tīpakohia te whakawhiti whakanui, katahi ka huri i te encoder pulse. Huri karaka hei neke i te
te tuaka pai me te taha karaka hei neke i te tuaka toraro.
5. Pēhi me te pupuri i tetahi pātene ritenga, a ko te patene e rite ana te putanga IO o te kaiwhiwhi ka whakakā. Tukua te paatene, a ka whakawetohia te putanga.
6. Pēhi i te pātene aukati ohorere, Ko te aukati i te aukati i te whakaputanga o te kaiwhiwhi ka whakakorehia, Ka monokia te mahi a-ringa,Tukuna te pātene aukati ohorere, Ka kati te putanga ohorere io, Na ka whakahokia mai te mahi a-ringa.
7. Mena kaore i te whakahaerehia te ringaringa mo te waa roa, ka uru aunoa ki te aratau moe hei whakaiti i te kohi hiko. Ka whakamahia ano hoki, ka taea te whakahohe i te wira ringaringa ma te pehi i te paatene whakahohe.
8. Mena kaore i te whakamahia te ringaringa mo te wa roa, e taunaki ana kia huri i te rakau wiriwiri ki te tuunga OFF, whakaweto i te mana ringaringa, ka whakawhānui i te ora pākahiko.
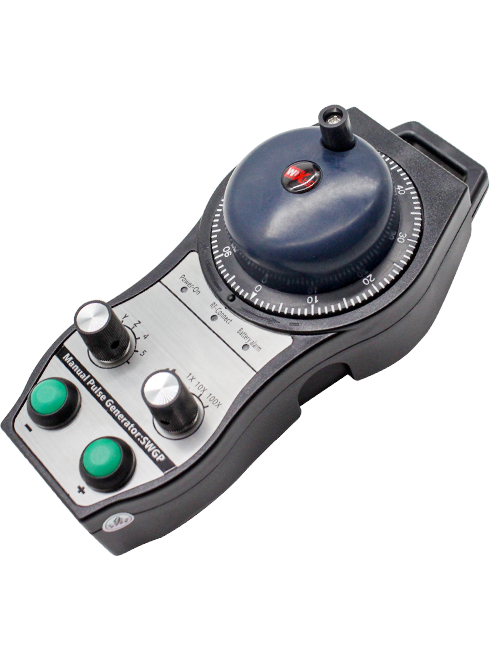
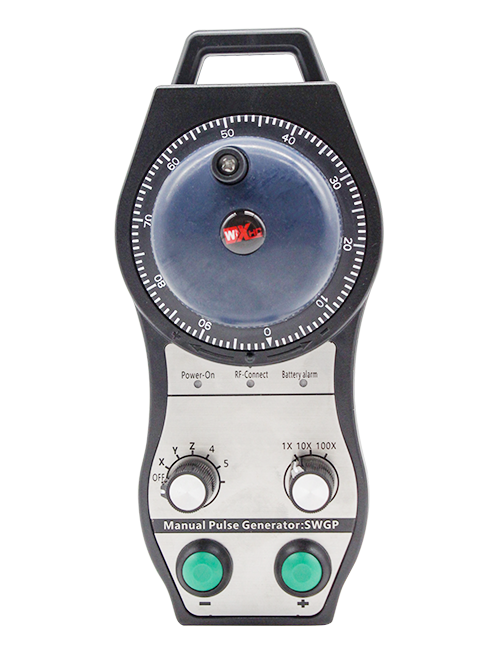
8. Whakaahuatanga Tauira Hua

① :Ko te ZTWGP te ahua o te ahua
②:Ko nga tohu whakaputa whakaputa:
01: E tohu ana ko te tohu whakaputa ko te A, B; Pulse Lolgal 5V; te nui o te pupuhi 100PPR.
02:E tohu ana ko A me B nga tohu whakaputa; Ngaohiko Pulse 12V; te nui o te pupuhi 100PPR.
03:E tohu ana ko nga tohu whakaputa ko te A, B, A -, B -; Pulse Lolgal 5V; te nui o te pupuhi 100PPR.
04:E whakaatu ana i te putanga-tuwhera o te Taumata Taumata-iti, me nga tohu putanga Pulse o A me B;Ko te maha o nga pire he 100PPR.
05:E whakaatu ana i te putanga PNP nui-taumata, me nga tohu putanga Pulse o A me B; Ko te maha o nga pire he 100PPR.
③:E tohu ana i te maha o nga huringa whiriwhiri tuaka, 2 tohu 2 oka.
④:He tohu i te momo tohu whakakā whiriwhiri tuaka, He tohu tohu tohu-ki-tohu, me te B e tohu ana i te tohu whakauru whakauru.
⑤:He tohu i te momo tohu whakarea whakarea, He tohu tohu tohu-ki-tohu, me te B e tohu ana i te tohu whakauru whakauru.
⑥:He tohu i te maha o nga paatene ritenga, 2 tohu 2 pātene ritenga.
⑦:He tohu i te tuku hiko mo te wira-a-ringa o te punaha, me 05 tohu mo te 5V mana mana.
⑧:Ko L te tohu i te pou maui (maui maui maui), ko R e tohu ana i te pou matau (te pupuri maripi matau).
9.He otinga mo nga mahi kino o nga hua

1. Whakamahia koa ki te taiao maroke i te pāmahana o te rūma me te pehanga kia whakawhānuitia tana mahi ratonga.
2. Tena ra, kaua e whakamahia te whakamahi i nga taiao kore penei i te ua me nga mirumiru wai hei whakawhānui i te koiora ratonga.
3. Kia mau ki te ahua o te ringaringa ma te horoi ki te whakawhānui i tana mahi ratonga.
4. Tena koa karohia te kotiti, hinga, tōpito, take. Hei aukati i te kino o nga waahanga tika i roto i te ringaringa, i nga hapa tika ranei.
5. Mena kaore i whakamahia mo te wa roa, Tena koa rongoa te ringaringa i te waahi ma me te haumaru. I te rokiroki me te waka, Me utu te aro ki te makuku me te aukati i te aukati.
11. Nga korero mo te Haumaru
1. Tena panuihia nga tohutohu i mua i te whakamahi me te aukati i nga umanga kore ngaio mai i te mahi.
2. Tena koa whakakapihia te pākahiko i te wa e iti ana te taumata o te pākahiko hei karo i nga hapa na te iti o te mana o te pākahiko me te kore e taea te whakahaere i te wira ringaringa..
3. Mena e hiahiatia ana te whakatikatika, Tena whakapā atu ki te kaiwhakanao. Mena he kino te kino na te whakatikatika i a ia ano, Kaore te kaiwhakanao e tuku raihana