Descrição
1. Introdução do produto
O controle remoto para corte automático da serra de corda do carro de esteira é adequado para serra de corda tipo esteira
máquinas de corte. Ele usa o 485 Protocolo Modbus RTU para controlar a frequência da trilha esquerda e direita
conversores, bem como o grande início do controle de velocidade de conversão de frequência do motor e o frontal, traseira,
controladores de direção esquerda e direita. E pode ler a corrente de trabalho da grande frequência do motor
conversor através do 485 Protocolo Modbus RTU. Analisando e comparando a corrente do
motor grande, a velocidade das faixas esquerda e direita pode ser ajustada automaticamente em tempo real para
alcançar a função de corte automático.
2. Recursos funcionais do produto
1. Adotando tecnologia de comunicação sem fio de 433 MHz, com uma distância operacional sem fio de 100 metros.
2. Adote a função automática de salto de frequência e use 32 conjuntos de controladores remotos sem fio
simultaneamente, sem afetar um ao outro.
3. Suporta todos os conversores de frequência com 485 Protocolo Modbus RTU, e frequência atualmente compatível
marcas de conversores incluem:Xangai Xielin, Fuji, Huachuan, Zhongchen, INVT, e . Para marcas
que não são compatíveis, entre em contato conosco para personalização.
4. Regulação de velocidade de suporte, começando, e leitura de corrente de grandes conversores de frequência de motores.
5. Suporta regulação de velocidade do conversor de frequência de faixa esquerda e direita, começando, frente, voltar, controle esquerdo e direito.
6. Suporta correção linear dos conversores de frequência da trilha esquerda e direita para manter a máquina andando em um
linha reta.
7. Suporta função de corte automático de serra de corda, ajustar automaticamente a velocidade da trilha esquerda e direita em
em tempo real de acordo com as informações atuais do grande motor.
8. Também é compatível com controle de saída IO direto para partida e parada do motor, e saída de tensão analógica
controle de velocidade do motor.
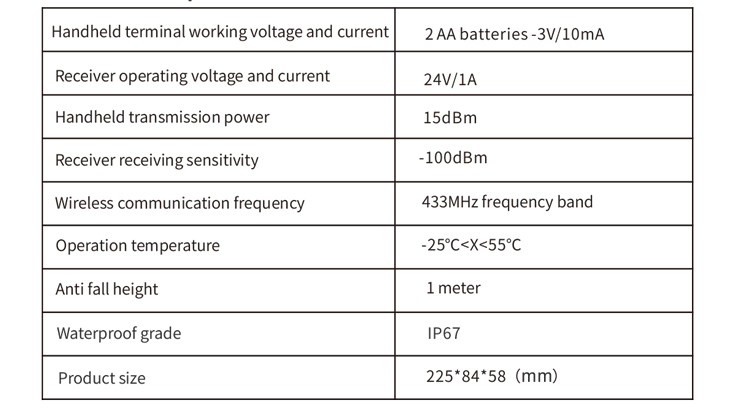
3. Especificações do produto
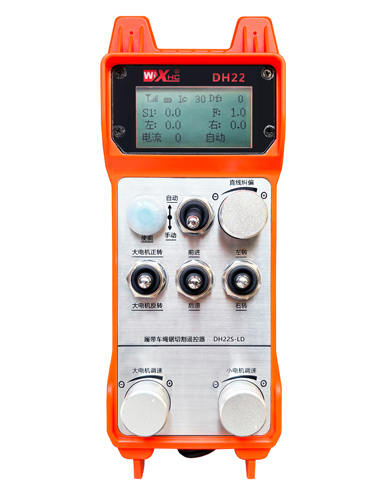
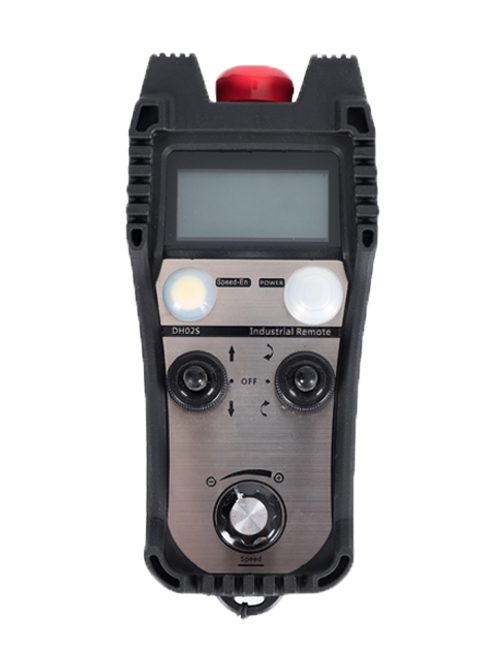
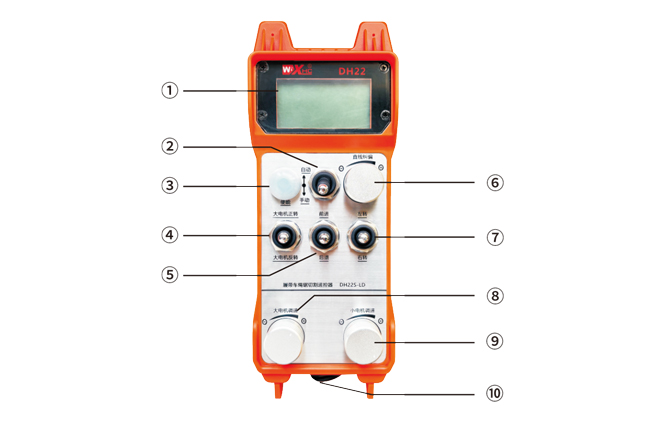
4. Introdução à função do produto
Notas:
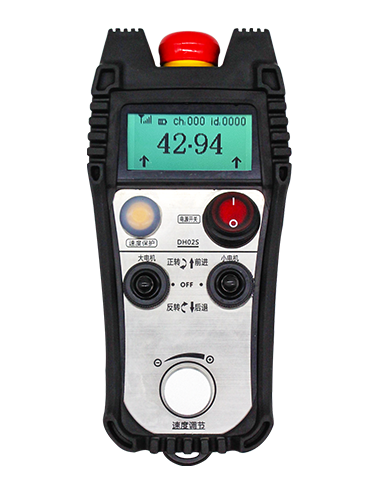
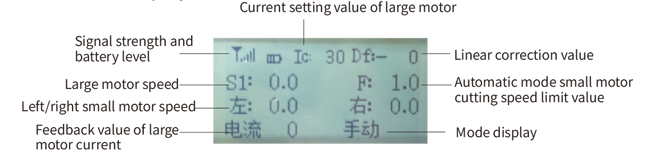
①Exibição de tela:
②Interruptor de modo:
③Ativar:
Botões de combinação, algumas operações exigem manter pressionado o botão de ativação para operação,veja as instruções de cada switch para obter detalhes.
④Interruptor de motor grande:
Usando um interruptor de reinicialização de 3 velocidades, puxar esta chave pode controlar a rotação para frente e para trás do motor grande. Depois de liberá-lo, o estado permanecerá, e haverá exibições correspondentes na tela. A seta S1↑ indica rotação para frente, e a seta S1 ↓ indica rotação inversa.
⑤Interruptor de avanço/reverso do motor pequeno:
O pequeno motor está equipado com um interruptor de travamento automático de 3 velocidades na frente dele. Pressionar o botão de ativação e puxar esta chave pode controlar o pequeno motor para avançar e retroceder, e a exibição correspondente aparecerá na tela. A seta ↑↑ representa avançar, e a seta ↓↓ representa para trás.
⑥ Correção de linha reta:
Usando um botão codificador multivoltas, pressione o botão ativar, gire o botão para a direita, e exibir a correção em linha reta: Df: O botão giratório esquerdo aumenta em 1 unidade por rotação, e a esquerda
a velocidade do motor aumenta em 0.1 unidade; Gire o botão esquerdo, exibição de correção de linha reta: Df: À direita, cada volta do botão aumenta em 1 unidade, e a velocidade do motor certo aumenta
por 0.1 unidade.
⑦Interruptor de giro do motor pequeno:
Usando um interruptor de reinicialização de 3 velocidades, quando operado manualmente, o pequeno motor pode ser controlado para virar à esquerda ou à direita. Uma vez liberado, o controle remoto interromperá automaticamente esta ação. No estado avançado, quando esta chave é ligada, a exibição correspondente aparecerá na tela. A seta ←↑ indica curva à esquerda, e a seta ↑→ indica curva à direita. Quando no modo reverso, gire esta chave e a exibição correspondente aparecerá na tela. A seta ←↓ indica curva à esquerda, e a seta ↓→ indica curva à direita.
⑧ Grande regulação da velocidade do motor:
Usando um botão codificador multivoltas, girando 1 grade de cada vez, o valor da velocidade do motor grande muda em aproximadamente 0.2 unidades. A rotação rápida pode modificar rapidamente o valor da velocidade do motor grande.
⑨ Regulação de velocidade do motor pequeno:
Usando um botão codificador multivoltas, em modo manual, pressione o botão de ativação e gire uma grade de cada vez,o valor da velocidade dos pequenos motores esquerdo e direito muda em cerca de 0.1 unidades, e a rotação rápida pode modificar rapidamente o valor da velocidade do motor pequeno. No modo automático, pressione o botão ativar e gire uma grade de cada vez,o valor limite de velocidade F do motor pequeno muda aproximadamente 0.1 unidades. A rotação rápida pode modificar rapidamente o valor limite de velocidade do motor pequeno.
⑩ Interruptor liga / desliga do controle remoto
A tela do controle remoto está ligada.
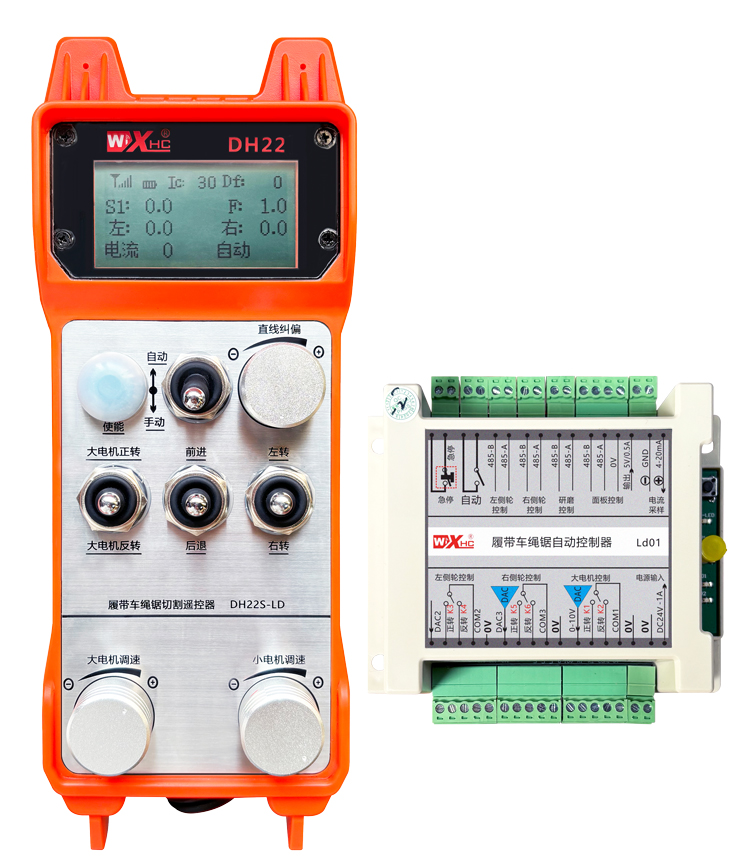
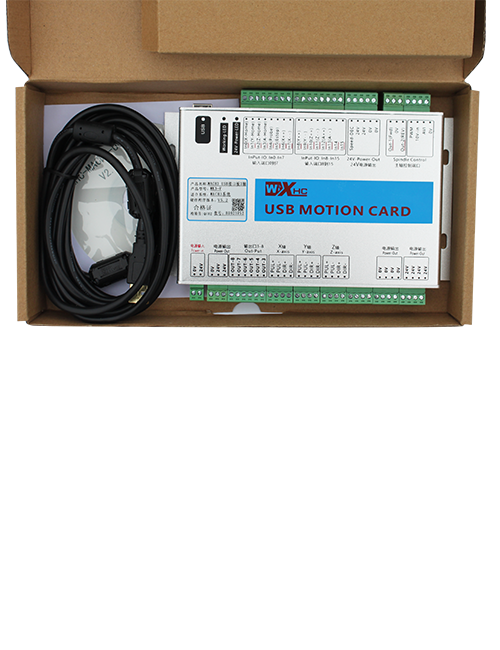
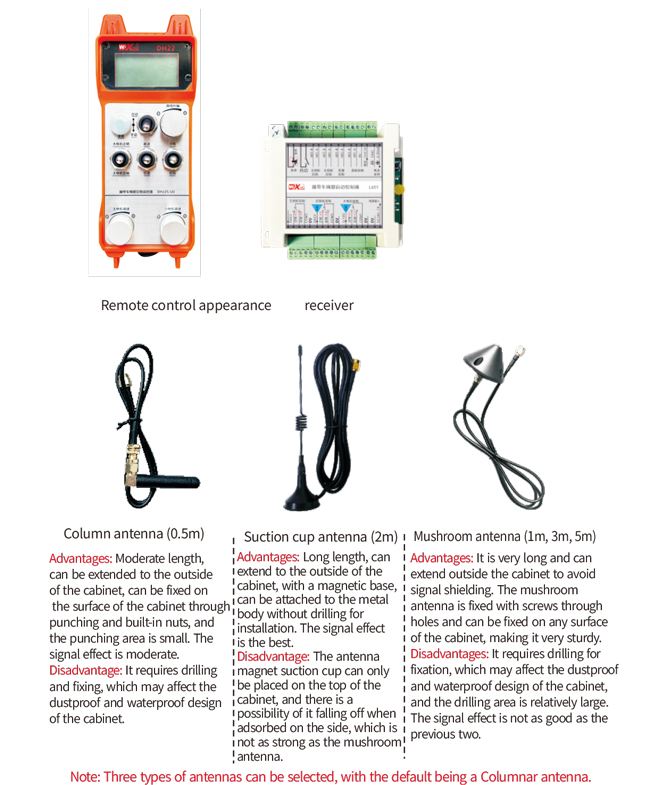
5. Diagrama de acessórios do produto
6. Guia de instalação do produto
6.1 Etapas de instalação do produto
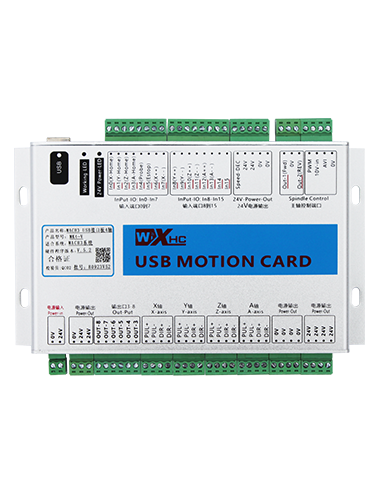
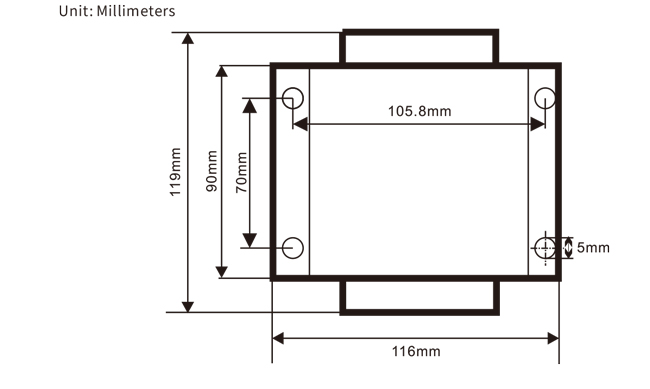
1. Instale o receptor no quadro elétrico através da fivela na parte traseira, ou instale-o no gabinete através dos orifícios dos parafusos nos quatro cantos do receptor.
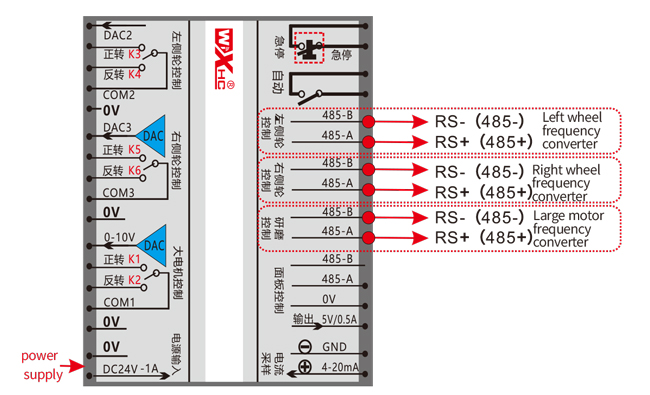
2. Consulte nosso diagrama de fiação do receptor e compare-o com o seu equipamento no local. Conecte o equipamento ao receptor através de fios.
3. Depois de consertar o receptor, é necessário conectar a antena equipada com o receptor e instalar ou colocar a extremidade externa da antena fora do quadro elétrico. Recomenda-se colocá-lo na parte superior do quadro elétrico para obter o melhor efeito de sinal. É proibido deixar a antena desconectada ou colocá-la dentro do quadro elétrico, pois pode fazer com que o sinal fique inutilizável.
4. Finalmente, instale a bateria no controle remoto, aperte a tampa da bateria, e ligue o botão liga / desliga do controle remoto. Depois que a tela do controle remoto mostrar o normal
interface de trabalho, operações de controle remoto podem ser realizadas.
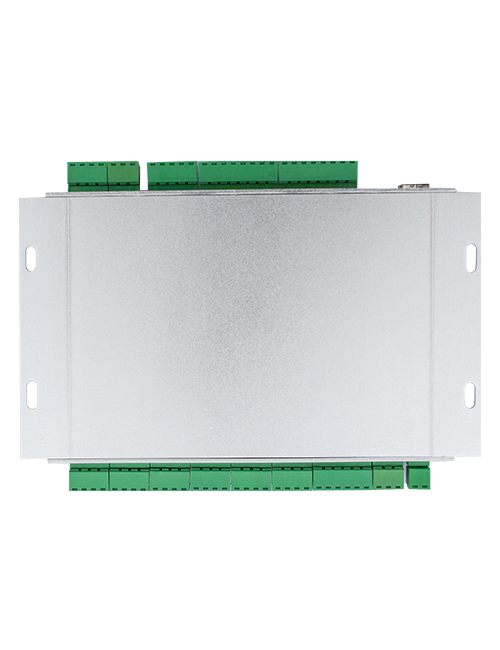
6.2 Dimensões de instalação do receptor
6.3 Diagrama de referência da fiação do receptor
7. Instruções de operação do produto
7.1 Configurações de parâmetros de controle remoto
Método para inserir os parâmetros de back-end do controle remoto:
Gire o interruptor de modo para o modo manual, ajuste a velocidade do pequeno motor para 25 em ambos os lados, ou 0, 10, 20, 40, 50 por todos os lados, e gire continuamente o interruptor de avanço do motor grande para cima 3 vezes e para baixo 3 vezes;
Use o “Controle de velocidade de motor pequeno” botão para virar as páginas, pressione o botão ativar, e, em seguida, gire o pequeno botão de controle de velocidade do motor para modificar os parâmetros. Após modificação, vire a página até o fim,selecione “Salvar” sair, e pressione o botão ativar para sair do menu;
Os parâmetros são os seguintes:
Corrente máxima: faixa de feedback de grande corrente do motor, definir faixa 15-200A, padrão 100;
Parâmetros de controle de velocidade: Modo automático, motor pequeno acelera automaticamente mais rápido ou mais devagar,quanto menor mais rápido, definir intervalo 200-1500, padrão 800;
Parâmetro de desaceleração: Defina o limite superior que permite que a velocidade do motor mude. Quando a corrente muda além deste valor, a desaceleração ocorrerá. Quanto menor, mais rápida será a desaceleração dos motores esquerdo e direito, com uma gama de 05-12 e um padrão de 06;
Aceleração a1: Quanto maior a velocidade do motor, quanto mais rápido aumenta, com uma gama de 00-06 e um padrão de 01;
Desaceleração a2: Quanto maior a velocidade do motor, quanto mais rápido diminui, com uma gama de 00-06 e um padrão de 02;
Ativar regulação de velocidade: A regulação de pequena velocidade do motor precisa ser habilitada? 00 não permite, 01 permite, o padrão é 01;
Iniciar o travamento automático: O motor grande mantém automaticamente o travamento automático depois que os interruptores de avanço e reversão são liberados?? 00 não segura, 01 detém, padrão 01
Caminhada máxima: velocidade máxima dos motores esquerdo e direito, faixa 10-100, padrão 50;
Corrente de corte: corrente máxima de corte, exibido na tela como valor IC, faixa 15-160, padrão 30,
correspondente ao CI: 30 exibido na tela. O limite superior deste parâmetro é 80% da corrente máxima;
Limite de velocidade padrão: A velocidade de corte automática padrão do motor pequeno quando ligado está dentro da faixa de 0-100, com um padrão de 10. A tela exibe F1.0, e este parâmetro só é preciso quando a caminhada máxima está definida como 50.
Modo automático: Definir como 00, a chave automática/manual é uma chave de modo. Definir como 01, o interruptor automático/manual está na posição automática, a tela mostra iluminação, e a saída do terminal automático no receptor é fechada. Quando definido como manual, o terminal de saída automática está desconectado;
Desvio do limite de velocidade: O limite superior da velocidade de corte automática do pequeno motor varia de 00 para 200, com um padrão de 60 e uma exibição correspondente de 6.0 na tela; Limite superior do valor de exibição = deslocamento do limite de velocidade x 0.1;
Host máximo: velocidade máxima do motor grande, faixa 10-100, padrão 50;
Equipamento Mbus (obrigatório): Seleção de modelo de conversor de frequência de motor grande, faixa 00-03, padrão 03;
00- Xangai Xielin 01-Fuji
02-INVT 03-Inovance(Zhongchen, Robicon)
Equipamento SBUS (obrigatório): Seleção de modelo de conversor de frequência de motor pequeno, faixa 00-05, padrão 03;
00- Xangai Xielin 01-Fuji
02-INVT 03-Inovance(Zhongchen, Robicon)
04-Anchuanda 05-Nenhum
7.2 Configuração de parâmetros do conversor de frequência
1. Seleção de fonte de comando: Canal de comando de comunicação
2. Seleção da fonte de frequência principal: comunicação dada
3. Taxa de transmissão: 19200
4. Formato de dados: Sem verificação, formato de dados<8-N-1>
5. Endereço local: Configure o conversor de frequência esquerdo para 1, o conversor de frequência certo para 2, e
o grande conversor de frequência do motor para 3
7.3 Instruções de operação do controle remoto
1. Ligue a máquina, ligue o controle remoto, entre no back-end do controle remoto, definir o
parâmetros de back-end de controle remoto, definindo principalmente o motor pequeno e a frequência do motor grande
modelos de conversor: (pule esta etapa se o fabricante da máquina já tiver definido);
2. Defina os parâmetros do conversor de frequência (pule esta etapa se o fabricante da máquina
já configurou);
3. Defina o controle remoto para o modo manual, e, em seguida, use o controle remoto para mover a máquina para
a posição de trabalho;
4. No modo manual, defina a corrente de corte do motor grande para IC e a velocidade do motor grande
5. Mude para o modo automático e defina o valor F do limite de velocidade de corte para o motor pequeno;
6. No modo automático, gire o interruptor do motor grande para frente para ligar o motor grande, então vire
o pequeno interruptor do motor para avançar ou reverter, e o controle remoto entra em corte automático
modo para começar a cortar.
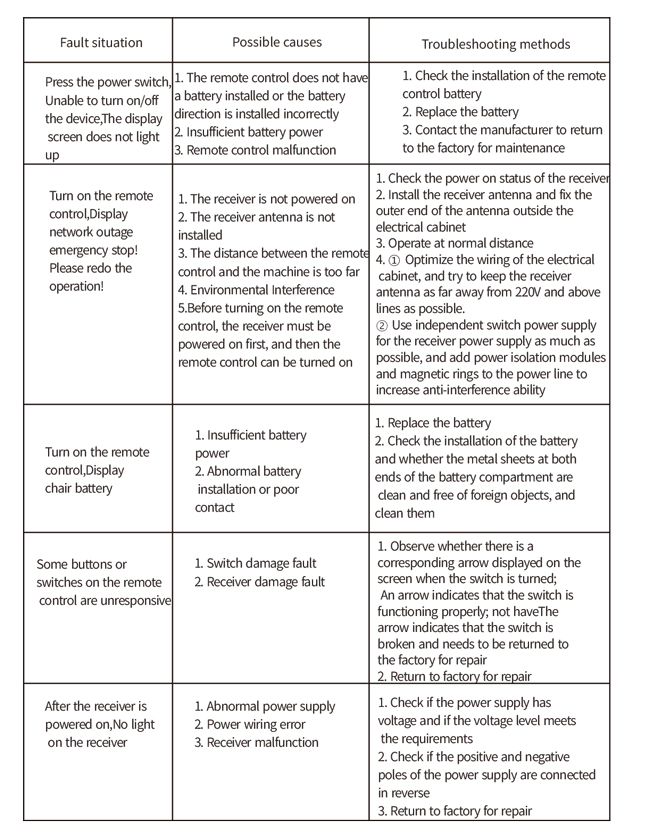
8.Solução de problemas do produto
9.Manutenção
1. Use-o em um ambiente seco à temperatura e pressão ambiente para prolongar sua vida útil.
2. Evite usar em ambientes anormais, como chuva e bolhas de água, para prolongar a vida útil.
3. Por favor, mantenha o compartimento da bateria e a área de estilhaços de metal limpos.
4. Evite danificar o controle remoto devido a compressão e queda.
5. Se não for usado por muito tempo, remova a bateria e guarde o controle remoto e a bateria em um local limpo
e lugar seguro.
6.Durante o armazenamento e transporte, atenção deve ser dada à resistência à umidade e ao choque.
10. Informações de segurança
1. Por favor, leia as instruções cuidadosamente antes de usar e proíba que não profissionais operem.
2. Substitua a bateria em tempo hábil quando a bateria estiver muito fraca para evitar erros causados por
energia insuficiente, o que pode fazer com que o controle remoto não consiga operar.
3. Se for necessário reparo, entre em contato com o fabricante. Se o dano for causado por auto-reparo, o fabricante
não fornecerá garantia.