Descriere
1. Introducerea produsului
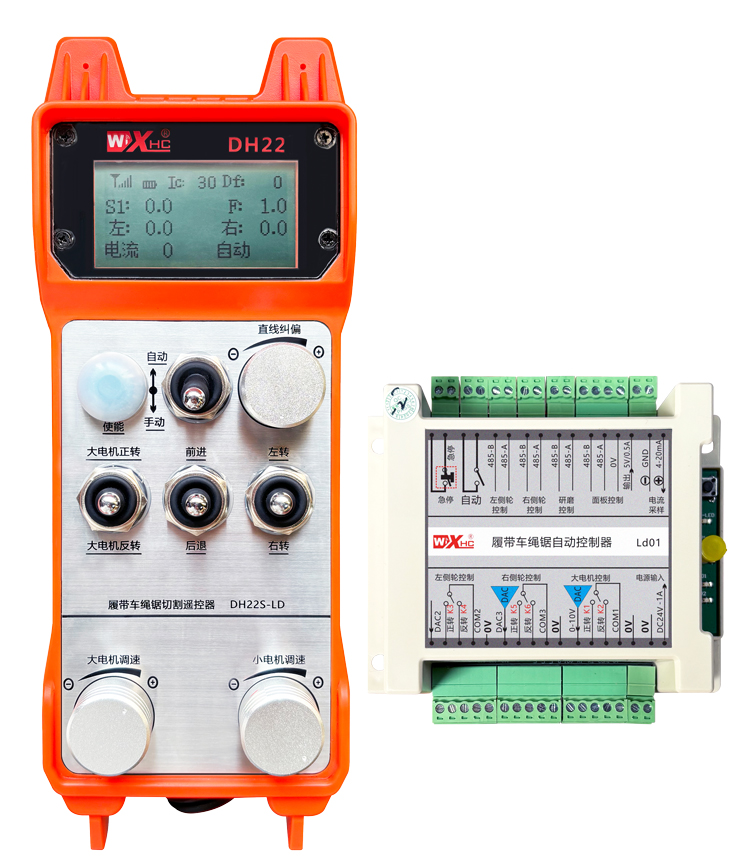
The remote control for automatic cutting of track car rope saw is suitable for track type rope saw
cutting machines. It uses the 485 Modbus RTU protocol to control the left and right track frequency
converters, as well as the large motor frequency conversion speed control start and the front, rear,
left and right direction controllers. And it can read the working current of the large motor frequency
converter through the 485 Modbus RTU protocol. By analyzing and comparing the current of the
large motor, the speed of the left and right tracks can be automatically adjusted in real time to
achieve automatic cutting function.
2. Caracteristici funcționale ale produsului
1. Adopting 433MHz wireless communication technology, cu o distanță de funcționare wireless de 100 metri.
2. Adoptați funcția automată de salt de frecvență și utilizați 32 sets of wireless remote controllers
simultaneously, fără a ne afecta reciproc.
3. Supports all frequency converters with 485 Modbus RTU protocol, and currently compatible frequency
converter brands include:Shanghai Xielin, Fuji, Huichuan, Zhongchen, INVT, şi . For brands
that are not compatible, please contact us for customization.
4. Reglementarea vitezei de susținere, pornire, și citirea curentă a convertoarelor mari de frecvență motorie.
5. Sprijină Reglementarea vitezei convertorului de frecvență la stânga și dreapta și dreapta, pornire, faţă, spate, Controlul stâng și dreapta.
6. Sprijină corecția liniară a convertizoarelor de frecvență din stânga și din dreapta pentru a menține mașina să meargă într-un
linie dreaptă.
7. Support automatic cutting function of rope saw, automatically adjust the left and right track speed in
real time according to the current information of the large motor.
8. It is also compatible with direct IO output control for motor start and stop, and analog voltage output
control for motor speed.
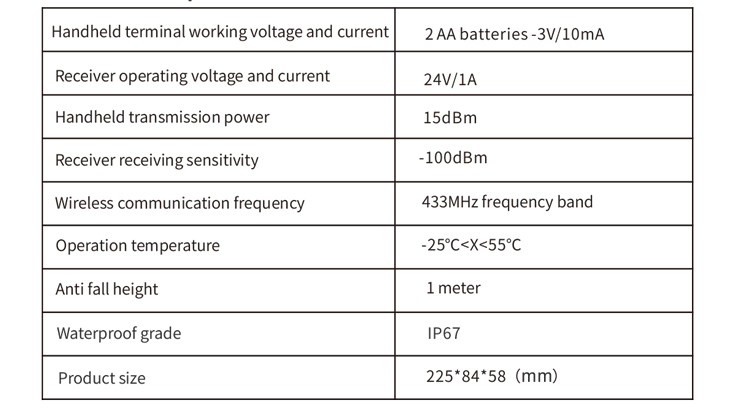
3. Specificații ale produsului
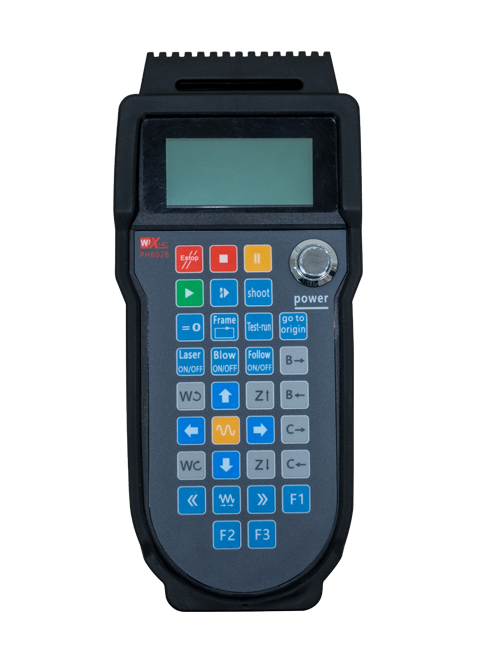
4. Introducerea funcției produsului
Note:
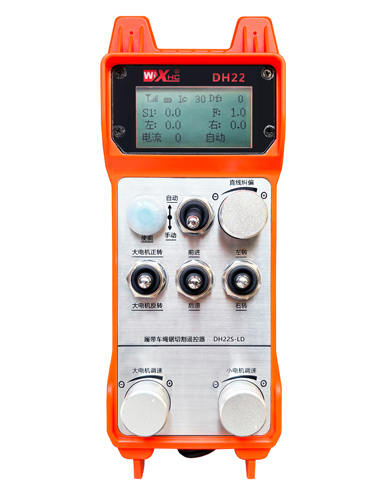
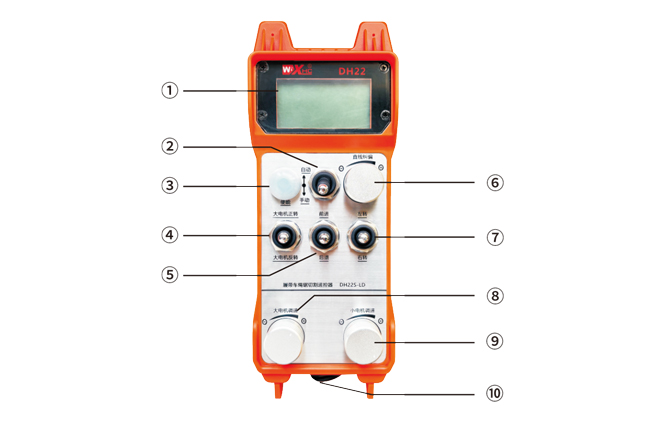
①Afișaj pe ecran:
②Comutator de mod:
③Enable:
Butoane combinate, unele operațiuni necesită menținerea apăsată a butonului de activare pentru funcționare,see the instructions for each switch for details.
④Large motor switch:
Folosind un comutator de resetare cu 3 viteze, tragerea acestui comutator poate controla rotația înainte și înapoi a motorului mare. După ce l-a eliberat, statul va rămâne, și vor apărea afișaje corespunzătoare pe ecran. The S1↑ arrow indicates forward rotation, and the S1 ↓ arrow indicates everse rotation.
⑤Comutator de motor mic înainte/înapoi:
The small motor is equipped with a 3-speed self-locking switch in front of it. Pressing the enable button and pulling this switch can control the small motor to move forward and backward, and the corresponding display will appear on the screen.The ↑↑ arrow represents forward, and the ↓↓ arrow represents backward.
⑥ Straight line correction:
Folosind un buton de codificare cu mai multe rotații, press the enable button, turn the knob right, and display the straight line correction: Df: The left turn knob increases by 1 unit per rotation, and the left
motor speed increases by 0.1 unitate; Rotiți butonul din stânga, afișaj de corecție în linie dreaptă: Df: On the right, every turn of the knob increases by 1 unitate, and the speed of the right motor increases
by 0.1 unitate.
⑦Small motor turning switch:
Folosind un comutator de resetare cu 3 viteze, când este acţionat manual, motorul mic poate fi controlat pentru a vira la stânga sau la dreapta. Odată eliberat, the remote control will automatically stop this action. In the forward state, when this switch is turned, the corresponding display will appear on the screen. The ←↑ arrow indicates left turn, and the ↑→ arrow indicates right turn.When in reverse mode, turn this switch and the corresponding display will appear on the screen. The ←↓ arrow indicates left turn, and the ↓→ arrow indicates right turn.
⑧ Reglare mare a vitezei motorului:
Folosind un buton de codificare cu mai multe rotații, rotating 1 grilă de fiecare dată, valoarea vitezei motorului mare se modifică cu aproximativ 0.2 unitati. Fast rotation can quickly modify the speed value of the large motor.
⑨ Small motor speed regulation:
Folosind un buton de codificare cu mai multe rotații, în modul manual, press the enable button and then rotate one grid at a time,the speed value of the left and right small motors changes by about 0.1 unitati, and quick rotation can quickly modify the speed value of the small motor.In automatic mode, press the enable button and rotate one grid at a time,the speed limit value F of the small motor changes by approximately 0.1 unitati. Rapid rotation can quickly modify the speed limit value of the small motor.
⑩ Remote control power switch
Ecranul de afișare a telecomenzii este pornit.
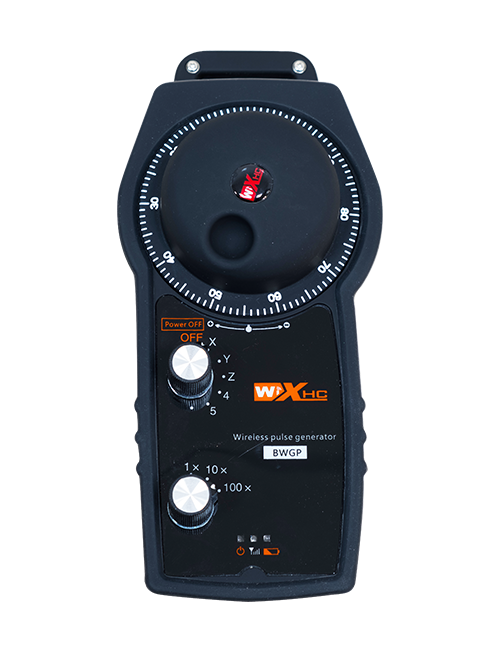
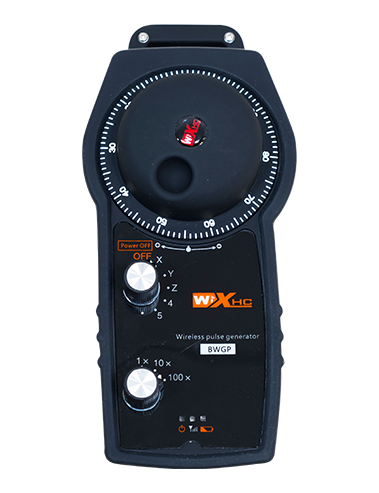
5. Schema de accesorii pentru produs
6. Ghid de instalare a produsului
6.1 Pași de instalare a produsului
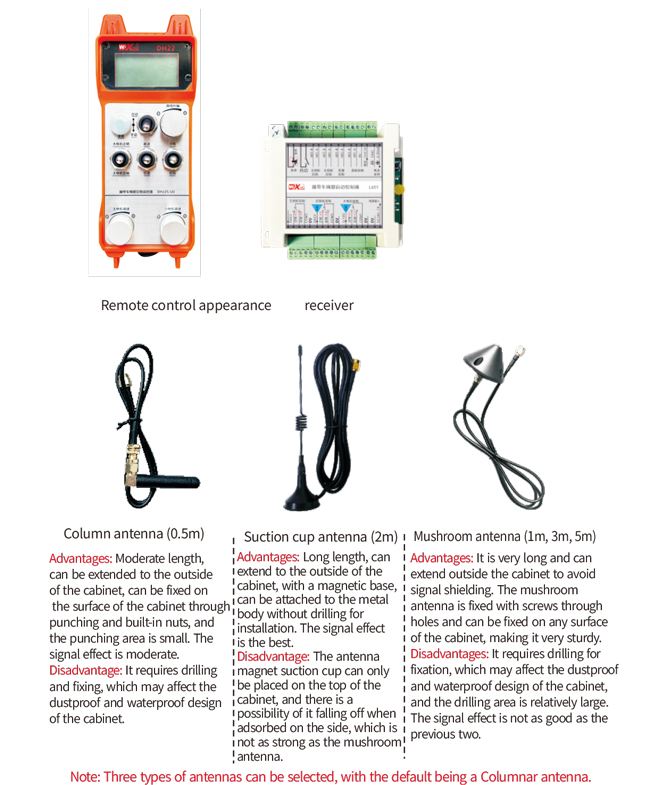
1. Instalați receptorul în dulapul electric prin catarama de pe spate, sau instalați -l în dulap prin găurile șurubului de la cele patru colțuri ale receptorului.
2. Consultați diagrama de cablare a receptorului și comparați-o cu echipamentul dvs. la fața locului. Connect the equipment to the receiver through wires.
3. După fixarea receptorului, it is necessary to connect the antenna equipped with the receiver and install or place the outer end of the antenna outside the electrical cabinet. Este recomandat să îl așezați în partea de sus a dulapului electric pentru cel mai bun efect de semnal. It is forbidden to leave the antenna unconnected or place it inside the electrical cabinet, as it may cause the signal to be unusable.
4. În cele din urmă, install the battery on the remote control, strângeți capacul bateriei, and turn on the power switch of the remote control. After the remote control display screen shows the normal
working interface, remote control operations can be performed.
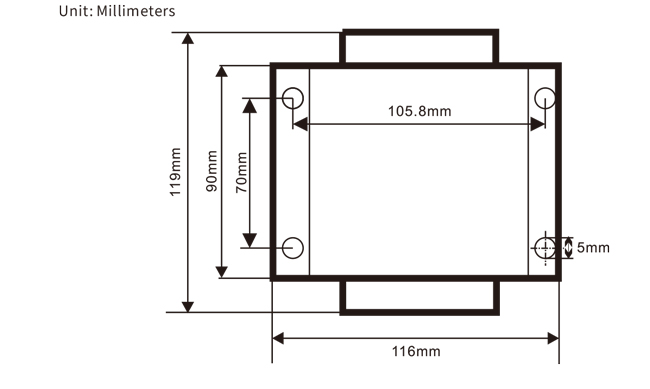
6.2 Dimensiuni de instalare a receptorului
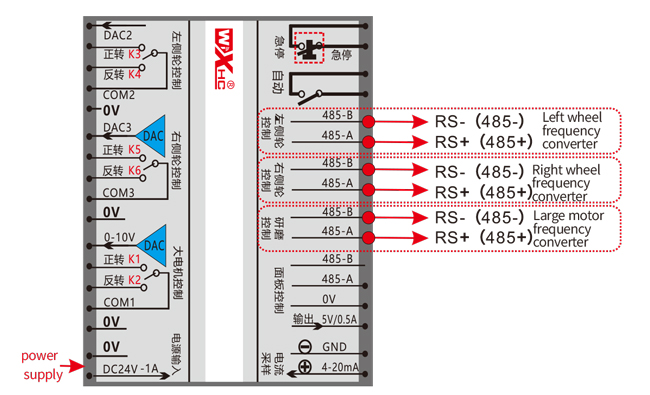
6.3 Diagrama de referință a cablului receptorului
7. Instrucțiuni de funcționare a produsului
7.1 Setările parametrilor telecomenzii
Method to enter the remote control backend parameters:
Turn the mode switch to manual mode, reglați viteza motorului mic la 25 on both sides, sau 0, 10, 20, 40, 50 on all sides, and continuously turn the forward switch of the large motor up 3 times and down 3 ori;
Utilizați “Controlul vitezei motorului mic” knob to flip pages, press the enable button, and then turn the small motor speed control knob to modify parameters. After modification, întoarce pagina până la capăt,selecta “Save” to exit, and press the enable button to exit the menu;
Parametrii sunt după cum urmează:
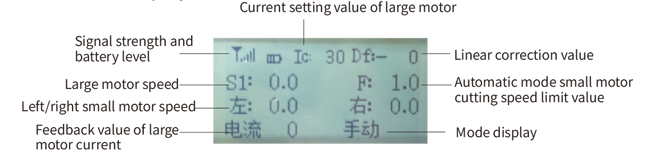
Curent maxim: feedback range of large motor current, set range 15-200A, implicit 100;
Parametrii de control al vitezei: Modul automat, small motor automatically accelerates faster or slower,cu cât este mai mic, cu atât mai repede, set range 200-1500, implicit 800;
Parametru de decelerare: Set the upper limit that allows the motor speed to change. Când curentul se modifică dincolo de această valoare, the deceleration will occur. The smaller, the faster the deceleration of the left and right motors, cu o gamă de 05-12 and a default of 06;
Accelerația a1: The larger the motor speed, the faster it increases, cu o gamă de 00-06 and a default of 01;
Decelerație a2: The larger the motor speed, the faster it decreases, cu o gamă de 00-06 and a default of 02;
Activați reglarea vitezei: Does the small motor speed regulation need to be enabled? 00 does not enable, 01 enables, default is 01;
Începeți autoblocarea: Does the large motor automatically maintain self-locking after the forward and reverse switches are released? 00 does not hold, 01 holds, implicit 01
Mersul maxim: maximum speed of left and right motors, gamă 10-100, implicit 50;
Curentul de tăiere: maximum cutting current, displayed on the screen as IC value, gamă 15-160, implicit 30,
corresponding to IC: 30 displayed on the screen. The upper limit of this parameter is 80% of the maximum current;
Limită de viteză implicită: The default small motor automatic cutting speed when turned on is within the range of 0-100, with a default of 10. The screen displays F1.0, and this parameter is only accurate when the maximum walking is set to 50.
Modul automat: Set to 00, the automatic/manual switch is a mode switch. Set to 01, the automatic/manual switch is set to the automatic position, the display screen shows lighting, and the automatic terminal output on the receiver is closed. When set to manual, the automatic output terminal is disconnected;
Speed limit deviation: The upper limit of the automatic cutting speed of the small motor ranges from 00 la 200, with a default of 60 and a corresponding display of 6.0 on the screen; Upper limit of display value=speed limit offset x 0.1;
Gazdă maximă: maximum speed of the large motor, gamă 10-100, implicit 50;
Mbus equipment (obligatoriu): Selection of large motor frequency converter model, gamă 00-03, implicit 03;
00- Shanghai Xielin 01-Fuji
02-INVT 03-Inovance(Zhongchen, Robicon)
Echipament SBUS (obligatoriu): Selectarea modelului de convertizor de frecvență a motorului mic, gamă 00-05, implicit 03;
00- Shanghai Xielin 01-Fuji
02-INVT 03-Inovance(Zhongchen, Robicon)
04-Anchuanda 05-Niciuna
7.2 Setarea parametrilor convertizorului de frecvență
1. Selectarea sursei comenzii: Canal de comandă de comunicare
2. Selectarea sursei de frecvență principală: comunicarea dată
3. Rata baud: 19200
4. Format de date: Nicio verificare, format de date<8-N-1>
5. Adresă locală: Setați convertizorul de frecvență din stânga la 1, convertizorul de frecvență potrivit pentru 2, şi
the large motor frequency converter to 3
7.3 Instrucțiuni de utilizare a telecomenzii
1. Porniți mașina, porniți telecomanda, enter the remote control backend, set the
remote control backend parameters, mainly setting the small motor and large motor frequency
converter models: (sări peste acest pas dacă producătorul mașinii l-a setat deja);
2. Setați parametrii convertizorului de frecvență (skip this step if the machine manufacturer
has already set it);
3. Setați telecomanda în modul manual, and then use the remote control to move the machine to
the working position;
4. În modul manual, set the cutting current of the large motor to IC and the speed of the large motor
5. Treceți în modul automat și setați valoarea limită F a vitezei de tăiere pentru motorul mic;
6. În modul automat, rotiți comutatorul mare al motorului spre înainte pentru a porni motorul mare, then turn
the small motor switch to forward or reverse, and the remote control enters automatic cutting
mode to start cutting.
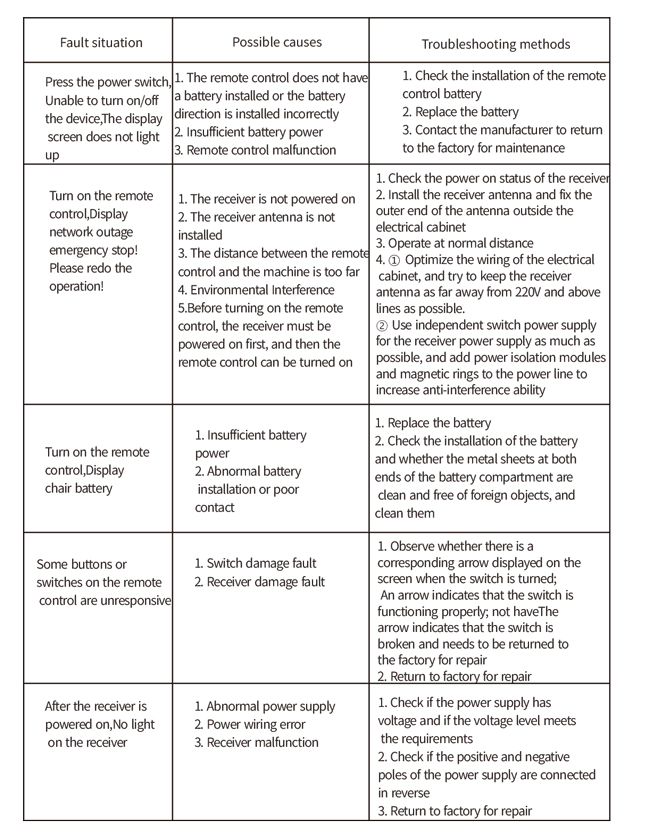
8.Depanarea produsului
9.Întreţinere
1. Vă rugăm să -l utilizați într -un mediu uscat la temperatura și presiunea camerei pentru a -și extinde durata de viață.
2. Vă rugăm să evitați să utilizați în medii anormale, cum ar fi bule de ploaie și apă pentru a prelungi viața serviciului.
3. Vă rugăm să păstrați curate compartimentul bateriei și zona de schije metalice.
4. Vă rugăm să evitați deteriorarea telecomenzii din cauza strângerii și căderii.
5. Dacă nu este folosit de mult timp, please remove the battery and store the remote control and battery in a clean
and safe place.
6.În timpul depozitării și transportului, Ar trebui să se acorde atenție rezistenței la umiditate și la șoc.
10. Informații de siguranță
1. Vă rugăm să citiți cu atenție instrucțiunile înainte de utilizare și interziceți non -profesioniștii să funcționeze.
2. Please replace the battery in a timely manner when the battery is too low to avoid errors caused by
insufficient power, ceea ce poate duce la imposibilitatea de a funcționa telecomanda.
3. Dacă este necesară reparația, Vă rugăm să contactați producătorul. Dacă daunele sunt cauzate de auto -reparație, the manufacturer
will not provide warranty.