Descriere
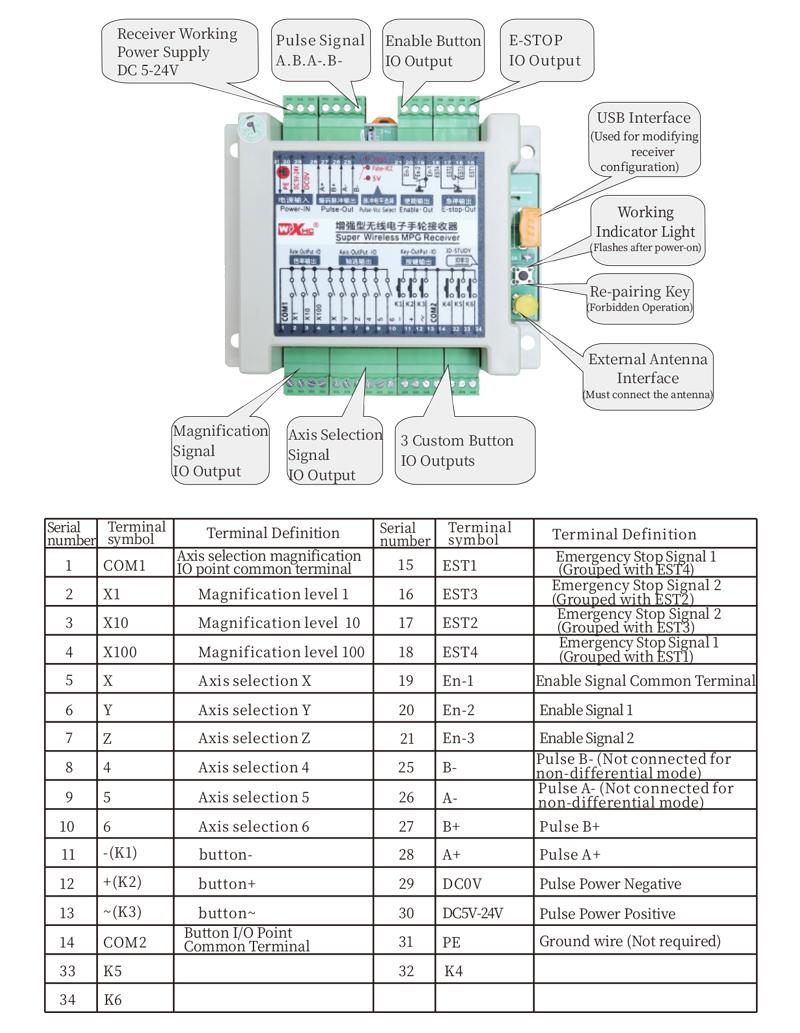
1.Introducerea produsului
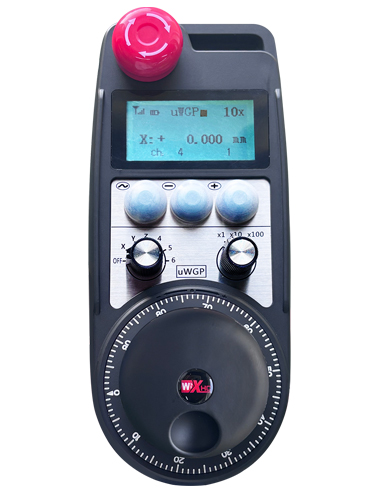
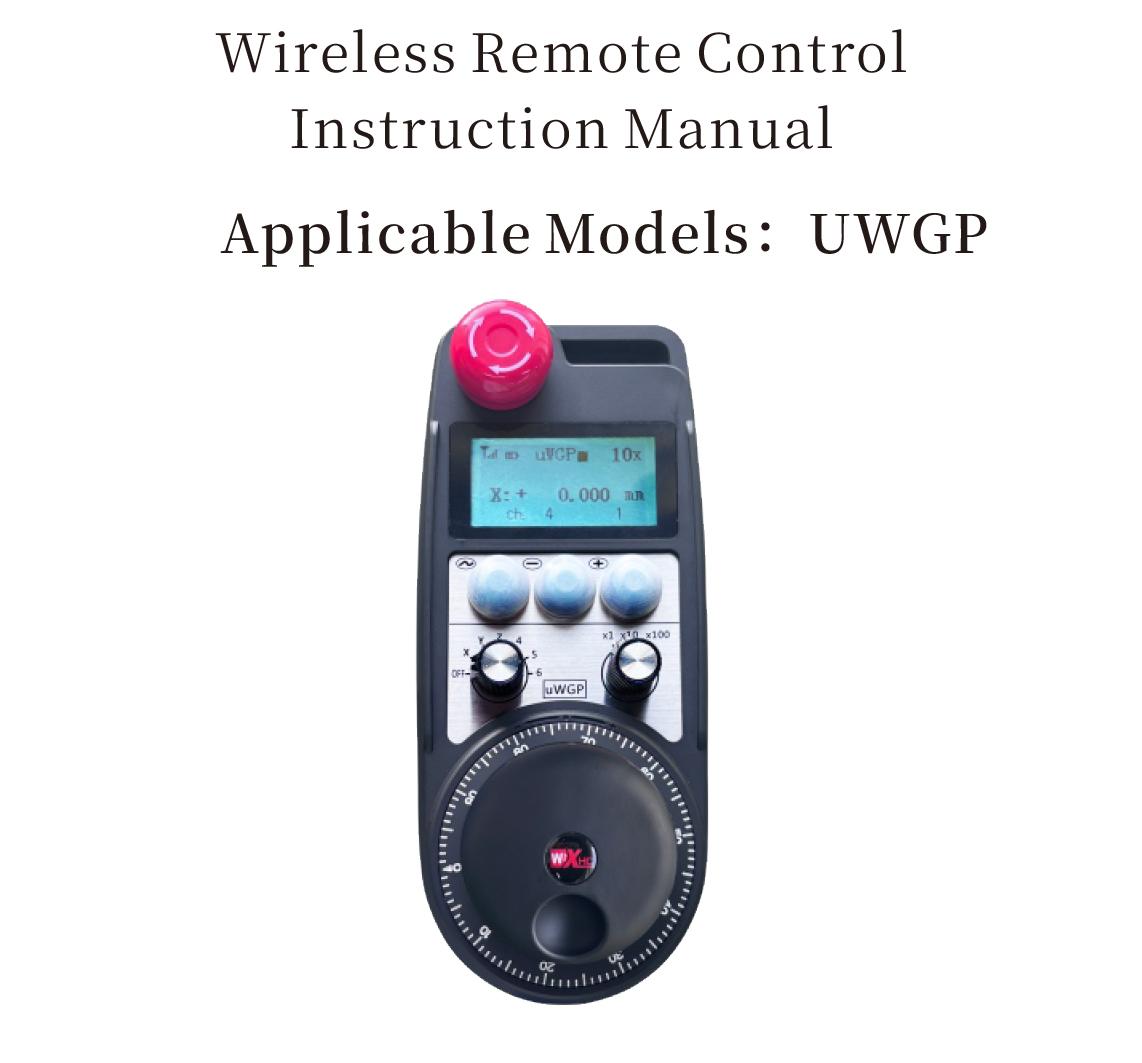
Wireless Remote Control is used for manual guidance, poziționare, tool setting and other operations of CNC machine tools. Acest produs adoptă tehnologie de transmisie wireless, eliminarea conexiunii tradiționale de sârmă de arc, Reducerea defecțiunilor echipamentelor cauzate de cabluri, eliminând dezavantajele tragerii cablului, pete de ulei, etc., and is more convenient to operate.It is widely applicable to CNC machine tools such as gantry machining centers, gantry vertical lathes, and CNC gear processing machines, and is compatible with various mainstream CNC system brands on the market, including Siemens, Mitsubishi, Fanuc, Syntec and more.
2.Caracteristici ale produsului
1. Adoptă tehnologia de comunicație fără fir de 433 MHz cu o distanță de operare fără fir de 20 metri.
2.Salt de frecvență adaptiv; 32 seturi de telecomenzi fără fir pot fi utilizate simultan fără interferențe.
3.Supports the emergency stop button, and the emergency stop button remains effective even after the remote control is powered off.
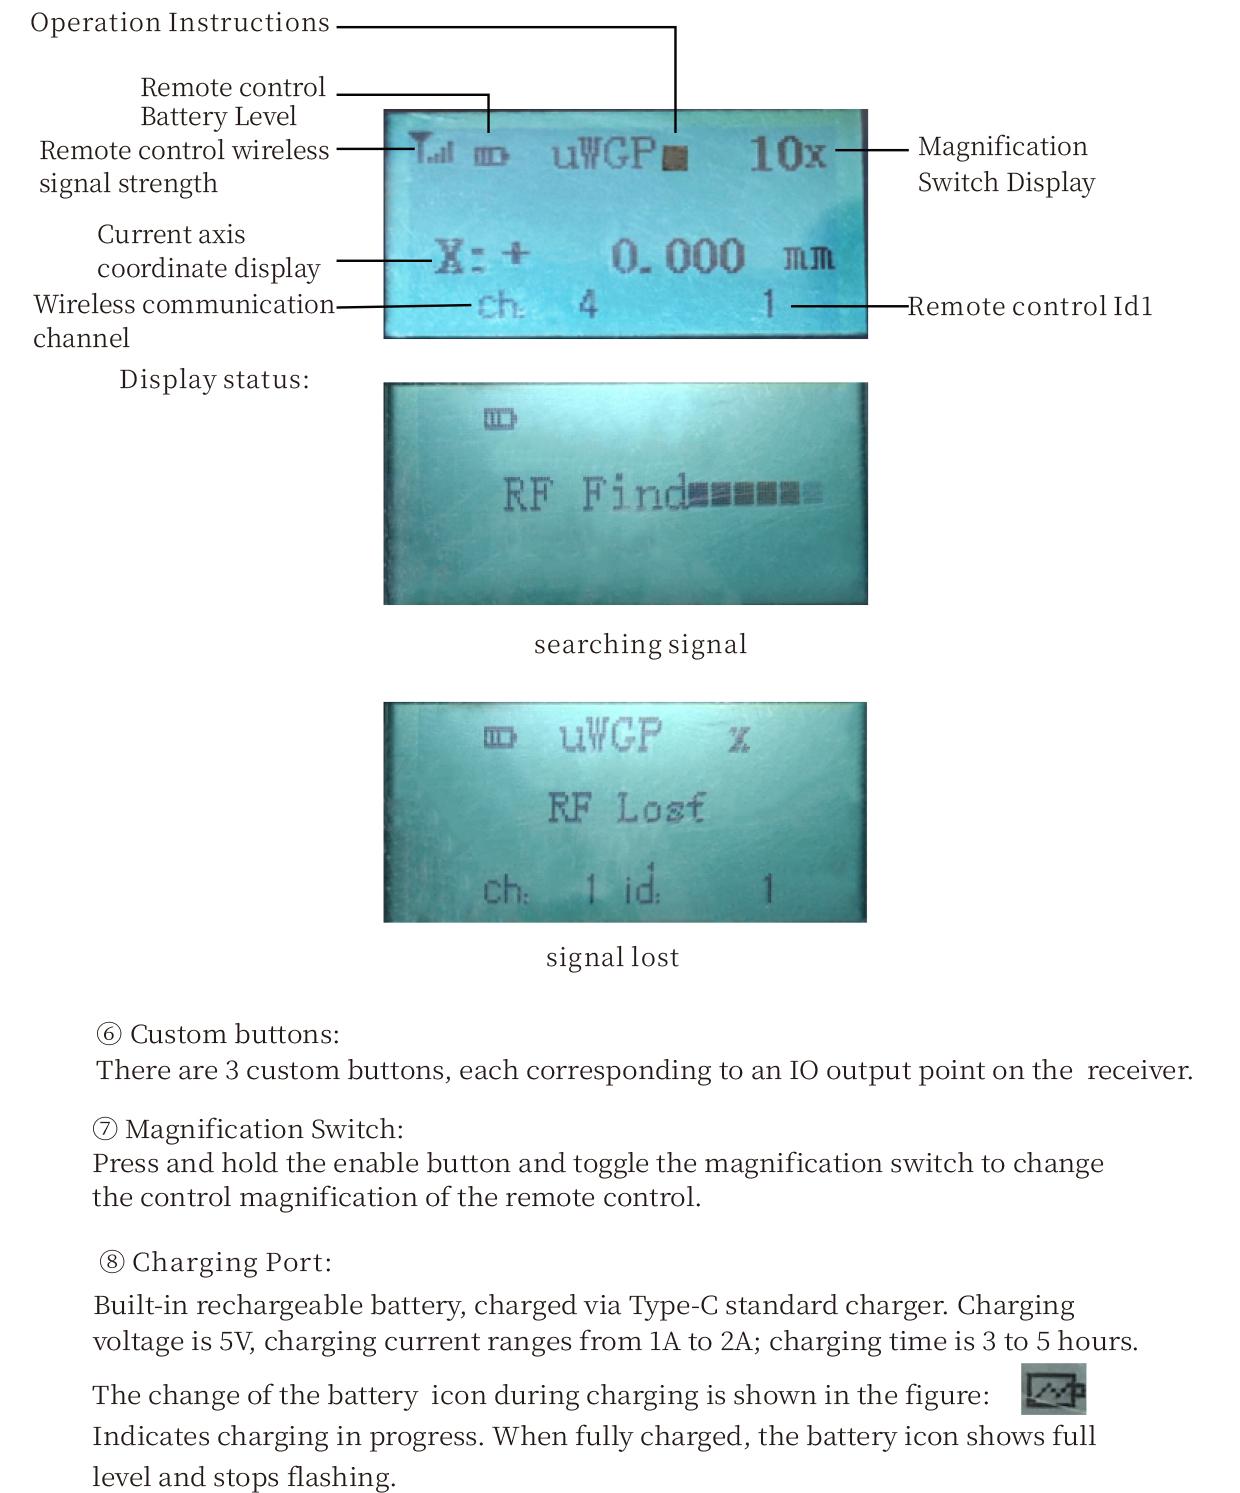
4.Suport 3 butoane personalizate cu ieșire de semnal IO de comutare.
5.Suporta controlul pe 6 axe, şi 7 controlul pe 12 axe este personalizabil.
6. Acceptă controlul măririi cu 3 viteze, iar controlul măririi cu 4 viteze este personalizabil.
7.acceptă funcția butonului de activare, care poate scoate semnale de comutare IO, și, de asemenea, controlează selecția axei, mărire și codificator.
8.Acceptă modificarea tipului de codificare de selecție și mărire a axei prin intermediul software-ului.
9. Supports pulse encoder with specification of 100 impulsuri pe revoluție.
10. Supports standard Type-C charging with 5V-2A charging specification; built-in battery
specification: 14500 / 1100mAh.
3. Specificații ale produsului
| Working Voltage and Current of Handheld Terminal |
3.7V/20.0mA |
| Charging Battery Specification |
3.7V/14500/1100mAh
|
| Low Voltage Alarm Range of Handheld Terminal |
<3.35V |
| Receiver Power Supply Voltage |
DC5V-24V/1A |
| Receiver Emergency Stop Output Load Range |
AC125V-1A/DC30V-2A |
| Receiver Enable Output Load Range |
AC125V-1A/DC30V-2A |
| Receiver Custom Button Output Load Range |
DC24V/50mA
|
| Receiver Axis Selection Output Load Range |
DC24V/50mA |
| Receiver magnification Output Load Range |
DC24V/50mA |
| Handheld Terminal Transmit Power |
15DBM
|
| Receptorul care primește sensibilitate |
-100DBM |
| Frecvența de comunicare fără fir |
433Banda de frecvență MHz
|
| Wireless Communication Distance |
20 meters barrier-free distance
|
| Operating Temperature |
-25℃<X<55℃ |
| Safe drop height |
1 m
|
| Number of Custom Buttons |
3
|
| Product Weight |
546.86(g) |
| Product Dimensions |
200*87*72(mm) |
4. Introducerea funcției produsului
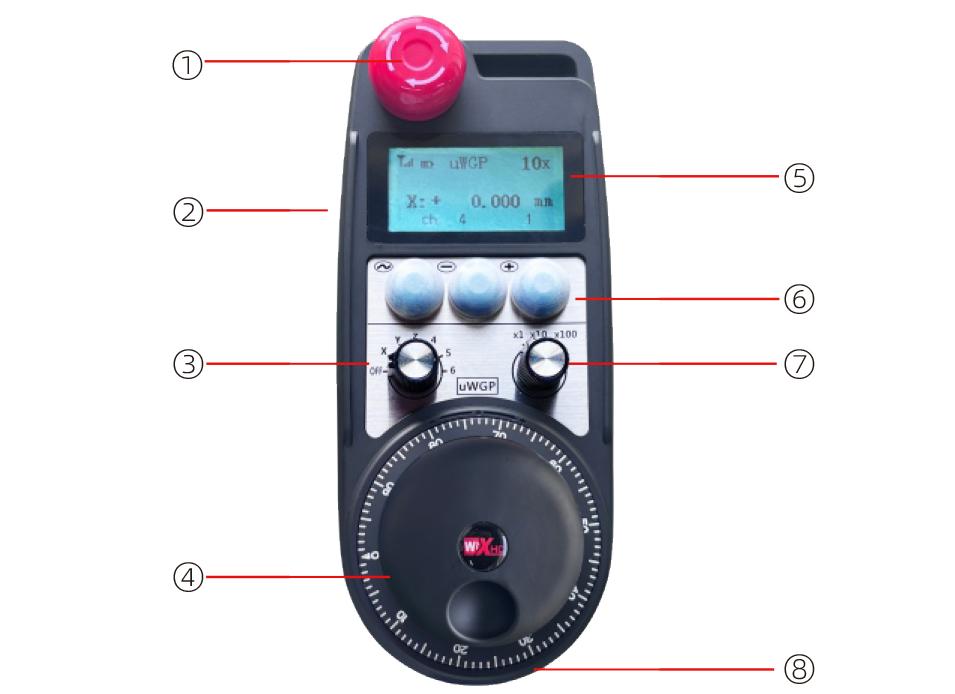
Note:
① Emergency Stop Button:
Apăsați butonul de oprire de urgență, the two groups of emergency stop IO outputs on the receiver will disconnect, and all remote control functions will be invalidated.Release the emergency stop button, the emergency stop IO outputs on the receiver will be closed, and all remote control functions will be restored. în plus, even if the remote control is powered off, pressing the emergency stop button can still activate the emergency stop IO output of the receiver.
② Enable Button:
Press either enable button on both sides, the two sets of enable IO outputs on the receiver will conduct. Release the enable button, and the enable IO outputs will disconnect. It is necessary to press and hold the enable button before toggling axis selection, magnification or rotating the remote control for the operation to take effect.This function can be canceled through the configuration software.
③ Axis Selection Switch (Power Switch):
Apăsați și mențineți apăsat butonul de activare, then toggling the axis selection switch can control the movement of axis .Press and hold the enable button, then toggle the axis selection switch to switch the motion axis controlled by the remote control. Toggle the switch from the OFF position to any axis position, and the remote control will power on automatically.
④ Pulse Encoder:
Press and hold the enable button and rotate the pulse encoder, it will output pulse signals to control the movement of the machine axis.
⑤ LCD Display Screen:
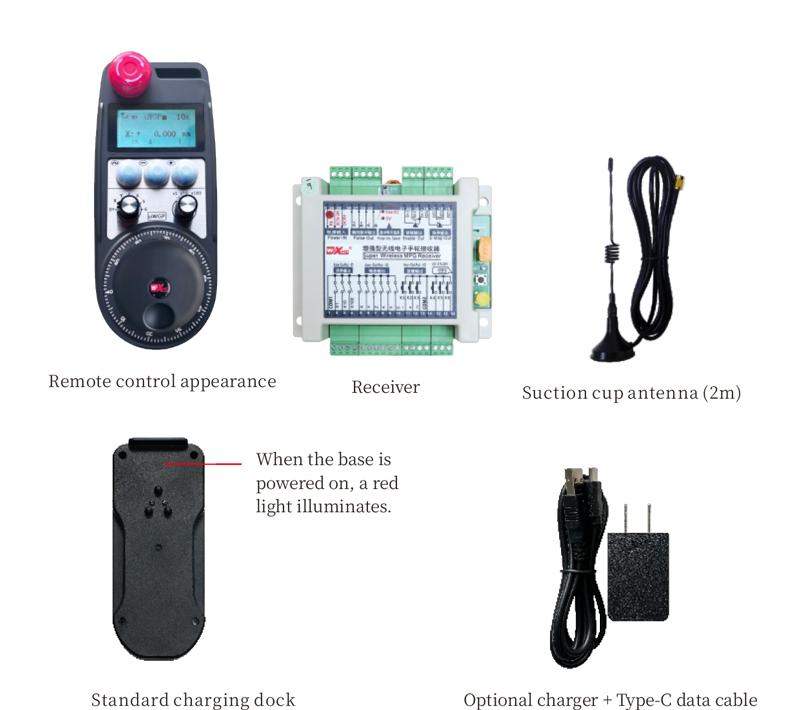
5. Product Accessories Diagram
6. Ghid de instalare a produsului
6.1 Pași de instalare a produsului
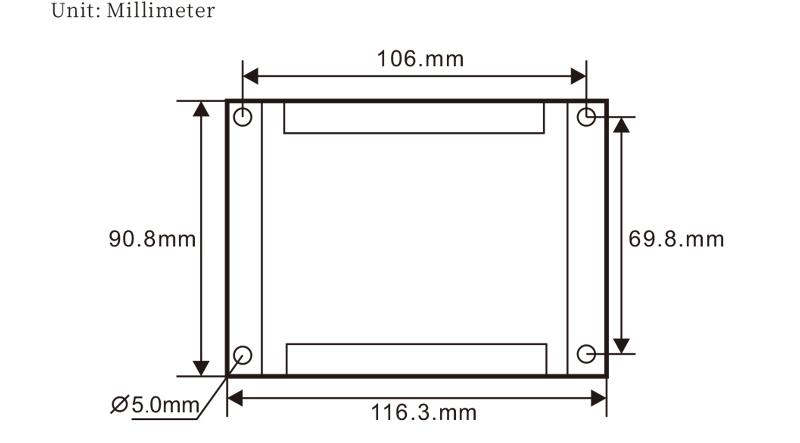
1. Install the receiver in the electrical cabinet via the buckle on its back, or mount it inside the electrical cabinet through the screw holes at the four corners of the receiver.
2. Consultați diagrama de cablare a receptorului nostru, Comparați-l cu echipamentul dvs. la fața locului, and connect the equipment to the receiver with cables.
3. After the receiver is fixed in place, install the supporting antenna of the receiver properly. Mount or place the outer end of the antenna outside the electrical cabinet. It is recommended to place it on the top of the electrical cabinet for optimal signal performance. Do not leave the antenna uninstalled or place it inside the electrical cabinet; otherwise, signal failure may occur.
4. În cele din urmă, turn on the remote control power switch, then you can remotely operate the machine via the remote control.
6.2 Receiver Installation Dimensions
6.3 Diagrama de referință a cablului receptorului
7. Instrucțiuni de utilizare a produsului
1. Alimentați mașina și receptorul. The receiver operation indicator flashes. After the wireless electronic remote control is fully charged, toggle it from the OFF gear to the X-axis gear, and the remote control display lights up.
2. Select the axis : Apăsați și mențineți apăsat butonul de activare, toggle the axis selection switch to select the axis to be operated.
3. Select the magnification: Apăsați și mențineți apăsat butonul de activare, toggle the magnification switch to select the required magnification gear.
4. Axis movement: Apăsați și mențineți apăsat butonul de activare, select the axis selection switch and the magnification switch, then rotate the pulse encoder. Rotate clockwise to move the axis in the positive direction, and rotate counterclockwise to move the axis in the negative direction.
5. Apăsați și mențineți apăsat orice buton personalizat, the corresponding button IO output of the receiver will turn on; release the button, and the output will turn off.
6. Apăsați butonul de oprire de urgență, the corresponding emergency stop IO output of the receiver disconnects and the remote control function becomes invalid. Release the emergency stop button, the emergency stop IO output closes and the remote control function is restored.
7. If the wireless remote control is not operated for a period of time, Acesta va intra automat în modul de somn pentru a reduce consumul de energie. It can be used normally again by pressing the enable button again.
8.If the wireless remote control is not used for a long time, turn the axis switch to OFF to turn off the power and extend battery life
8. Descrierea modelului produsului
①:UWGP stands for appearance style.
②:Pulse Output Parameters:
01: Indică faptul că semnalul de ieșire a pulsului este un, B; Tensiunea pulsului 5V; Cantitatea pulsului 100ppr.
02: Indică faptul că semnalul de ieșire a pulsului este un, B; Tensiunea pulsului 12V; pulse quantity 25PPR.
03: Indică faptul că semnalul de ieșire a pulsului este un, B, O -, B -; Tensiunea pulsului 5V; Cantitatea pulsului 100ppr.
04: Indică o ieșire a circuitului deschis NPN la nivel scăzut, cu semnale de ieșire a pulsului de A și B; The number of pulses is 100PPR.
05: Indică ieșirea sursei PNP la nivel înalt, cu semnale de ieșire a pulsului de A și B; Numărul de impulsuri este de 100ppr.
③:Represents the axis selection switch quantity; 6 stands for 6 axe, 7 stands for 7 axe, and so on.
④: Represents the signal type of the axis selection switch.A stands for point-to-point output signal, and B stands for encoder output signal.
⑤: Represents the signal type of the magnification switch.A stands for point-to-point output signal, and B stands for encoder output signal.
⑥: Reprezintă numărul de butoane personalizate; 3 corresponds to 6 butoane personalizate.
⑦: Represents the power supply for the system remote control. 05 stands for 5V power supply, şi 24 stands for 24V power supply.
⑧: Represents the contact charging mode. It starts charging automatically when placed back on the charging base.
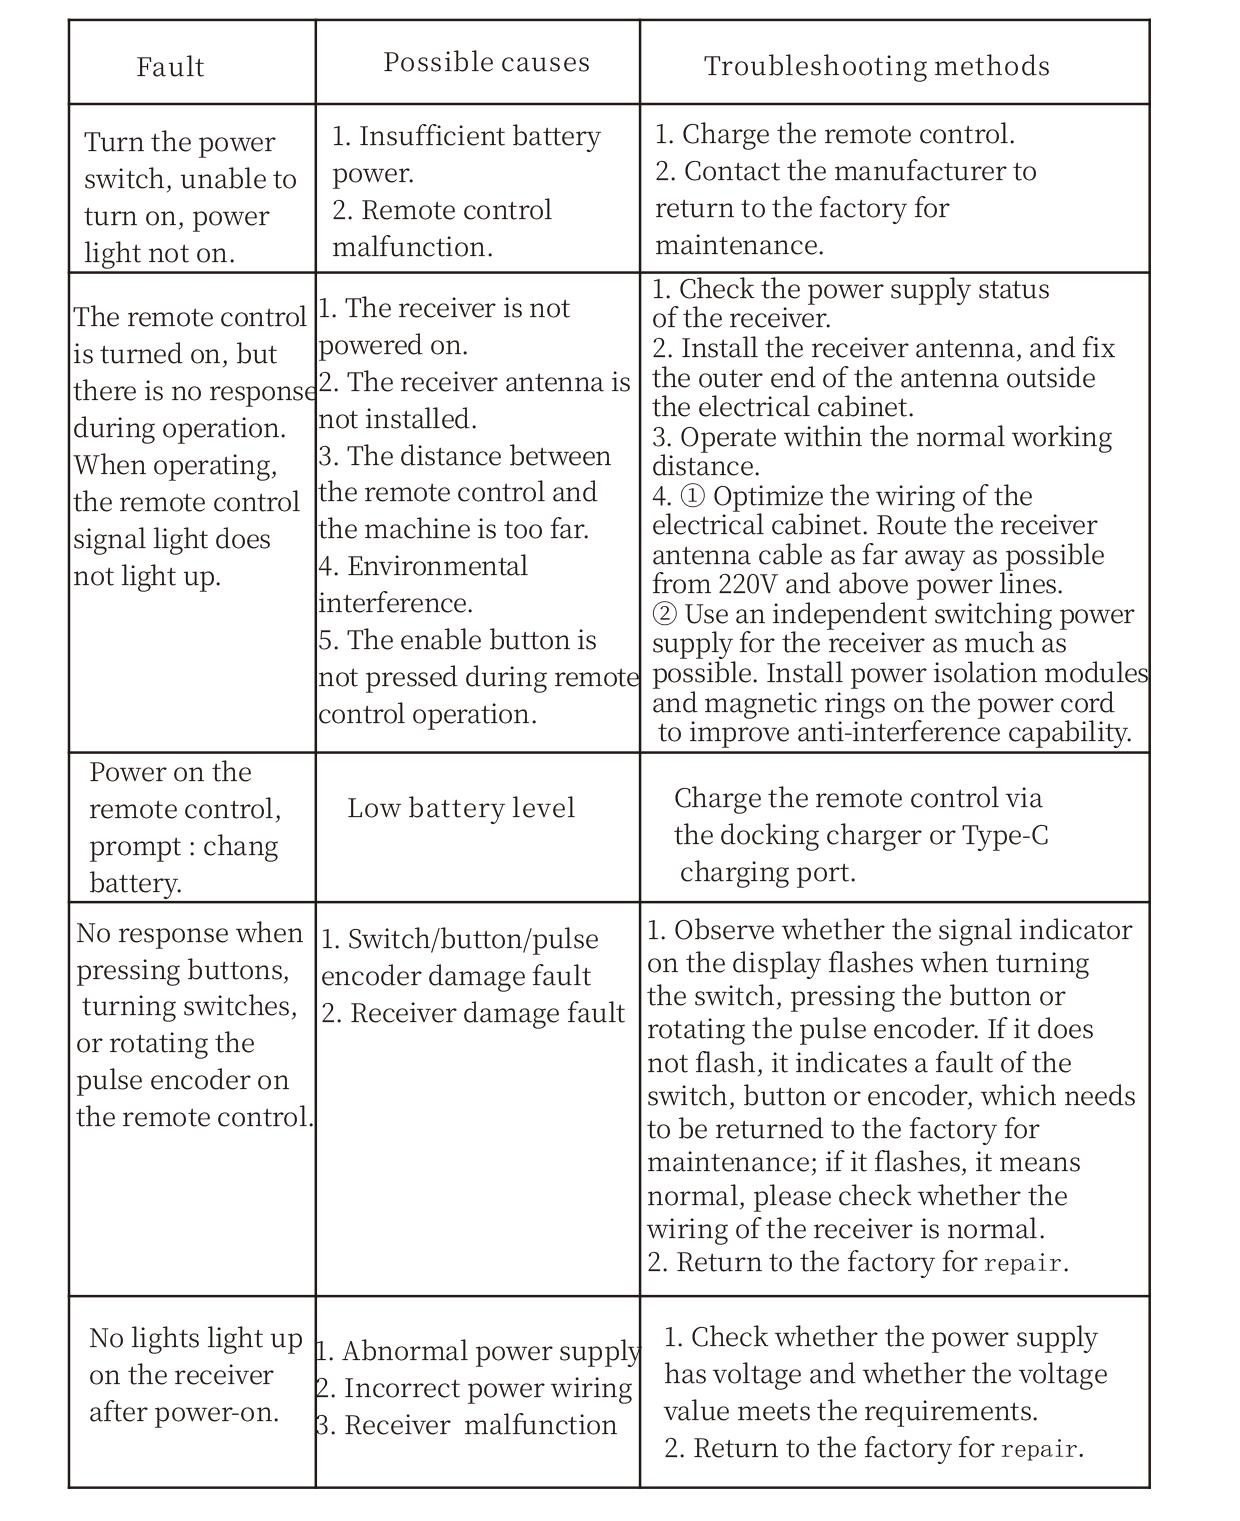
9. Depanarea produsului
10. Maintenance and upkeep
1. Vă rugăm să -l utilizați într -un mediu uscat la temperatura și presiunea camerei pentru a -și extinde durata de viață.
2. Please avoid using in abnormal environments such as rain and water to extend the service life.
3. Please keep the appearance of the remote control clean to extend its service life.
4. Please avoid crushing, dropping, or bumping, etc.. to prevent damage to the precision components inside the remote control or accuracy errors.
5. Dacă nu este folosit de mult timp, please store the remote control in a clean and safe place.
6. Avoid moisture and shock during storage and transportation.
11. Informații de siguranță
1. Vă rugăm să citiți cu atenție instrucțiunile înainte de utilizare și interziceți non -profesioniștii să funcționeze.
2. Please charge the remote control in a timely manner when the battery level is too low, to avoid malfunction and operational errors caused by insufficient power.
3. If you repair it yourself and cause damage, the warranty will be void.