Sifo
1. Hordhaca Waxsoosaarka
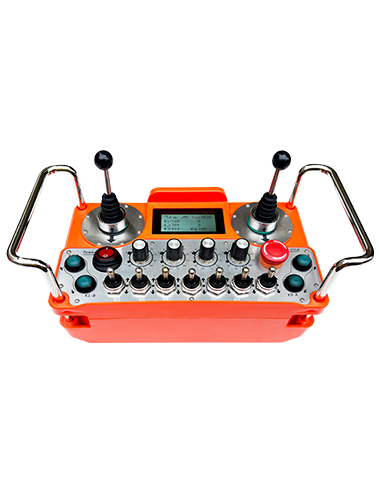
Xadhiga gawaarida gawaarida ayaa arkay meel fog oo go'itaan ah oo fog. Waxay qaadataa hab-dhismeedka 485moddbusrtu si loo xakameeyo bilowga xawaaraha iyo bidix iyo bidix ee jihada midig ee dhinaca bidix iyo midig, iyo sidoo kale isu beddelashada mot-ka weyn ee 'rtu', iyo beddelka guud ee isdaba joogga ah ee falanqaynta hadda jirta iyo isbarbardhiga, Si otomaatig ah ula qabsiga xawaaraha bidix iyo midigta midig ee waqtiga dhabta ah si loo gaaro howsha goynta otomaatigga ah.
2. Astaamaha wax soo saarka
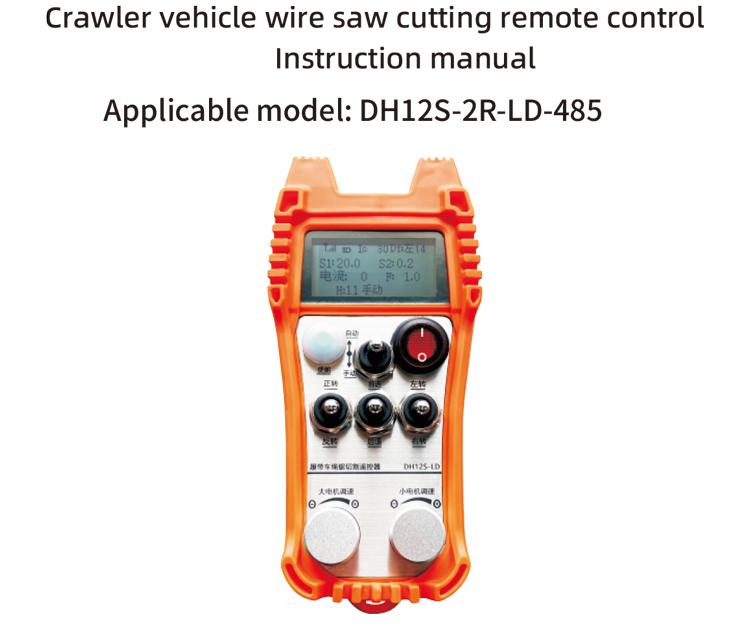
1. Kordmada 433mhz teknoolojiyadda isgaarsiinta wireless ah, masaafada hawlgalka wireless-ka ah waa 100 mitir.
2. Kordhinta shaqooyinka soo noqnoqda oo toos ah, isticmaal 32 Qeexda xaruustayaasha fog ee Wireless-ka waqti isku mid ah, Adigoo aan is saameyneyn midba midka kale.
3. Taageer dhammaan dib-u-dhiggayaasha leh 485-ModBus RTU Protocol. Noocyada ugu badan ee la waafajiyey waxaa ka mid ah:Shanghai Xilliyin, Fuji, Xaalad mamnuu xaalad ka-baxsa, Zhongchen, Booqasho, Wax. Haddii astaantu aysan ahayn Ada fadlan nala soo xiriir sidii loo dhisi lahaa.
4. Taageer bilow weyn ee gawaarida, Xeerka xawaaraha, iyo akhrinta hada jirta.
5. Taageer bidix iyo midig ee 'Grawler' ee xawaaraha xawaaraha, bilaabid, hore iyo gadaal bidix iyo midigta midig.
6. Taageero bidix iyo midig oo si toos ah u toosan oo xariiq ah si loo ilaaliyo mashiinka si toos ah.
7. Xaraashka taageerada ayaa arkay howsha goynta tooska ah, si otomaatig ah ula qabsiga xawaaraha bidix iyo midig ee waqtiga dhabta ah ee waqtiga dhabta ah iyadoo loo eegayo macluumaadka haatan jira.
8. Isla mar ahaantaana, Waxay la jaan qaadayaan wax soo saarka tooska ah ee IO si loo xakameeyo bilowga iyo joojinta matoorka, iyo wax soo saarka korantada analojka si loo xakameeyo xawaaraha dhaqdhaqaaqa.
3. Faahfaahinta alaabada
4. Hordhac Shaqada Wax soo saarka

Qoraalada:
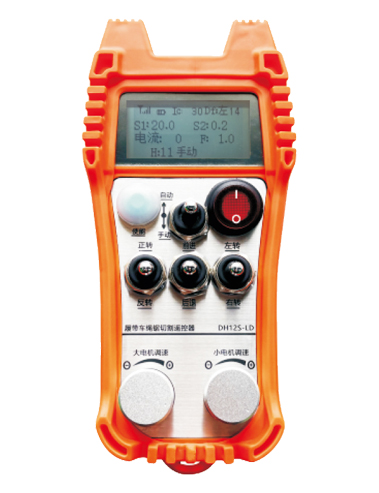
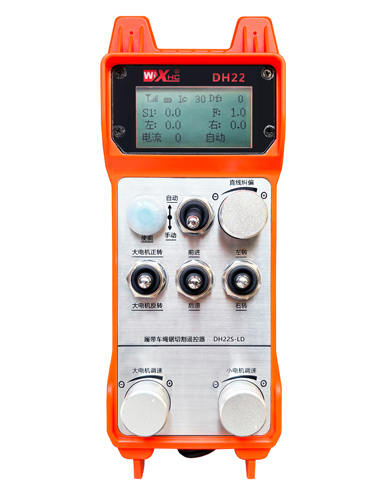
①ccreen muuqaal:

②mode wareejinta:
Adoo adeegsanaya 20-heer-heer, Waa suurta gal in la beddelo inta u dhexeysa malaha tooska ah iyo hagida buugaagta, iyo habka u dhigma ayaa lagu soo bandhigi doonaa shaashadda si loo beddelo.
③ Karti:
Badhamada isku darka, Hawlgallada qaarkood waxay u baahan yihiin inay qabaan badhanka suurtogalka ah ee hawlgalka, Fadlan tixraac tilmaamaha ku saabsan wareejinta wixii faahfaahin ah.
④ Beddelka gawaarida waaweyn:
Adoo adeegsanaya deret rett 3-xawaare, Jiidashada Wareeggan wuxuu xakameyn karaa wareejinta hore iyo wareejinta dhaqdhaqaaqa weyn. Ka dib markii la sii daayo, Gobolku wuu sii jiri doonaa, oo shaashadda waxaa jiri doona bandhigyo u dhigma shaashadda. Arrow therow wuxuu muujinayaa wareejinta hore, iyo therow waxay muujineysaa wareejinta wareejinta.
⑤SMALL MORDION WARK / BILAASH FARSAMADA:
Adoo adeegsanaya wareejinta 3-xawaare is-xirid, Jiidashada Wareeggan wuxuu xakameyn karaa matoorka yar si uu horay ugu socdo iyo gadaal. Bandhigga u dhigma ayaa ku tusi doona shaashadda, oo leh fallaarta oo muujinaya horay iyo arrow arrow gadaal u muujinaya gadaal.
⑥remote korantada korantada:
Shaashadda soo bandhiga ee kantaroolka fog ee kantaroolka ayaa la shiday.
⑦ Gaariga yar ee loo beddelo:
Adoo adeegsanaya deret rett 3-xawaare, markii gacanta lagu maareeyo, Gawaarida yar-yar waxaa lagu xakamayn karaa bidix ama midig. Mar la sii daayo, Xakamaynta fog fog ayaa si otomaatig ah u joojin doonta ficilkan., U leexo beddelkan oo soo bandhigida u dhigma ayaa ka soo muuqan doonta shaashadda. + Arrow waxay muujineysaa bidix, iyo – Arrow wuxuu muujiyaa leexashada midig., U leexo beddelkan oo soo bandhigida u dhigma ayaa ka soo muuqan doonta shaashadda. + Arrow waxay muujineysaa bidix, iyo – Arrow wuxuu muujiyaa leexashada midig .press oo hay badhanka suuxinta, Ka dib u rog wareejintan si aad u sameyso howlo u leexashada taagan, Ka dhigista si dhakhso leh.
⑧ Xeerka xawaaraha gawaarida waaweyn:
Adoo adeegsanaya gogo 'turjumaad badan, U wareeji bogagga si aad ula qabsato xawaaraha S1 ee matoorka weyn ee loo yaqaan ' 1 Wareega Grid, qiimaha xawaaraha ee isbeddelka gawaarida waaweyn illaa qiyaastii 0.2 cutuboodo, iyo wareegga deg-degga ah ayaa si dhakhso leh wax uga beddeli kara qiimaha xawaaraha ee matoorka weyn.
9 Xeerka xawaaraha yar ee dhaqdhaqaaqa (saxitaanka toosan):Si loo isticmaalo kuwa doomaha leexashada badan, Habka gacanta, mid kasta 1 leexashada garaaca, Qiimaha xawaaraha ee isbeddelka gawaarida yar-yar illaa qiyaastii 0.1 cutuboodo. Wareejinta degdegga ah ayaa si dhakhso leh wax uga badali kara qiimaha xawaaraha ee matoorka yar.
Qaabka otomatiga ah, Riix badhanka suurtogalka ah oo wareeji 1 Grid wakhti kasta. Xadka xawaaraha xawaaraha f ee isbeddelka gawaarida yar ee qiyaastii ugu dhawaan 0.1 cutuboodo. Wareeg deg deg ah ayaa si dhakhso ah wax uga beddeli kara qiimaha xadka xawaaraha ee dhaqdhaqaaqa yar.press badhanka suurtogalka ah, U leexo garabka dhanka midig, iyo soo bandhigida saxitaanka xariiqda toosan waxay muujineysaa d f: bidix. Wareeg kasta oo ku dhaca garaaca 1 cutub; Bidix u leexo, Soo bandhigida sixitaanka toosan: DF: sax. Wareeg kasta oo ku dhaca garaaca 1 cutub, iyo halbeeg kasta oo sixitaan ah waxay u dhigantaa xawaaraha xawaaraha xawaaraha ee avitat of avi 0.02 V.
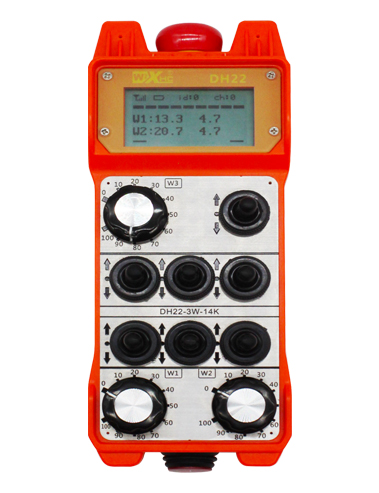
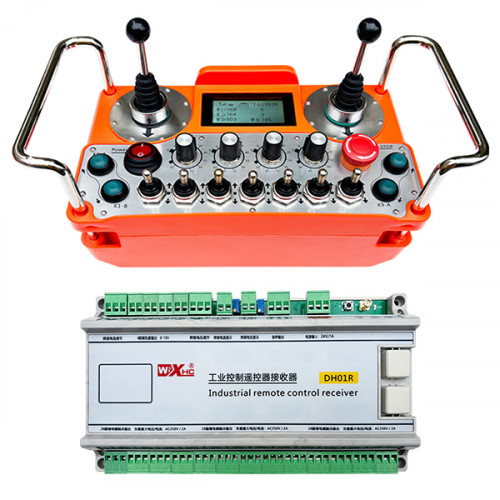
5. Jaantus Qalabka Qalabka
6. Tilmaanta Rakibaadda Waxsoosaarka Waxqabadka
6.1 Talaabooyinka rakibaadda wax soo saarka
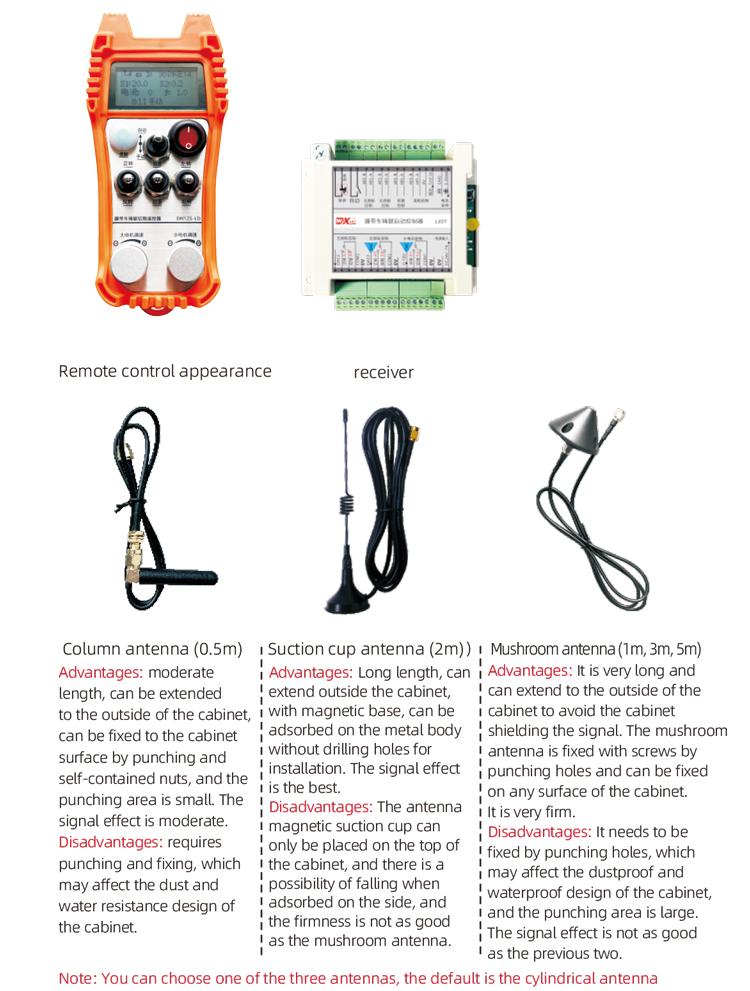
1. Ku rakib qaataha qaataha wasiirada korantada ee salka ku haya dhabarka, Ama ku rakib golaha korantada ee godadka daboolka afarta gees ee qaataha.
2. Tixraac jaantuskayaga soo-jeedinta, isbarbar dhig qalabkaaga goobta, oo qalabka ku xiraa qalabka qaataha fiilooyinka.
3. Ka dib markii qaataha la hagaajiyo, Anteenadu ku qalabaysan yahay qaataha waa in lagu xiraa, iyo dhamaadka bannaanka ee anteenada waa in lagu dhejiyaa ama lagu meeleeyaa meel ka baxsan golaha wasiirada korantada. Waxaa lagu talinayaa in lagu dhigo dusha sare ee golaha wasiirada korantada ee saameynta calaamadda ugu fiican. Waa reebban tahay in laga tago anteenada aan qarsooneyn ama anteenada ka dhex dhigaan golaha wasiirada korantada, taas oo sababi karta calaamad xumo oo aan la taaban karin.
4. Ugu dhambayntii, Ku rakib batteriga kontoroolka fog, adkee daboolka batteriga, ka dibna shid beddelka korantada ee kontoroolka fog. Ka dib markii soo bandhigida kantaroolka ee fog ka dib ay muujiso interface-ka caadiga ah ee shaqada, Waad sameyn kartaa howlgalka xakameynta fog.
6.2 Cabirrada rakibaadda qaataha
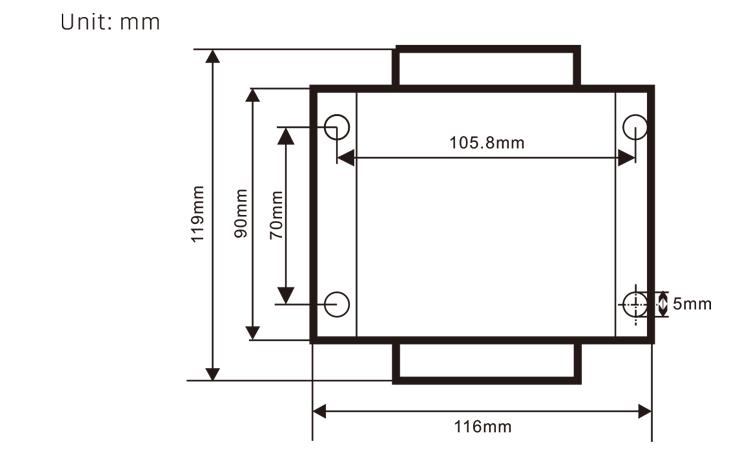
6.3 Qiyaasta tixraaca ee qaataha

7. Tilmaamaha Howlgalka Wax Soo Saarka
7.1 Dejinta Xakamaynta Xakamaynta Xakamaynta
Sida loo galo cabirrada asalka ee kantaroolka fog: U leexo habka loo beddelo qaabka gacanta, hagaaji xawaaraha matoorka yar ilaa 25, ama 0, 10, 20, 40, 50, oo u rog wareejinta hore ee gawaarida waaweyn 3 jeer iyo xagga hoose 3 jeer;
Adeegso “Xakamaynta xawaaraha dhaqdhaqaaqa yar” Ku garaac bogga, Taabo u sahliso oo damiso Knobka Xawaaraha xawaaraha ee xawaaraha xawaaraha si aad wax uga beddesho cabbirrada; Ka dib wax ka beddelidda ka dib, Bogga u wareeji dhamaadka, Xulo kaydinta iyo bixitaanka, oo riix badhanka suurtogalka si aad uga baxdid liiska;
Xaruntu waa sida soo socota:Ugu badnaan: Kala-soocidda qiimaha ee hadda jira, Dejinta u dhexeeya 15-200a, fulin la'aan 60;
Xaraashka Xakamaynta Xawaaraha: Qaabka tooska ah ee xawaaraha si otomaatig ah xawaare si otomaatig ah xawaare, si dhakhso ah, Meelaynta guud 200-1500, fulin la'aan 1000;
Xadgudubka khiyaanada: Deji xadka sare ee isbedelka xawaaraha dhaqdhaqaaqa ee loo oggol yahay. Marka isbeddelada hadda jira ee ka baxsan qiimahaan, Waa muhiim. Ka yar waa, Si dhakhso ah ee matoorrada bidix iyo midig ayaa muhiim u noqon doona. Xadka ayaa ah 05-12, oo sida caadiga ah waa 06;
Dardargelinta a1: Qiimaha weyn, Si dhakhso leh xawaaraha dhaqdhaqaaqa ayaa kordha, Range 00-06, Default 01; Khiyaano A2: Qiimaha weyn, Si dhakhso ah xawaaraha dhaqdhaqaaqa wuu yaraanayaa, seere daaq 00-06, fulin la'aan 02;
Awood u yeelo qaanuunka xawaaraha: Haddii qawaaniinta xawaaraha yar ee dhaqdhaqaaqa loo baahan yahay in la eego, 00 lama awoodo, 01 waa la awoodaa, fulin la'aan 01;
Is-xirid is-xirid: Haddii matoorka weyn uu si otomaatig ah u hayn doono quful ka dib marka la sii daayo, 00 lama hayo, 01 waa la ilaaliyaa, fulin la'aan 01;
Safarka ugu badan: Xawaaraha ugu badan ee bidix iyo midigta, seere daaq 10-100, fulin la'aan 50;
Joojinta hada: Qaadashada ugu badan, Shaashadda ayaa muujisay qiimaha IC, seere daaq 15-160, fulin la'aan 30, shaashadda ayaa muujisay IC: 30. Xadka sare ee qiyaasta = ugu badnaan hadda x 80%;
Xadka xawaaraha caadiga ah: Xawaaraha yar ee caadiga ah ee goynta ah, seere daaq 00-100, fulin la'aan 10, shaashadda shaashadda F1.0, Xukunkaani waa sax oo keliya marka safarka ugu badan loo dejiyo 50.
Khadka Wireless-ka: Asalka waa 10. Marka astaan kantaroolka fog fog aysan xasilloonayn ama waxaa jira faragelin calaamad leh goobta, Waad wax ka beddeli kartaa xuduudan si aad ugu beddelato kanaalka si aad uga fogaato faragelinta;
Xadidda xawaaraha: Xadka sare ee xawaaraha goynta otomaatiga ah ee dhaqdhaqaaqa yar,seere daaq 00-200, fulin la'aan 60, shaashadda shaashadda 6.0; Muujinta qiimaha sare = xawaaraha xaddiga xawaaraha × 0.1;
Martida ugu badan: Xawaaraha ugu badan ee matoorka weyn, seere daaq 10-100, fulin la'aan 50;
Qalabka MBUs ( waajib ah ): Xulashada Qaabka Gawaarida Gawaarida, seere daaq 00-03, fulin la'aan 03;
00- Shanghai Xilliyin 01 Fuji
02- Booqasho 03 Hafiska (zhongchen), Robicon)
Qalabka SBUS (waajib ah): XUQUUQDA MADAXWEYNAHA MADAXWEYNAHA, seere daaq 00-05, fulin la'aan 03;
00- Shanghai Xilliyin 01 Fuji
02- Booqasho 03 Hafiska (zhongchen), Robicon)
04-Anguaha 05-Ma Jiro
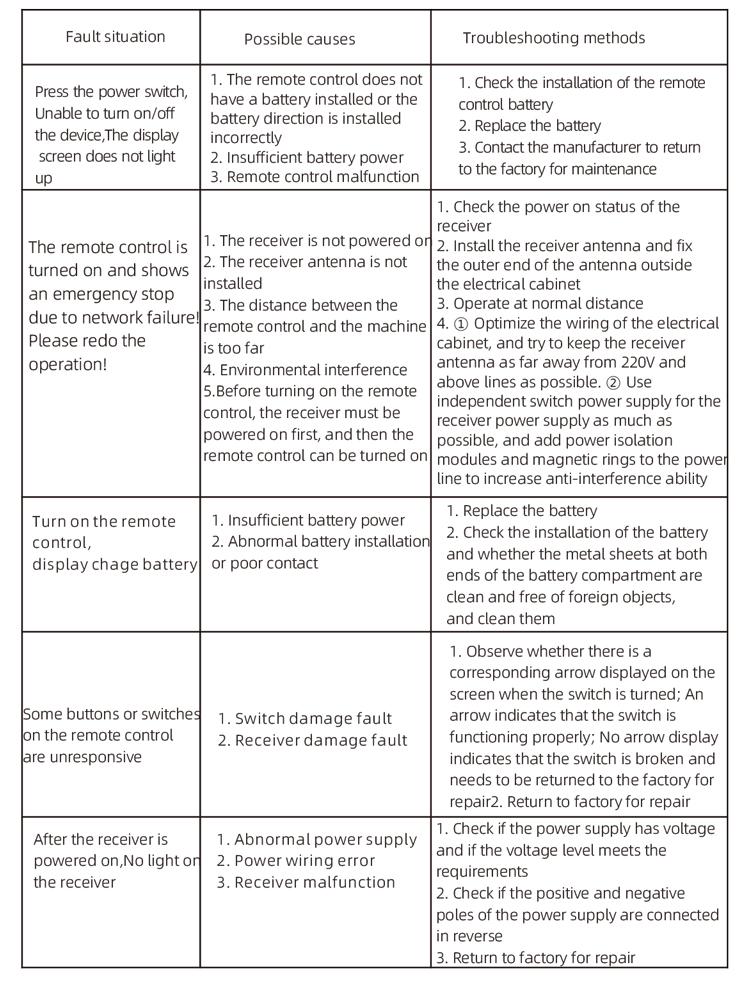
8. Dhibaatooyinka wax soo saarka
7.2 Dejinta guud ee isu-beddelka soo noqnoqda
1. Taliska xulashada isha: Kanaalka Taliska Isgaarsiinta
2. Xulashada isha ugu weyn ee xulashada: Isgaarsiinta la siiyay
3. Sicirka bauth: 19200
4. Qaabka Xogta: Wax cadeyn ah, Qaabka Xogta<8-N-1>
5. Cinwaanka Maxalliga ah: Deji beddelka bidix ee bidix 1, Ku-wareejinta ugu badan ee ugu badan 2, iyo isu-beddelka gawaarida waaweyn ee 3
7.3 Tilmaamaha Hawlgallada Xakamaynta ee fog
1. Awoodda mashiinka, dami koontaroolka fog, Gali asalka kontaroolka fog, Deji xaashiyaha kantaroolka asalka ah ee kantaroolka, Inta badan ayaa ah in la dejiyo moodooyinka dadka ku-beddelashada gawaarida yar yar iyo kuwa waaweyn (Ka gudub talaabadan haddii wax soo saarkii mashiinka uu horey u dhigay);
2. U deji cabbirrada isugeynta soo noqnoqda (Ka gudub talaabadan haddii wax soo saare mashiinka uu horey u dhigay);
3. U dejiso xanta fog ee hantanka gacanta, ka dibna u isticmaal xakameynta fog ee si aad mashiinka u dhaqaajiso booska shaqada;
4. Habka gacanta, U deji qiimaha iC ee goynta mowduuca baabuurta waaweyn iyo xawaaraha matoorka weyn;
5. U beddelo qaab toos ah oo deji xawaaraha xadka goynta ah F Qiimee F Qiimaha matoorka yar;
6. Qaabka otomatiga ah, u rogo dhaqdhaqaaqa weyn si aad ugu gudbiso si aad u bilowdo matoorka weyn, ka dibna u rog wareejinta gawaarida yar ee hore u dhaqaaq ama gadaal u rogo. Xakamaynta fog fog ayaa galaya qaabka goynta otomatiga ah oo uu bilaabmayo goynta.
9.Dayac-tir
1. Fadlan u isticmaal jawi qalalan heerkulka qolka iyo cadaadiska si aad u ballaariso nolosha adeegga.
2. Fadlan iska ilaali inaad ku isticmaasho jawi aan caadi ahayn sida roobka iyo biyaha oo biyuhu u dheereeyay nolosha adeegga.
3. Fadlan hayso qolka batteriga iyo aagga birta ee nadiifka ah.
4. Fadlan ka fogow waxyeelada kantaroolka fog sababta oo ah squelazing iyo dhicitaanka.
5. Haddii aan la isticmaalin muddo dheer, Fadlan ka saar batteriga oo kaydi meel fog iyo batteriga meel nadiif ah oo aamin ah.
6.Inta lagu gudajiro kaydinta iyo gaadiidka, Waa in fiiro gaar ah loo siiyo qoyaan iyo iska caabin naxdin leh.
10. Macluumaadka badbaadada
1. Fadlan si taxaddar leh u aqri tilmaamaha si taxaddar leh ka hor intaadan isticmaalin oo ka mamnuuc aqoonyahanada ka shaqeynta.
2. Fadlan ku beddel batteriga hab waqti ku habboon marka batteriga aad u yar tahay in laga fogaado khaladaadka ay sababaan awood aan ku filnayn, taas oo ka dhalan karta in kantaroolka fog ee aan awoodin inuu shaqeeyo.
3. Haddii loo baahdo hagaajinta, Fadlan la xiriir soo-saaraha. Haddii waxyeelada ay ka dhasheen is-hagaajinta, Soo-saarehu ma bixin doono dammaanad