Beskrivning
1.Produktintroduktion
Wireless Remote Control is used for manual guidance, positionering, tool setting and other operations of CNC machine tools. Denna produkt använder trådlös överföringsteknik, eliminerar den traditionella fjädertrådsanslutningen, minska utrustningsfel orsakade av kablar, eliminerar nackdelarna med kabeldragning, oljefläckar, etc., and is more convenient to operate.It is widely applicable to CNC machine tools such as gantry machining centers, gantry vertical lathes, and CNC gear processing machines, and is compatible with various mainstream CNC system brands on the market, including Siemens, Mitsubishi, Fläkt, Syntec and more.
2.Produktfunktioner
1. Antar 433MHz trådlös kommunikationsteknik med ett trådlöst driftavstånd på 20 mätare.
2.Adaptivt frekvenshopp; 32 uppsättningar av trådlösa fjärrkontroller kan användas samtidigt utan störningar.
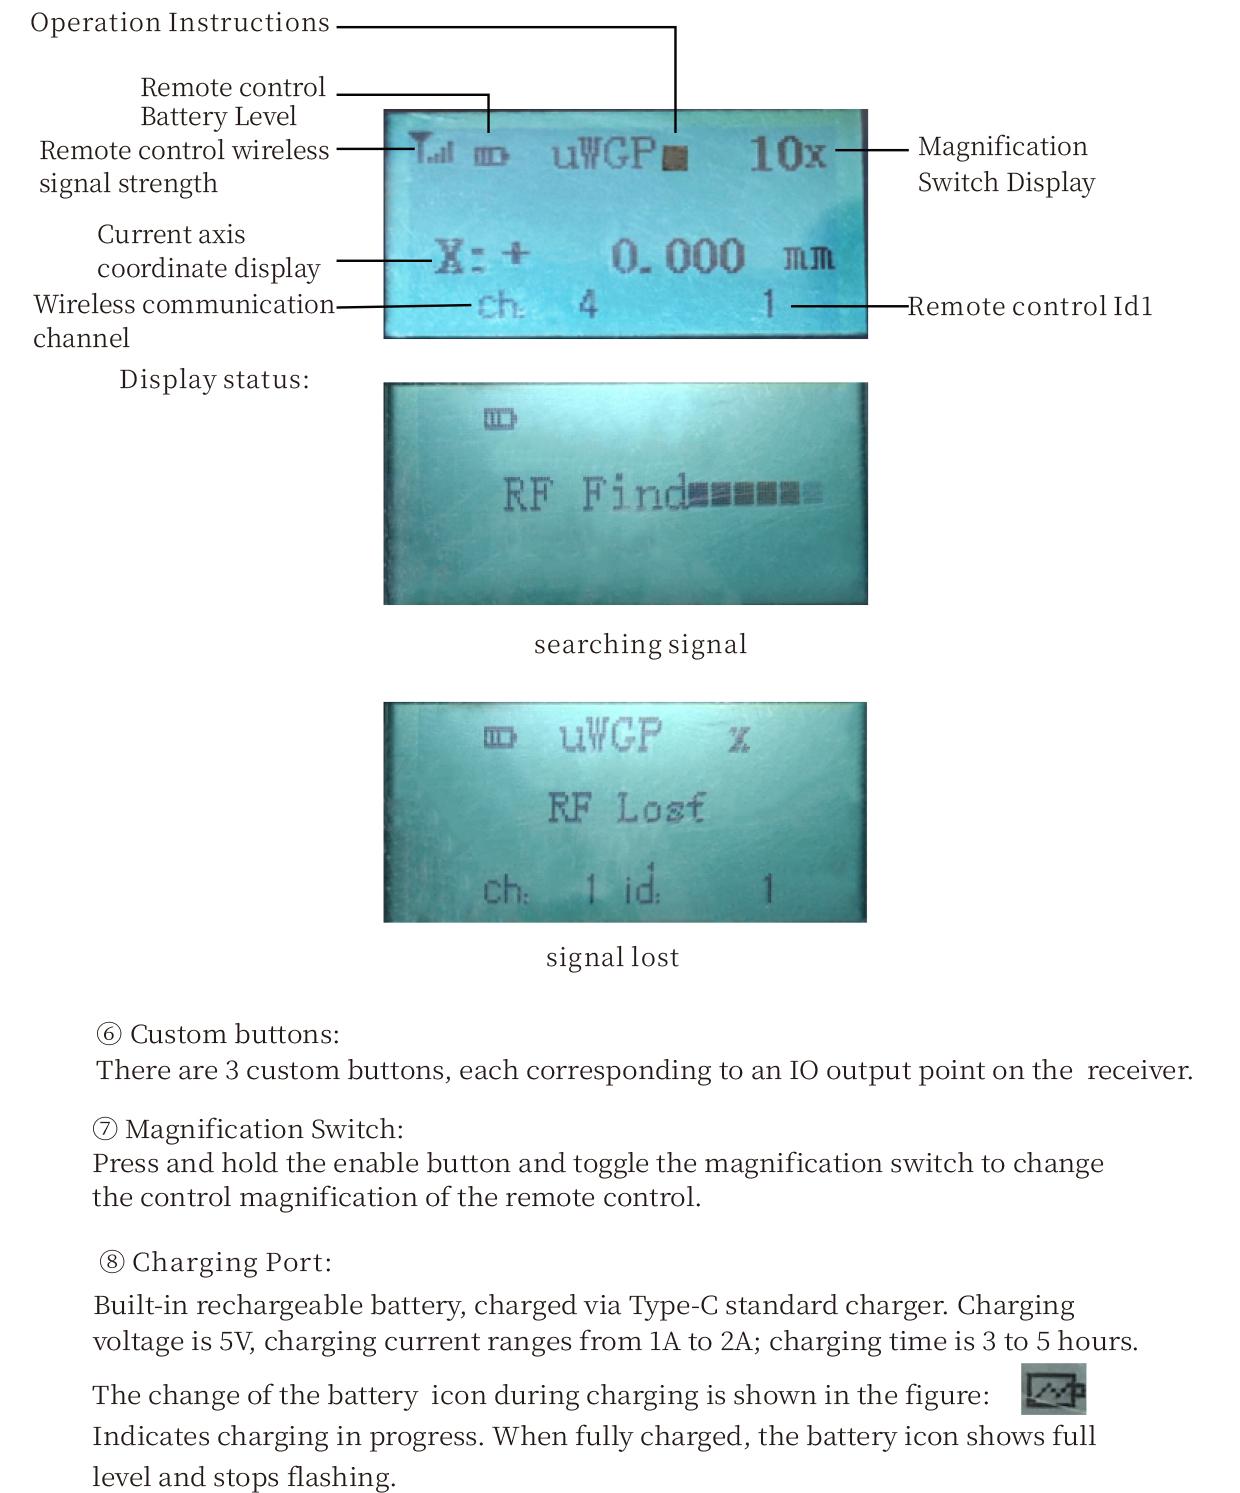
3.Supports the emergency stop button, and the emergency stop button remains effective even after the remote control is powered off.
4.Stödja 3 anpassade knappar med växlande IO-signalutgång.
5.Stöder 6-axlig kontroll, och 7 till 12-axlig kontroll är anpassningsbar.
6. Stöder 3-stegs förstoringskontroll, och 4-stegs förstoringskontroll är anpassningsbar.
7.stöder aktiveringsknappfunktionen, som kan mata ut switchande IO-signaler, och styr även val av axel, förstoring och kodare.
8.Stöder modifiering av kodningstypen för axelval och förstoring via programvara.
9. Supports pulse encoder with specification of 100 pulser per varv.
10. Supports standard Type-C charging with 5V-2A charging specification; built-in battery
specification: 14500 / 1100mAh.
3. Produktspecifikationer
| Working Voltage and Current of Handheld Terminal |
3.7V/20.0mA |
| Charging Battery Specification |
3.7V/14500/1100mAh
|
| Low Voltage Alarm Range of Handheld Terminal |
<3.35V |
| Receiver Power Supply Voltage |
DC5V-24V/1A |
| Receiver Emergency Stop Output Load Range |
AC125V-1A/DC30V-2A |
| Receiver Enable Output Load Range |
AC125V-1A/DC30V-2A |
| Receiver Custom Button Output Load Range |
DC24V/50mA
|
| Receiver Axis Selection Output Load Range |
DC24V/50mA |
| Receiver magnification Output Load Range |
DC24V/50mA |
| Handheld Terminal Transmit Power |
15dBm
|
| Mottagare som tar emot känslighet |
-100dBm |
| Trådlös kommunikationsfrekvens |
433MHz frekvensband
|
| Wireless Communication Distance |
20 meters barrier-free distance
|
| Operating Temperature |
-25℃<X<55℃ |
| Safe drop height |
1 m
|
| Number of Custom Buttons |
3
|
| Product Weight |
546.86(g) |
| Product Dimensions |
200*87*72(mm) |
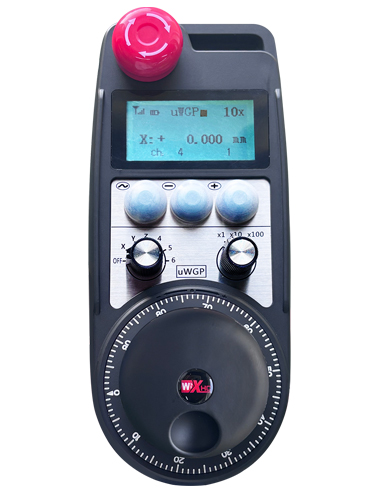
4. Produktfunktion Introduktion
Anteckningar:
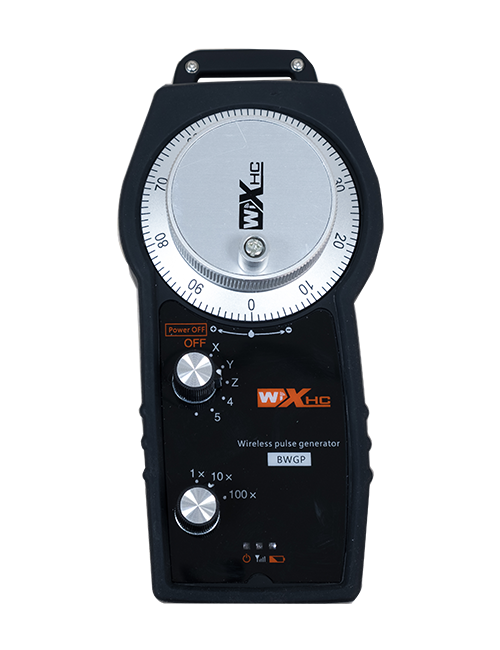
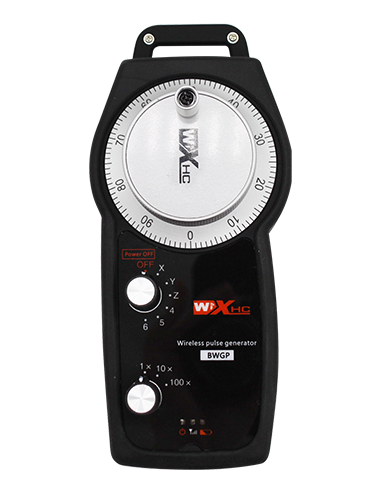
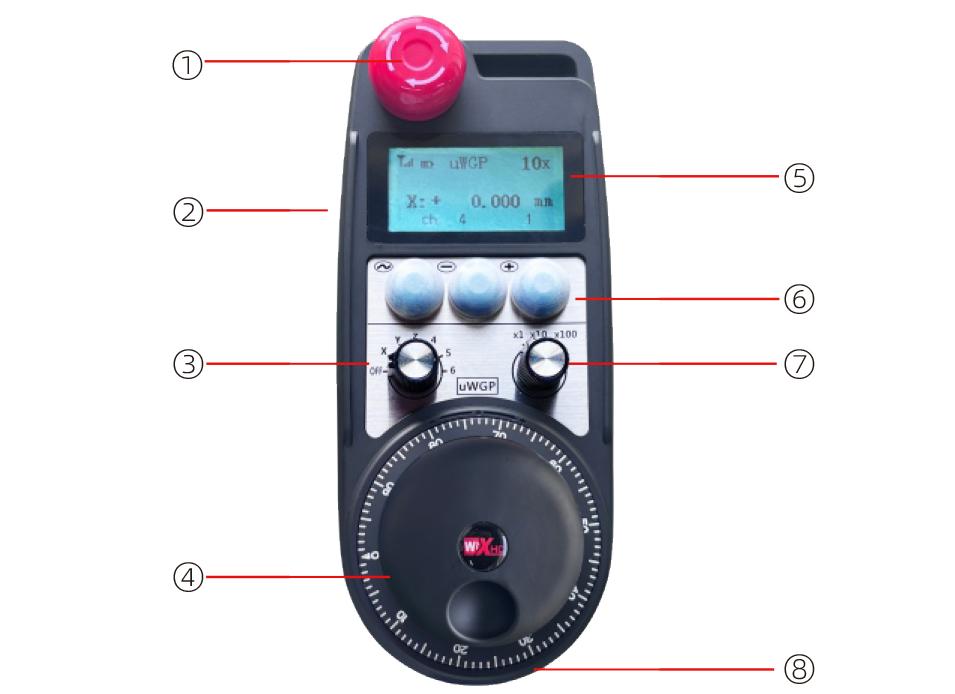
① Emergency Stop Button:
Tryck på nödstoppsknappen, the two groups of emergency stop IO outputs on the receiver will disconnect, and all remote control functions will be invalidated.Release the emergency stop button, the emergency stop IO outputs on the receiver will be closed, and all remote control functions will be restored. Dessutom, even if the remote control is powered off, pressing the emergency stop button can still activate the emergency stop IO output of the receiver.
② Enable Button:
Press either enable button on both sides, the two sets of enable IO outputs on the receiver will conduct. Release the enable button, and the enable IO outputs will disconnect. It is necessary to press and hold the enable button before toggling axis selection, magnification or rotating the remote control for the operation to take effect.This function can be canceled through the configuration software.
③ Axis Selection Switch (Power Switch):
Tryck och håll ned aktiveringsknappen, then toggling the axis selection switch can control the movement of axis .Press and hold the enable button, then toggle the axis selection switch to switch the motion axis controlled by the remote control. Toggle the switch from the OFF position to any axis position, and the remote control will power on automatically.
④ Pulse Encoder:
Press and hold the enable button and rotate the pulse encoder, it will output pulse signals to control the movement of the machine axis.
⑤ LCD Display Screen:
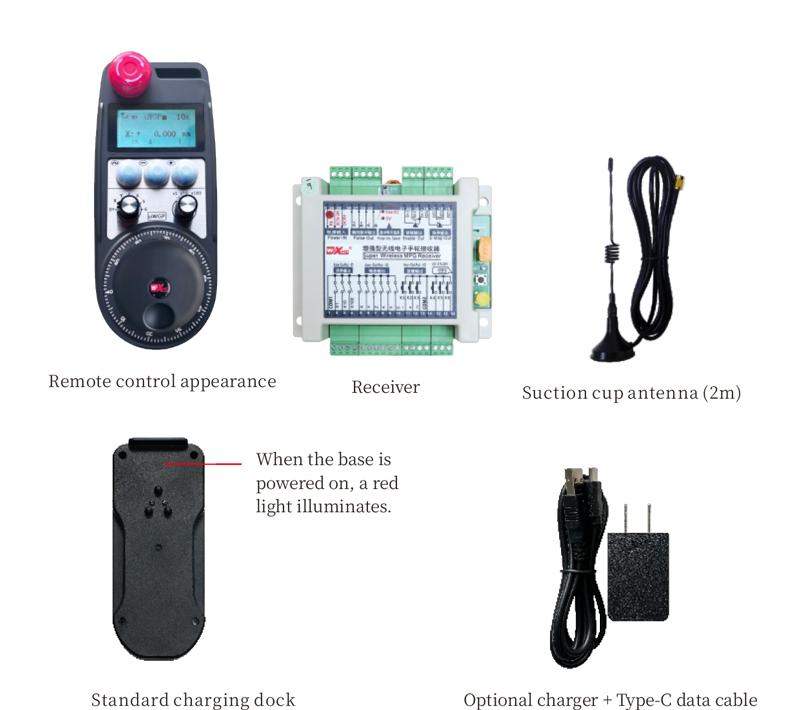
5. Product Accessories Diagram
6. Produktinstallationsguide
6.1 Produktinstallationssteg
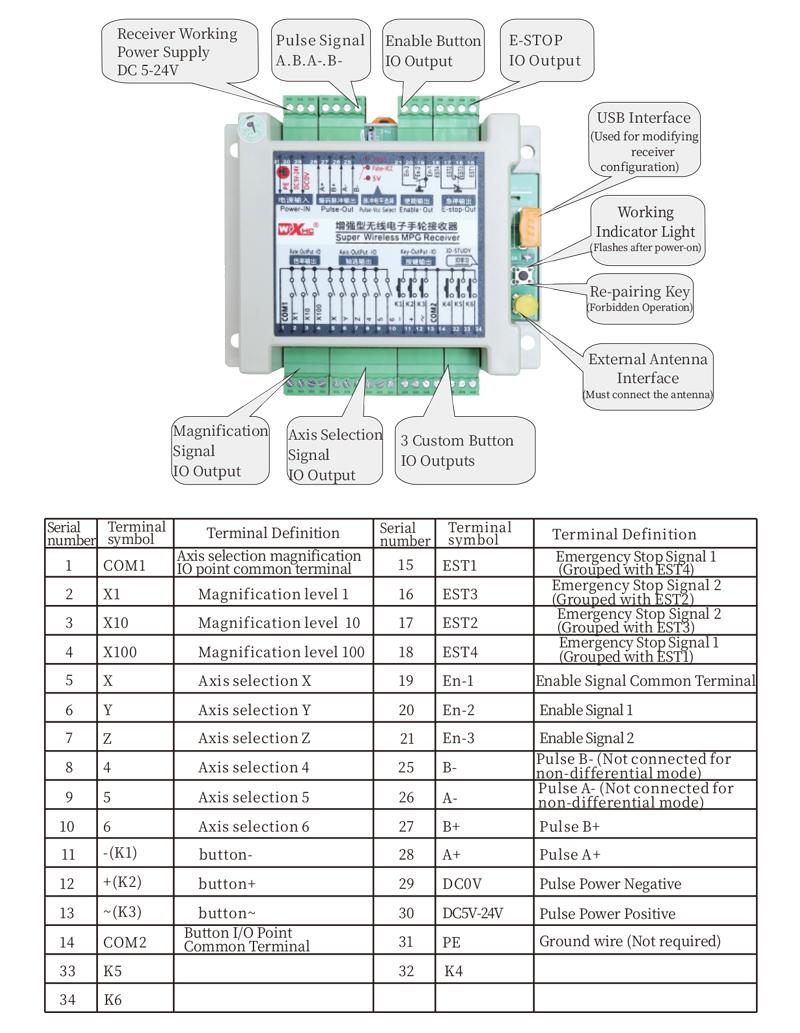
1. Install the receiver in the electrical cabinet via the buckle on its back, or mount it inside the electrical cabinet through the screw holes at the four corners of the receiver.
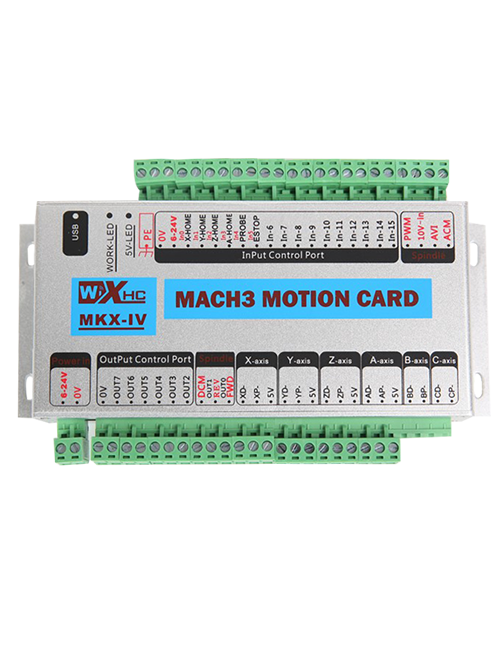
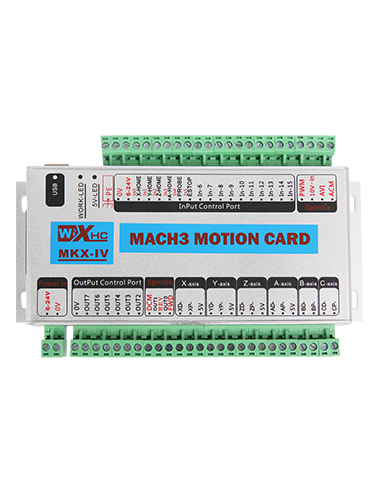
2. Se vårt kopplingsschema för mottagaren, jämför det med din utrustning på plats, and connect the equipment to the receiver with cables.
3. After the receiver is fixed in place, install the supporting antenna of the receiver properly. Mount or place the outer end of the antenna outside the electrical cabinet. It is recommended to place it on the top of the electrical cabinet for optimal signal performance. Do not leave the antenna uninstalled or place it inside the electrical cabinet; annat, signal failure may occur.
4. Slutligen, turn on the remote control power switch, then you can remotely operate the machine via the remote control.
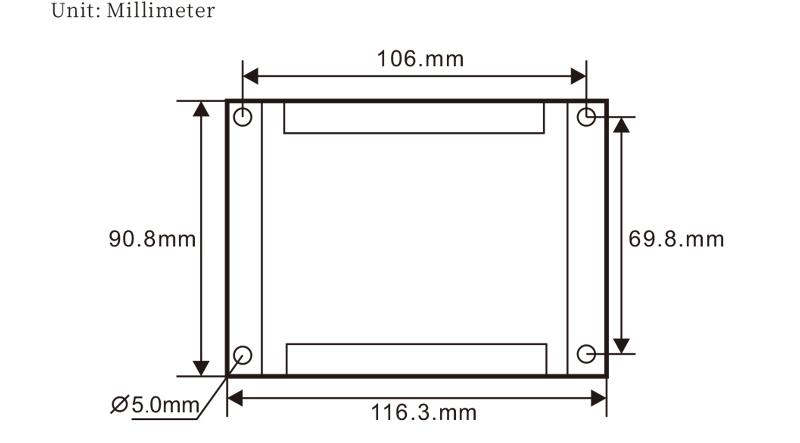
6.2 Receiver Installation Dimensions
6.3 Referensdiagram för mottagaren
7. Produktverksamhetsinstruktioner
1. Slå på maskinen och mottagaren. The receiver operation indicator flashes. After the wireless electronic remote control is fully charged, toggle it from the OFF gear to the X-axis gear, and the remote control display lights up.
2. Select the axis : Tryck och håll ned aktiveringsknappen, toggle the axis selection switch to select the axis to be operated.
3. Select the magnification: Tryck och håll ned aktiveringsknappen, toggle the magnification switch to select the required magnification gear.
4. Axis movement: Tryck och håll ned aktiveringsknappen, select the axis selection switch and the magnification switch, then rotate the pulse encoder. Rotate clockwise to move the axis in the positive direction, and rotate counterclockwise to move the axis in the negative direction.
5. Tryck och håll ned valfri anpassad knapp, the corresponding button IO output of the receiver will turn on; release the button, and the output will turn off.
6. Tryck på nödstoppsknappen, the corresponding emergency stop IO output of the receiver disconnects and the remote control function becomes invalid. Release the emergency stop button, the emergency stop IO output closes and the remote control function is restored.
7. If the wireless remote control is not operated for a period of time, den går automatiskt in i viloläge för att minska strömförbrukningen. It can be used normally again by pressing the enable button again.
8.If the wireless remote control is not used for a long time, turn the axis switch to OFF to turn off the power and extend battery life
8. Produktmodellbeskrivning
①:UWGP stands for appearance style.
②:Pulse Output Parameters:
01: Indikerar att pulsutgångssignalen är A, B; Pulsspänning 5V; pulsmängd 100PPR.
02: Indikerar att pulsutgångssignalen är A, B; Pulsspänning 12V; pulse quantity 25PPR.
03: Indikerar att pulsutgångssignalen är A, B, A -, B -; Pulsspänning 5V; pulsmängd 100PPR.
04: Indikerar en lågnivå NPN öppen kretsutgång, med pulsutgångssignaler A och B; The number of pulses is 100PPR.
05: Indikerar PNP-källa på hög nivå, med pulsutgångssignaler A och B; Antalet pulser är 100PPR.
③:Represents the axis selection switch quantity; 6 stands for 6 yxor, 7 stands for 7 yxor, and so on.
④: Represents the signal type of the axis selection switch.A stands for point-to-point output signal, and B stands for encoder output signal.
⑤: Represents the signal type of the magnification switch.A stands for point-to-point output signal, and B stands for encoder output signal.
⑥: Representerar antalet anpassade knappar; 3 corresponds to 6 anpassade knappar.
⑦: Represents the power supply for the system remote control. 05 stands for 5V power supply, och 24 stands for 24V power supply.
⑧: Represents the contact charging mode. It starts charging automatically when placed back on the charging base.
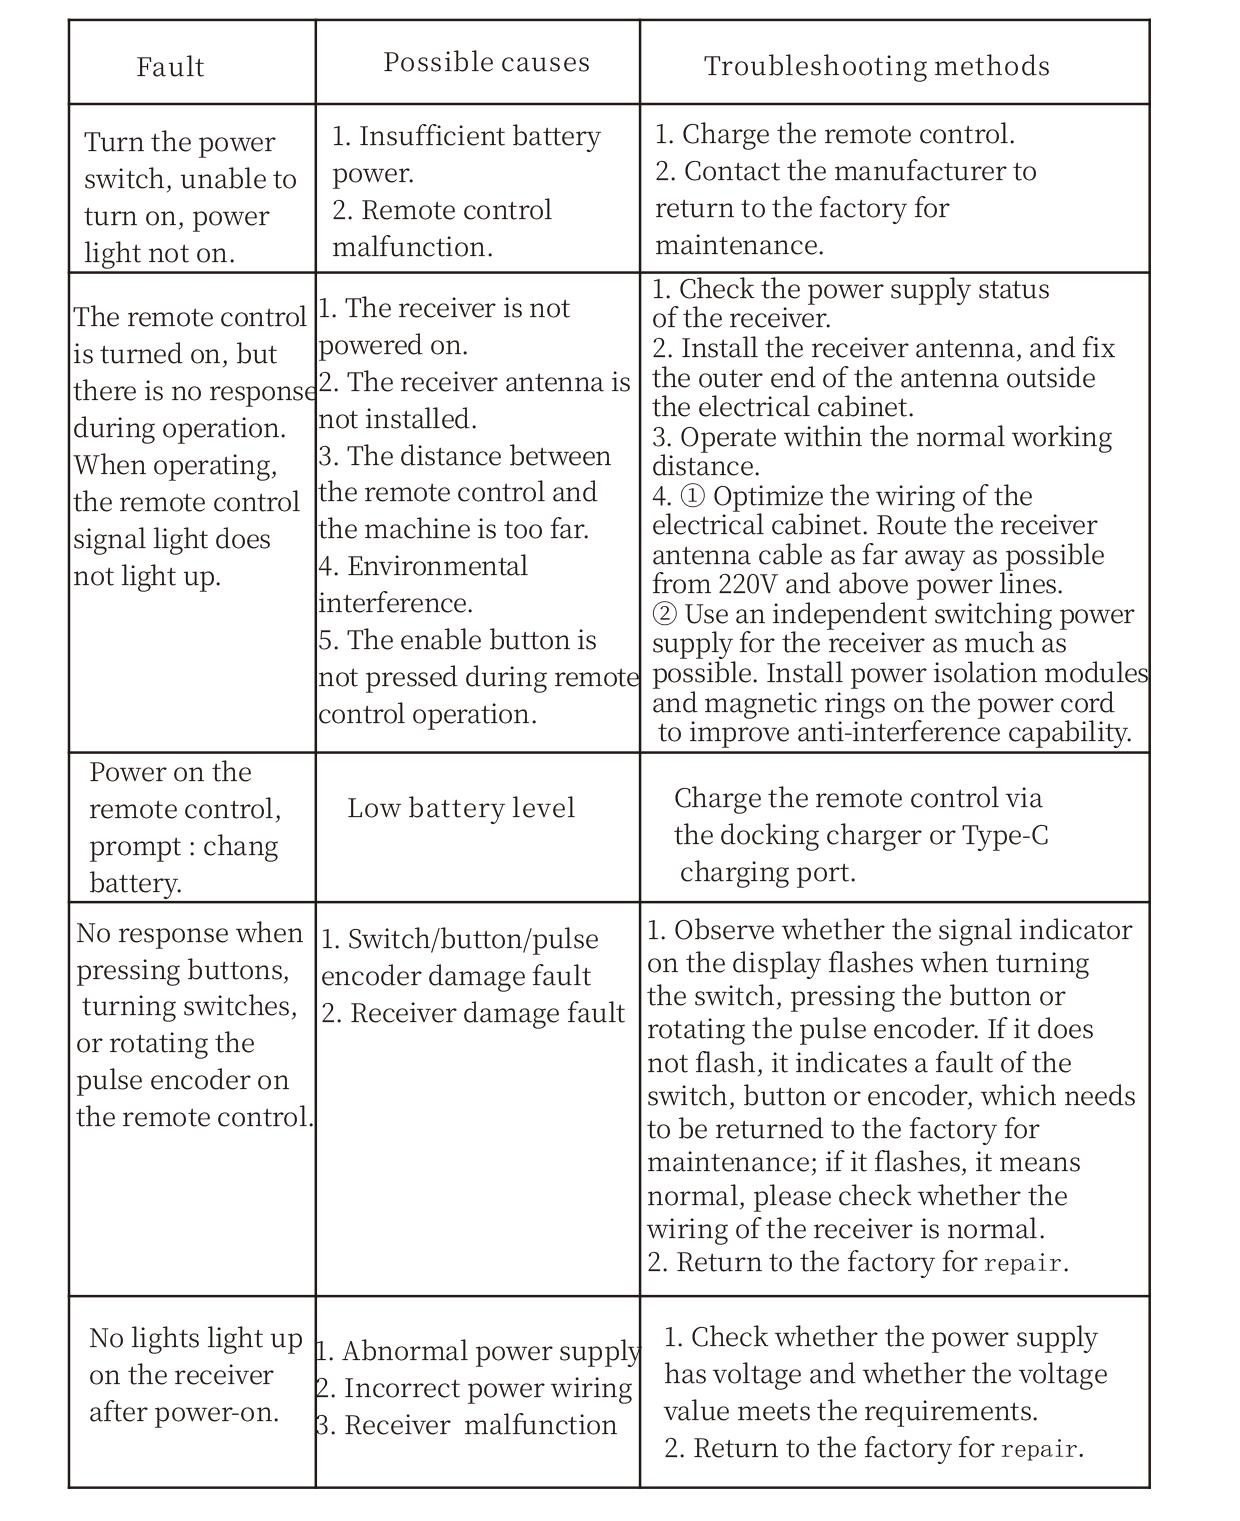
9. Felsökning av produkten
10. Maintenance and upkeep
1. Använd den i en torr miljö vid rumstemperatur och tryck för att förlänga dess livslängd.
2. Please avoid using in abnormal environments such as rain and water to extend the service life.
3. Please keep the appearance of the remote control clean to extend its service life.
4. Please avoid crushing, dropping, or bumping, etc. to prevent damage to the precision components inside the remote control or accuracy errors.
5. Om det inte används länge, please store the remote control in a clean and safe place.
6. Avoid moisture and shock during storage and transportation.
11. Säkerhetsinformation
1. Vänligen läs instruktionerna noggrant före användning och förbjud icke-professionella att använda.
2. Please charge the remote control in a timely manner when the battery level is too low, to avoid malfunction and operational errors caused by insufficient power.
3. If you repair it yourself and cause damage, the warranty will be void.