Тасвирлау
1.Продукция кертү
Wireless Remote Control is used for manual guidance, Позиция, tool setting and other operations of CNC machine tools. Бу продукт чыбыксыз тапшыру технологиясен кабул итә, Традицион яз чыбык бәйләнешен бетерү, Кабельләр аркасында җиһазларның кимчелекләрен киметү, Кабель диагнагының кимчелекләрен бетерү, Нефть таплары, һ.б., and is more convenient to operate.It is widely applicable to CNC machine tools such as gantry machining centers, gantry vertical lathes, and CNC gear processing machines, and is compatible with various mainstream CNC system brands on the market, including Siemens, Мицубиси, Фанук, Syntec and more.
2.Продукция үзенчәлекләре
1. 433МГц чыбыксыз элемтә технологиясен кабул итә 20 метр.
2.Адаптив ешлыкны чабу; 32 чыбыксыз дистанцион контроль комплектлар берьюлы комачауламыйча кулланылырга мөмкин.
3.Supports the emergency stop button, and the emergency stop button remains effective even after the remote control is powered off.
4.Ярдәм итә 3 IO сигнал чыгу белән махсус төймәләр.
5.6 күчәр белән идарә итүне хуплый, һәм 7 12-күчәр контроле көйләнә.
6. 3 тизлектә зурайту контролен хуплый, һәм 4 тизлектәге зурайту контроле көйләнә.
7.кушу төймәсе функциясен хуплый, IO сигналларын күчерә ала, һәм шулай ук күчәр сайлау белән идарә итү, зурайту һәм кодлау.
8.Программа ярдәмендә күчәр сайлау һәм зурлау кодлау төрен үзгәртүгә ярдәм итә.
9. Supports pulse encoder with specification of 100 Революциягә импульс.
10. Supports standard Type-C charging with 5V-2A charging specification; built-in battery
specification: 14500 / 1100mah.
| Working Voltage and Current of Handheld Terminal |
3.7V/20.0mA |
| Charging Battery Specification |
3.7V/14500/1100mAh
|
| Low Voltage Alarm Range of Handheld Terminal |
<3.35V |
| Receiver Power Supply Voltage |
DC5V-24V/1A |
| Receiver Emergency Stop Output Load Range |
AC125V-1A / DC30V-2a |
| Receiver Enable Output Load Range |
AC125V-1A / DC30V-2a |
| Receiver Custom Button Output Load Range |
DC24V / 50ma
|
| Receiver Axis Selection Output Load Range |
DC24V / 50ma |
| Receiver magnification Output Load Range |
DC24V / 50ma |
| Handheld Terminal Transmit Power |
15dbm
|
| Кабул итүче |
-100dbm |
| Чыбыксыз аралашу ешлыгы |
433MHZ ешлык төркеме
|
| Wireless Communication Distance |
20 meters barrier-free distance
|
| Operating Temperature |
-25℃<X<55℃ |
| Safe drop height |
1 м
|
| Number of Custom Buttons |
3
|
| Product Weight |
546.86(g) |
| Product Dimensions |
200*87*72(Мм) |
4. Продукция функциясе кереш сүз
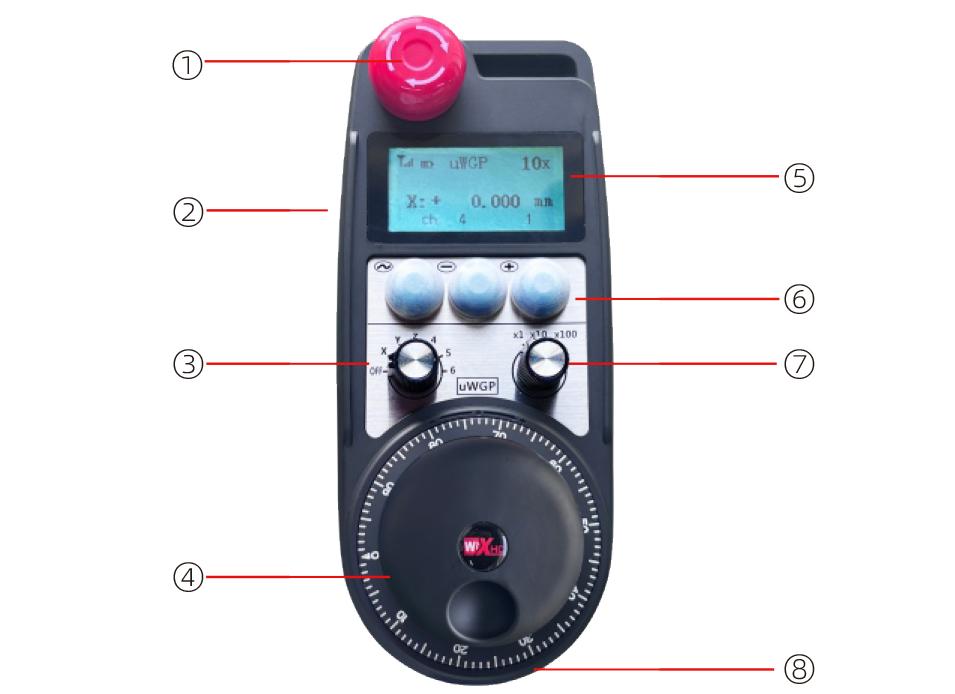
Искәрмәләр:
① Emergency Stop Button:
Ашыгыч тукталыш төймәсенә басыгыз, the two groups of emergency stop IO outputs on the receiver will disconnect, and all remote control functions will be invalidated.Release the emergency stop button, the emergency stop IO outputs on the receiver will be closed, and all remote control functions will be restored. Моннан тыш, even if the remote control is powered off, pressing the emergency stop button can still activate the emergency stop IO output of the receiver.
② Enable Button:
Press either enable button on both sides, the two sets of enable IO outputs on the receiver will conduct. Release the enable button, and the enable IO outputs will disconnect. It is necessary to press and hold the enable button before toggling axis selection, magnification or rotating the remote control for the operation to take effect.This function can be canceled through the configuration software.
③ Axis Selection Switch (Power Switch):
Эшне кушыгыз һәм тотыгыз, then toggling the axis selection switch can control the movement of axis .Press and hold the enable button, then toggle the axis selection switch to switch the motion axis controlled by the remote control. Toggle the switch from the OFF position to any axis position, and the remote control will power on automatically.
④ Pulse Encoder:
Press and hold the enable button and rotate the pulse encoder, it will output pulse signals to control the movement of the machine axis.
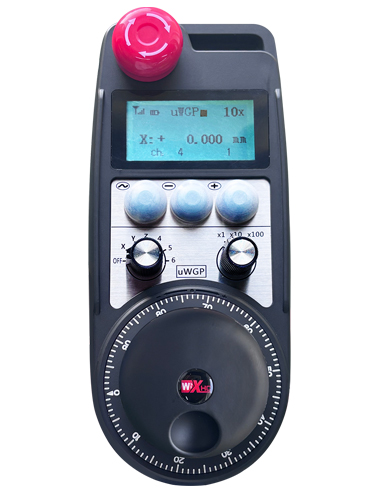
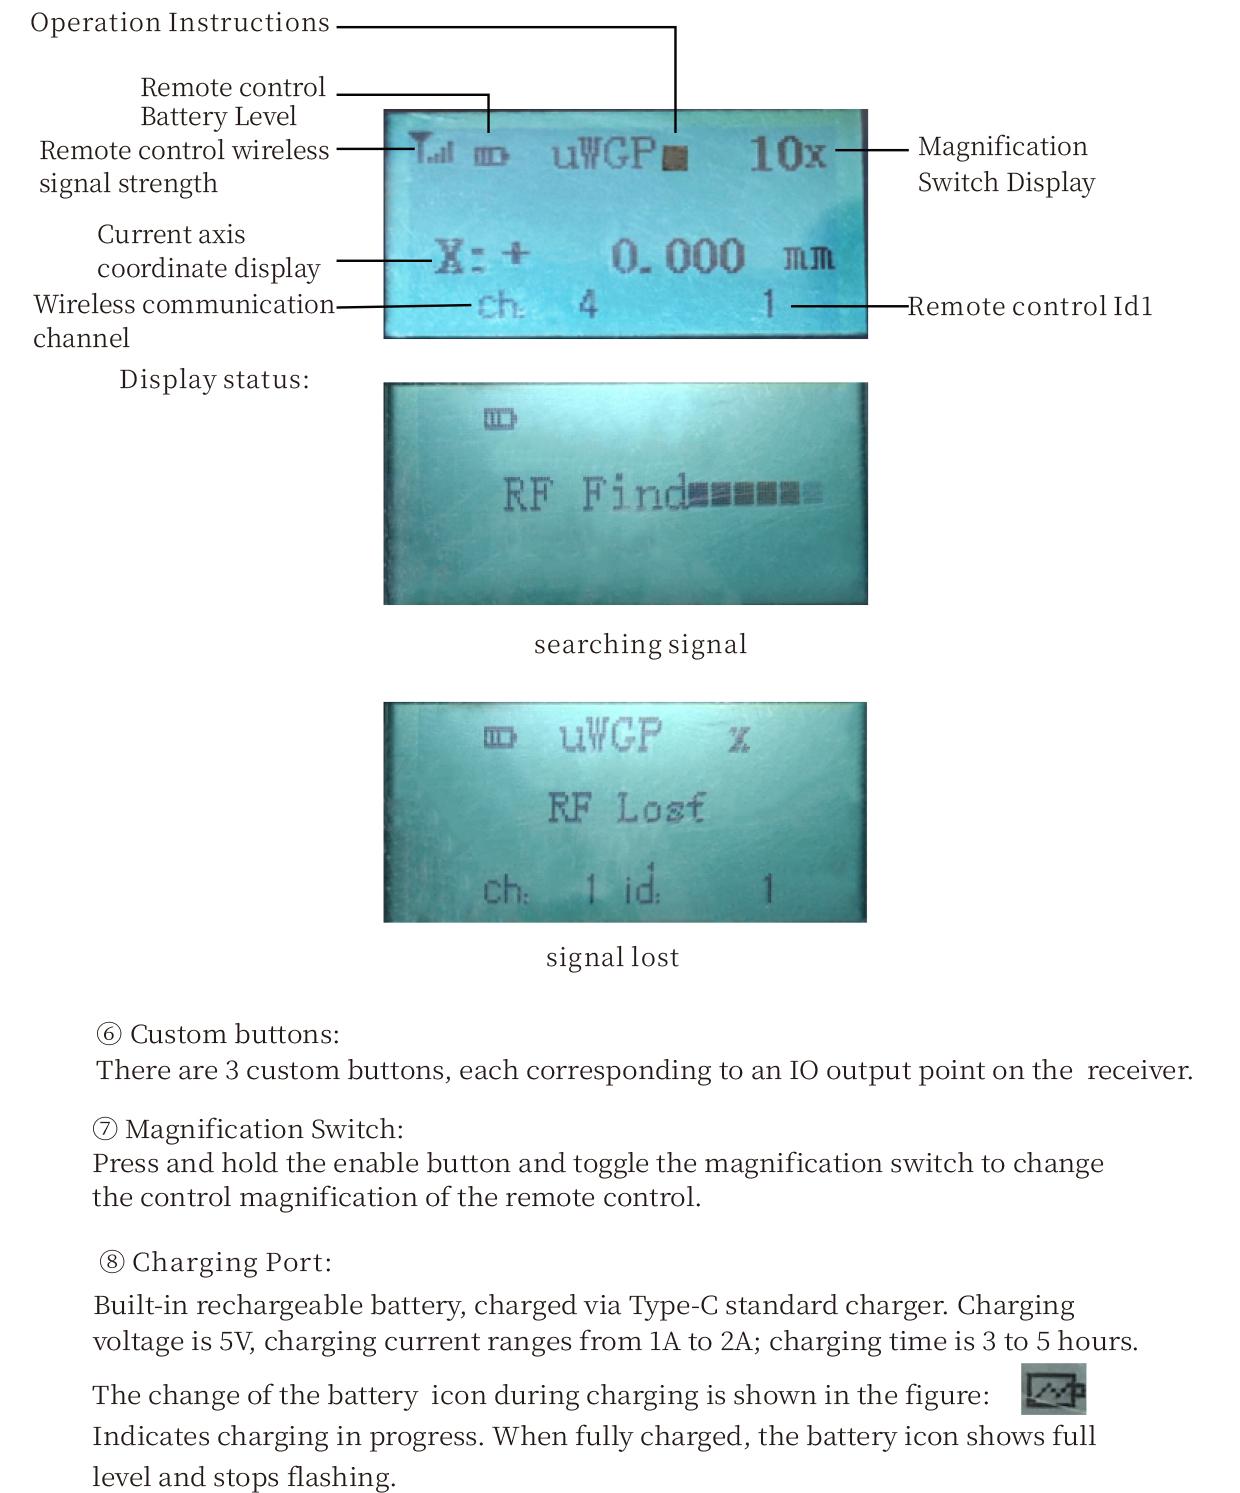
⑤ LCD Display Screen:
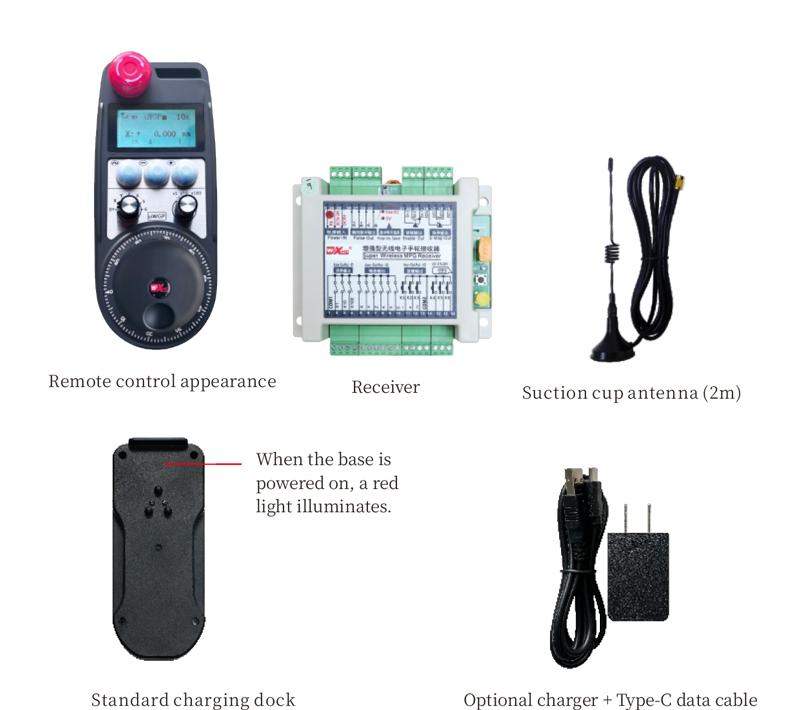
5. Product Accessories Diagram
6. Продукция урнаштыру кулланмасы
6.1 Продукция урнаштыру адымнары
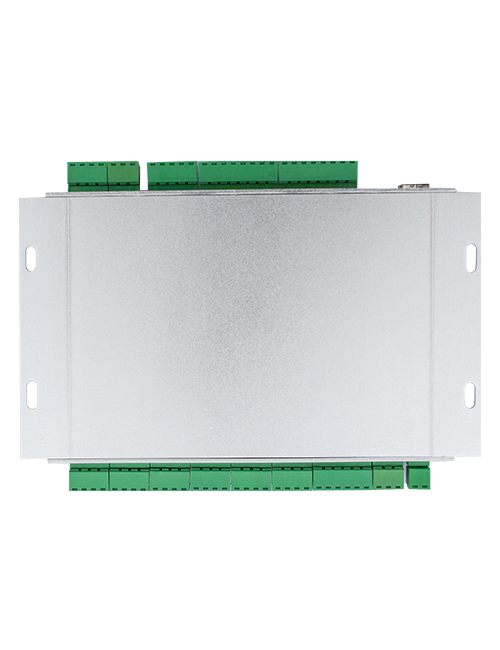
1. Install the receiver in the electrical cabinet via the buckle on its back, or mount it inside the electrical cabinet through the screw holes at the four corners of the receiver.
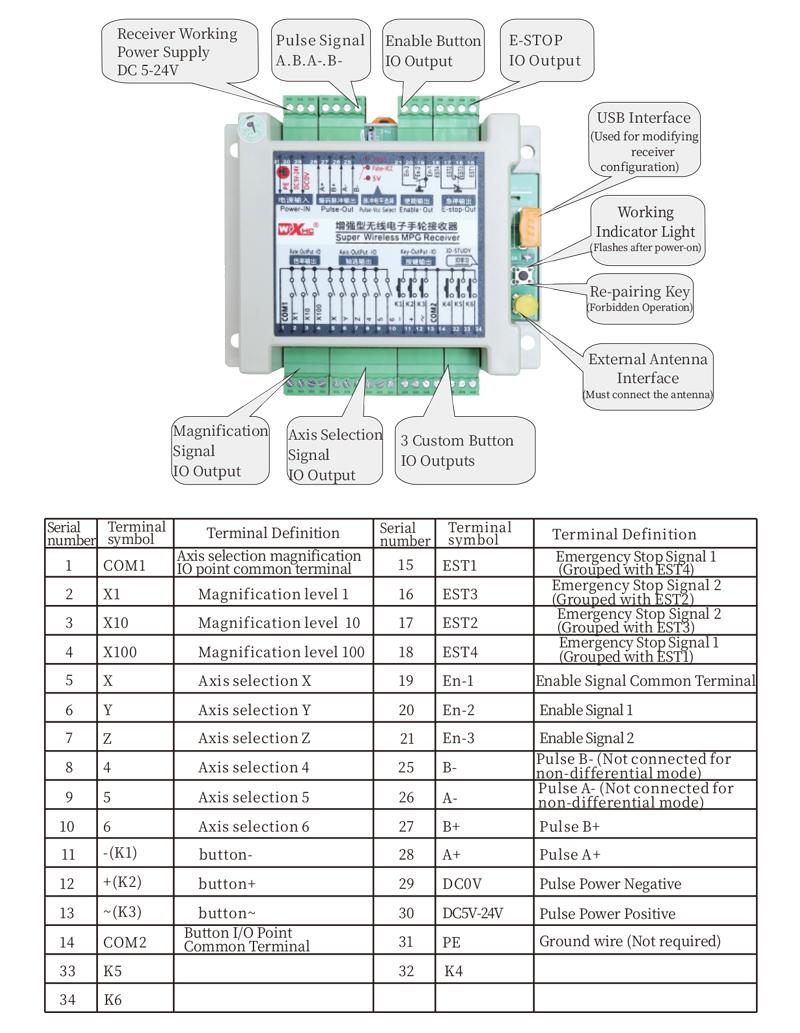
2. Безнең кабул итүче схемасына мөрәҗәгать итегез, аны сайттагы җиһазлар белән чагыштырыгыз, and connect the equipment to the receiver with cables.
3. After the receiver is fixed in place, install the supporting antenna of the receiver properly. Mount or place the outer end of the antenna outside the electrical cabinet. It is recommended to place it on the top of the electrical cabinet for optimal signal performance. Do not leave the antenna uninstalled or place it inside the electrical cabinet; otherwise, signal failure may occur.
4. Ниһаять, turn on the remote control power switch, then you can remotely operate the machine via the remote control.
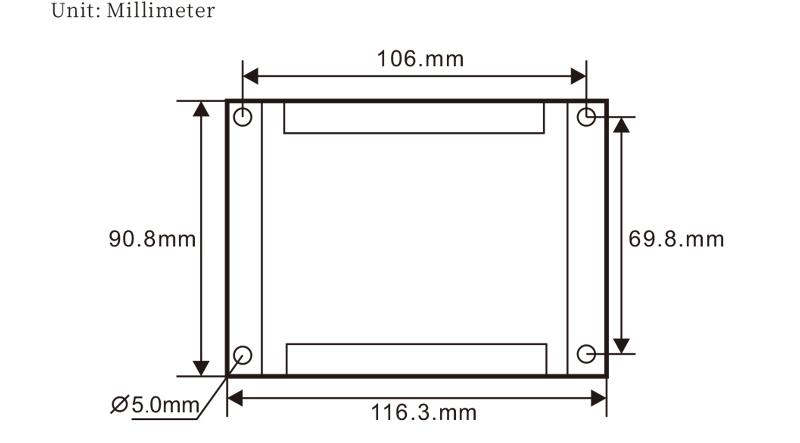
6.2 Receiver Installation Dimensions
6.3 Кабул итүче белгечлек схемасы
7. Продукция операциясе күрсәтмәләре
1. Машинада һәм кабул итүчедә көч. The receiver operation indicator flashes. After the wireless electronic remote control is fully charged, toggle it from the OFF gear to the X-axis gear, and the remote control display lights up.
2. Select the axis : Эшне кушыгыз һәм тотыгыз, toggle the axis selection switch to select the axis to be operated.
3. Select the magnification: Эшне кушыгыз һәм тотыгыз, toggle the magnification switch to select the required magnification gear.
4. Axis movement: Эшне кушыгыз һәм тотыгыз, select the axis selection switch and the magnification switch, then rotate the pulse encoder. Rotate clockwise to move the axis in the positive direction, and rotate counterclockwise to move the axis in the negative direction.
5. Теләсә нинди махсус төймәгә басыгыз һәм үткәрегез, the corresponding button IO output of the receiver will turn on; release the button, and the output will turn off.
6. Ашыгыч тукталыш төймәсенә басыгыз, the corresponding emergency stop IO output of the receiver disconnects and the remote control function becomes invalid. Release the emergency stop button, the emergency stop IO output closes and the remote control function is restored.
7. If the wireless remote control is not operated for a period of time, Ул электр куллануны киметү өчен автоматик рәвештә йокы режимын кертәчәк. It can be used normally again by pressing the enable button again.
8.If the wireless remote control is not used for a long time, turn the axis switch to OFF to turn off the power and extend battery life
8. Продукция моделе тасвирлау
①:UWGP stands for appearance style.
②:Pulse Output Parameters:
01: Шпл чыгару сигналы а, Б; Pulse көчәнеш 5В; Pulse саны 100PPR.
02: Шпл чыгару сигналы а, Б; Ишек көчәнеше 12В; pulse quantity 25PPR.
03: Шпл чыгару сигналы а, Б, А -, Б -; Pulse көчәнеш 5В; Pulse саны 100PPR.
04: Түбән дәрәҗәдәге NPN ачык схеманы күрсәтә, А һәм В пульс чыгару сигналлары белән; The number of pulses is 100PPR.
05: Югары дәрәҗәдәге PNP чыганак чыганакларын күрсәтә, А һәм В пульс чыгару сигналлары белән; Иптәшләр саны 100PPR.
③:Represents the axis selection switch quantity; 6 stands for 6 балта, 7 stands for 7 балта, and so on.
④: Represents the signal type of the axis selection switch.A stands for point-to-point output signal, and B stands for encoder output signal.
⑤: Represents the signal type of the magnification switch.A stands for point-to-point output signal, and B stands for encoder output signal.
⑥: Махсус төймәләр санын күрсәтә; 3 corresponds to 6 махсус төймәләр.
⑦: Represents the power supply for the system remote control. 05 stands for 5V power supply, һәм 24 stands for 24V power supply.
⑧: Represents the contact charging mode. It starts charging automatically when placed back on the charging base.
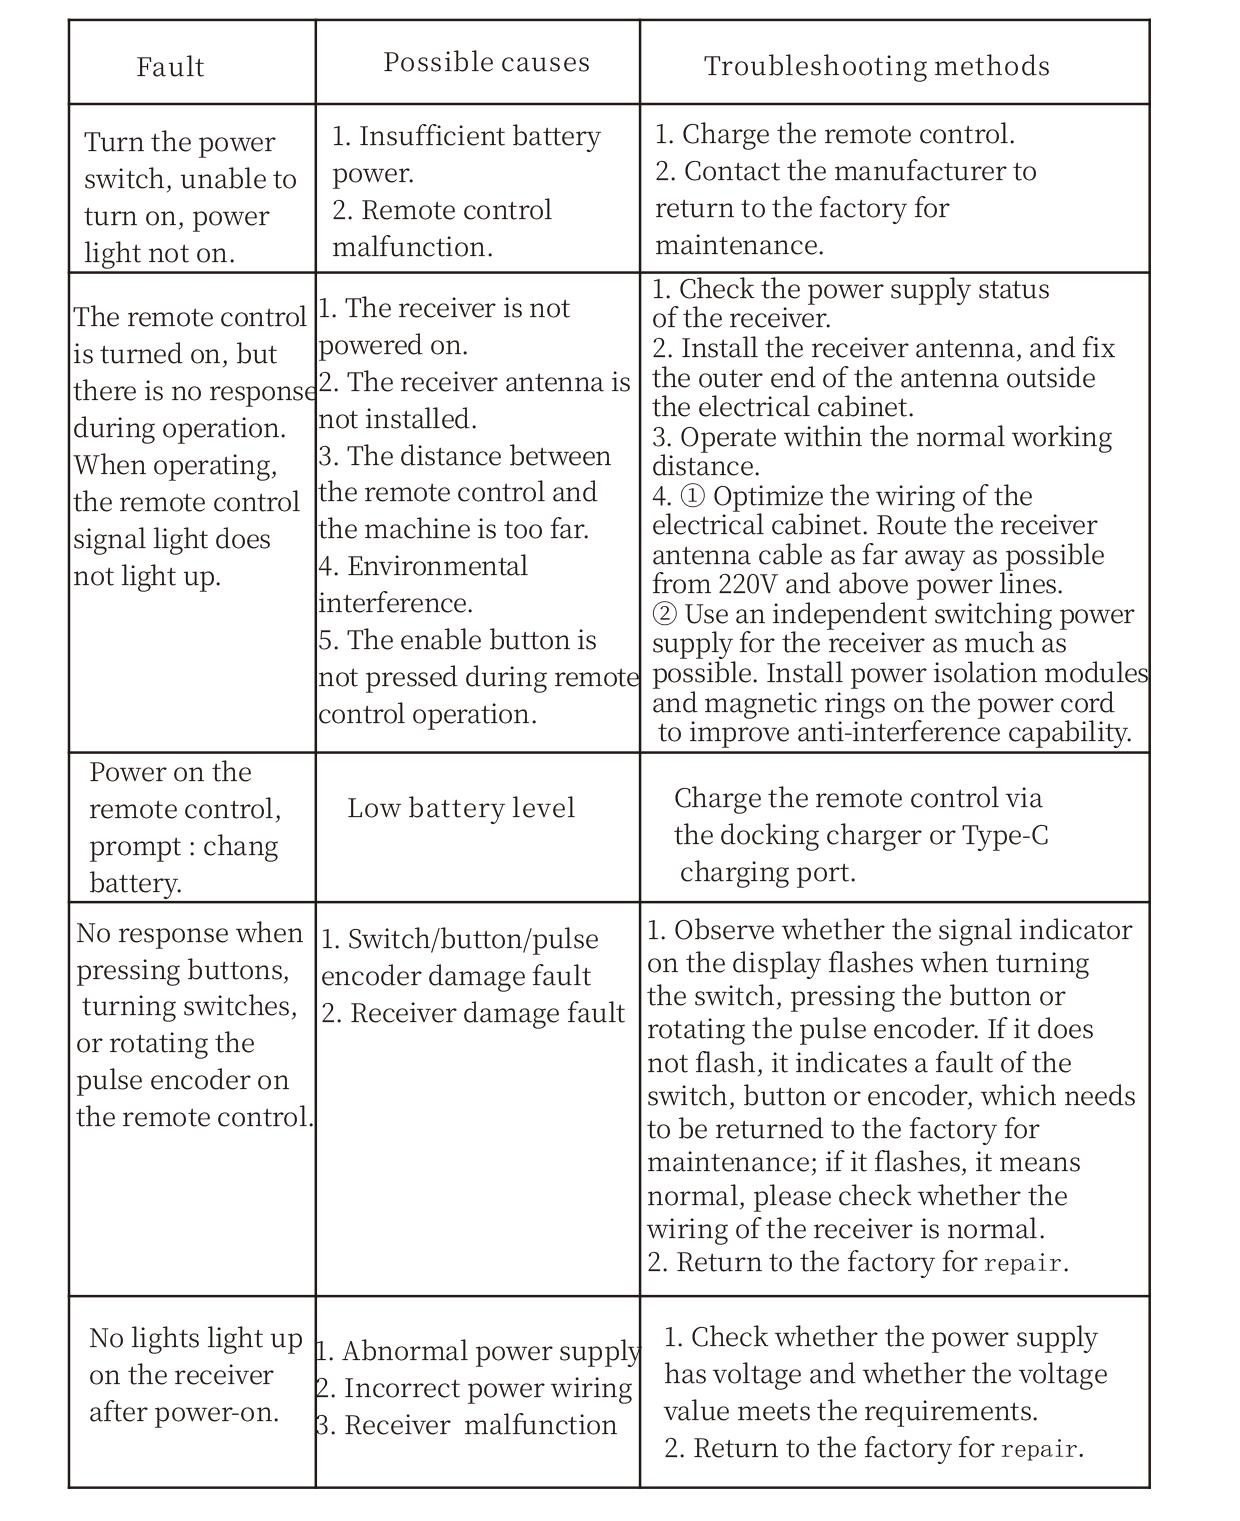
9. Продукция проблемаларын чишү
10. Maintenance and upkeep
1. Зинһар, аны бүлмә температурасында һәм аның хезмәт күрсәтүен киңәйтү өчен басым белән коры мохиттә кулланыгыз.
2. Please avoid using in abnormal environments such as rain and water to extend the service life.
3. Please keep the appearance of the remote control clean to extend its service life.
4. Please avoid crushing, dropping, or bumping, һ.б.. to prevent damage to the precision components inside the remote control or accuracy errors.
5. Озак вакыт кулланылмаса, please store the remote control in a clean and safe place.
6. Avoid moisture and shock during storage and transportation.
11. Куркынычсызлык турында мәгълүмат
1. Зинһар, күрсәтмәләрне кулланып, профессионалларның эшләвен тыючы игътибар белән укыгыз.
2. Please charge the remote control in a timely manner when the battery level is too low, to avoid malfunction and operational errors caused by insufficient power.
3. If you repair it yourself and cause damage, the warranty will be void.