Підтримує 2 настроювані кнопки, за допомогою вихідного сигналу типу перемикання;
Підтримує -2 управління вісь;
Підтримує 3-рівня управління збільшенням;

1.Введення продукту
2. Функціональні особливості виробу
| Робоча напруга та струм бездротового пульта |
3V/14MA
|
| Характеристики батареї | 2 Лужні батарейки АА, розмір 5 |
| Діапазон сигналізації низької напруги бездротового дистанційного керування | < 2.3V |
| Напруга живлення приймача | DC5V-24V/A |
| Діапазон вихідного навантаження аварійної зупинки приймача | AC125V-1A/DC30V-2A |
| Діапазон вихідного навантаження дозволу приймача |
AC125V-1A/DC30V-2A
|
| Діапазон вихідного навантаження кнопки приймача | DC24V/50mA |
| Діапазон вихідного навантаження вибору осі приймача | DC24V/50mA |
| Діапазон вихідного навантаження збільшення приймача | DC24V/50mA |
| Потужність передачі портативного терміналу |
15дБм
|
| Чутливість прийому приймача | -100дБм |
| Частота бездротового зв'язку | 433діапазон частот МГц |
| Відстань бездротового зв'язку | Безбар'єрна відстань 40 метри |
| Робоча температура | -25℃ < X < 55℃ |
| Висота проти падіння | 1 (метр) |
| Індивідуальна кількість кнопок | 2 |


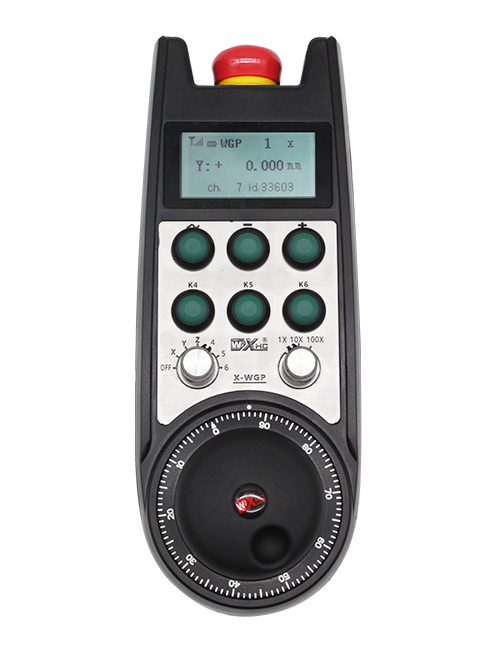
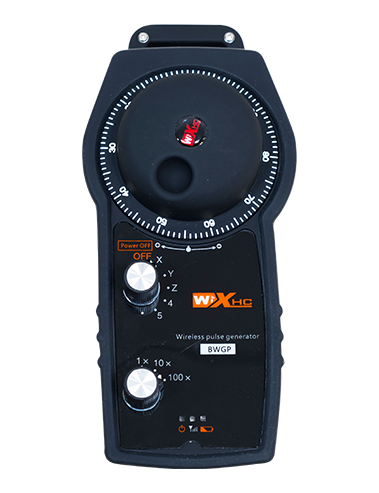
① Імпульсний кодер:
Натисніть і утримуйте кнопку ввімкнення, струсіть імпульсний кодер, видавати імпульсний сигнал,і керуйте рухом осі верстата.
② Кнопка «Увімкнути».:
Натисніть будь-яку кнопку ввімкнення з обох боків, і два набори дозволених виходів введення-виведення на приймачі будуть проводити. Відпустіть кнопку ввімкнення, щоб від’єднати вихід увімкнення вводу-виведення; А перед перемиканням вибору осі збільшення і струшування маховичка,кнопку ввімкнення потрібно утримувати натиснутою, щоб діяти; Цю функцію можна скасувати за допомогою програмного забезпечення налаштування.
③ Світлові індикатори:
Лівий бічний ліхтар: увімкніть світло,маховик використовує вісь, щоб вибрати ВИМК для увімкнення живлення, і цей індикатор продовжує горіти після ввімкнення;
Середнє світло: сигнальне світло, яке загоряється під час виконання будь-якої функції маховичка, і не світиться, коли не виконується жодна операція;
Правий бічний ліхтар: Сигналізатор низької напруги, низький рівень заряду батареї,цей індикатор блимає або продовжує світитися, батарею потрібно замінити.
④ Кнопка аварійної зупинки:
Натисніть кнопку аварійної зупинки, і два набори аварійних виходів IO на приймачі будуть відключені, і всі функції штурвала будуть недійсними.
⑤ Перемикач збільшення:
Натисніть і утримуйте кнопку ввімкнення, щоб перемкнути перемикач збільшення, який може перемикати збільшення, кероване маховиком.
⑥ Перемикач вибору осі (вимикач живлення):
Натисніть і утримуйте кнопку ввімкнення, щоб перемкнути перемикач вибору осі, який може перемикати вісь руху, керовану маховиком. Переведіть цей перемикач із положення ВИМК. на будь-яку вісь і увімкніть живлення маховичка.
⑦ Спеціальна кнопка:
Дві спеціальні кнопки, кожен відповідає вихідній точці введення-виведення на приймачі.

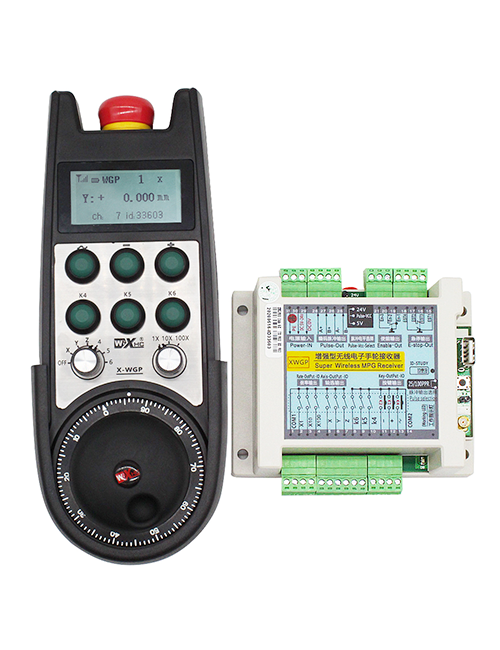
1. Встановіть приймач в електрошафу через пряжку на тильній стороні, або встановіть його в корпус через отвори для гвинтів у чотирьох кутах ствольної коробки.
2. Зверніться до схеми з’єднання нашого приймача та порівняйте її з наявним у вас обладнанням. Підключіть обладнання до приймача за допомогою кабелів.
3.Після того, як ствольна коробка правильно закріплена, антена, оснащена приймачем, а зовнішній кінець антени повинен бути встановлений або розміщений за межами електричної шафи. Рекомендується розмістити його на вершині електричного шафи для найкращого ефекту сигналу. Забороняється залишати антену не підключеною або розміщувати її всередині електрошафи, оскільки це може призвести до непридатності сигналу.
4. Нарешті, увімкніть вимикач живлення маховичка, і ви можете дистанційно керувати машиною за допомогою штурвала.
6.2 Розміри встановлення приймача

6.3 Довідкова схема проводки приймача

7. Інструкції з експлуатації продукту
1. Увімкніть апарат і приймач. Індикатор роботи приймача блимає. Встановіть батарею в бездротовий електронний маховик, закріпіть кришку акумулятора, і
увімкніть вимикач бездротового електронного штурвала. Світиться індикатор рівня батареї маховичка.
2. Виберіть вісь координат: Натисніть і утримуйте кнопку ввімкнення, перемкніть перемикач вибору осі, і виберіть вісь, якою ви хочете керувати.
3. Виберіть збільшення: Натисніть і утримуйте кнопку ввімкнення, перемкніть перемикач збільшення,і виберіть потрібний рівень збільшення.
4. Рухома вісь: Натисніть і утримуйте кнопку ввімкнення, виберіть перемикач вибору осі, виберіть перемикач збільшення, а потім поверніть датчик імпульсу. Поверніть за годинниковою стрілкою, щоб перемістити
позитивну вісь і проти годинникової стрілки, щоб перемістити негативну вісь.
5. Натисніть і утримуйте будь-яку спеціальну кнопку, і відповідний вихід кнопки IO приймача буде включений. Відпустіть кнопку, і вихід буде вимкнено.
6. Натисніть кнопку аварійної зупинки, відповідний аварійний вихід IO приймача буде відключено, функція маховичка буде вимкнена,відпустіть кнопку аварійної зупинки, вихід аварійної зупинки IO буде закрито, і функція маховичка буде відновлена.
7. Якщо маховик не працює протягом певного часу, він автоматично перейде в режим сну, щоб зменшити споживання енергії. При повторному використанні, маховичок можна активувати, натиснувши кнопку включення.
8. Якщо маховичок не використовується протягом тривалого часу, рекомендується перевести вал маховика в положення ВИМК, вимкніть живлення маховичка, і продовжити термін служби батареї.
8. Опис моделі продукту

① :ZTWGP представляє стиль зовнішнього вигляду
②:Параметри імпульсного виходу:
01: Вказує, що імпульсний вихідний сигнал дорівнює А, Б; Імпульсна напруга 5В; кількість імпульсів 100PPR.
02:Вказує на те, що імпульсні вихідні сигнали є A і B; Імпульсна напруга 12В; кількість імпульсів 100PPR.
03:Вказуючи, що імпульсні вихідні сигнали дорівнюють A, Б, А -, Б -; Імпульсна напруга 5В; кількість імпульсів 100PPR.
04:Вказує на розрив вихідного ланцюга NPN низького рівня, з імпульсними вихідними сигналами А і В;Кількість імпульсів 100PPR.
05:Вказує на вихід джерела PNP високого рівня, з імпульсними вихідними сигналами А і В; Кількість імпульсів 100PPR.
③:Представляє кількість перемикачів вибору осі, 2 представляє 2 сокири.
④:Відображає тип сигналу перемикання вибору осі, A представляє вихідний сигнал «точка-точка»., і B представляє закодований вихідний сигнал.
⑤:Позначає тип сигналу перемикання множення, A представляє вихідний сигнал «точка-точка»., і B представляє закодований вихідний сигнал.
⑥:Позначає кількість настроюваних кнопок, 2 представляє 2 Спеціальні кнопки.
⑦:Являє собою джерело живлення системного штурвала, і 05 являє собою блок живлення 5 В.
⑧:L представляє лівий стовпець (лівий тримач ножа), і R представляє правий стовпець (правий тримач ножа).
9.Рішення несправностей продукту

1. Будь ласка, використовуйте його в сухому середовищі при кімнатній температурі та тиску, щоб продовжити термін служби.
2. Будь ласка, уникайте використання в аномальних середовищах, таких як дощ та бульбашки води, щоб продовжити термін служби.
3. Слідкуйте за чистотою маховика, щоб продовжити термін його служби.
4. Будь ласка, уникайте стискання, падіння, качка, тощо. щоб запобігти пошкодженню прецизійних компонентів всередині маховичка або помилкам точності.
5. Якщо не використовується тривалий час, Будь ласка, зберігайте ручне колесо в чистому та безпечному місці. Під час зберігання та транспортування, Слід звернути увагу на вологу та ударну стійкість.
11. Інформація про безпеку
1. Будь ласка, уважно прочитайте інструкції перед використанням та забороняйте не професіоналам діяти.
2. Будь ласка, своєчасно замініть батарею, якщо рівень заряду батареї занадто низький, щоб уникнути помилок, спричинених недостатнім зарядом батареї та неможливістю керувати маховиком.
3. Якщо потрібен ремонт, Будь ласка, зв'яжіться з виробником. Якщо пошкодження спричинено самостійним ремонтом, Виробник не надасть гарантії