Unterstützt 2 anpassbare Schaltflächen, mit schaltbarem IO-Signalausgang;
Unterstützt -2 Achsensteuerung;
Unterstützt die 3-stufige Vergrößerungssteuerung;

1.Produkteinführung
2. Funktionsmerkmale des Produkts
| Operating voltage and current of wireless remote |
3V/14MA
|
| Battery specifications | 2 AA alkaline batteries, size 5 |
| Low voltage alarm range of wireless remote | < 2.3V |
| Versorgungsspannung des Empfängers | DC5V-24V/A |
| Receiver emergency stop output load range | AC125V-1A/DC30V-2A |
| Receiver enable output load range |
AC125V-1A/DC30V-2A
|
| Receiver custom button output load range | DC24V/50mA |
| Receiver axis selection output load range | DC24V/50mA |
| Receiver magnification output load range | DC24V/50mA |
| Transmission power of handheld terminal |
15dBm
|
| Empfangsempfindlichkeit des Empfängers | -100dBm |
| Frequenz der drahtlosen Kommunikation | 433MHz-Frequenzband |
| Wireless communication distance | Barrier free distance of 40 Meter |
| Operation temperature | -25℃ < X < 55℃ |
| Anti fall height | 1 (Meter) |
| Custom button quantity | 2 |


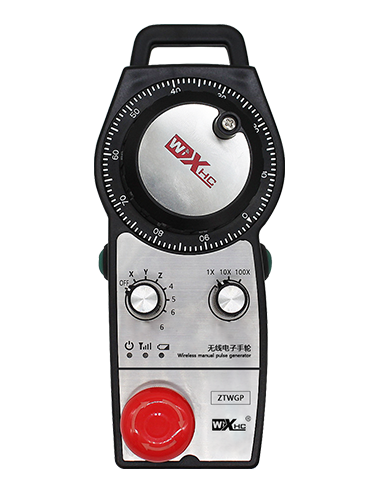
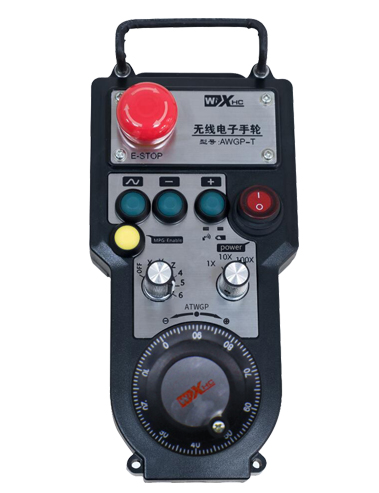
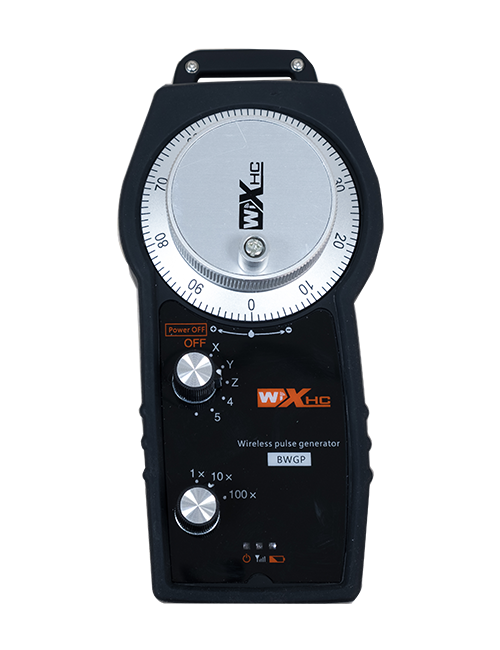
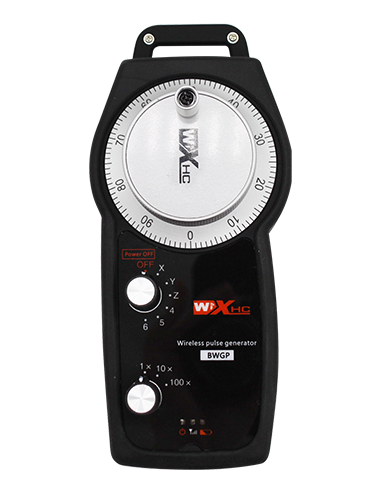
① Pulse encoder:
Halten Sie die Aktivierungstaste gedrückt, Schütteln Sie den Impulsgeber, ein Impulssignal abgeben,and control the movement ofthe machine axis.
② Enable button:
Press either enable button on either side, and the two sets of enable IO outputs on the receiver will conduct. Release the enable button to disconnect the enable IO output; And before switching the axis selection magnification and shaking the handwheel,the enable button needs to be held down to be effective; This function can be cancelled through configuration software.
③ Indicator lights:
Left side light: power on light,the handwheel uses the axis to select OFF for power on, and this light stays on after power on;
Middle light: a signal light that lights up when operating any function ofthe handwheel, and does not light up when there is no operation;
Right side light: Alarmleuchte für Unterspannung, low battery level,this lightflashes or stays on, battery needs to be replaced.
④ Emergency stop button:
Drücken Sie den Not-Aus-Knopf, und die beiden Sätze von Notstopp-E/A-Ausgängen am Empfänger werden getrennt, und alle Funktionen des Handrads sind ungültig.
⑤ Magnification switch:
Press and hold the enable button to switch the magnification switch, which can switch the magnification controlled by the handwheel.
⑥ Axis selection switch (Netzschalter):
Press and hold the enable button to switch the axis selection switch, which can switch the movement axis controlled by the handwheel. Switch this switch from OFF to any axis and turn on the handwheel power.
⑦ Custom button:
Two custom buttons, jeweils entsprechend einem IO-Ausgangspunkt am Empfänger.

1. Installieren Sie den Empfänger durch die Schnalle auf der Rückseite im Schaltschrank, oder installieren Sie es durch die Schraubenlöcher an den vier Ecken des Empfängers im Gehäuse.
2. Sehen Sie sich unseren Receiver-Verdrahtungsplan an und vergleichen Sie ihn mit Ihrer Ausrüstung vor Ort. Connect the equipment to the receiver via cables.
3.After the receiver is properly fixed, Die mit dem Empfänger ausgestattete Antenne muss angeschlossen sein, and the outer end of the antenna should be installed or placed outside the electrical cabinet. Für den besten Signaleffekt wird empfohlen, es oben auf dem Schaltschrank zu platzieren. It is prohibited to leave the antenna unconnected or place it inside the electrical cabinet, as this may result in the signal being unusable.
4. Endlich, turn on the power switch of the handwheel, and you can operate the machine remotely using the handwheel.
6.2 Einbaumaße des Empfängers

6.3 Referenzdiagramm zur Empfängerverkabelung

7. Bedienungsanleitung des Produkts
1. Schalten Sie die Maschine und den Empfänger ein. The receiver’s working indicator light flashes. Install the battery in the wireless electronic handwheel, secure the battery cover, Und
turn on the power switch of the wireless electronic handwheel. The handwheel’s battery level indicator light is on.
2. Wählen Sie die Koordinatenachse aus: Halten Sie die Aktivierungstaste gedrückt, toggle the axis selection switch, and select the axis you want to operate.
3. Vergrößerung auswählen: Halten Sie die Aktivierungstaste gedrückt, toggle the magnification switch,and select the desired magnification level.
4. Bewegliche Achse: Halten Sie die Aktivierungstaste gedrückt, Wählen Sie den Achsenauswahlschalter, Wählen Sie den Vergrößerungsschalter, and then rotate the pulse encoder. Rotate clockwise to move the
positive axis and counterclockwise to move the negative axis.
5. Halten Sie eine beliebige benutzerdefinierte Taste gedrückt, and the corresponding button IO output of the receiver will be turned on. Release the button, and the output will be turned off.
6. Drücken Sie den Not-Aus-Knopf, der entsprechende Not-Aus-IO-Ausgang des Empfängers wird abgeschaltet, Die Handradfunktion wird deaktiviert,Lassen Sie den Not-Aus-Knopf los, Der Notstopp-IO-Ausgang wird geschlossen, und die Handradfunktion wird wiederhergestellt.
7. Wenn das Handrad längere Zeit nicht betätigt wird, Es wechselt automatisch in den Schlafmodus, um den Stromverbrauch zu senken. Wenn es wieder verwendet wird, the handwheel can be activated by pressing the enable button.
8. Wenn das Handrad längere Zeit nicht benutzt wird, it is recommended to switch the handwheel shaft to the OFF position, Schalten Sie die Stromversorgung des Handrads aus, und verlängern die Batterielebensdauer.
8. Beschreibung des Produktmodells

① :ZTWGP represents the appearance style
②:Impulsausgangsparameter:
01: Zeigt an, dass das Impulsausgangssignal A ist, B; Impulsspannung 5V; Impulsmenge 100PPR.
02:Indicating thatthe pulse output signals are A and B; Impulsspannung 12V; Impulsmenge 100PPR.
03:Indicating thatthe pulse output signals are A, B, A -, B -; Impulsspannung 5V; Impulsmenge 100PPR.
04:Zeigt einen NPN-Leerlaufausgang mit niedrigem Pegel an, mit Impulsausgangssignalen von A und B;Die Anzahl der Impulse beträgt 100PPR.
05:Zeigt den Ausgang einer PNP-Quelle mit hohem Pegel an, mit Impulsausgangssignalen von A und B; Die Anzahl der Impulse beträgt 100PPR.
③:Representing the number of axis selection switches, 2 repräsentiert 2 Achsen.
④:Represents the type of axis selection switch signal, A stellt ein Punkt-zu-Punkt-Ausgangssignal dar, und B stellt das codierte Ausgangssignal dar.
⑤:Represents the type of multiplication switch signal, A stellt ein Punkt-zu-Punkt-Ausgangssignal dar, und B stellt das codierte Ausgangssignal dar.
⑥:Stellt die Anzahl der benutzerdefinierten Schaltflächen dar, 2 repräsentiert 2 Benutzerdefinierte Tasten.
⑦:Represents the power supply for the system handwheel, Und 05 stellt eine 5-V-Stromversorgung dar.
⑧:L represents the left column (left knife holder), and R represents the right column (right knife holder).
9.Solution to Product Malfunctions

1. Bitte verwenden Sie es in einer trockenen Umgebung bei Raumtemperatur und Druck, um seine Lebensdauer zu verlängern.
2. Bitte vermeiden Sie die Verwendung in ungewöhnlichen Umgebungen wie Regen und Wasserblasen, um die Lebensdauer zu verlängern.
3. Bitte halten Sie das Erscheinungsbild des Handrads sauber, um seine Lebensdauer zu verlängern.
4. Bitte vermeiden Sie Quetschungen, fallen, stoßen, usw. um Schäden an den Präzisionskomponenten im Handrad oder Genauigkeitsfehler zu vermeiden.
5. Wenn es lange nicht verwendet wird, Bitte bewahren Sie das Handrad an einem sauberen und sicheren Ort auf. Während der Lagerung und des Transports, Dabei ist auf Feuchtigkeits- und Stoßbeständigkeit zu achten.
11. Sicherheitsinformationen
1. Bitte lesen Sie die Anweisungen vor der Verwendung sorgfältig durch und verbieten Sie die Bedienung durch Laien.
2. Please replace the battery in a timely manner when the battery level is too low to avoid errors caused by insufficient battery power and inability to operate the handwheel.
3. Wenn Reparatur erforderlich ist, Bitte wenden Sie sich an den Hersteller. Wenn der Schaden durch Selbstreparatur verursacht wurde, Der Hersteller übernimmt keine Garantie