Tuet 2 muokattavat painikkeet, kytkintyyppisellä IO-signaalilähtöllä;
Tuet -2 akselin ohjaus;
Tukee 3-tason suurennuksen hallintaa;

1.Tuotteen esittely
2. Tuotteen toiminnalliset ominaisuudet
| Langattoman kaukosäätimen käyttöjännite ja virta |
3V/14MA
|
| Akun tekniset tiedot | 2 AA alkaliparistot, koko 5 |
| Langattoman kaukosäätimen matalajännitehälytysalue | < 2.3V |
| Vastaanottimen virtalähteen jännite | DC5V-24V/A |
| Vastaanottimen hätäpysäytyslähdön kuormitusalue | AC125V-1A/DC30V-2A |
| Vastaanottimen lähtökuormitusalue |
AC125V-1A/DC30V-2A
|
| Vastaanottimen mukautetun painikkeen lähtökuormitusalue | DC24V/50mA |
| Vastaanottimen akselin valinnan lähtökuormitusalue | DC24V/50mA |
| Vastaanottimen suurennuksen lähtökuormitusalue | DC24V/50mA |
| Kämmenpäätteen lähetysteho |
15dBm
|
| Vastaanottimen vastaanottoherkkyys | -100dBm |
| Langattoman viestinnän taajuus | 433MHz taajuusalue |
| Langattoman yhteyden etäisyys | Esteetön etäisyys 40 metri |
| Toimintalämpötila | -25℃ < X < 55℃ |
| Putoamista estävä korkeus | 1 (metri) |
| Mukautettu painikkeen määrä | 2 |


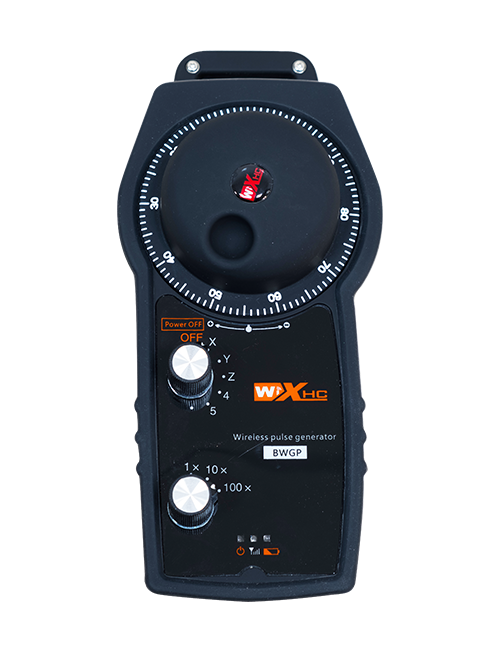
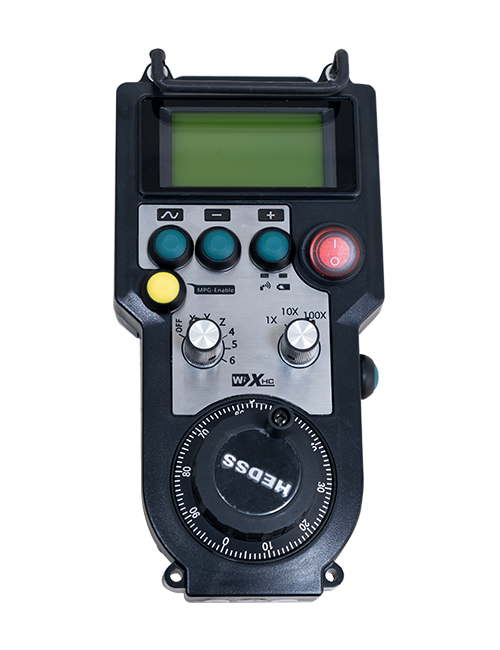
① Pulssianturi:
Pidä käynnistyspainiketta painettuna, ravista pulssianturia, lähettää pulssisignaalin,ja ohjata koneen akselin liikettä.
② Ota käyttöön -painike:
Paina jompaakumpaa käyttöönottopainiketta kummallakin puolella, ja vastaanottimen kaksi käyttöönotto-IO-lähtösarjaa johtavat. Vapauta käyttöönottopainike irrottaaksesi IO-lähdön; Ja ennen kuin vaihdat akselin valinnan suurennusta ja ravistat käsipyörää,aktivointipainiketta on pidettävä painettuna, jotta se toimii; Tämä toiminto voidaan peruuttaa konfigurointiohjelmiston kautta.
③ Merkkivalot:
Vasen sivuvalo: valo päälle,käsipyörä käyttää akselia valitakseen OFF virran kytkemiseksi päälle, ja tämä valo jää palamaan virran kytkemisen jälkeen;
Keskivalo: merkkivalo, joka syttyy käytettäessä mitä tahansa käsipyörän toimintoa, eikä syty, kun toimintoa ei ole;
Oikeanpuoleinen valo: Pienen jännitteen hälytysvalo, akun varaustaso alhainen,tämä valo vilkkuu tai jää palamaan, akku on vaihdettava.
④ Hätäpysäytyspainike:
Paina hätäpysäytyspainiketta, ja vastaanottimen kaksi hätäpysäytys-IO-lähtöä irrotetaan, ja kaikki käsipyörän toiminnot eivät toimi.
⑤ Suurennuskytkin:
Paina ja pidä käynnistyspainiketta painettuna vaihtaaksesi suurennuskytkintä, jolla voi vaihtaa käsipyörällä ohjattua suurennusta.
⑥ Akselin valintakytkin (virtakytkin):
Paina ja pidä käynnistyspainiketta painettuna vaihtaaksesi akselinvalintakytkintä, joka voi vaihtaa käsipyörällä ohjattua liikeakselia. Kytke tämä kytkin OFF-asennosta mille tahansa akselille ja kytke käsipyörän virta päälle.
⑦ Mukautettu painike:
Kaksi mukautettua painiketta, jokainen vastaa IO-lähtöpistettä vastaanottimessa.

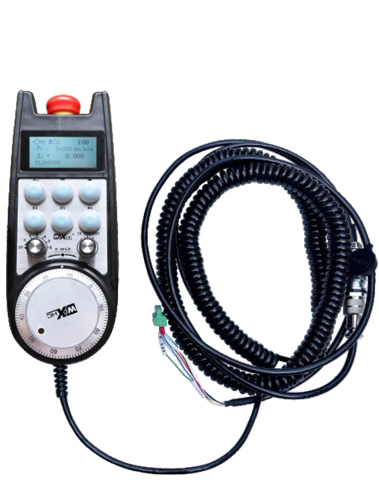
1. Asenna vastaanotin sähkökaappiin takana olevan soljen läpi, tai asenna se kaappiin ruuvireiän läpi vastaanottimen neljään kulmaan.
2. Katso vastaanottimen kytkentäkaaviomme ja vertaa sitä paikan päällä oleviin laitteisiin. Liitä laite vastaanottimeen kaapeleiden avulla.
3.Kun vastaanotin on kunnolla kiinnitetty, Vastaanottimella varustettu antenni on kytkettävä, ja antennin ulkopää tulee asentaa tai sijoittaa sähkökaapin ulkopuolelle. On suositeltavaa sijoittaa se sähkökaapin päälle parhaan signaalivaikutuksen saavuttamiseksi. Antennia ei saa jättää kytkemättä tai sijoittaa sähkökaapin sisään, koska tämä voi johtaa siihen, että signaali on käyttökelvoton.
4. Lopuksi, kytke käsipyörän virtakytkin päälle, ja voit ohjata konetta etänä käsipyörällä.
6.2 Vastaanottimen asennusmitat

6.3 Vastaanottimen johdotusviitekaavio

7. Tuotteen käyttöohjeet
1. Kytke koneeseen ja vastaanottimeen virta. Vastaanottimen toimintamerkkivalo vilkkuu. Asenna akku langattomaan elektroniseen käsipyörään, kiinnitä akun kansi, ja
kytke langattoman elektronisen käsipyörän virtakytkin päälle. Käsipyörän akun varaustason merkkivalo palaa.
2. Valitse koordinaattiakseli: Pidä käynnistyspainiketta painettuna, vaihda akselin valintakytkintä, ja valitse akseli, jota haluat käyttää.
3. Valitse suurennus: Pidä käynnistyspainiketta painettuna, vaihda suurennuskytkintä,ja valitse haluamasi suurennustaso.
4. Liikkuva akseli: Pidä käynnistyspainiketta painettuna, valitse akselinvalintakytkin, valitse suurennuskytkin, ja käännä sitten pulssikooderia. Kierrä myötäpäivään siirtääksesi
positiivinen akseli ja vastapäivään siirtääksesi negatiivista akselia.
5. Paina ja pidä painettuna mitä tahansa mukautettua painiketta, ja vastaanottimen vastaava painikkeen IO-lähtö kytketään päälle. Vapauta painike, ja lähtö kytkeytyy pois päältä.
6. Paina hätäpysäytyspainiketta, Vastaanottimen vastaava hätäpysäytys-IO-lähtö katkeaa, käsipyörätoiminto poistetaan käytöstä,vapauta hätäpysäytyspainike, hätäpysäytys-IO-lähtö suljetaan, ja käsipyörän toiminta palautetaan.
7. Jos käsipyörää ei käytetä vähään aikaan, se siirtyy automaattisesti lepotilaan virrankulutuksen vähentämiseksi. Kun sitä käytetään uudelleen, käsipyörä voidaan aktivoida painamalla käynnistyspainiketta.
8. Jos käsipyörää ei käytetä pitkään aikaan, on suositeltavaa vaihtaa käsipyörän akseli OFF-asentoon, katkaise käsipyörän virta, ja pidentää akun käyttöikää.
8. Tuotemallin kuvaus

① :ZTWGP edustaa ulkonäkötyyliä
②:Pulssin lähtöparametrit:
01: Osoittaa, että pulssin lähtösignaali on A, B; Pulssijännite 5V; pulssin määrä 100PPR.
02:Osoittaa, että pulssilähtösignaalit ovat A ja B; Pulssijännite 12V; pulssin määrä 100PPR.
03:Osoittaa, että pulssilähtösignaalit ovat A, B, A -, B -; Pulssijännite 5V; pulssin määrä 100PPR.
04:Osoittaa matalan tason NPN avoimen piirin lähtöä, pulssilähtösignaaleilla A ja B;Pulssien määrä on 100PPR.
05:Osoittaa korkean tason PNP-lähdelähtöä, pulssilähtösignaaleilla A ja B; Pulssien määrä on 100PPR.
③:Edustaa akselinvalintakytkimien määrää, 2 edustaa 2 kirveet.
④:Edustaa akselinvalintakytkimen signaalin tyyppiä, A edustaa pisteestä pisteeseen lähtösignaalia, ja B edustaa koodattua lähtösignaalia.
⑤:Edustaa kertolaskukytkinsignaalin tyyppiä, A edustaa pisteestä pisteeseen lähtösignaalia, ja B edustaa koodattua lähtösignaalia.
⑥:Edustaa mukautettujen painikkeiden määrää, 2 edustaa 2 Mukautetut painikkeet.
⑦:Edustaa järjestelmän käsipyörän virtalähdettä, ja 05 edustaa 5V virtalähdettä.
⑧:L edustaa vasenta saraketta (vasen veitsen pidike), ja R edustaa oikeaa saraketta (oikea veitsen pidike).
9.Ratkaisu tuotehäiriöihin

1. Käytä sitä kuivassa ympäristössä huoneenlämpötilassa ja paineessa pidentääksesi sen käyttöiän.
2. Vältä käyttöä epänormaaleissa ympäristöissä, kuten sade ja vesikuplia, jotta käyttöikä pidentää.
3. Pidä käsipyörän ulkonäkö puhtaana pidentääksesi sen käyttöikää.
4. Vältä puristamista, putoaminen, törmääminen, jne. estääksesi käsipyörän sisällä olevien tarkkuuskomponenttien vaurioitumisen tai tarkkuusvirheet.
5. Jos sitä ei käytetä pitkään, säilytä käsipyörää puhtaassa ja turvallisessa paikassa. Varastoinnin ja kuljetuksen aikana, Kosteuteen ja iskunkestävyyteen olisi kiinnitettävä huomiota.
11. Turvatiedot
1. Lue ohjeet huolellisesti ennen käyttöä ja kielletä ei -ammattilaisia toimimasta.
2. Vaihda paristo ajoissa, kun akun varaustaso on liian alhainen välttääksesi virheet, jotka johtuvat riittämättömästä akun tehosta ja kyvyttömyydestä käyttää käsipyörää.
3. Jos korjausta vaaditaan, Ota yhteyttä valmistajaan. Jos vaurio johtuu itsekorjauksesta, Valmistaja ei anna takuuta