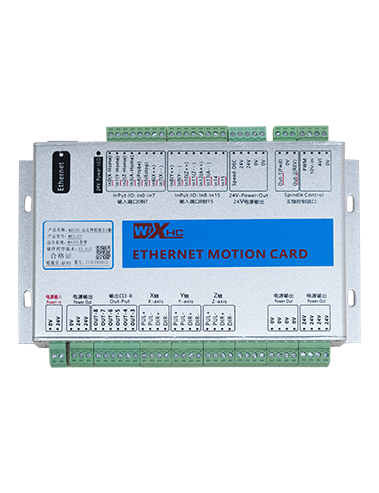
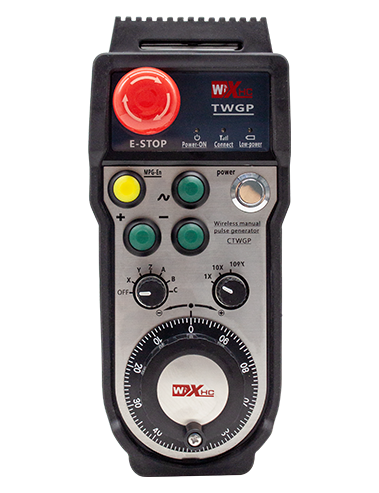
Descrizione
1. Introduzione del prodotto
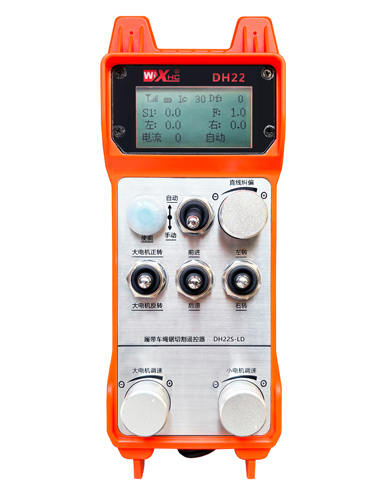
The remote control for automatic cutting of track car rope saw is suitable for track type rope saw
cutting machines. It uses the 485 Modbus RTU protocol to control the left and right track frequency
converters, as well as the large motor frequency conversion speed control start and the front, rear,
left and right direction controllers. And it can read the working current of the large motor frequency
converter through the 485 Modbus RTU protocol. By analyzing and comparing the current of the
large motor, the speed of the left and right tracks can be automatically adjusted in real time to
achieve automatic cutting function.
2. Caratteristiche funzionali del prodotto
1. Adopting 433MHz wireless communication technology, con una distanza operativa wireless di 100 metri.
2. Adopt automatic frequency hopping function and use 32 sets of wireless remote controllers
simultaneously, senza influenzarsi a vicenda.
3. Supports all frequency converters with 485 Modbus RTU protocol, and currently compatible frequency
converter brands include:Shangai Xielin, Fuji, Huichuan, Zhongchen, INVT, E . For brands
that are not compatible, please contact us for customization.
4. Supporta la regolazione della velocità, di partenza, e lettura della corrente di convertitori di frequenza per motori di grandi dimensioni.
5. Supporta la regolazione della velocità del convertitore di frequenza del binario sinistro e destro, di partenza, anteriore, Indietro, controllo sinistro e destro.
6. Supporta la correzione lineare dei convertitori di frequenza del binario sinistro e destro per mantenere la macchina in movimento
linea retta.
7. Support automatic cutting function of rope saw, automatically adjust the left and right track speed in
real time according to the current information of the large motor.
8. It is also compatible with direct IO output control for motor start and stop, and analog voltage output
control for motor speed.
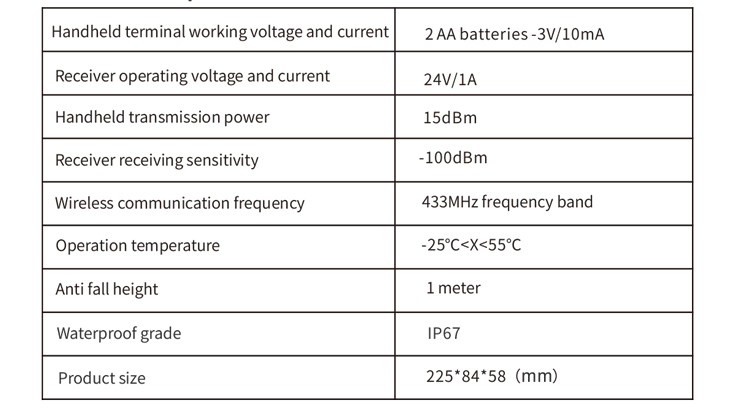
3. Specifiche del prodotto
4. Introduzione alla funzione del prodotto
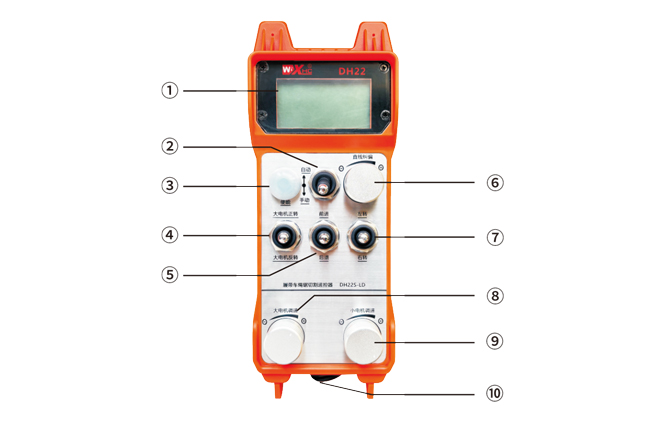
Note:
①Visualizzazione sullo schermo:

②Interruttore di modalità:
③Enable:
Pulsanti combinati, alcune operazioni richiedono di tenere premuto il pulsante di abilitazione per il funzionamento,see the instructions for each switch for details.
④Large motor switch:
Utilizzando un interruttore di ripristino a 3 velocità, tirando questo interruttore è possibile controllare la rotazione avanti e indietro del motore grande. Dopo averlo rilasciato, lo Stato rimarrà, e sullo schermo verranno visualizzate le visualizzazioni corrispondenti. The S1↑ arrow indicates forward rotation, and the S1 ↓ arrow indicates everse rotation.
⑤Piccolo interruttore avanti/indietro del motore:
The small motor is equipped with a 3-speed self-locking switch in front of it. Pressing the enable button and pulling this switch can control the small motor to move forward and backward, and the corresponding display will appear on the screen.The ↑↑ arrow represents forward, and the ↓↓ arrow represents backward.
⑥ Straight line correction:
Utilizzando una manopola encoder multigiro, press the enable button, turn the knob right, and display the straight line correction: Df: The left turn knob increases by 1 unit per rotation, and the left
motor speed increases by 0.1 unità; Girare la manopola sinistra, visualizzazione della correzione in linea retta: Df: On the right, every turn of the knob increases by 1 unità, and the speed of the right motor increases
by 0.1 unità.
⑦Small motor turning switch:
Utilizzando un interruttore di ripristino a 3 velocità, quando azionato manualmente, il piccolo motore può essere controllato per girare a sinistra o a destra. Una volta rilasciato, the remote control will automatically stop this action. In the forward state, when this switch is turned, the corresponding display will appear on the screen. The ←↑ arrow indicates left turn, and the ↑→ arrow indicates right turn.When in reverse mode, turn this switch and the corresponding display will appear on the screen. The ←↓ arrow indicates left turn, and the ↓→ arrow indicates right turn.
⑧ Ampia regolazione della velocità del motore:
Utilizzando una manopola encoder multigiro, rotating 1 griglia ogni volta, il valore della velocità del motore grande varia di circa 0.2 unità. Fast rotation can quickly modify the speed value of the large motor.
⑨ Small motor speed regulation:
Utilizzando una manopola encoder multigiro, in modalità manuale, press the enable button and then rotate one grid at a time,the speed value of the left and right small motors changes by about 0.1 unità, and quick rotation can quickly modify the speed value of the small motor.In automatic mode, press the enable button and rotate one grid at a time,the speed limit value F of the small motor changes by approximately 0.1 unità. Rapid rotation can quickly modify the speed limit value of the small motor.
⑩ Remote control power switch
Lo schermo del display del telecomando è acceso.
5. Schema degli accessori del prodotto
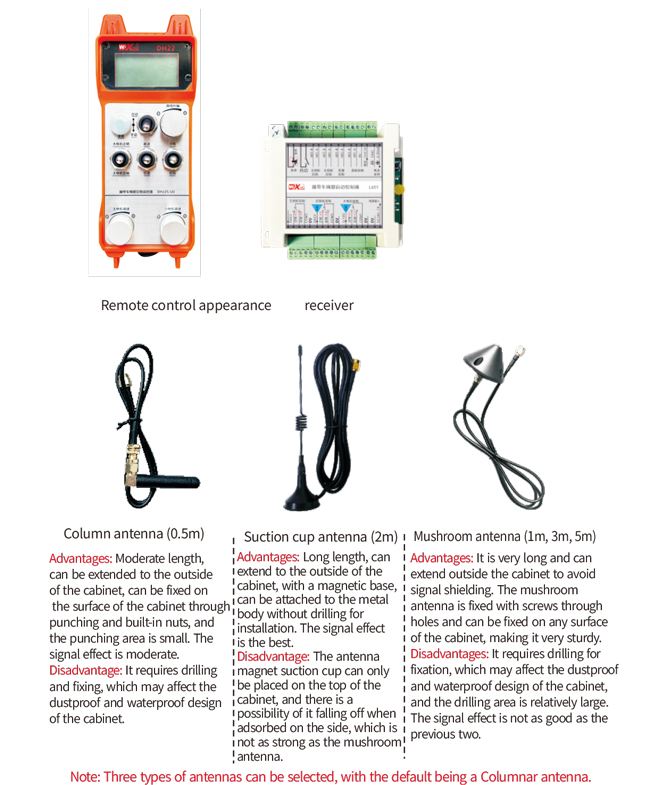
6. Guida all'installazione del prodotto
6.1 Passaggi di installazione del prodotto
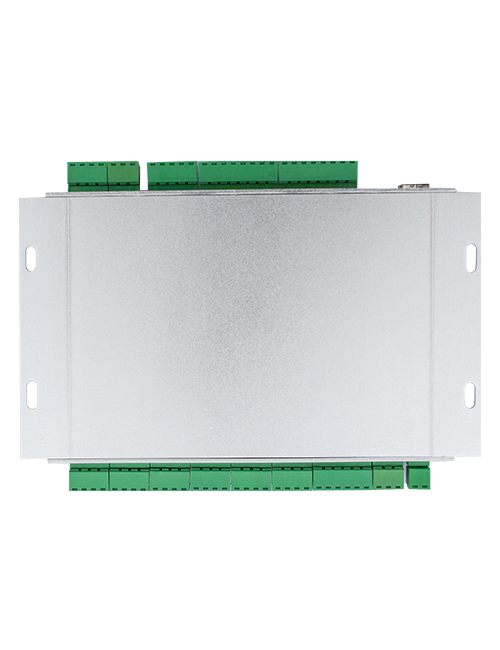
1. Installare il ricevitore nell'armadio elettrico attraverso la fibbia sul retro, oppure installarlo nell'armadio attraverso i fori per le viti ai quattro angoli del ricevitore.
2. Fare riferimento al nostro schema elettrico del ricevitore e confrontarlo con l'attrezzatura in loco. Connect the equipment to the receiver through wires.
3. After fixing the receiver, it is necessary to connect the antenna equipped with the receiver and install or place the outer end of the antenna outside the electrical cabinet. Si consiglia di posizionarlo sulla parte superiore dell'armadio elettrico per ottenere il miglior effetto del segnale. It is forbidden to leave the antenna unconnected or place it inside the electrical cabinet, as it may cause the signal to be unusable.
4. Finalmente, install the battery on the remote control, serrare il coperchio della batteria, and turn on the power switch of the remote control. After the remote control display screen shows the normal
working interface, remote control operations can be performed.
6.2 Dimensioni di installazione del ricevitore
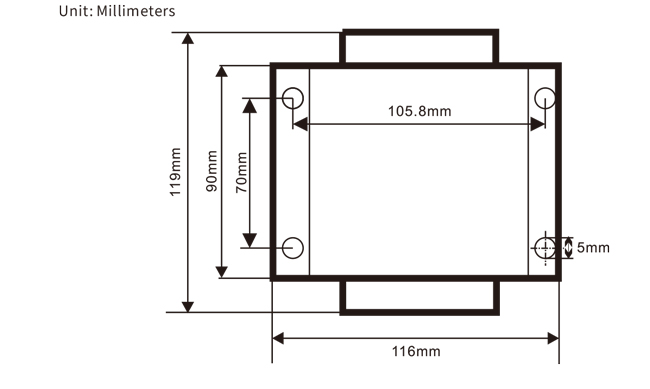
6.3 Schema di riferimento del cablaggio del ricevitore
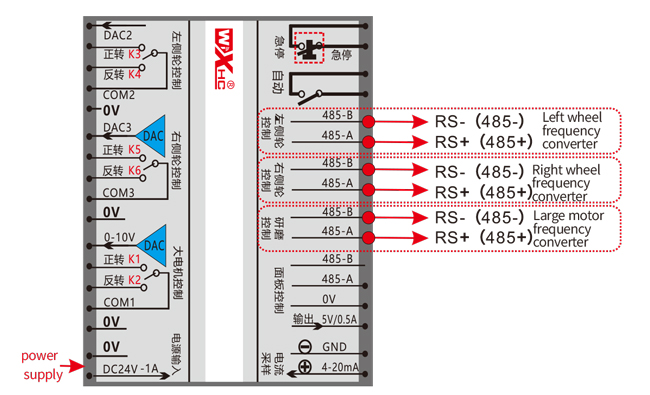
7. Istruzioni per l'uso del prodotto
7.1 Impostazioni dei parametri del telecomando
Method to enter the remote control backend parameters:
Turn the mode switch to manual mode, regolare la velocità del piccolo motore su 25 on both sides, O 0, 10, 20, 40, 50 on all sides, and continuously turn the forward switch of the large motor up 3 times and down 3 volte;
Usa il “Controllo della velocità del piccolo motore” knob to flip pages, press the enable button, and then turn the small motor speed control knob to modify parameters. After modification, girare la pagina fino alla fine,selezionare “Save” to exit, and press the enable button to exit the menu;
I parametri sono i seguenti:
Corrente massima: feedback range of large motor current, set range 15-200A, predefinito 100;
Parametri di controllo della velocità: Modalità automatica, small motor automatically accelerates faster or slower,più piccolo è, più veloce, set range 200-1500, predefinito 800;
Parametro di decelerazione: Set the upper limit that allows the motor speed to change. Quando la corrente cambia oltre questo valore, the deceleration will occur. The smaller, the faster the deceleration of the left and right motors, with a range of 05-12 and a default of 06;
Accelerazione a1: The larger the motor speed, the faster it increases, with a range of 00-06 and a default of 01;
Decelerazione a2: The larger the motor speed, the faster it decreases, with a range of 00-06 and a default of 02;
Abilita la regolazione della velocità: Does the small motor speed regulation need to be enabled? 00 does not enable, 01 enables, default is 01;
Inizia l'autobloccaggio: Does the large motor automatically maintain self-locking after the forward and reverse switches are released? 00 does not hold, 01 holds, predefinito 01
Camminata massima: maximum speed of left and right motors, allineare 10-100, predefinito 50;
Taglio della corrente: maximum cutting current, displayed on the screen as IC value, allineare 15-160, predefinito 30,
corresponding to IC: 30 displayed on the screen. The upper limit of this parameter is 80% of the maximum current;
Limite di velocità predefinito: The default small motor automatic cutting speed when turned on is within the range of 0-100, with a default of 10. The screen displays F1.0, and this parameter is only accurate when the maximum walking is set to 50.
Modalità automatica: Set to 00, the automatic/manual switch is a mode switch. Set to 01, the automatic/manual switch is set to the automatic position, the display screen shows lighting, and the automatic terminal output on the receiver is closed. When set to manual, the automatic output terminal is disconnected;
Speed limit deviation: The upper limit of the automatic cutting speed of the small motor ranges from 00 A 200, with a default of 60 and a corresponding display of 6.0 on the screen; Upper limit of display value=speed limit offset x 0.1;
Ospite massimo: maximum speed of the large motor, allineare 10-100, predefinito 50;
Mbus equipment (obbligatorio): Selection of large motor frequency converter model, allineare 00-03, predefinito 03;
00- Shanghai Xielin 01-Fuji
02-INVT 03-Inovance(Zhongchen, Robicon)
Attrezzatura SBUS (obbligatorio): Selezione del modello di convertitore di frequenza per piccoli motori, allineare 00-05, predefinito 03;
00- Shanghai Xielin 01-Fuji
02-INVT 03-Inovance(Zhongchen, Robicon)
04-Anchuanda 05-Nessuno
7.2 Impostazione dei parametri del convertitore di frequenza
1. Selezione della sorgente del comando: Canale di comando di comunicazione
2. Selezione della sorgente di frequenza principale: comunicazione data
3. Velocità di trasmissione: 19200
4. Formato dei dati: Nessuna verifica, formato dei dati<8-N-1>
5. Indirizzo locale: Impostare il convertitore di frequenza sinistro su 1, il giusto convertitore di frequenza 2, E
the large motor frequency converter to 3
7.3 Istruzioni per l'uso del telecomando
1. Accendere la macchina, Accendi il telecomando, enter the remote control backend, set the
remote control backend parameters, mainly setting the small motor and large motor frequency
converter models: (saltare questo passaggio se il costruttore della macchina lo ha già impostato);
2. Impostare i parametri del convertitore di frequenza (skip this step if the machine manufacturer
has already set it);
3. Impostare il telecomando in modalità manuale, and then use the remote control to move the machine to
the working position;
4. In modalità manuale, set the cutting current of the large motor to IC and the speed of the large motor
5. Passare alla modalità automatica e impostare il valore F del limite di velocità di taglio per il motore piccolo;
6. In modalità automatica, ruotare l'interruttore del motore grande su avanti per avviare il motore grande, then turn
the small motor switch to forward or reverse, and the remote control enters automatic cutting
mode to start cutting.
8.Risoluzione dei problemi del prodotto
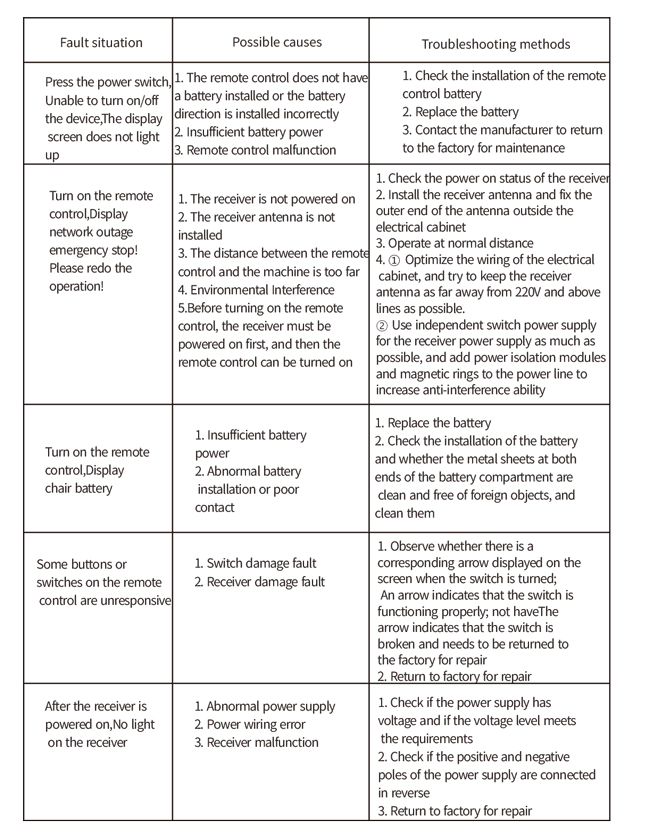
9.Manutenzione
1. Si prega di utilizzarlo in un ambiente asciutto a temperatura e pressione ambiente per prolungarne la durata.
2. Si prega di evitare l'uso in ambienti anomali come pioggia e bolle d'acqua per prolungarne la durata.
3. Si prega di mantenere puliti il vano batteria e l'area delle schegge metalliche.
4. Si prega di evitare di danneggiare il telecomando a causa di schiacciamenti e cadute.
5. Se non usato per molto tempo, please remove the battery and store the remote control and battery in a clean
and safe place.
6.Durante lo stoccaggio e il trasporto, è necessario prestare attenzione all'umidità e alla resistenza agli urti.
10. Informazioni sulla sicurezza
1. Si prega di leggere attentamente le istruzioni prima dell'uso e di vietare l'utilizzo ai non professionisti.
2. Please replace the battery in a timely manner when the battery is too low to avoid errors caused by
insufficient power, ciò potrebbe impedire il funzionamento del telecomando.
3. Se è richiesta la riparazione, Si prega di contattare il produttore. Se il danno è causato dall'autoriparazione, the manufacturer
will not provide warranty.
