1. Utilizzare un cavo con spina aeronautica a 6 conduttori per il collegamento, con una lunghezza del cavo del volantino di 10 metri.
2. Lo schermo del volantino può visualizzare le coordinate del pezzo del sistema, coordinate meccaniche,velocità di avanzamento, selezione dell'asse, ingrandimento, e altre informazioni.
3. Supporta il pulsante di arresto di emergenza, commutare l'uscita del segnale IO, e l'arresto di emergenza tramite volantino è ancora valido.
4. Supporta 6 pulsanti personalizzati, commutare i segnali IO, e può inviare segnali al sistema tramite cablaggio o comunicazione IO.
Manuale Istruzioni Volantino elettronico filare
Descrizione
1. Introduzione del prodotto
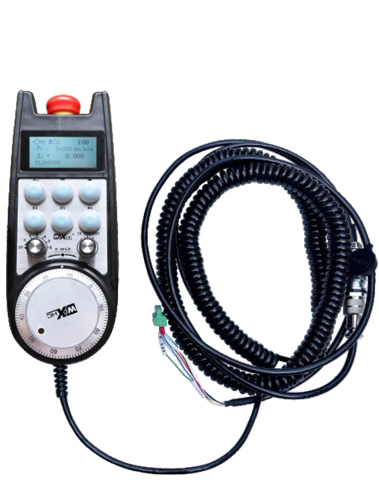
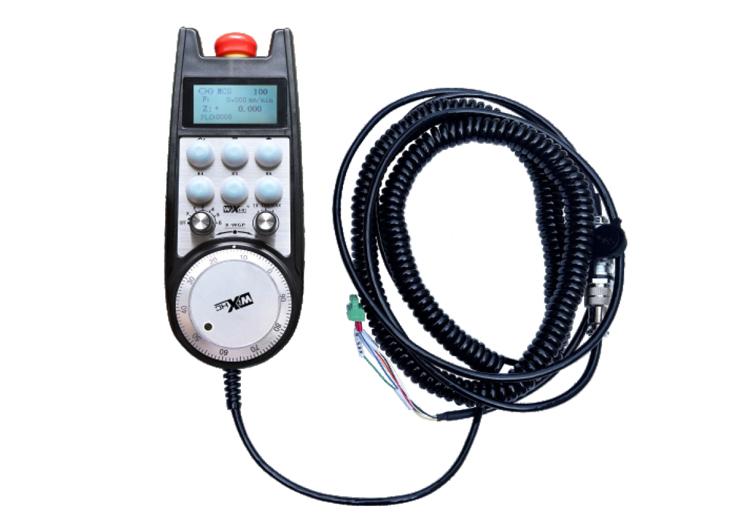
Il volantino elettronico viene utilizzato per la guida manuale, posizionamento, allineamento dell'utensile, e altre operazioni su macchine utensili CNC. Questo modello di volantino elettronico è un vero e proprio volantino elettronico cablato Siemens con display. Il volantino è collegato all'interfaccia X130 del sistema Siemens tramite un cavo di rete, e le coordinate del sistema vengono lette e visualizzate sullo schermo LCD del volantino tramite la comunicazione con protocollo S7. Il volantino può anche controllare la selezione degli assi del sistema, ingrandimento, pulsanti, e altri segnali attraverso la comunicazione.
2.Caratteristiche funzionali del prodotto
1. Utilizzare un cavo con spina aeronautica a 6 conduttori per il collegamento, con una lunghezza del cavo del volantino di 10 metri.
2. Lo schermo del volantino può visualizzare le coordinate del pezzo del sistema, coordinate meccaniche,velocità di avanzamento, selezione dell'asse, ingrandimento, e altre informazioni.
3. Supporta il pulsante di arresto di emergenza, commutare l'uscita del segnale IO, e l'arresto di emergenza tramite volantino è ancora valido.
4. Supporta 6 pulsanti personalizzati, commutare i segnali IO, e può inviare segnali al sistema tramite cablaggio o comunicazione IO.
5. Supporta 6 O 8 controllo degli assi, con segnali IO dell'interruttore che possono essere inviati al sistema tramite il cablaggio o la comunicazione IO.
6. Supporta 3 O 4 livelli di controllo dell'ingrandimento, con segnali IO dell'interruttore che possono essere inviati al sistema tramite il cablaggio o la comunicazione IO.
7. Supporta codificatore di impulsi, 100 impulsi/turno, può inviare segnali al sistema tramite il cablaggio a impulsi AB.
8. Supporta il protocollo Siemens S7 e Siemens 828D, 840DSL, ONE e altri sistemi modello.
3. Specifiche del prodotto
| Tensione di alimentazione di lavoro del volantino | CC 24 V/1 A |
| Tensione di alimentazione del ricevitore | CC 24 V/1 A |
| Intervallo di carico dell'uscita IO del ricevitore | DC24V |
| Lunghezza cavo estremità volantino | 10M |
| Lunghezza cavo estremità ricevitore | 1M |
| Lunghezza del cavo di rete dell'estremità del ricevitore | 3M |
| Temperatura operativa | -25℃<X<55℃ |
| Altezza anticaduta | 1M |
| Quantità di pulsanti personalizzati | 6 |
| Dimensioni del prodotto | 233*90.7*77.4(mm) |
4.Introduzione alla funzione del prodotto
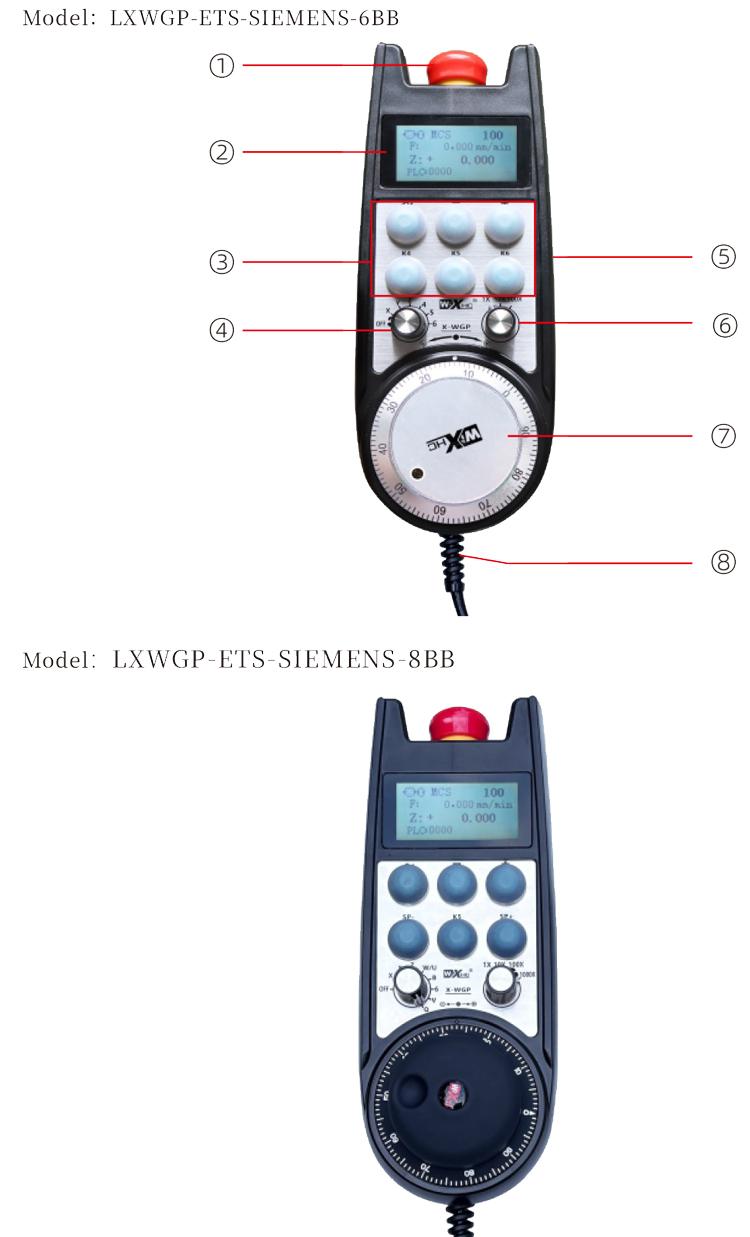
Nota:
Pulsante di arresto di emergenza:
Premere il pulsante di arresto di emergenza, e i due set di uscite IO di arresto di emergenza sul ricevitore verranno disconnessi, e tutte le funzioni del volantino non saranno valide.
Dopo aver rilasciato l'arresto di emergenza, l'uscita IO dell'arresto di emergenza sul ricevitore è chiusa, e tutte le funzioni del volantino vengono ripristinate.
② Visualizzazione sullo schermo:
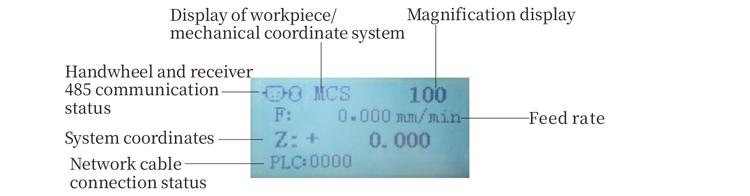
PLC: 0000 indica che il cavo di rete non è collegato, PLC: 1010 indica che il cavo di rete è collegato correttamente al sistema PLC.
PLC: 1110 rappresenta la scrittura riuscita dei dati di sistema sul volantino, PLC: 0001 rappresenta la connessione riuscita al computer.
③ Pulsante personalizzato:
6 pulsanti personalizzati, ciascuno corrispondente a un punto di uscita IO sul ricevitore, collegato anche al sistema tramite comunicazione.
④ Selettore dell'asse:
L'interruttore di selezione dell'asse può cambiare l'asse di movimento controllato dal volantino.
⑤ Pulsante Abilita:
Premere e tenere premuto uno dei pulsanti di abilitazione su entrambi i lati per attivare il codificatore a impulsi scuotendolo. E i due gruppi sul ricevitore consentono la conduzione dell'uscita IO, rilasciare il pulsante di abilitazione per consentire la disconnessione dell'uscita IO.
⑥ Interruttore di ingrandimento:L'interruttore di ingrandimento può cambiare l'ingrandimento
comandato dal volantino.
⑦ Encoder a impulsi:
Tieni premuto il pulsante di attivazione, scuotere il codificatore di impulsi, emettere un segnale a impulsi, e controllare il movimento dell'asse della macchina.
⑧ Cavo del volantino:
Cavo di collegamento volantino e ricevitore, spina aeronautica, utilizzato per l'alimentazione e la comunicazione del volantino.
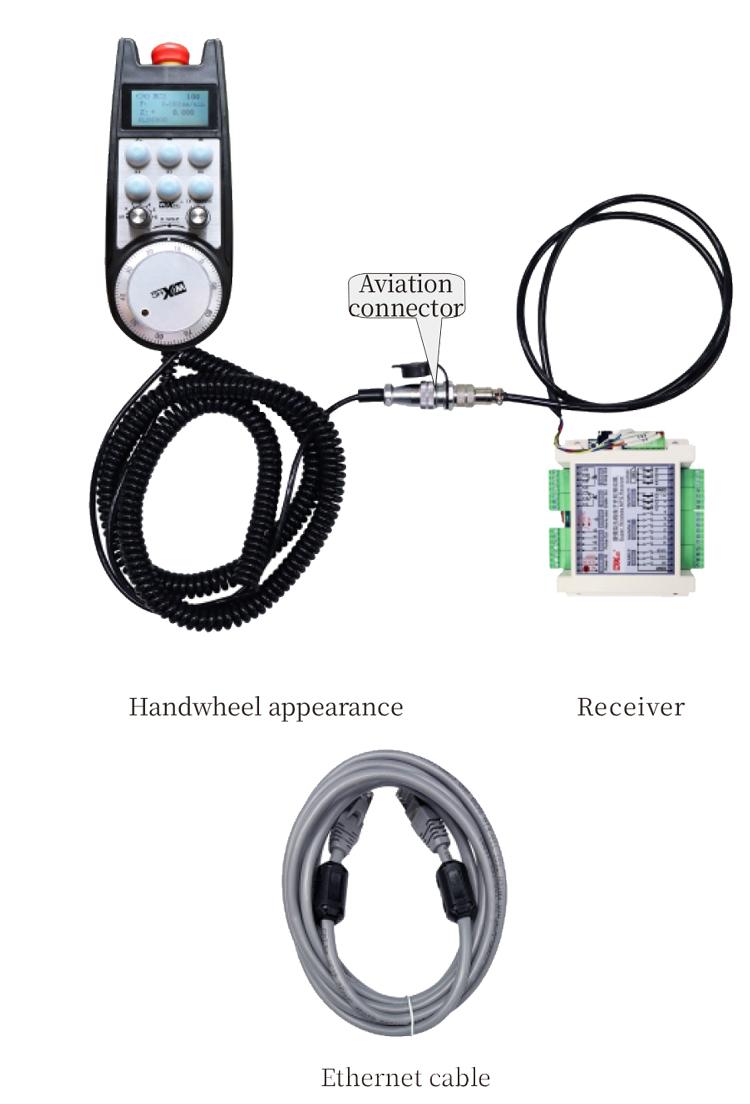
5. Schema degli accessori del prodotto
6. Guida all'installazione del prodotto
6.1 Passaggi di installazione del prodotto
6.1 Passaggi di installazione del prodotto
1. Installare il ricevitore nell'armadio elettrico attraverso i fori per le viti ai quattro angoli.
2. Fare riferimento al nostro schema elettrico del ricevitore e confrontarlo con l'attrezzatura in loco. Collegare il dispositivo al ricevitore tramite cavi e collegare il ricevitore all'interfaccia X130 del sistema tramite cavi Ethernet.
3. Dopo aver riparato il ricevitore, installare la base della spina aeronautica nella posizione di apertura del volantino sul pannello, e collegare l'altra estremità della base all'interfaccia del volantino sul ricevitore. Quindi inserire la spina aeronautica del cavo del volantino nella base e serrare il dispositivo di fissaggio.
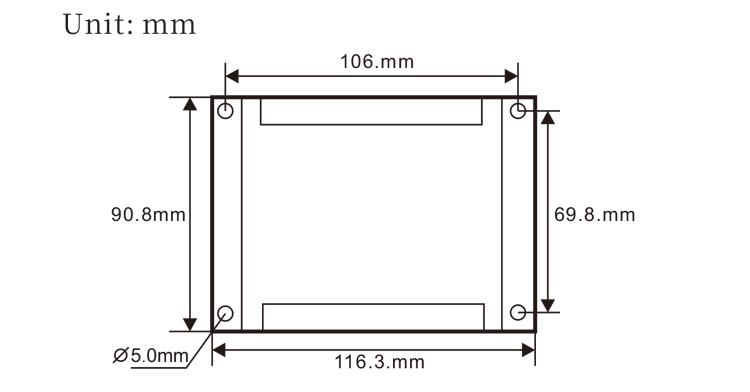
6.2 Dimensioni di installazione del ricevitore
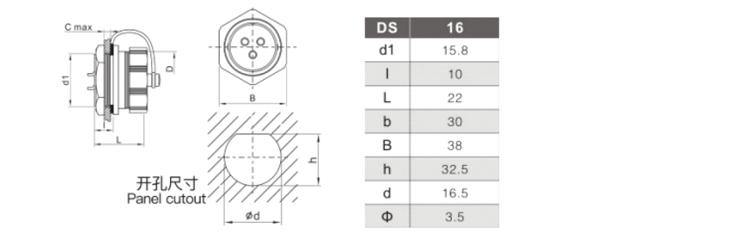
6.3 Dimensioni di installazione delle spine aeronautiche
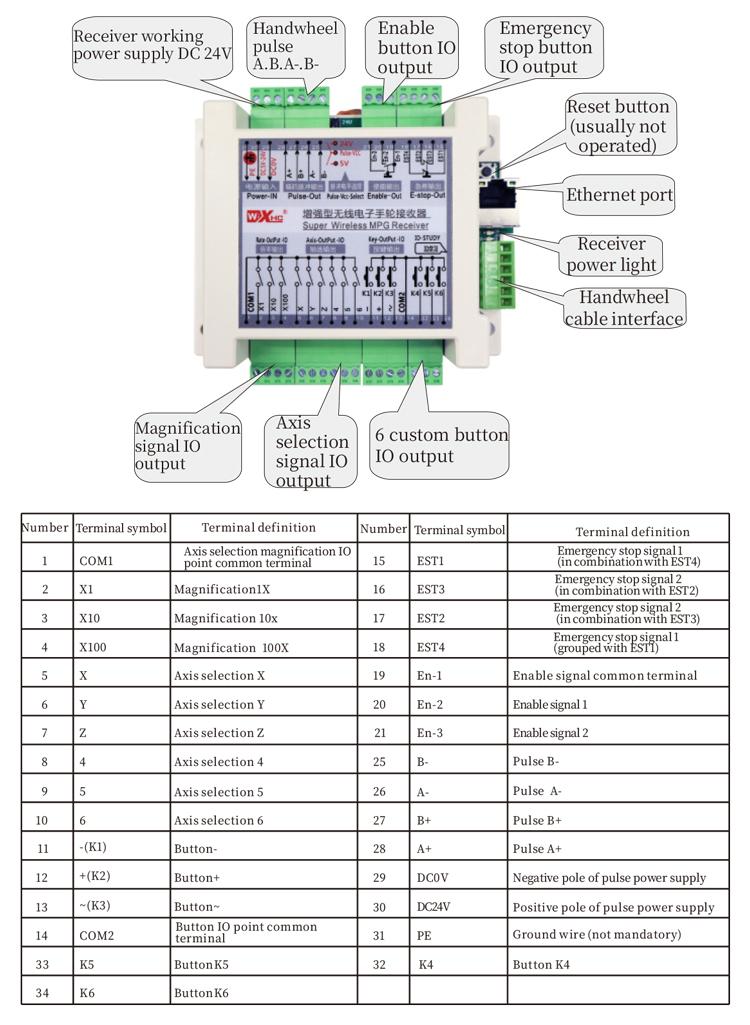
6.4 Schema di riferimento del cablaggio del ricevitore
 7.Istruzioni per il funzionamento del prodotto
7.Istruzioni per il funzionamento del prodotto
1. Quando il ricevitore è acceso e la spia di funzionamento del ricevitore lampeggia, collegare il ricevitore al computer con un cavo di rete, impostare l'indirizzo IP fisso del computer, e utilizzare il software dello strumento di configurazione di rete per impostare i parametri di rete della funzione volantino. Per metodi di impostazione specifici, fare riferimento al “Manuale utente volantino cablato LXWGP-ETS”.
2.Dopo aver configurato il ricevitore, il sistema deve programmare un programma PLC. Si prega di fare riferimento al “LXWGP-ETS Diversi metodi di impostazione del sistema di controllo numerico Siemens” e materiali di routine del programma PLC per i dettagli.
3.Dopo aver completato le impostazioni di cui sopra, portare il ricevitore nel quadro elettrico della macchina e installarlo. Estrarre il cavo di rete dal computer e collegarlo all'interfaccia X130 del sistema. Collegare l'alimentazione del ricevitore e la linea a impulsi.3.
4.Dopo aver completato le impostazioni di cui sopra, portare il ricevitore nel quadro elettrico della macchina e installarlo. Estrarre il cavo di rete dal computer e collegarlo all'interfaccia X del sistema. Collegare l'alimentazione del ricevitore e la linea a impulsi.
5. Seleziona la selezione dell'asse: Cambiare l'interruttore di selezione dell'asse e selezionare l'asse su cui si desidera operare.
6. Seleziona l'ingrandimento: Cambia l'interruttore di ingrandimento e seleziona il livello di ingrandimento che ti serve.
7. Asse mobile: Tieni premuto il pulsante di attivazione, selezionare l'interruttore di selezione dell'asse, selezionare l'interruttore di ingrandimento, quindi ruotare il codificatore a impulsi per ruotare l'asse mobile positivo in senso orario e l'asse mobile negativo in senso antiorario.
8. Tenere premuto qualsiasi pulsante personalizzato per attivare l'uscita IO del pulsante corrispondente nel ricevitore, e rilasciare il pulsante per disattivare l'uscita.
9. Premere il pulsante di arresto di emergenza, l'uscita IO dell'arresto di emergenza corrispondente del ricevitore verrà disconnessa, la funzione del volantino verrà disabilitata, rilasciare il pulsante di arresto di emergenza, l'uscita IO dell'arresto di emergenza verrà chiusa, e la funzione del volantino verrà ripristinata.
8.Descrizione del modello del prodotto

① LXWGP rappresenta uno stile di aspetto cablato, e l'interfaccia di comunicazione del ricevitore
è un'interfaccia Ethernet.
② : Rappresenta il sistema specifico Siemens.
③ : rappresenta il numero di interruttori di selezione dell'asse, rappresenta gli assi, e rappresenta
assi.
④ : rappresenta il tipo di segnale di selezione dell'asse e di ingrandimento, A rappresenta
segnale di uscita punto a punto, e B rappresenta il segnale di uscita codificato.

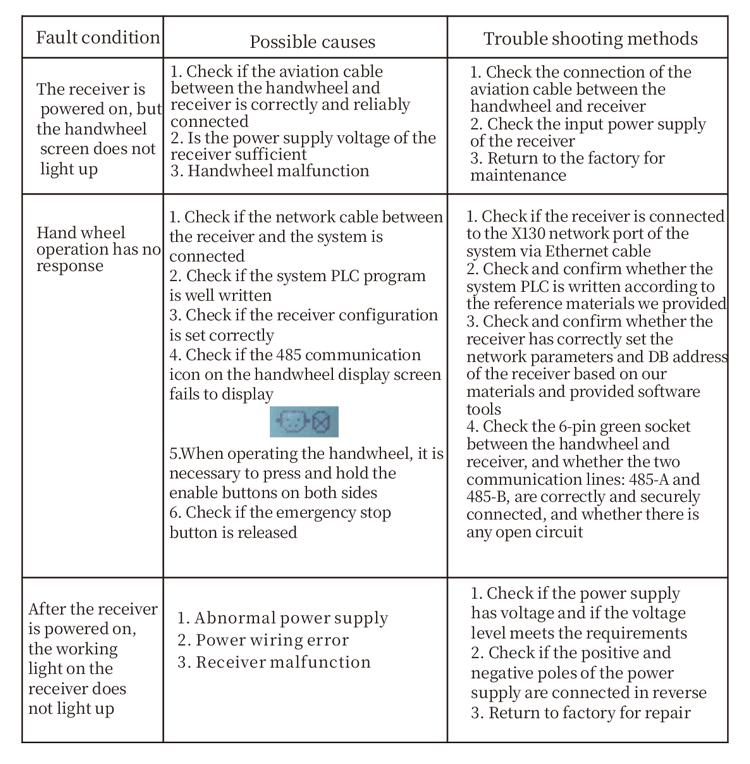
9.Risoluzione dei problemi del prodotto
10.Manutenzione
1. Si prega di utilizzarlo in un ambiente asciutto a temperatura e pressione ambiente per prolungarne la durata.
2. Si prega di evitare l'uso in ambienti anomali come pioggia e bolle d'acqua per prolungarne la durata.
3. Si prega di mantenere pulito l'aspetto del volantino per prolungarne la durata.
4. Si prega di evitare di schiacciare, cadente, urtando, ecc. per evitare danni ai componenti di precisione all'interno del volantino o errori di precisione.
5. Se non usato per molto tempo, conservare il volantino in un luogo pulito e sicuro. Durante lo stoccaggio e il trasporto, è necessario prestare attenzione all'umidità e alla resistenza agli urti.
11. Informazioni sulla sicurezza
1. Si prega di leggere attentamente le istruzioni prima dell'uso e di vietare l'utilizzo ai non professionisti.
2. Se si verifica una situazione anomala con il volantino, per favore smetti di usarlo immediatamente e risolvi il problema. Prima della risoluzione dei problemi, è vietato utilizzare nuovamente il volantino difettoso per evitare incidenti di sicurezza causati da difetti sconosciuti del volantino;
3. Se è richiesta la riparazione, Si prega di contattare il produttore. Se il danno è causato dall'autoriparazione, Il produttore non fornirà garanzia