应用:自动切割轨道绳索锯的遥控器适用于轨道类型绳索切割机
1. 支持速度法规, 开始, 和当前大型电动机转换器的读数.
2. 支持左右轨道频率转换器速度法规, 开始, 正面, 后退, 左右控制.
3. 支持左右轨道频率转换器的线性校正,以使机器行走
直线.
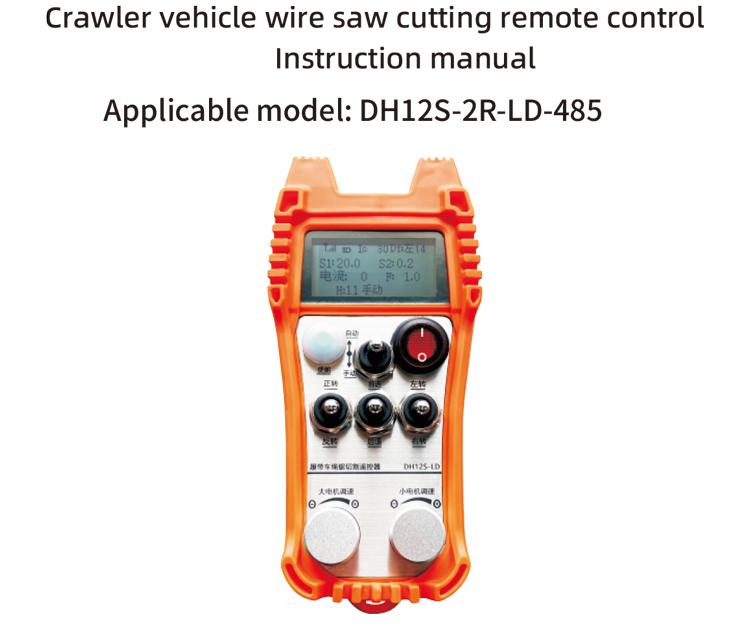
应用:自动切割轨道绳索锯的遥控器适用于轨道类型绳索切割机
1. 支持速度法规, 开始, 和当前大型电动机转换器的读数.
2. 支持左右轨道频率转换器速度法规, 开始, 正面, 后退, 左右控制.
3. 支持左右轨道频率转换器的线性校正,以使机器行走
直线.
1. 产品简介
横梁绳索锯自动切割遥控器适用于轨绳索切割机. 它采用了485个modbusrtu协议来控制速度的启动和后左右方向的左右方向控制, 以及较大的电动机频率转换RTU协议,以控制速度启动和后方和右侧的速度左右方向, 以及大型电动机转换过度分析和比较, 自动在实时调整左右爬网速度以实现自动切割功能.
2. 产品功能
1. 采用433MHz无线通信技术, 无线操作距离为 100 仪表.
2. 采用自动跳跃功能, 使用 32 同时的无线遥控器, 不互相影响.
3. 使用485-modbus RTU协议支持所有逆变器. 已改编的逆变器品牌包括:Shanghai Xielin, 富士, 无聊, Zhongchen, Invt, Anchuanda. 如果品牌不是ADA,请与我们联系以进行自定义.
4. 支持大型电机逆变器开始, 速度调节, 和当前的阅读.
5. 支撑左右移动器逆变器速度法规, 开始, 前后左右控制.
6. 支撑左右移动器逆变器直线校正以保持机器的直线移动.
7. 支撑绳索自动切割功能, 根据大型电机的信息自动实时调整左右爬网速度.
8. 同时, 它与直接IO输出兼容以控制电动机的开始和停止, 和模拟电压输出以控制电动机速度.
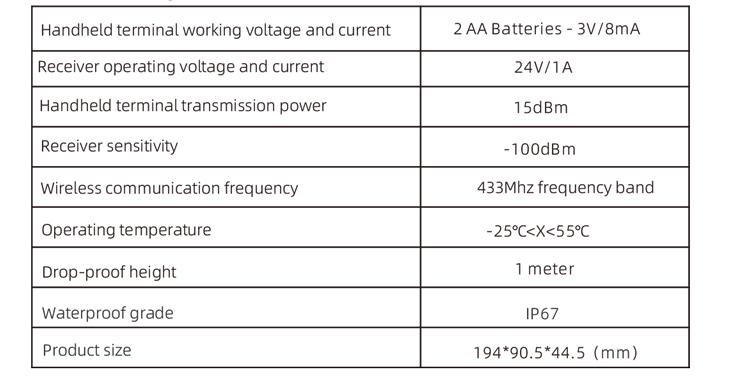
3. 产品规格
4. 产品功能简介

笔记:
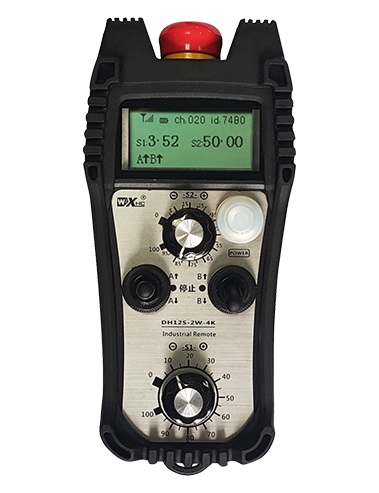
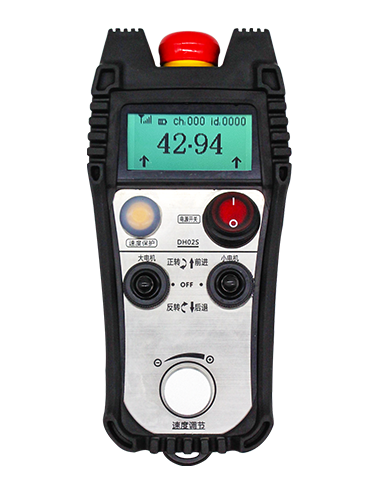
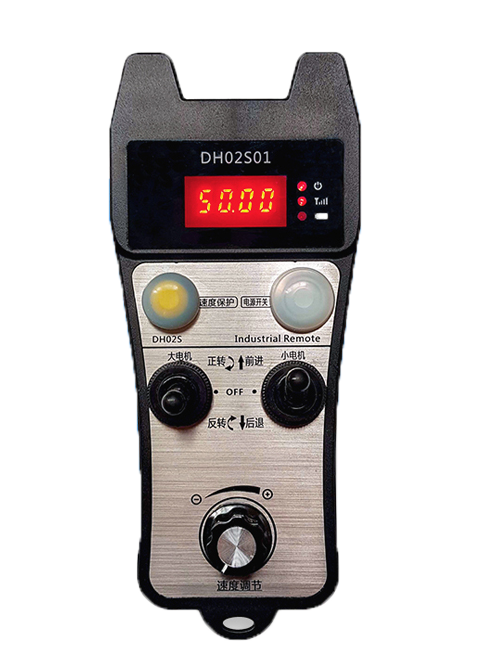
①屏幕显示:

②模式开关:
使用2级开关, 可以在自动和手动模式之间切换, 并且相应的模式将显示在屏幕上以进行切换.
③启用:
组合按钮, 有些操作需要按下启用按钮以进行操作, 请参阅每个开关的说明以获取详细信息.
④大型电机开关:
使用3速复位开关, 拉动此开关可以控制大电动机的前进和反向旋转. 发布后, 国家将保留, 屏幕上将有相应的显示器. T箭表示向前旋转, y箭表示反向旋转.
⑤小型电动机向前/反向开关:
使用3速自锁开关, 拉动此开关可以控制小电动机以向前和向后移动. 相应的显示将在屏幕上显示, T箭头向前指示,↓箭头向后指示.
remote控制电源开关:
遥控显示屏幕已打开.
⑦小型电动机转开开关:
使用3速复位开关, 手动操作时, 可以控制小电动机以左或右转. 一旦发布, 遥控器将自动停止此操作。, 转动此开关,相应的显示将显示在屏幕上。 + 箭头指示左转, 和 – 箭头指示右转。, 转动此开关,相应的显示将显示在屏幕上。 + 箭头指示左转, 和 – 箭头指示右转。, 然后将此开关转换为执行固定的转弯功能, 使转弯更快.
⑧大型运动速度法规:
使用多转弯编码器旋钮, 旋转旋钮以调整每个电动机的速度S1 1 网格旋转, 大电机的速度值大约变化 0.2 单位, 快速旋转可以快速改变大电动机的速度值.
9 小运动速度法规 (线性校正):使用多转弯编码器旋钮, 在手动模式下, 每个 1 旋转, 小电动机的速度值大约变化 0.1 单位. 快速旋转可以快速改变小电动机的速度值.
在自动模式下, 按启用按钮并旋转 1 每次网格. 小电动机的速度限制值F大约变化 0.1 单位. 快速旋转可以快速修改小电动机的速度限制值。按下启用按钮, 向右旋转旋钮, 直线校正显示显示D F: 左边. 旋钮的每个旋转都会增加 1 单元; 转向左旋钮, 直线校正显示: DF: 正确的. 旋钮的每个旋转都会增加 1 单元, 每个校正单元对应于大约的电动机速度控制AVI电压 0.02 v.
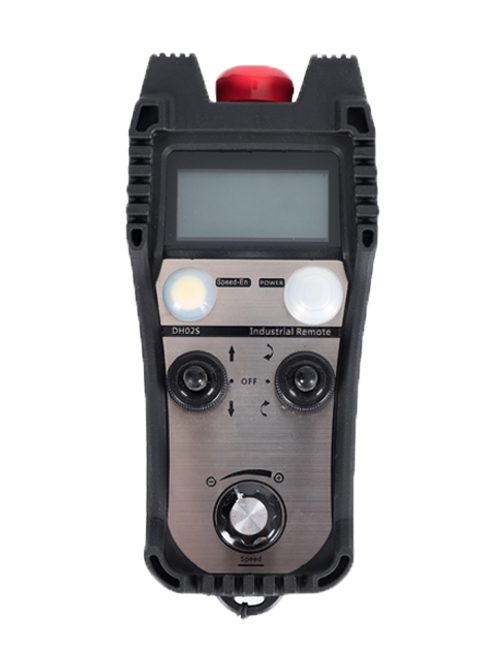
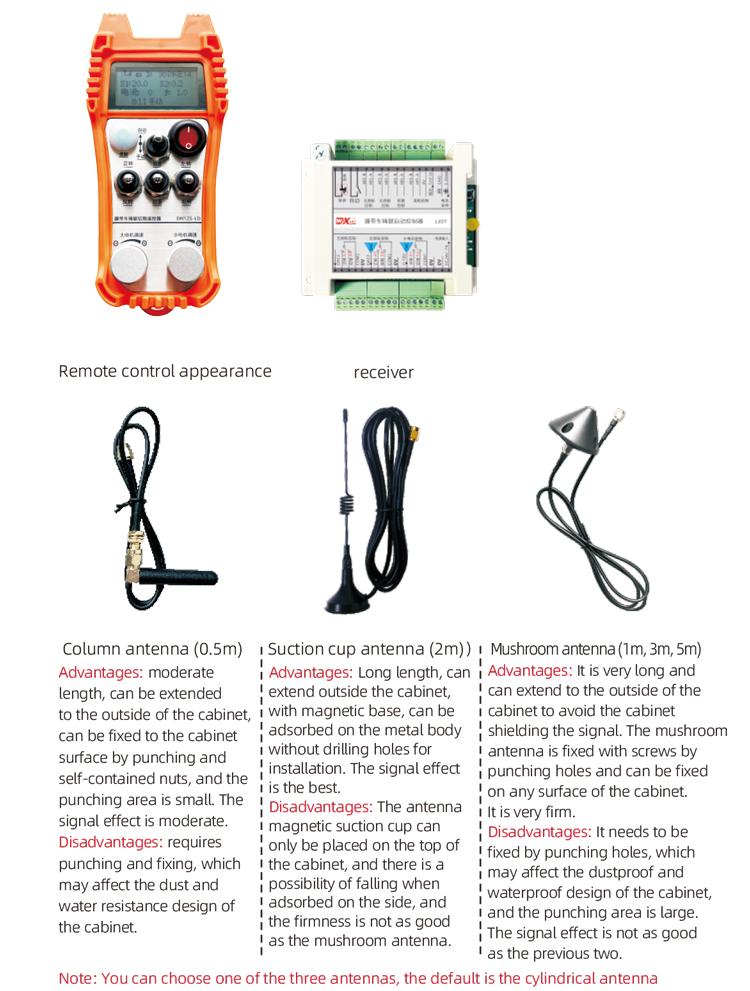
5. 产品配件图
6. 产品安装指南
6.1 产品安装步骤
1. 通过背面的扣子将接收器安装在电柜中, 或通过接收器四个角的螺丝孔将其安装在电柜中.
2. 请参阅我们的接收器接线图, 比较您的现场设备, 并通过电线将设备连接到接收器.
3. 接收器修复后, 配备了接收器的天线必须连接, 并且天线的外端必须安装或放置在电柜外面. 建议将其放在电柜的顶部以获得最佳信号效果. 禁止将天线保持无连接或将天线放在电柜内, 这可能会导致信号差而无法使用.
4. 最后, 将电池安装在遥控器中, 拧紧电池盖, 然后打开遥控器的电源开关. 遥控显示显示正常工作界面之后, 您可以执行遥控操作.
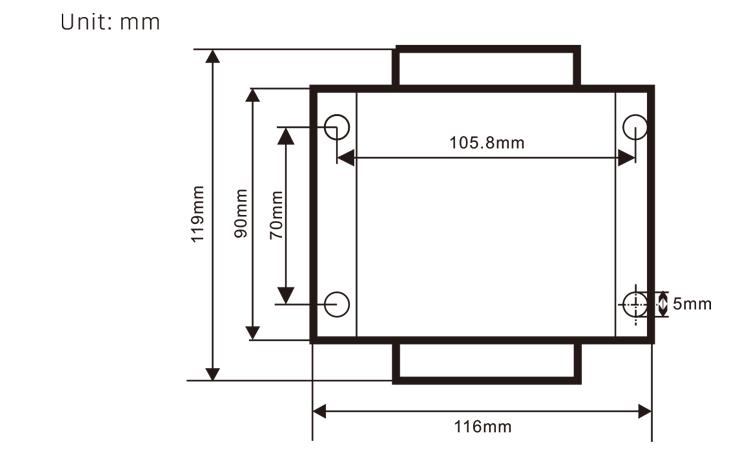
6.2 接收器安装尺寸
6.3 接收器接线参考图

7. 产品操作说明
7.1 遥控参数设置
如何输入遥控器的背景参数: 将模式开关转换为手动模式, 调整小电动机的速度 25, 或者 0, 10, 20, 40, 50, 并将大型电动机的向前开关向上转动 3 时间和下降 3 时代;
使用 “小运动速度控制” 旋钮翻页, 按启用并转动小型电动机速度控制旋钮来修改参数; 修改后, 将页面转到末尾, 选择保存并退出, 然后按启用按钮退出菜单;
参数如下:最大电流: 大电流电流反馈价值范围, 设置范围15-200A, 默认 60;
速度控制参数: 自动模式小型电机自动加速度速度, 速度越快, 设置范围 200-1500, 默认 1000;
减速参数: 设置允许的电动机速度更换的上限. 当电流超出此值时, 它将减速. 越小, 左右电动机的速度越快. 范围是 05-12, 默认值为 06;
加速A1: 价值越大, 运动速度越快, 范围00-06,默认值 01; 减速A2: 价值越大, 电动机速度降低速度越快, 范围 00-06, 默认 02;
启用速度法规: 是否需要启用小型运动速度法规, 00 未启用, 01 已启用, 默认 01;
启动自锁: 向前和反向开关释放后,大电机是否会自动保持自锁, 00 不维护, 01 维护, 默认 01;
最大旅行: 左右电动机的最大速度, 范围 10-100, 默认 50;
切割电流: 最大切割电流, 屏幕显示IC值, 范围 15-160, 默认 30, 屏幕显示IC: 30. 此参数的上限=最大电流x 80%;
默认速度限制: 默认小型电机自动切割速度在启动时, 范围 00-100, 默认 10, 屏幕显示F1.0, 仅当将最大行程设置为时,此参数才能准确 50.
无线通道: 默认为 10. 当遥控信号不稳定或现场有信号干扰时, 您可以修改此参数以切换通道以避免干扰;
速度限制偏移: 小电动机的自动切割速度的上限,范围 00-200, 默认 60, 屏幕显示 6.0; 显示值上限=速度限制偏移× 0.1;
最大主机: 大电机的最大速度, 范围 10-100, 默认 50;
MBU设备 ( 强制的 ): 大型电机逆变器模型选择, 范围 00-03, 默认 03;
00- Shanghai Xielin 01 富士
02- Invt 03 Inovance(中昌, 罗比克(Robicon)
SBU设备 (强制的): 小型电动机转换器模型选择, 范围 00-05, 默认 03;
00- Shanghai Xielin 01 富士
02- Invt 03 Inovance(中昌, 罗比克(Robicon)
04-anchuanda 05-NONE
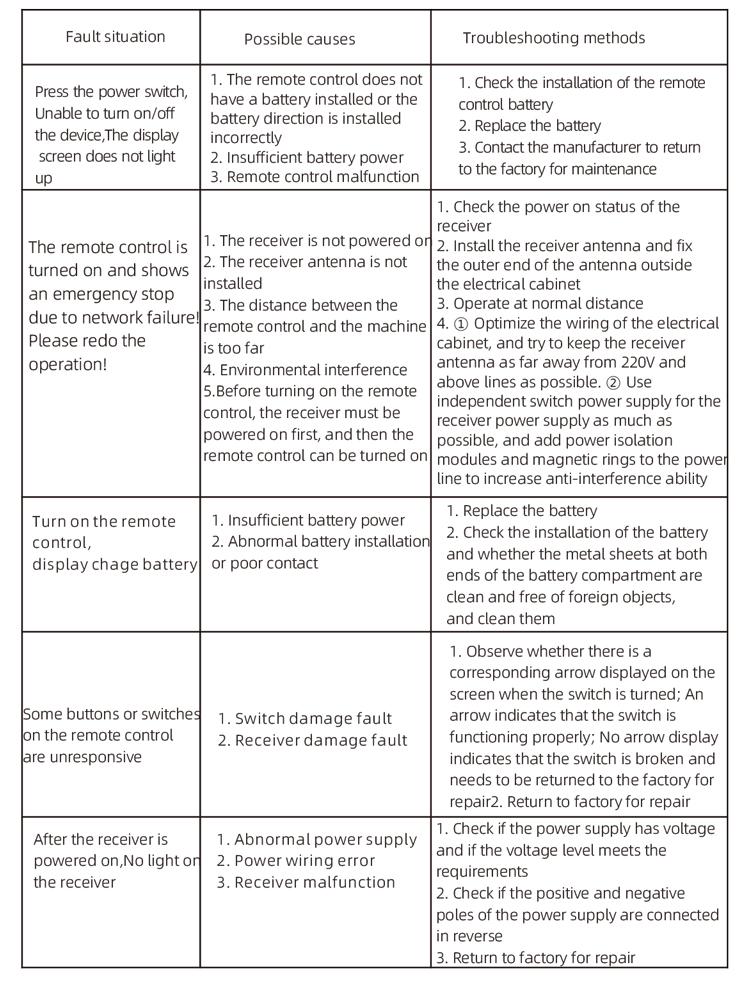
8. 产品故障排除
7.2 转换器的参数设置
1. 命令源选择: 通信命令频道
2. 主要频率源选择: 给出的沟通
3. 波特率: 19200
4. 数据格式: 没有验证, 数据格式<8-N-1>
5. 本地地址: 将左频转换器设置为 1, 正确的频转换器 2, 以及大型电动机转换器 3
7.3 遥控操作说明
1. 在机器上电源, 打开遥控器, 输入遥控背景, 设置遥控背景参数, 主要是设置小型和大型电动机转换器的模型 (如果机器制造商已经将它们设置为);
2. 设置频转换器的参数 (如果机器制造商已经设置了此步骤,则跳过此步骤);
3. 将遥控器设置为手动模式, 然后使用遥控器将机器移至工作位置;
4. 在手动模式下, 为大电机的切割电流和大电动机的速度设置IC值;
5. 切换到自动模式并设置小电动机的切割速度限制F值;
6. 在自动模式下, 将大型电机开关向前转动以启动大电动机, 然后将小型电机开关转向向前或反向. 遥控器进入自动切割模式并开始切割.
9.维护
1. 请在室温和压力下在干燥的环境中使用它以延长其使用寿命.
2. 请避免在雨水和水泡等异常环境中使用以延长使用寿命.
3. 请保持电池舱和金属弹片区域清洁.
4. 请避免由于挤压和下降而损坏遥控器.
5. 如果很长一段时间没有使用, 请拆下电池,将遥控器和电池存储在干净安全的地方.
6.在存储和运输过程中, 应注意水分和电击性.
10. 安全信息
1. 请在使用前仔细阅读说明,并禁止非专业人员操作.
2. 当电池太低而避免电源不足引起的错误时,请及时更换电池, 这可能导致遥控器无法操作.
3. 如果需要维修, 请联系制造商. 如果损害是由自修理造成的, 制造商将不提供保修