1. 接続には6芯航空プラグケーブルを使用, ハンドルケーブルの長さは 10 メーター.
2. ハンドホイール画面にシステムのワーク座標を表示可能, 機械座標,送り速度, 軸の選択, 倍率, その他の情報.
3. 緊急停止ボタンをサポート, スイッチIO信号出力, ハンドルシャットダウン緊急停止は引き続き有効です.
4. サポート 6 カスタムボタン, IO信号を切り替える, IO配線または通信を通じてシステムに信号を出力できます。.
有線電子ハンドル取扱説明書
説明
1. 製品の紹介
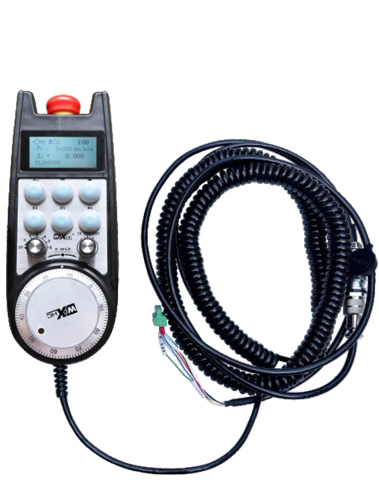
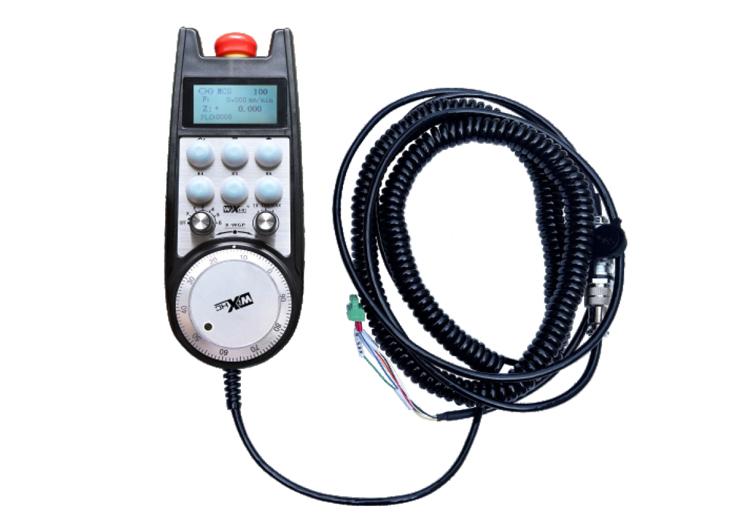
手動ガイダンスには電子ハンドルを使用, 位置決め, ツールの位置合わせ, CNC工作機械でのその他の作業. このモデルの電子ハンドホイールは、シーメンスの実際のディスプレイ有線電子ハンドホイールです。. ハンドホイールは、ネットワーク ケーブルを介して Siemens システムの X130 インターフェイスに接続されています。, S7 プロトコル通信を通じてシステム座標が読み取られ、ハンドホイールの LCD 画面に表示されます。. ハンドホイールはシステム軸の選択も制御できます, 倍率, ボタン, 通信によるその他の信号.
2.製品の機能的特徴
1. 接続には6芯航空プラグケーブルを使用, ハンドルケーブルの長さは 10 メーター.
2. ハンドホイール画面にシステムのワーク座標を表示可能, 機械座標,送り速度, 軸の選択, 倍率, その他の情報.
3. 緊急停止ボタンをサポート, スイッチIO信号出力, ハンドルシャットダウン緊急停止は引き続き有効です.
4. サポート 6 カスタムボタン, IO信号を切り替える, IO配線または通信を通じてシステムに信号を出力できます。.
5. サポート 6 または 8 軸制御, スイッチ付き IO 配線または通信を通じてシステムに出力できる IO 信号.
6. サポート 3 または 4 倍率制御のレベル, スイッチ付き IO 配線または通信を通じてシステムに出力できる IO 信号.
7. サポートパルスエンコーダ, 100 パルス/ターン, ABパルス配線によりシステムに信号を出力可能.
8. Siemens S7 プロトコルおよび Siemens 828D をサポート, 840DSL, ONE およびその他のモデル システム.
3. 製品仕様
| ハンドル作動電源電圧 | DC24V/1A |
| 受信機電源電圧 | DC24V/1A |
| レシーバIO出力負荷範囲 | DC24V |
| ハンドル端ケーブル長さ | 10m |
| 受信側ケーブル長 | 1m |
| 受信側ネットワークケーブルの長さ | 3m |
| 動作温度 | -25℃<×<55℃ |
| 落下防止高さ | 1m |
| カスタムボタンの数量 | 6 |
| 製品寸法 | 233*90.7*77.4(mm) |
4.製品機能の紹介
注記:
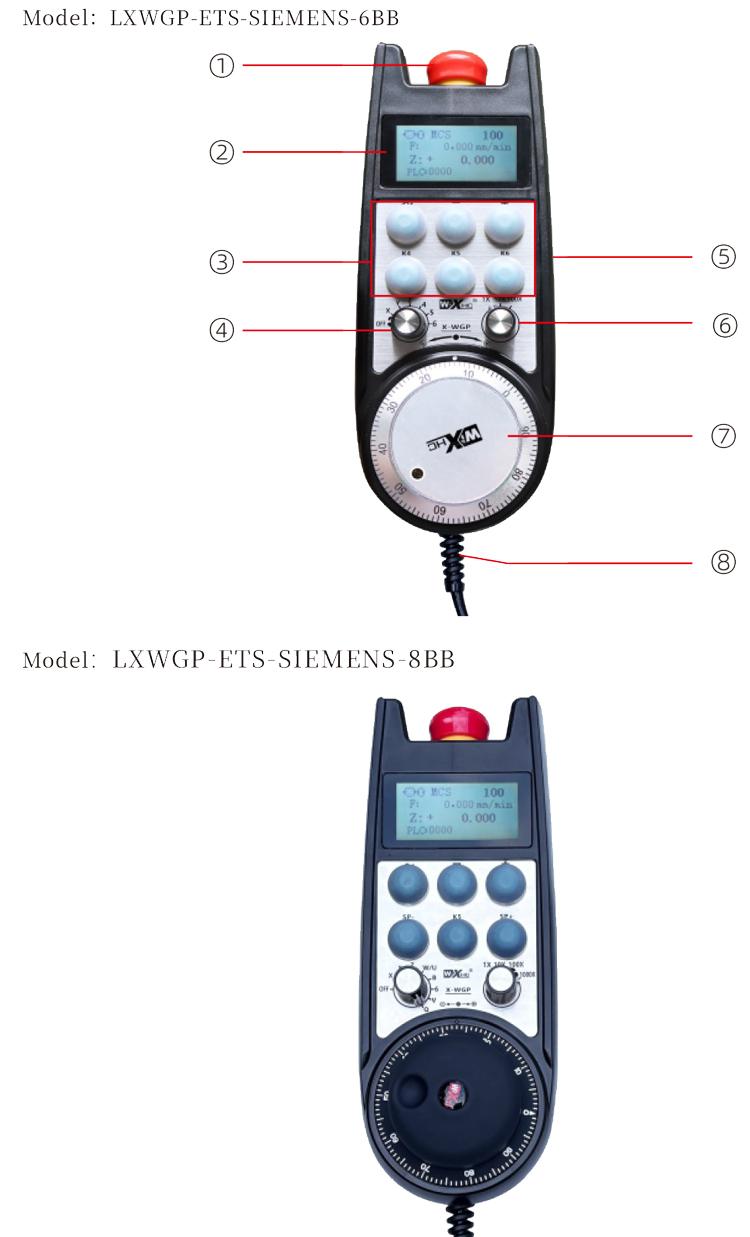
非常停止ボタン:
非常停止ボタンを押す, 受信機の 2 セットの緊急停止 IO 出力が切断されます。, ハンドルのすべての機能が無効になります.
非常停止解除後, 受信機の緊急停止 IO 出力が閉じられている, ハンドルのすべての機能が回復します.
② 画面表示:
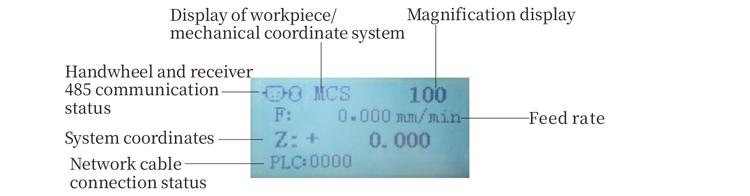
PLC: 0000 ネットワークケーブルが接続されていないことを示します, PLC: 1010 ネットワーク ケーブルが PLC システムに正常に接続されていることを示します.
PLC: 1110 ハンドルへのシステム データの書き込みが成功したことを表します, PLC: 0001 コンピュータへの接続が成功したことを表します.
③カスタムボタン:
6 カスタムボタン, それぞれが受信機の IO 出力ポイントに対応します, 通信を通じてシステムにも接続.
④軸選択スイッチ:
軸選択スイッチによりハンドルによる移動軸を切り替えることができます。.
⑤有効ボタン:
両側のいずれかのイネーブルボタンを押したままにして、振ってパルスエンコーダをアクティブにします。. また、レシーバー上の 2 つのグループにより、IO 出力の導通が可能になります。, イネーブルボタンを放すと、IO 出力が切断可能になります。.
⑥倍率スイッチ:倍率スイッチで倍率を切り替えることができます
ハンドルによって制御される.
⑦パルスエンコーダ:
有効化ボタンを押し続けます, パルスエンコーダーを振る, パルス信号を発する, 機械の軸の動きを制御します.
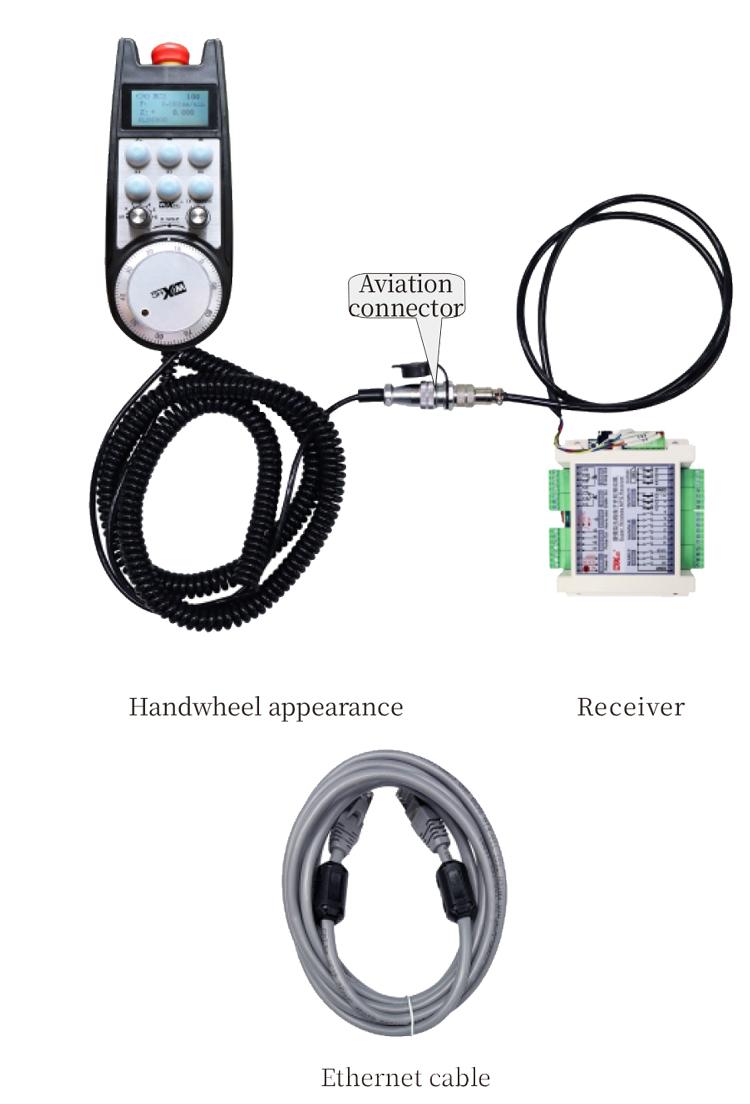
⑧ ハンドルケーブル:
ハンドルと受信機を接続するケーブル, 航空プラグ, ハンドルの電源と通信に使用.
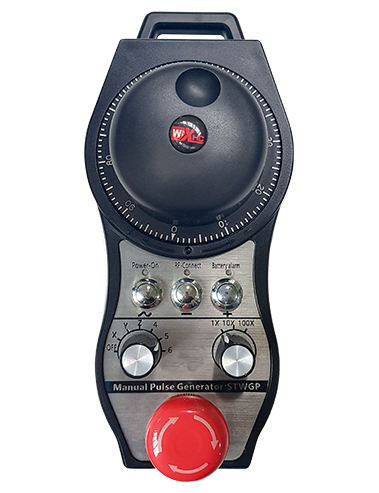
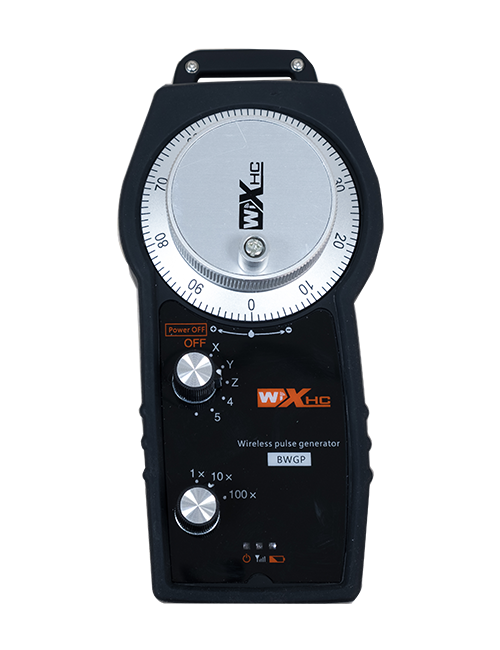
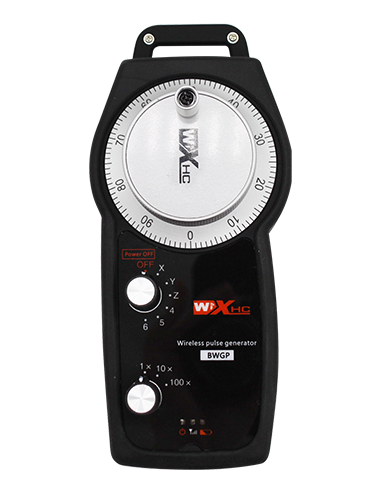
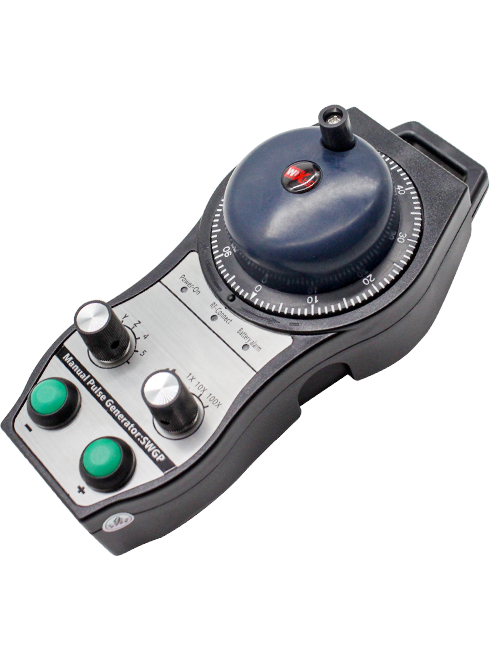
5. 製品アクセサリー図
6. 製品インストールガイド
6.1 製品のインストール手順
6.1 製品のインストール手順
1. 受信機を電気キャビネットの四隅のネジ穴に通して取り付けます。.
2. 当社の受信機配線図を参照して、現場の機器と比較してください。. デバイスをケーブルで受信機に接続し、イーサネット ケーブルを使用して受信機をシステムの X130 インターフェイスに接続します。.
3. 受信機を固定したら, 航空プラグベースをパネル上のハンドル開口位置に取り付けます, ベースのもう一方の端を受信機のハンドルインターフェイスに差し込みます. 次に、ハンドホイール ケーブルの航空プラグをベースに挿入し、固定装置を締めます。.
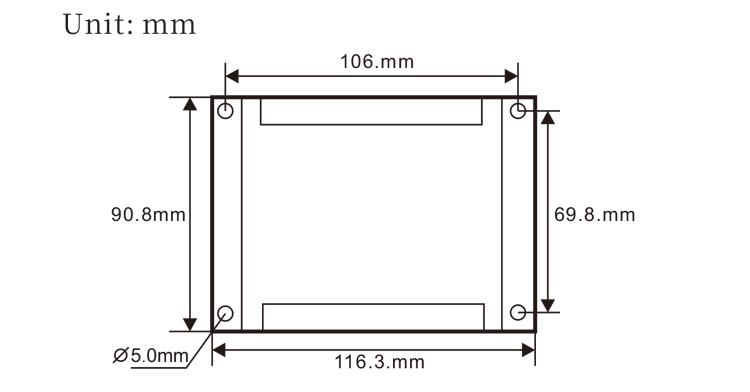
6.2 受信機のインストール寸法
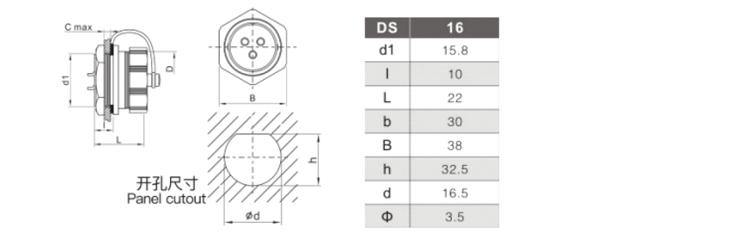
6.3 航空プラグの取り付け寸法
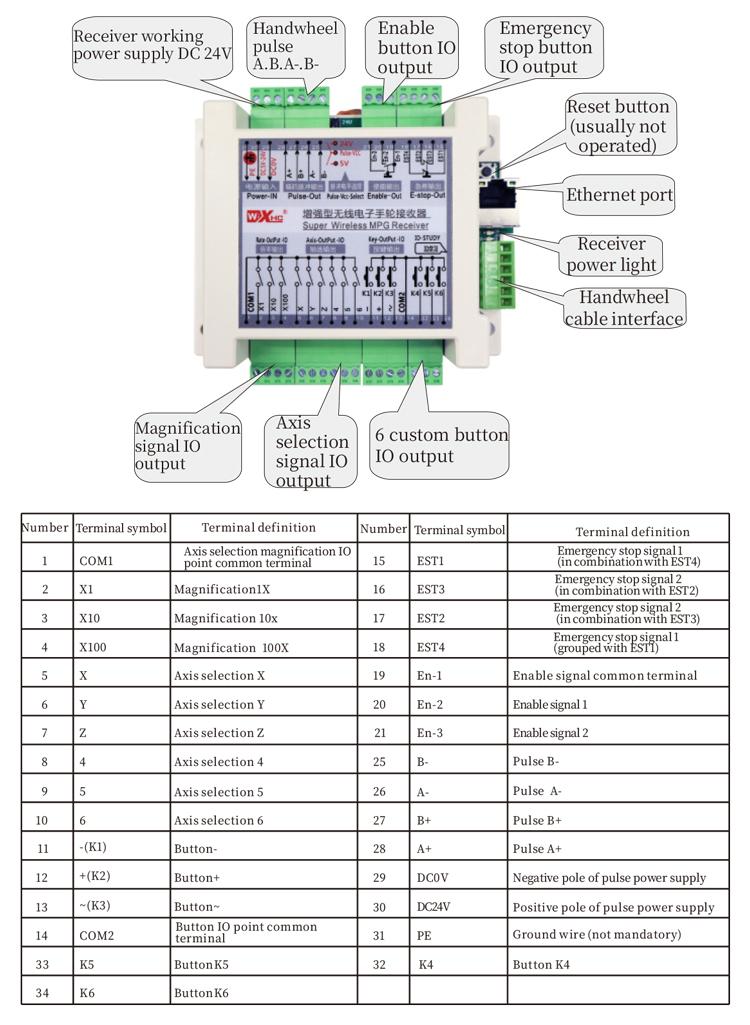
6.4 レシーバー配線参照図
 7.製品の操作説明書
7.製品の操作説明書
1. 受信機の電源がオンになり、受信機の動作表示灯が点滅したとき, ネットワークケーブルで受信機をコンピュータに接続します, パソコンの固定IPアドレスを設定する, ネットワーク設定ツール ソフトウェアを使用して、ハンドホイール機能のネットワーク パラメータを設定します。. 具体的な設定方法については, を参照してください “LXWGP-ETS 有線ハンドホイール ユーザーマニュアル”.
2.受信機のセットアップが完了したら, システムはPLCプログラムをプログラムする必要があります. を参照してください。 “LXWGP-ETS シーメンス数値制御システムのさまざまな設定方法” 詳細については、PLC プログラム ルーチン資料を参照してください。.
3.上記の設定が完了したら, 受信機を機械の電気キャビネットに持ってきて設置します. ネットワーク ケーブルをコンピュータから引き出し、システムの X130 インターフェイスに差し込みます。受信機の電源とパルス ラインを接続します。3.
4.上記の設定が完了したら, 受信機を機械の電気キャビネットに持ってきて設置します. ネットワーク ケーブルをコンピュータから引き出し、システムの X インターフェイスに接続します。. 受信機の電源とパルスラインを接続します.
5. 軸選択を選択: 軸選択スイッチを切り替えて操作したい軸を選択します.
6. 倍率を選択してください: 倍率スイッチを切り替えて必要な倍率を選択します.
7. 移動軸: 有効化ボタンを押し続けます, 軸選択スイッチを選択します, 倍率スイッチを選択します, 次に、パルスエンコーダを回転させて、正の移動軸を時計回りに、負の移動軸を反時計回りに回転させます。.
8. 任意のカスタム ボタンを押し続けると、受信機の対応するボタンの IO 出力がオンになります。, ボタンを放して出力をオフにします.
9. 非常停止ボタンを押す, 受信機の対応する緊急停止 IO 出力が切断されます。, ハンドル機能は無効になります, 非常停止ボタンを放します, 緊急停止 IO 出力は閉じられます, ハンドル機能が回復します.
8.製品モデルの説明

① LXWGP は有線の外観スタイルを表します, および受信機通信インターフェース
イーサネットインターフェイスです.
② : Siemens システム固有を表します.
③ : 軸選択スイッチの数を表します, 軸を表します, そして表します
軸.
④ : 軸選択と倍率信号の種類を表します, A は表します
ポイントツーポイント出力信号, B はエンコードされた出力信号を表します.

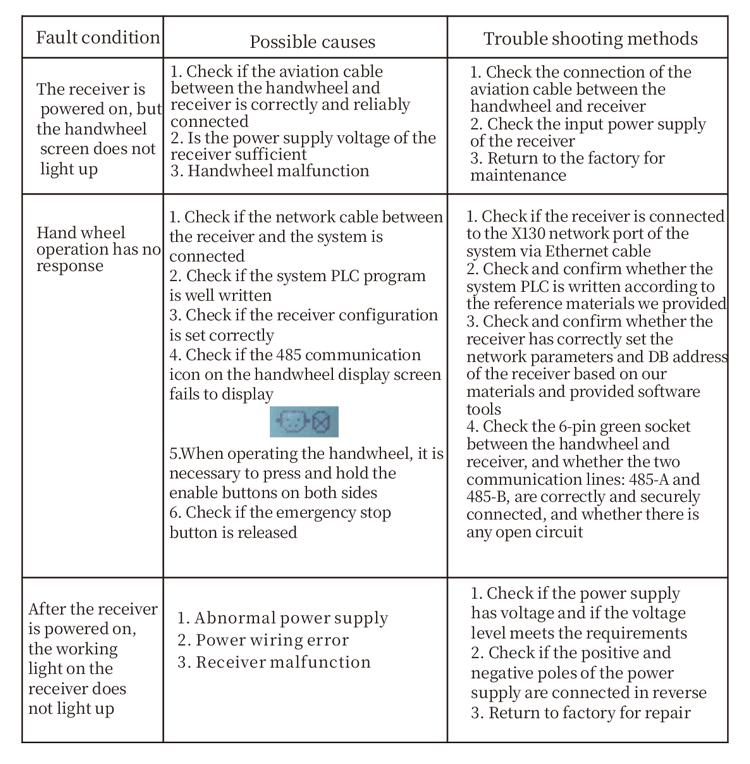
9.製品のトラブルシューティング
10.メンテナンス
1. 室温と圧力の乾燥環境でそれを使用して、そのサービス寿命を延ばしてください.
2. 雨や水の泡などの異常な環境で使用して、サービスの寿命を延ばしないでください.
3. 寿命を延ばすために、ハンドホイールの外観を清潔に保ってください。.
4. 圧迫は避けてください, 落ちる, ぶつかる, 等. ハンドル内の精密部品の損傷や精度誤差を防ぐため.
5. 長い間使用されていない場合, ハンドルは清潔で安全な場所に保管してください。保管および輸送中は, 水分と衝撃耐性に注意を払う必要があります.
11. 安全情報
1. 使用する前に指示を注意深く読んで、非専門家が運営を禁止してください.
2. ハンドルに異常が発生した場合, すぐに使用を中止し、トラブルシューティングを行ってください. トラブルシューティングの前に, 原因不明のハンドルの故障による安全上の事故を避けるため、故障したハンドルを再使用することは禁止されています。;
3. 修理が必要な場合, メーカーに連絡してください. 損傷が自己修復によって引き起こされる場合, メーカーは保証を提供しません