Katrangan
1.Pambuka Produk
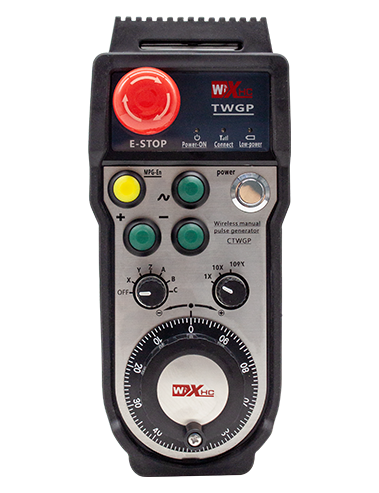
Wireless Remote Control is used for manual guidance, posisi, tool setting and other operations of CNC machine tools. Produk iki nggunakake teknologi transmeless nirkabel, Ngilangi Sambungan Kabel Musim semi Tradisional, nyuda gagal peralatan sing disebabake kabel, Ngilangake kekurangan kabel nyeret kabel, Noda minyak, lsp., and is more convenient to operate.It is widely applicable to CNC machine tools such as gantry machining centers, gantry vertical lathes, and CNC gear processing machines, and is compatible with various mainstream CNC system brands on the market, including Siemens, Mitsubishi, Fanuc, Syntec and more.
2.Fitur Produk
1. Adopts 433MHz wireless communication technology with a wireless operating distance of 20 meter.
2.Adaptive frequency hopping; 32 sets of wireless remote controls can be used simultaneously without interference.
3.Supports the emergency stop button, and the emergency stop button remains effective even after the remote control is powered off.
4.Ndhukung 3 custom buttons with switching IO signal output.
5.Supports 6-axis control, lan 7 to 12-axis control is customizable.
6. Supports 3-speed magnification control, and 4-speed magnification control is customizable.
7.supports the enable button function, which can output switching IO signals, and also control axis selection, magnification and encoder.
8.Supports modifying the encoding type of axis selection and magnification via software.
9. Supports pulse encoder with specification of 100 pulsa saben revolusi.
10. Supports standard Type-C charging with 5V-2A charging specification; built-in battery
specification: 14500 / 1100mAh.
| Working Voltage and Current of Handheld Terminal |
3.7V/20.0mA |
| Charging Battery Specification |
3.7V/14500/1100mAh
|
| Low Voltage Alarm Range of Handheld Terminal |
<3.35V |
| Receiver Power Supply Voltage |
DC5V-24V/1A |
| Receiver Emergency Stop Output Load Range |
AC125V-1A/DC30V-2A |
| Receiver Enable Output Load Range |
AC125V-1A/DC30V-2A |
| Receiver Custom Button Output Load Range |
DC24V/50mA
|
| Receiver Axis Selection Output Load Range |
DC24V/50mA |
| Receiver magnification Output Load Range |
DC24V/50mA |
| Handheld Terminal Transmit Power |
15dBm
|
| Receiver nampa sensitivitas |
-100dBm |
| Frekuensi komunikasi nirkabel |
433Pita frekuensi MHz
|
| Wireless Communication Distance |
20 meters barrier-free distance
|
| Operating Temperature |
-25℃<X<55℃ |
| Safe drop height |
1 m
|
| Number of Custom Buttons |
3
|
| Product Weight |
546.86(g) |
| Product Dimensions |
200*87*72(Mm) |
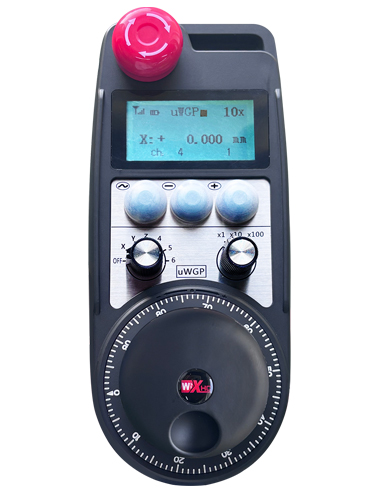
4. Pengenalan Fungsi Produk
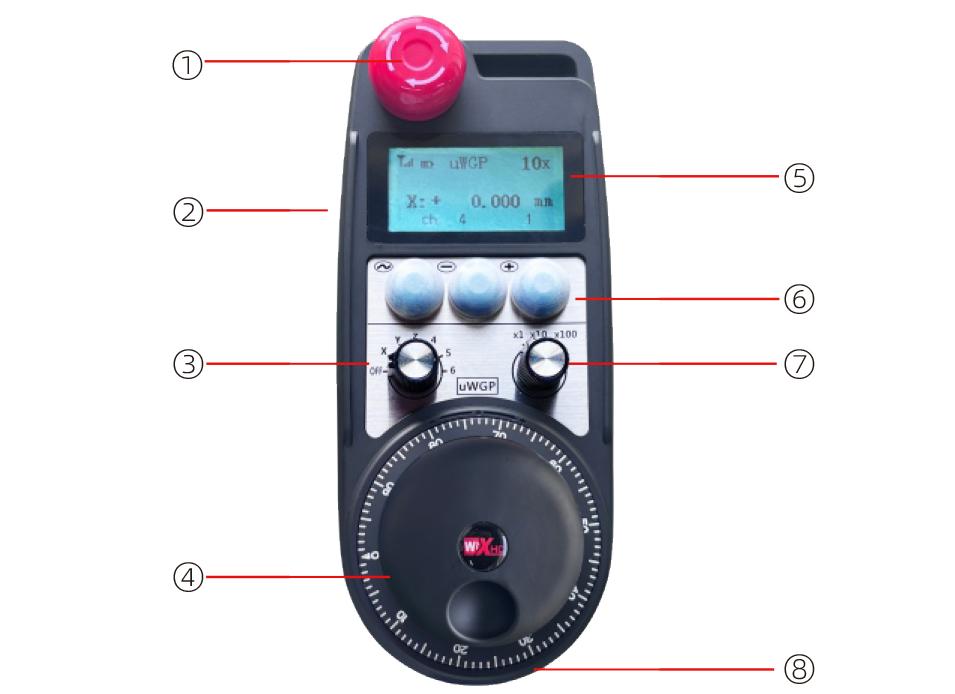
Cathetan:
① Emergency Stop Button:
Pencet tombol mandeg darurat, the two groups of emergency stop IO outputs on the receiver will disconnect, and all remote control functions will be invalidated.Release the emergency stop button, the emergency stop IO outputs on the receiver will be closed, and all remote control functions will be restored. Kajaba iku, even if the remote control is powered off, pressing the emergency stop button can still activate the emergency stop IO output of the receiver.
② Enable Button:
Press either enable button on both sides, the two sets of enable IO outputs on the receiver will conduct. Release the enable button, and the enable IO outputs will disconnect. It is necessary to press and hold the enable button before toggling axis selection, magnification or rotating the remote control for the operation to take effect.This function can be canceled through the configuration software.
③ Axis Selection Switch (Power Switch):
Pencet terus tombol Aktifake, then toggling the axis selection switch can control the movement of axis .Press and hold the enable button, then toggle the axis selection switch to switch the motion axis controlled by the remote control. Toggle the switch from the OFF position to any axis position, and the remote control will power on automatically.
④ Pulse Encoder:
Press and hold the enable button and rotate the pulse encoder, it will output pulse signals to control the movement of the machine axis.
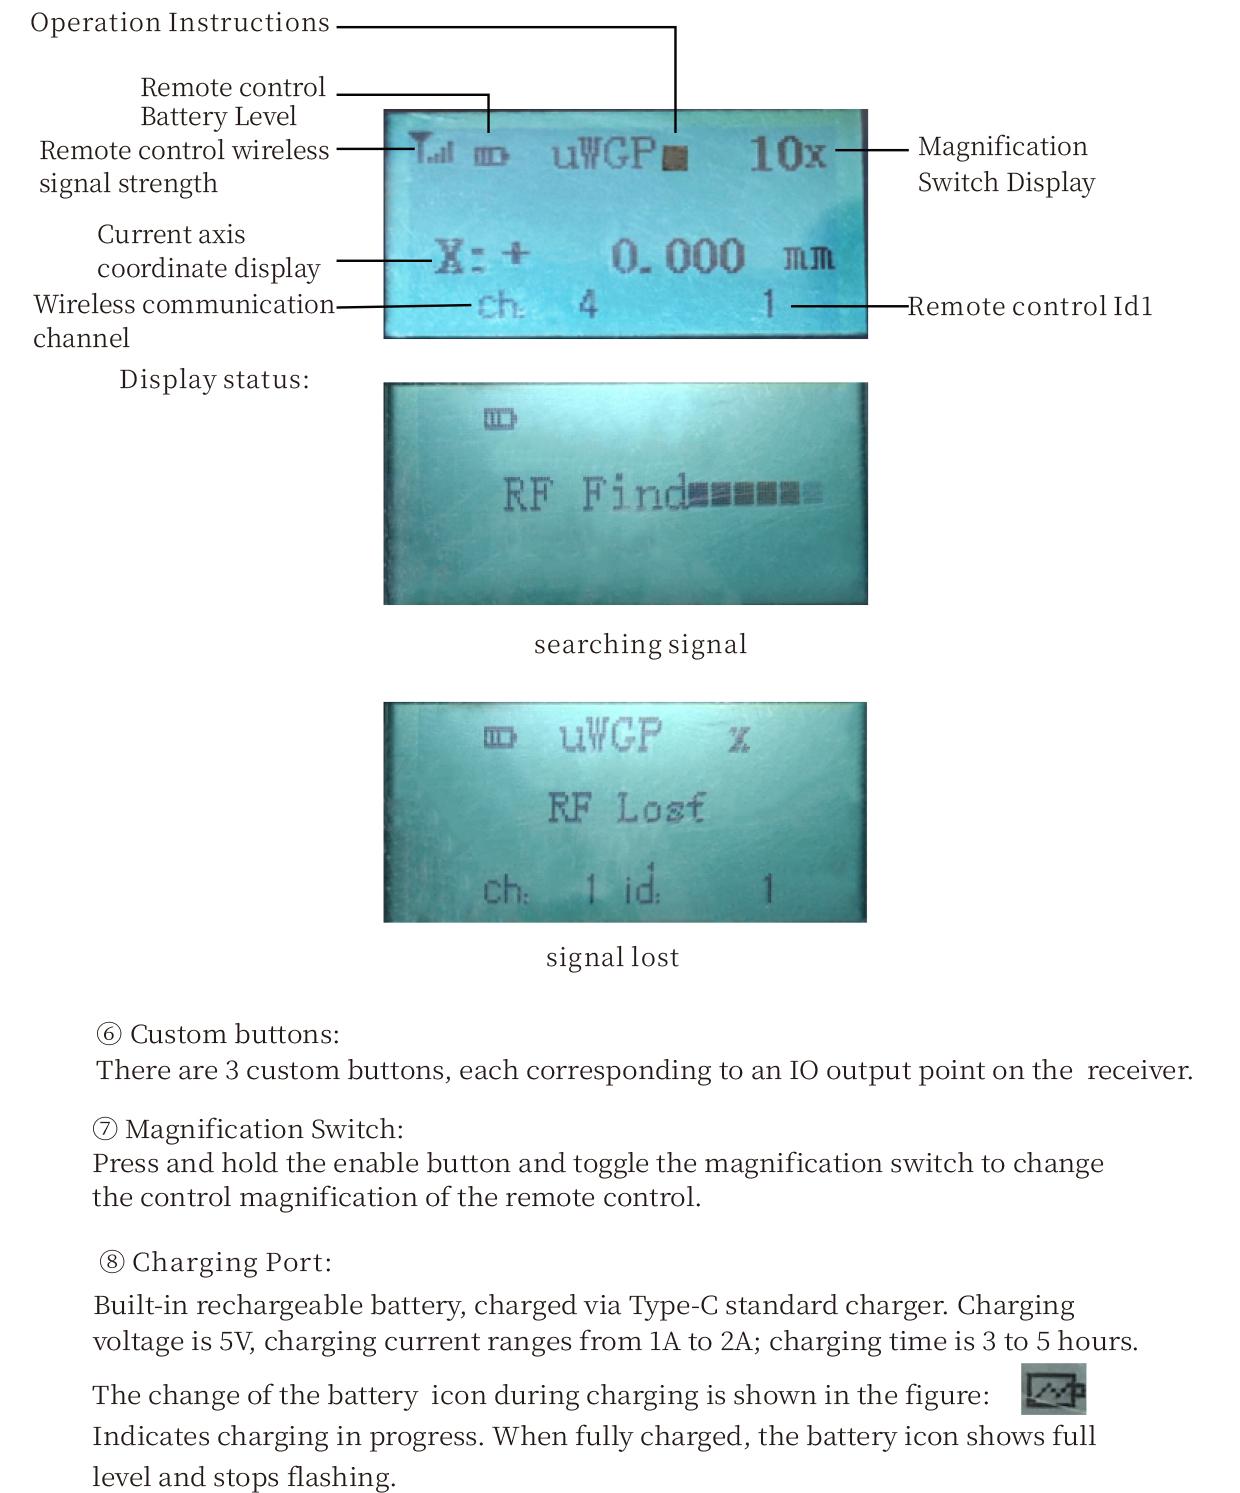
⑤ LCD Display Screen:
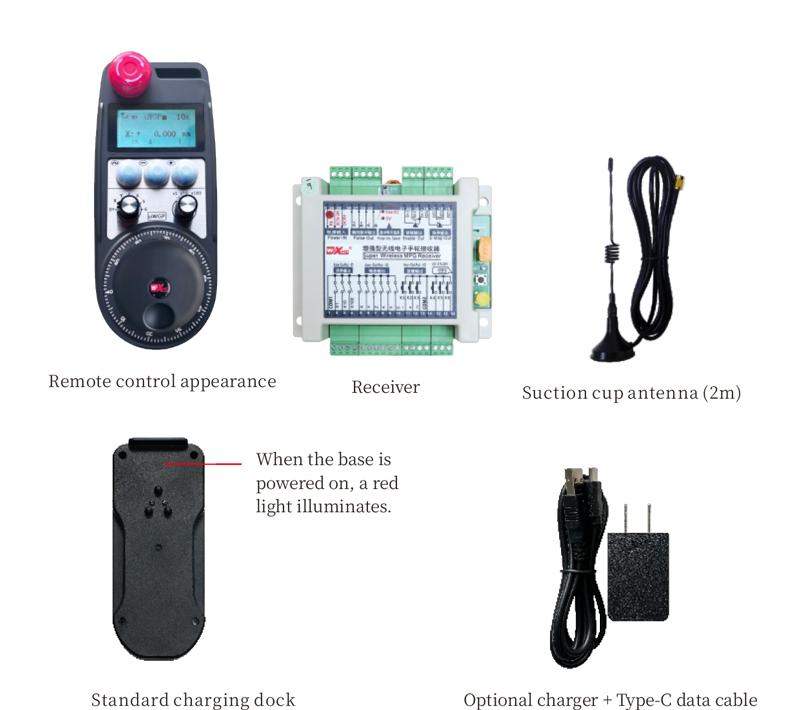
5. Product Accessories Diagram
6. Pandhuan instalasi Produk
6.1 Langkah-langkah instalasi Produk
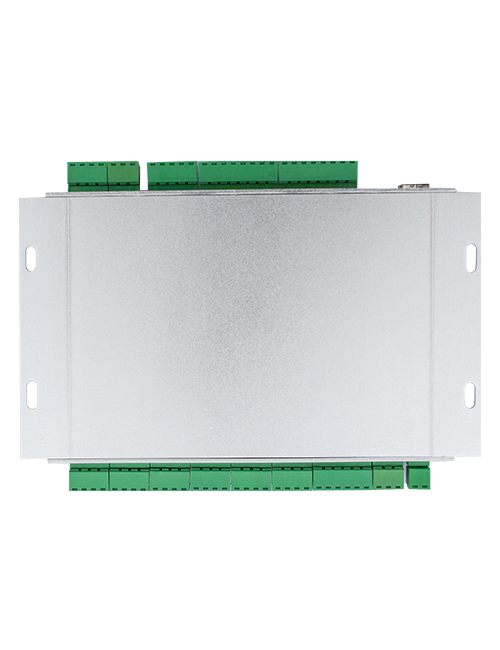
1. Install the receiver in the electrical cabinet via the buckle on its back, or mount it inside the electrical cabinet through the screw holes at the four corners of the receiver.
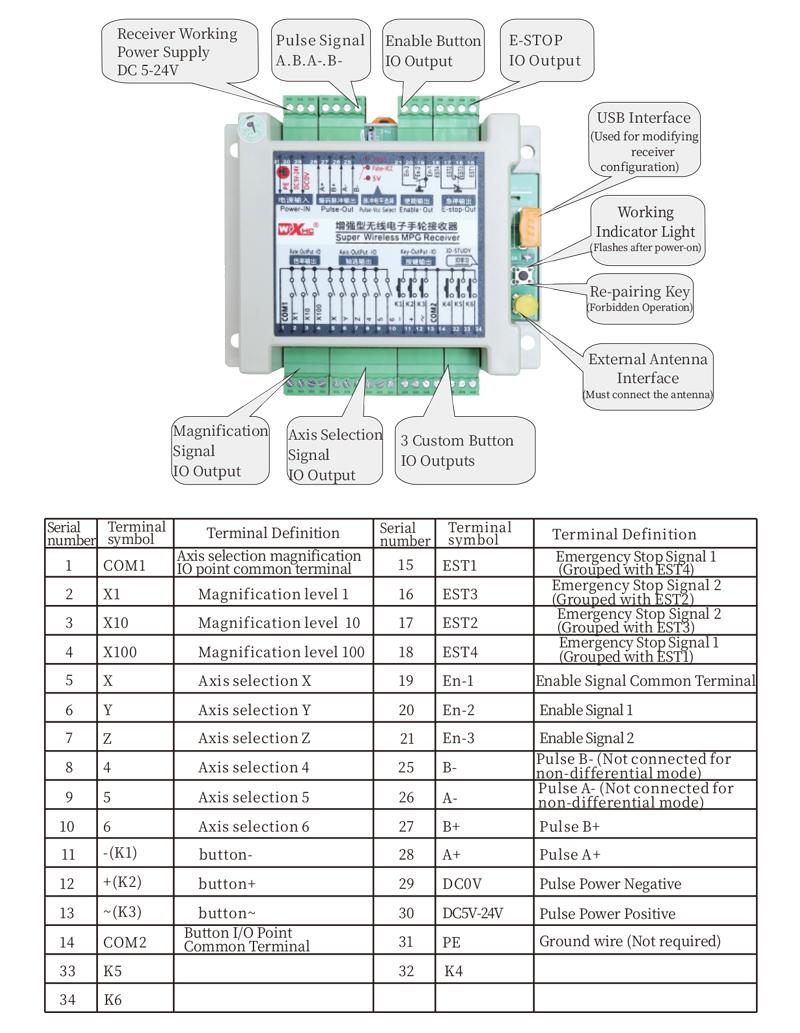
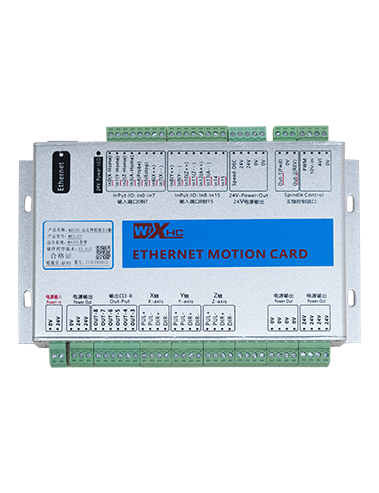
2. Rujuk diagram kabel panrima kita, Bandhingake karo peralatan ing situs sampeyan, and connect the equipment to the receiver with cables.
3. After the receiver is fixed in place, install the supporting antenna of the receiver properly. Mount or place the outer end of the antenna outside the electrical cabinet. It is recommended to place it on the top of the electrical cabinet for optimal signal performance. Do not leave the antenna uninstalled or place it inside the electrical cabinet; yen ora, signal failure may occur.
4. Pungkasane, turn on the remote control power switch, then you can remotely operate the machine via the remote control.
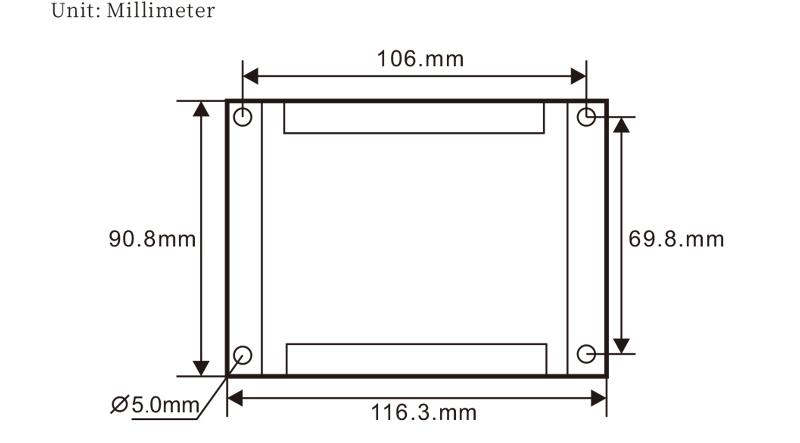
6.2 Receiver Installation Dimensions
6.3 Diagram referensi wiring wiring panrima
7. Pandhuan operasi produk
1. Daya ing mesin lan panrima. The receiver operation indicator flashes. After the wireless electronic remote control is fully charged, toggle it from the OFF gear to the X-axis gear, and the remote control display lights up.
2. Select the axis : Pencet terus tombol Aktifake, toggle the axis selection switch to select the axis to be operated.
3. Select the magnification: Pencet terus tombol Aktifake, toggle the magnification switch to select the required magnification gear.
4. Axis movement: Pencet terus tombol Aktifake, select the axis selection switch and the magnification switch, then rotate the pulse encoder. Rotate clockwise to move the axis in the positive direction, and rotate counterclockwise to move the axis in the negative direction.
5. Pencet terus tombol apa wae, the corresponding button IO output of the receiver will turn on; release the button, and the output will turn off.
6. Pencet tombol mandeg darurat, the corresponding emergency stop IO output of the receiver disconnects and the remote control function becomes invalid. Release the emergency stop button, the emergency stop IO output closes and the remote control function is restored.
7. If the wireless remote control is not operated for a period of time, bakal kanthi otomatis mlebu mode turu kanggo nyuda konsumsi daya. It can be used normally again by pressing the enable button again.
8.If the wireless remote control is not used for a long time, turn the axis switch to OFF to turn off the power and extend battery life
8. Katrangan Model Produk
①:UWGP stands for appearance style.
②:Pulse Output Parameters:
01: Nuduhake yen sinyal output pulsa yaiku A, B; Pulsa voltase 5V; jumlah pulsa 100PPR.
02: Nuduhake yen sinyal output pulsa yaiku A, B; Tegangan pulsa 12 V; pulse quantity 25PPR.
03: Nuduhake yen sinyal output pulsa yaiku A, B, A -, B -; Pulsa voltase 5V; jumlah pulsa 100PPR.
04: Nuduhake output sirkuit sing kurang murah, Kanthi sinyal output pulsa saka A lan B; The number of pulses is 100PPR.
05: Nuduhake output sumber PNP sing dhuwur, Kanthi sinyal output pulsa saka A lan B; Jumlah pulsa yaiku 100PPR.
③:Represents the axis selection switch quantity; 6 stands for 6 Axes, 7 stands for 7 Axes, and so on.
④: Represents the signal type of the axis selection switch.A stands for point-to-point output signal, and B stands for encoder output signal.
⑤: Represents the signal type of the magnification switch.A stands for point-to-point output signal, and B stands for encoder output signal.
⑥: Nggantosi nomer tombol khusus; 3 corresponds to 6 Kancing Custom.
⑦: Represents the power supply for the system remote control. 05 stands for 5V power supply, lan 24 stands for 24V power supply.
⑧: Represents the contact charging mode. It starts charging automatically when placed back on the charging base.
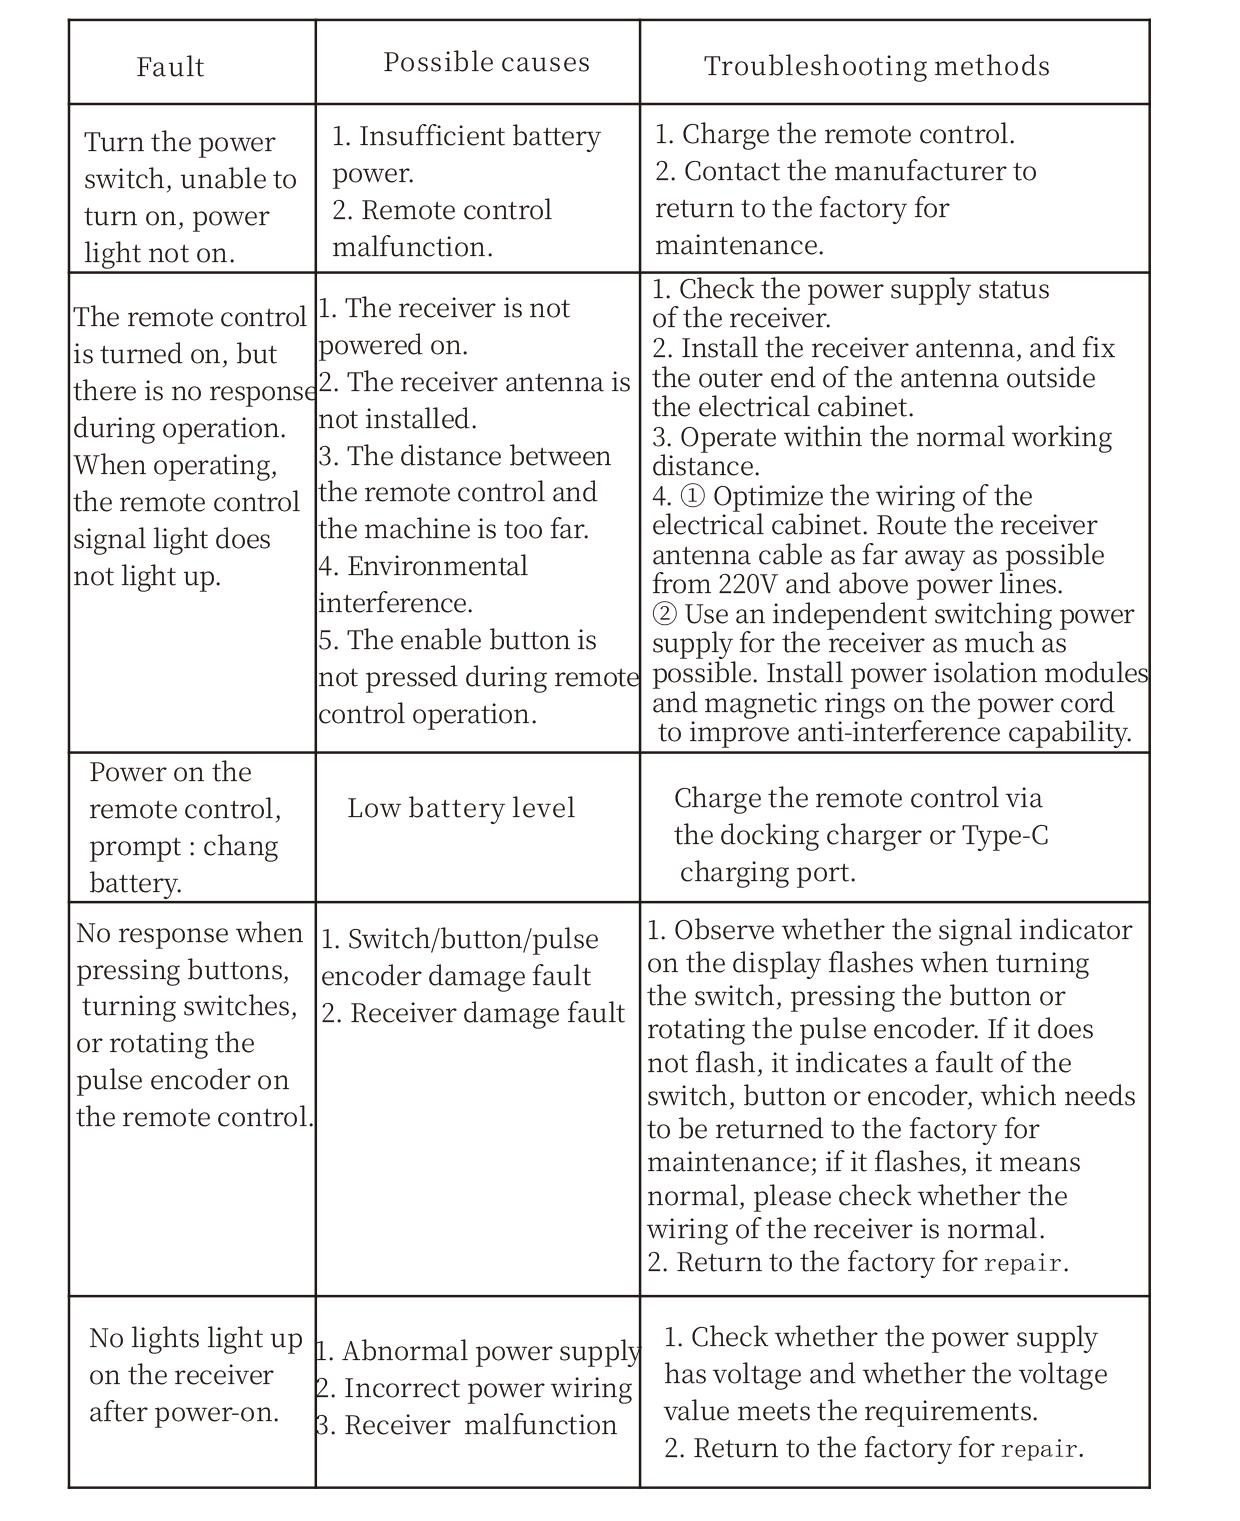
9. Ngatasi masalah produk
10. Maintenance and upkeep
1. Mangga nggunakake ing lingkungan garing ing suhu kamar lan tekanan kanggo ngluwihi layanan.
2. Please avoid using in abnormal environments such as rain and water to extend the service life.
3. Please keep the appearance of the remote control clean to extend its service life.
4. Please avoid crushing, dropping, or bumping, lsp. to prevent damage to the precision components inside the remote control or accuracy errors.
5. Yen ora digunakake kanggo wektu sing suwe, please store the remote control in a clean and safe place.
6. Avoid moisture and shock during storage and transportation.
11. Informasi safety
1. Mangga maca pandhuan kanthi ati-ati sadurunge digunakake lan nglarang profesional saka operasi.
2. Please charge the remote control in a timely manner when the battery level is too low, to avoid malfunction and operational errors caused by insufficient power.
3. If you repair it yourself and cause damage, the warranty will be void.