Описание
1. Введение продукта
Гусеничная канатная пила с автоматическим дистанционным управлением подходит для гусеничных канатных пил.. Он использует протокол 485ModbusRTU для управления запуском скорости, а также управления передним и задним левым и правым направлением левого и правого гусеничных инверторов., а также протокол преобразования частоты большого двигателя RTU для управления запуском скорости и управлением передним и задним левым и правым направлением левого и правого гусеничных инверторов., и анализ и сравнение перегрузки по току с преобразованием частоты большого двигателя., автоматическая регулировка скорости левого и правого гусеничного хода в режиме реального времени для достижения функции автоматической резки.
2. Особенности продукта
1. Принять технологию беспроводной коммуникации 433 МГц, Беспроводное расстояние 100 метры.
2. Принять функцию автоматического перерыва частоты, использовать 32 наборы беспроводных пультов дистанционного управления одновременно, не влияя друг на друга.
3. Поддержка всех инверторов с протоколом 485-Modbus RTU.. Адаптированные марки инверторов включают в себя:Шанхай Ксилин, Фудзи, Инновации, Чжунхен, Инвентарь, Анчуанда. Если бренд не ada, пожалуйста, свяжитесь с нами для настройки.
4. Поддержка запуска инвертора большого двигателя, регулирование скорости, и текущее чтение.
5. Поддержка регулирования скорости левого и правого гусеничного инвертора., начинать, переднее и заднее левое и правое управление.
6. Поддержка коррекции прямой линии левого и правого гусеничного инвертора, чтобы машина двигалась по прямой линии..
7. Поддержка функции автоматической резки канатной пилы, автоматически регулирует скорость левого и правого гусеничного хода в режиме реального времени в соответствии с большой информацией о токе двигателя.
8. В то же время, он совместим с прямым выходом ввода-вывода для управления запуском и остановкой двигателя., и аналоговый выход напряжения для управления скоростью двигателя.
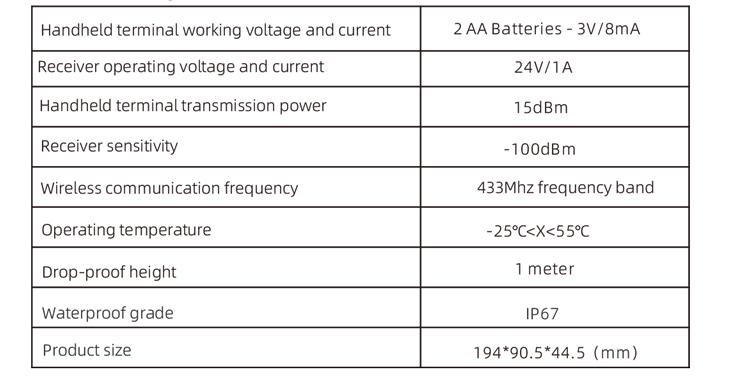
3. Спецификации продукта
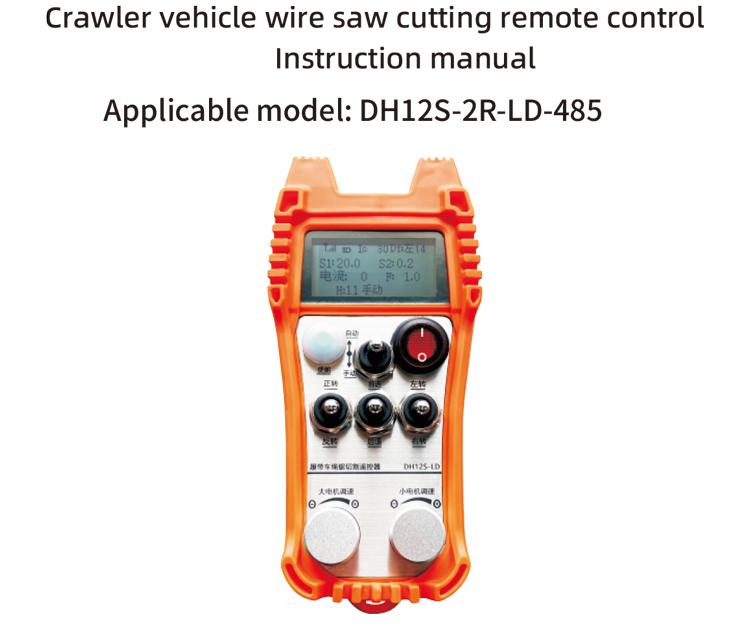
4. Введение функции продукта

Примечания:
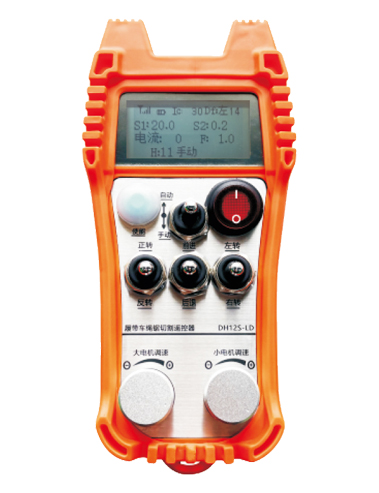
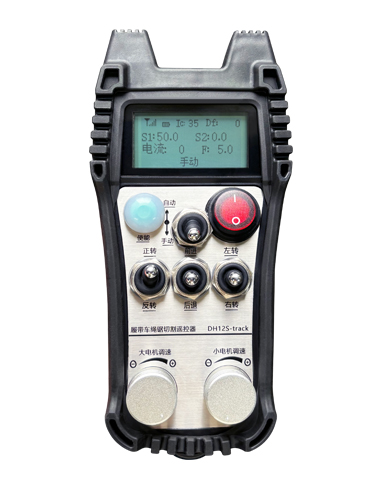
① Экранный дисплей:

②mode переключатель:
Использование двухуровневого переключателя, есть возможность переключения между автоматическим и ручным режимами, и соответствующий режим отобразится на экране переключения.
③ Включить:
Комбинированные кнопки, Некоторые операции требуют удержания кнопки включения для работы, Подробную информацию см. в инструкциях для каждого переключателя..
④ Большой выключатель двигателя:
Использование 3-ступенчатого переключателя сброса, Потягивание этого переключателя может управлять передним и обратным вращением большого двигателя. После выпуска его, Государство останется, и на экране будут соответствующие дисплеи. Стрелка t указывает вращение вперед., и стрелка y указывает обратное вращение.
⑤small Двигатель вперед/обратный переключатель:
Использование 3-скоростного самоблокирующегося переключателя, потянув за этот переключатель, можно управлять движением небольшого двигателя вперед и назад.. Соответствующий дисплей отобразится на экране., со стрелкой t, указывающей вперед, и стрелкой ↓, указывающей назад.
⑥Выключатель питания с дистанционным управлением.:
Экран дисплея дистанционного управления включен.
⑦ переключатель поворота небольшого двигателя:
Использование 3-ступенчатого переключателя сброса, Когда работают вручную, Небольшой двигатель можно контролировать, чтобы повернуть налево или вправо. После выпуска, пульт дистанционного управления автоматически прекратит это действие. В прямом состоянии, поверните этот переключатель, и на экране появится соответствующая индикация. + стрелка указывает левый поворот, и – стрелка указывает правый поворот. В режиме заднего хода, поверните этот переключатель, и на экране появится соответствующая индикация. + стрелка указывает левый поворот, и – стрелка указывает поворот направо. Нажмите и удерживайте кнопку включения., затем поверните этот переключатель, чтобы выполнить функцию стационарного поворота, делая поворот быстрее.
⑧ Большое регулирование скорости двигателя:
Использование ручки энкодера с несколькими шагами, поверните ручку, чтобы отрегулировать скорость S1 большого двигателя. Для каждого 1 вращение сетки, Значение скорости большого двигателя изменяется приблизительно 0.2 единицы, и быстрое вращение может быстро изменить значение скорости большого двигателя.
9 Малая регулировка скорости двигателя (линейная коррекция):Использование многооборотной ручки энкодера, в ручном режиме, для каждого 1 поворот ручки, значение скорости малого двигателя изменяется примерно на 0.1 единицы. Быстрое вращение может быстро изменить значение скорости небольшого двигателя..
В автоматическом режиме, нажмите кнопку включения и поверните 1 сетка каждый раз. Предельное значение скорости F малого двигателя изменяется примерно на 0.1 единицы. Быстрое вращение позволяет быстро изменить значение ограничения скорости небольшого двигателя. Нажмите кнопку включения., поверните ручку вправо, и на дисплее коррекции прямой линии отображается D f: левый. Каждое вращение ручки увеличивает 1 единица; Поверните левую ручку, Поправочная линия прямой линии: Дф: верно. Каждое вращение ручки увеличивает 1 единица, и каждый блок коррекции соответствует напряжению AVI управления скоростью двигателя примерно 0.02 В.
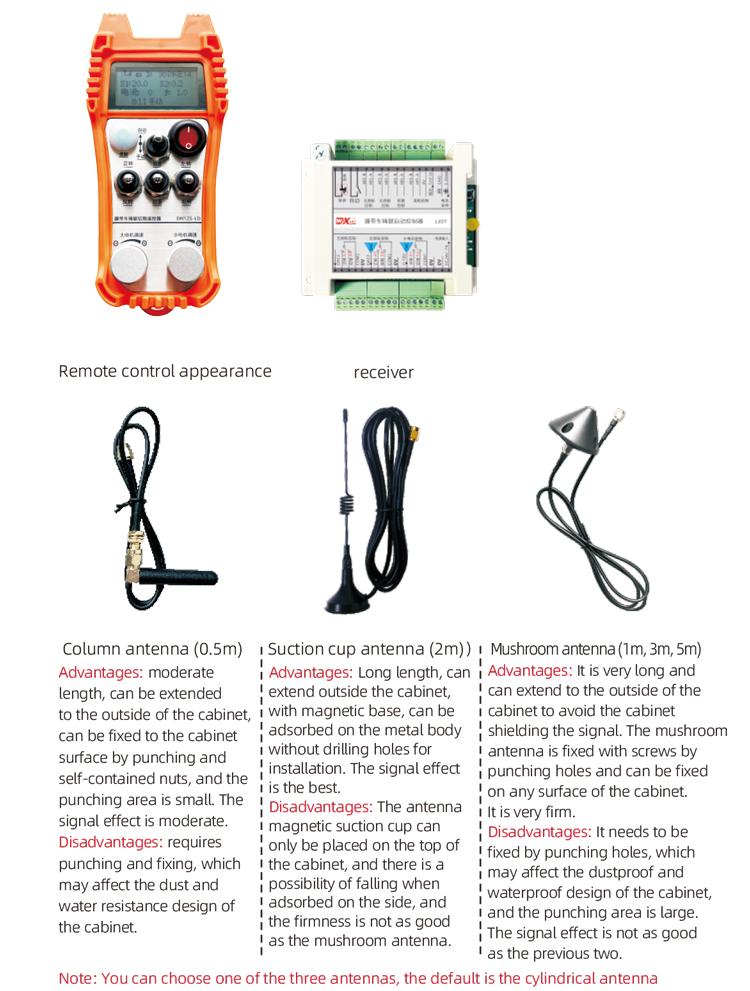
5. Диаграмма аксессуаров продукта
6. Руководство по установке продукта
6.1 Шаги установки продукта
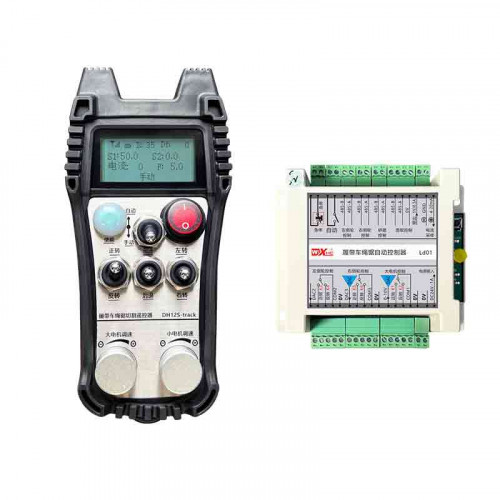
1. Установите приемник в электрический шкаф через пряжку на задней стороне., или установите его в электрический шкаф через отверстия для винтов в четырех углах приемника..
2. Обратитесь к нашей схеме подключения приемника, сравните ваше оборудование на месте, и подключить оборудование к ресиверу через провода.
3. После исправления приемника, Антенна, оснащенная приемником, и внешний конец антенны должен быть установлен или размещен за пределами электрического шкафа. Рекомендуется поместить его на верхнюю часть электрического шкафа для лучшего эффекта сигнала. Запрещается оставлять антенну неподключенной или размещать ее внутри электрошкафа., что может привести к плохому сигналу и непригодности для использования.
4. Окончательно, установить батарейку в пульт дистанционного управления, Затяните крышку аккумулятора, а затем включите выключатель питания пульта дистанционного управления. После того, как на дисплее пульта дистанционного управления отобразится нормальный рабочий интерфейс., вы можете выполнять операции дистанционного управления.
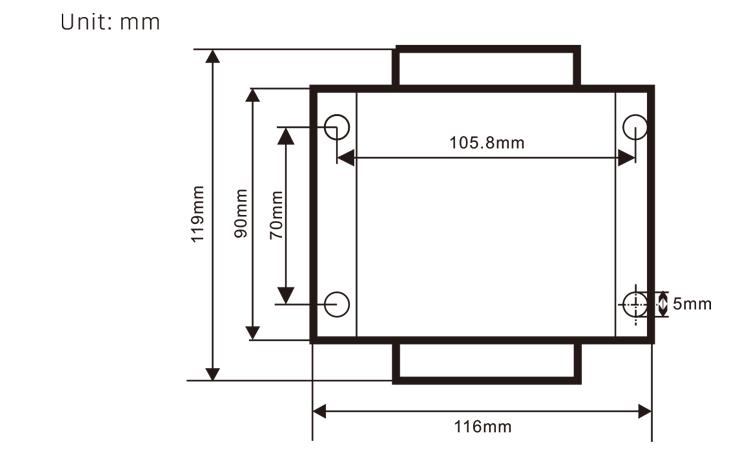
6.2 Установка приемника
6.3 Справочная диаграмма подключения приемника

7. Инструкции по эксплуатации продукта
7.1 Настройки параметра дистанционного управления
Как войти в фоновые параметры пульта: переведите переключатель режимов в ручной режим, отрегулировать скорость небольшого мотора до 25, или 0, 10, 20, 40, 50, и поверните передний переключатель большого двигателя вверх. 3 раз и ниже 3 раз;
Используйте “Маленький контроль скорости двигателя” ручка, чтобы перевернуть страницу, нажмите «Включить» и поверните ручку управления скоростью небольшого двигателя, чтобы изменить параметры.; после модификации, Поверните страницу до конца, выберите «Сохранить и выйти», и нажмите кнопку «Включить», чтобы выйти из меню.;
Параметры следующие:Максимальный ток: Большой диапазон значений обратной связи по току двигателя, диапазон настройки 15-200А, по умолчанию 60;
Параметры управления скоростью: автоматический режим, малый двигатель, автоматическая скорость ускорения, Чем меньше, тем быстрее, диапазон настройки 200-1500, по умолчанию 1000;
Параметр замедления: Установите верхний предел допустимого изменения скорости двигателя.. Когда ток меняется за пределы этого значения, оно будет замедляться. Чем он меньше, тем быстрее будут замедляться левый и правый двигатели. Диапазон 05-12, и значение по умолчанию 06;
Ускорение A1: Чем больше значение, тем быстрее увеличивается скорость двигателя, диапазон 00-06, по умолчанию 01; Замедление A2: Чем больше значение, тем быстрее снижается скорость двигателя, диапазон 00-06, по умолчанию 02;
Включить регулирование скорости: Необходимо ли включать регулирование скорости малого двигателя, 00 не включен, 01 включен, по умолчанию 01;
Запуск самоблокирующийся: Будет ли большой двигатель автоматически блокироваться после отпускания переключателя прямого и обратного хода?, 00 не поддерживается, 01 поддерживается, по умолчанию 01;
Максимальное путешествие: Максимальная скорость левого и правого моторов, диапазон 10-100, по умолчанию 50;
Резкий ток: Максимальный ток резки, на экране отображается значение IC, диапазон 15-160, по умолчанию 30, на экране отображается IC: 30. Верхний предел этого параметра = максимальный ток x 80%;
Ограничение скорости по умолчанию: Скорость автоматической резки небольшого двигателя по умолчанию при запуске, диапазон 00-100, по умолчанию 10, на экране отображается F1.0, этот параметр является точным только в том случае, если максимальный ход установлен на 50.
Беспроводной канал: По умолчанию 10. Когда сигнал пульта дистанционного управления нестабилен или на объекте возникают помехи, вы можете изменить этот параметр для переключения каналов во избежание помех;
Скорочное смещение ограничения: Верхний предел автоматической скорости резки небольшого двигателя,диапазон 00-200, по умолчанию 60, на экране отображается 6.0; Верхний предел отображаемого значения = смещение ограничения скорости × 0.1;
Максимальный хост: Максимальная скорость большого двигателя, диапазон 10-100, по умолчанию 50;
Устройство Mbus ( обязательный ): Выбор модели инвертора большого двигателя, диапазон 00-03, по умолчанию 03;
00- Шанхай Ксилин 01 Фудзи
02- Инвентарь 03 Инновация (Чжунчэнь), Робикон)
Оборудование SBUS (обязательный): Выбор модели крови частоты моторного трансформатора, диапазон 00-05, по умолчанию 03;
00- Шанхай Ксилин 01 Фудзи
02- Инвентарь 03 Инновация (Чжунчэнь), Робикон)
04-Анщеда 05-None
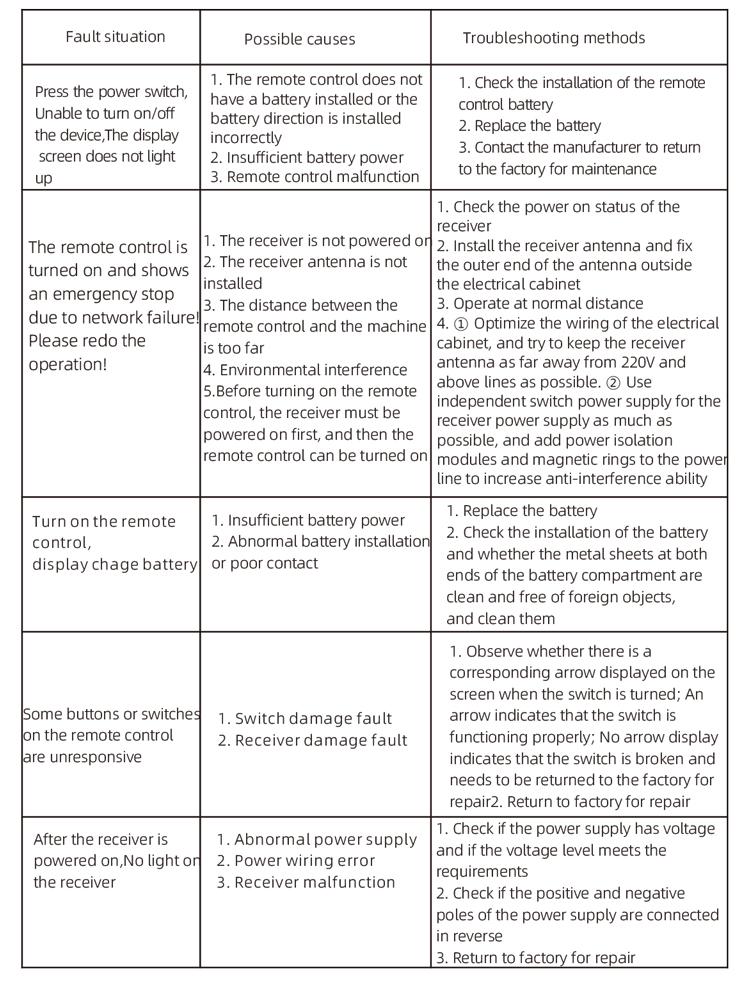
8. Устранение неполадок продукта
7.2 Настройка параметров преобразователя частот
1. Выбор источника команды: Командный канал связи
2. Выбор основного источника частоты: общение дано
3. Скорость бода: 19200
4. Формат данных: Нет проверки, формат данных<8-N-1>
5. Местный адрес: Установить левый преобразователь частоты на 1, Правильный преобразователь частоты в 2, и большой преобразователь частоты двигателя для 3
7.3 Инструкции по эксплуатации дистанционного управления
1. Питание на машине, Включите пульт дистанционного управления, введите фон пульта дистанционного управления, установить параметры фона пульта дистанционного управления, В основном это установка моделей малых и больших преобразователей частоты двигателей. (пропустите этот шаг, если производитель машины уже установил их);
2. Установите параметры преобразователя частот (Пропустите этот шаг, если производитель машины уже установил его);
3. Установите пульт дистанционного управления в ручный режим, а затем с помощью пульта дистанционного управления переведите машину в рабочее положение;
4. В ручном режиме, установите значение IC для тока резки большого двигателя и скорости большого двигателя;
5. Переключитесь в автоматический режим и установите значение F -предела скорости резания для небольшого двигателя;
6. В автоматическом режиме, Поверните большой переключатель двигателя, чтобы запустить большой двигатель, а затем поверните небольшой переключатель двигателя в положение вперед или назад.. Пульт дистанционного управления переходит в режим автоматической резки и начинает резку..
9.Обслуживание
1. Пожалуйста, используйте его в сухой среде при комнатной температуре и давлении, чтобы продлить срок службы.
2. Пожалуйста, избегайте использования в аномальных условиях, таких как дождь и пузыри воды, чтобы продлить срок службы.
3. Пожалуйста, держите батарею и металлическую шрапнутную зону в чистоте.
4. Пожалуйста, не повреждайте пульт дистанционного управления из -за сжимания и падения.
5. Если не используется в течение долгого времени, пожалуйста, извлеките батарею и храните пульт дистанционного управления и батарею в чистом и безопасном месте..
6.Во время хранения и транспорта, Внимание должно быть уделено влажности и шоковой сопротивлении.
10. Информация о безопасности
1. Пожалуйста, внимательно прочитайте инструкции перед использованием и запрещайте не специалистам работать.
2. Пожалуйста, заменяйте батарею своевременно, когда она слишком разряжена, чтобы избежать ошибок, вызванных недостаточной мощностью., что может привести к тому, что пульт дистанционного управления не сможет работать.
3. Если требуется ремонт, Пожалуйста, свяжитесь с производителем. Если ущерб вызван самостоятельным ремонтом, Производитель не предоставит гарантию